Page 93 of 561
92 Safety and SecurityOccupant safetyOnce the top tether anchorage hook is
attached, the child restraint itself can be
secured. Tighten the top tether strap
according to the child restraint manufac-
turer’s instructions.Child seat anchors – LATCH type
This vehicle is equipped with two LATCH
(L
ower A
nchors and T
ethers for CH
ildren)
type anchors (at each of the rear seats) for
the installation of a LATCH child seat with
matching mounting fittings.
The LATCH anchors on the second-row
seats are covered with an upholstery
blend.
1Anchors second-row seats
2Indicates the position of the anchors
�
Remove anchorage ring covers 1 from
seat on which a child seat is to be in-
stalled.
3Anchorage ring covers, third-row seats
Warning!
G
Always lock backrest in its upright position
when rear seat bench is occupied by pas-
sengers, or the expanded cargo area is not
in use. Check for secure locking by pushing
and pulling on the backrest.
��
Page 94 of 561

93 Safety and Security
Occupant safety
4Anchors third-row seats�
Install a LATCH type child seat accord-
ing to the manufacturer’s instructions.
Blocking of rear door window operation
With the override switch you can disable
the rear side window switches in the rear
door panels.
iNon-LATCH type child seats may also
be used and can be installed using the
vehicle’s seat belt system. Install child
seat according to the manufacturer’s
instructions.
Warning!
G
Children too big for a toddler restraint must
ride in seats using regular seat belts. Posi-
tion shoulder belt across chest and shoul-
der, not face or neck. A booster seat may be
necessary to achieve proper belt positioning
for children from 41 lbs until they reach a
height where a lap / shoulder belt fits prop-
erly without a booster.
Install child seat according to manufactu-
rer’s instructions.
The child seat must be firmly attached in the
right and left side anchors 1.
An incorrectly mounted child seat may come
loose during an accident which could result
in serious injury or death to the child.
Damaged or impact damaged child seats or
child seat mounting fittings must be re-
placed.
Do not leave children unattended in the ve-
hicle, even if the children are secured in a
child restraint system.
Warning!
G
Activate the override switch when children
are riding in the back seats of the vehicle.
The children may otherwise injure them-
selves, e.g. by becoming trapped in the win-
dow opening.
When leaving the vehicle, always remove the
SmartKey or SmartKey with KEYLESS-GO*
from the starter switch, take it with you, and
lock the vehicle. Do not leave children unat-
tended in the vehicle, or with access to an
unlocked vehicle. Unsupervised use of vehi-
cle equipment may cause an accident
and/or serious personal injury.
Page 95 of 561
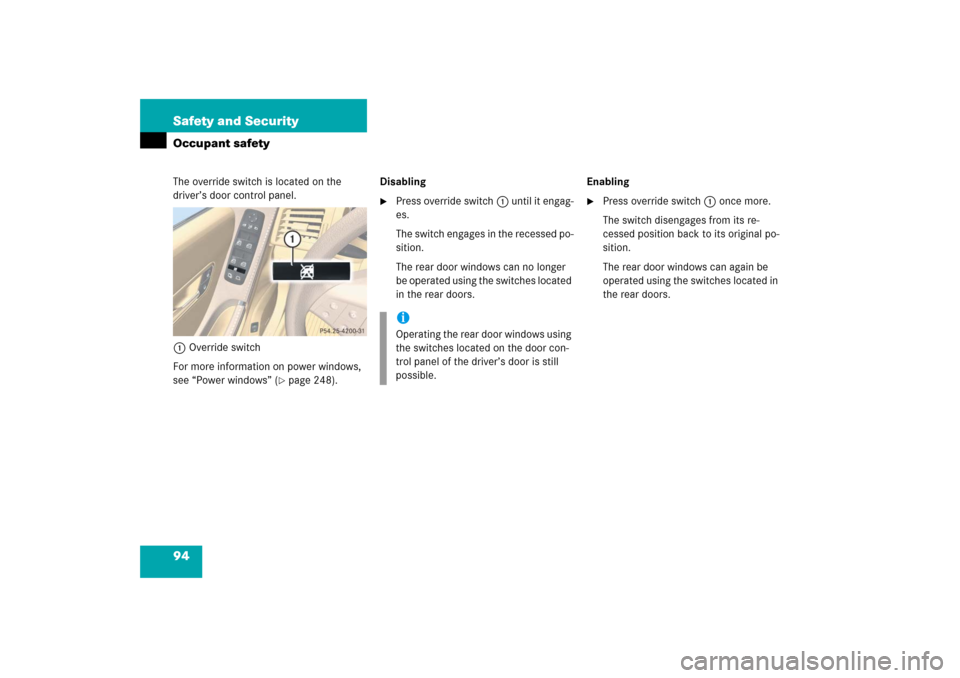
94 Safety and SecurityOccupant safetyThe override switch is located on the
driver’s door control panel.
1Override switch
For more information on power windows,
see “Power windows” (
�page 248).Disabling
�
Press override switch1 until it engag-
es.
The switch engages in the recessed po-
sition.
The rear door windows can no longer
be operated using the switches located
in the rear doors.Enabling
�
Press override switch1 once more.
The switch disengages from its re-
cessed position back to its original po-
sition.
The rear door windows can again be
operated using the switches located in
the rear doors.
iOperating the rear door windows using
the switches located on the door con-
trol panel of the driver’s door is still
possible.
Page 101 of 561
.
Warning!
G
Never switch off the ESP
® when you see the
ESP
® warning lampv f")
100 Safety and SecurityDriving safety systems
For more information, see the “Practical
hints” section (
�page 409).
Warning!
G
Never switch off the ESP
® when you see the
ESP
® warning lampv flashing in the in-
strument cluster. In this case, proceed as
follows:
�
While driving off, apply as little throttle
as possible.
�
While driving, ease up on the accelera-
tor.
�
Adapt your speed and driving style to
the prevailing road conditions.
Failure to observe these guidelines could
cause the vehicle to skid.
The ESP
® cannot prevent accidents result-
ing from excessive speed.
Warning!
G
The ESP
® cannot prevent the natural laws of
physics from acting on the vehicle, nor can
it increase the traction afforded. The ESP
®
cannot prevent accidents, including those
resulting from excessive speed in turns, fol-
lowing another vehicle too closely, or hydro-
planing. Only a safe, attentive, and skillful
driver can prevent accidents. The capabili-
t i e s o f a n E S P
® equipped vehicle must never
be exploited in a reckless or dangerous
manner which could jeopardize the user’s
safety or the safety of others.
iThe ESP
® will only function properly if
you use wheels of the recommended
tire size (�page 514).
!Because of the ESP’s
® automatic oper-
ation, the engine and ignition must be
shut off (SmartKey in starter switch
position0 or1 or KEYLESS-GO*
start / stop button* in position0 or1)
when
�
the parking brake is being tested on
a brake test dynamometer
�
the vehicle is being towed with the
front or rear axle raised
Active braking action through the ESP
®
may otherwise seriously damage the
brake system.
Operational tests with the engine
running can only be conducted on a
two-axle dynamometer.
Page 103 of 561

102 Safety and SecurityDriving safety systems
Switching on the ESP
®
�
Press ESP
® switch1.
The ESP
® warning lampv in the in-
strument cluster goes out.
You are now again in normal driving
mode with the ESP
® switched on.
For more information, see the “Practical
hints” section (
�page 404).
EBP
The EBP enhances braking effectiveness
by allowing the rear brakes to supply a
greater proportion of the braking effort
without a loss of vehicle stability.
4-ETS
The 4-Electronic Traction System (4-ETS)
improves the vehicle’s ability to utilize
available traction, especially under slip-
pery road conditions. The brakes are ap-
plied to the spinning wheel and power is
transferred to the wheel(s) with traction.
The ESP
® warning lampvin the instru-
ment cluster starts to flash at any vehicle
speed, as soon as a tire loses traction and
the wheel begins to spin.
Warning!
G
When the ESP
® warning lampv is
illuminated continuously, the ESP
® is
switched off.
Adapt your speed and driving to the prevail-
ing road conditions and to the non-operating
status of the ESP
®.
!Avoid spinning of a drive wheel for an
extended period of time with the ESP
®
switched off. This may cause serious
damage to the drivetrain which is not
covered by the Mercedes-Benz Limited
Warranty.
Page 107 of 561
.
The turn signal lamps flash once to
indicate that the vehicle is disarmed.Canceling the alarm
To c")
106 Safety and SecurityAnti-theft systemsDisarming the alarm system�
Unlock the vehicle (
�page 36).
The turn signal lamps flash once to
indicate that the vehicle is disarmed.Canceling the alarm
To cancel the alarm:
With the SmartKey
�
Insert the SmartKey in the starter
switch.
or
�
Press theŒ or ‹button on the
SmartKey.
With KEYLESS-GO*
�
Grasp an outside door handle.
The SmartKey with KEYLESS-GO must
be within 3 ft (1 m) of the vehicle.
or
�
Press the KEYLESS-GO start / stop
button (
�page 40).
The SmartKey with KEYLESS-GO must
be inside the vehicle.
Tow-away alarm
Once the tow-away alarm is armed, a visual
and audible alarm will be triggered when
someone attempts to raise the vehicle.
iThe alarm system will rearm automati-
cally again after approximately
40 seconds if neither a door nor the
tailgate is opened.
iThe tow-away protection alarm is trig-
gered, for example, if the vehicle is
lifted on one side.
If the alarm stays on for more than
30 seconds, a call to the Response
Center is initiated automatically by the
Tele Aid* system (
�page 311) provid-
ed Tele Aid* service was subscribed to
and properly activated, and that neces-
sary cellular service and GPS coverage
are available.
Page 121 of 561
 is required to open the")
120 Controls in detailLocking and unlockingUnlocking and opening the tailgate
You can unlock and open the tailgate sep-
arately.
A minimum height clearance of 7.2 ft
(2.20 m) is required to open the tailgate.
The handle is located above the rear
license plate recess.�
Pull on the handle.
or
�
Press and hold buttonŠ on the
SmartKey with KEYLESS-GO until the
tailgate unlocks and opens.Locking the vehicle
1Lock button at tailgate
�
Press lock button on tailgate1.
or
�
Press the lock button on an outside
door handle (
�page 68).
or
�
Vehicles with tailgate opening/closing
system*: Press the KEYLESS-GO
locking/closing switch in the tailgate
(�page 129).
The vehicle locks. The turn signals flash
three times to confirm locking.
!The tailgate swings open upwards auto-
matically. Always make sure there is
sufficient overhead clearance.
Vehicles with tailgate opening/closing
system*:
To stop the opening procedure, press
buttonŠ on the SmartKey. The tail-
gate stops moving.iIf the vehicle was previously centrally
locked with the SmartKey or
KEYLESS-GO, the tailgate will lock au-
tomatically when closed (
�page 124).
The turn signals will flash three times to
confirm locking.
Page 122 of 561

121 Controls in detail
Locking and unlocking
Loss of the SmartKey with KEYLESS-GO
If you lose your SmartKey with
KEYLESS-GO or mechanical key, you
should do the following:�
Have the SmartKey with KEYLESS-GO
deactivated by an authorized
Mercedes-Benz Light Truck Center.
�
Report the loss of the SmartKey with
KEYLESS-GO or the mechanical key im-
mediately to your car insurance com-
pany.
�
Have the mechanical lock replaced if
necessary.
Your authorized Mercedes-Benz Light
Truck Center will be glad to supply you
with a replacement.
Opening the doors from the inside
You can open a locked door from the in-
side. Open door only when conditions are
safe to do so.
1Locking knob
2Inside door handleFront doors
�
Pull on inside door handle2 on the
respective front door to open door.
If the door was locked, locking knob1
will move up.
Rear doors
�
Pull up locking knob1 on the respec-
tive rear door to unlock door.
�
Pull on inside door handle2 on the re-
spective rear door to open door.