Page 34 of 561
33 At a glance
Storage compartments
Item
Page
1
Parcel net in front passen-
ger footwell
298
2
Glove box/CD-changer*
294
3
Door pocket
4
Parcel net on front passen-
ger seat backrest
298
5
Door pocket
6
Cup holder
302
7
Third-row storage compart-
ment
298
8
Parcel net in cargo compart-
ment
299
9
First aid kit, vehicle tool kit,
spare wheel
454
a
Third-row storage compart-
ment
298
b
Cup holder
302
Item
Page
c
Door pocket
d
Parcel net on driver’s seat
backrest
298
e
Door pocket
f
Storage compartment in
center console
296
g
Storage compartment in
center console
Ashtray*
296
303
h
Cupholders
298
j
Front armrest storage com-
partments
296
k
Cup holders*
302
l
Rear armrest storage com-
partment*
297
m
Cup holders
Rear storage compartment
Rear seat ashtray*
301
297
304
Page 35 of 561
34 At a glanceDoor control panel
Item
Page
1
Door handle
121
2
Central locking/unlocking
switch
131
3
Exterior rear view mirror ad-
justment
48
4
Selection buttons for exteri-
or rear view mirror adjust-
ment
Power-folding exterior rear
view mirrors*
48
211
5
Switches for opening/clos-
ing front and rear door win-
dows
248
6
Rear side window override
switch
94
7
Hinged quarter window
switch*
250
8
Remote tailgate release
switch, Tailgate opening
system*
123,
124
Page 43 of 561
42 Getting startedAdjustingSeatsWarning!
G
All seat, head restraint, steering wheel, and
rear view mirror adjustments, as well as fas-
tening of seat belts, must be done before
the vehicle is put into motion.Warning!
G
Do not adjust the driver’s seat while driving.
Adjusting the seat while driving could cause
the driver to lose control of the vehicle.
Never ride in a moving vehicle with the seat
back in an excessively reclined position as
this can be dangerous. You could slide un-
der the seat belt in a collision. If you slide
under it, the belt would apply force at the ab-
domen or neck. That could cause serious or
fatal injuries. The seat backrest and seat
belts provide the best restraint when the
wearer is in a nearly upright position and
belts are properly positioned on the body.
Your seat must be adjusted so that you can
correctly fasten your seat belt (
�page 50).
Never place hands under the seat or near
any moving parts while a seat is being ad-
justed.
Warning!
G
When leaving the vehicle, always remove the
SmartKey or SmartKey with KEYLESS-GO*
from the starter switch, take it with you, and
lock the vehicle.
Even with the SmartKey or the SmartKey
with KEYLESS-GO* removed from the
starter switch or the SmartKey with
KEYLESS-GO* removed from the vehicle,
the power seats can be operated when the
respective door is open.
Therefore, do not leave children unattended
in the vehicle, or with access to an unlocked
vehicle. Unsupervised use of vehicle equip-
ment may cause an accident and / or seri-
ous personal injury.
Warning!
G
According to accident statistics, children
are safer when properly restrained in the
rear seating positions than in the front seat-
ing position. Thus, we strongly recommend
that children be placed in the rear seats
whenever possible. Regardless of seating
position, children 12 years old and under
must be seated and properly secured in an
appropriate infant or toddler restraint, or
booster seat recommended for the size and
weight of the child. For additional informa-
tion, see “Children in the vehicle”
(�page 82).
A child’s risk of serious or fatal injuries is
significantly increased if the child restraints
are not properly secured in the vehicle and
the child is not properly secured in the child
restraint.
Page 44 of 561
43 Getting started
Adjusting
Seat adjustment
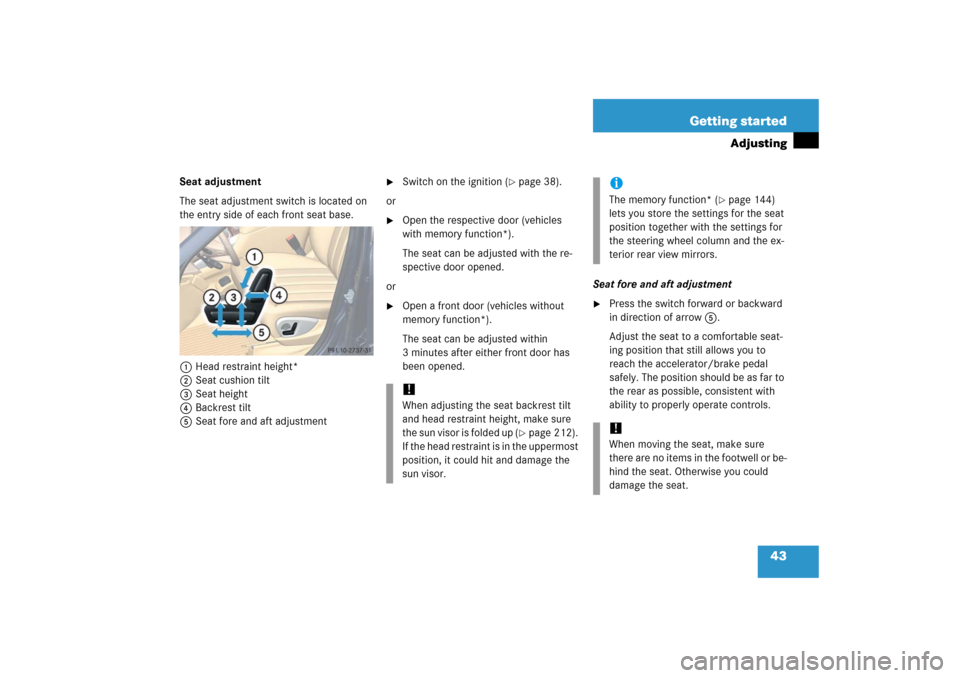
The seat adjustment switch is located on
the entry side of each front seat base.
1 Head restraint height*
2Seat cushion tilt
3Seat height
4Backrest tilt
5 Seat fore and aft adjustment
�
Switch on the ignition (
�page 38).
or
�
Open the respective door (vehicles
with memory function*).
The seat can be adjusted with the re-
spective door opened.
or
�
Open a front door (vehicles without
memory function*).
The seat can be adjusted within
3 minutes after either front door has
been opened.Seat fore and aft adjustment
�
Press the switch forward or backward
in direction of arrow5.
Adjust the seat to a comfortable seat-
ing position that still allows you to
reach the accelerator/brake pedal
safely. The position should be as far to
the rear as possible, consistent with
ability to properly operate controls.
!When adjusting the seat backrest tilt
and head restraint height, make sure
the sun visor is folded up (
�page 212).
If the head restraint is in the uppermost
position, it could hit and damage the
sun visor.
iThe memory function* (
�page 144)
lets you store the settings for the seat
position together with the settings for
the steering wheel column and the ex-
terior rear view mirrors.
!When moving the seat, make sure
there are no items in the footwell or be-
hind the seat. Otherwise you could
damage the seat.
Page 48 of 561
47 Getting started
Adjusting
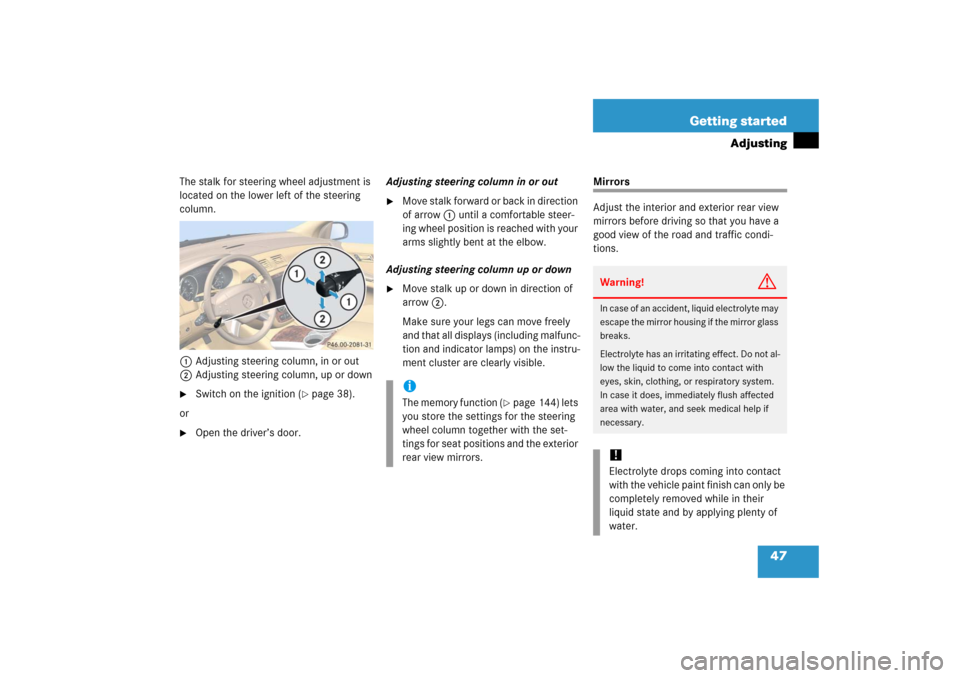
The stalk for steering wheel adjustment is
located on the lower left of the steering
column.
1Adjusting steering column, in or out
2Adjusting steering column, up or down�
Switch on the ignition (
�page 38).
or
�
Open the driver’s door.Adjusting steering column in or out
�
Move stalk forward or back in direction
of arrow1 until a comfortable steer-
ing wheel position is reached with your
arms slightly bent at the elbow.
Adjusting steering column up or down
�
Move stalk up or down in direction of
arrow2.
Make sure your legs can move freely
and that all displays (including malfunc-
tion and indicator lamps) on the instru-
ment cluster are clearly visible.
Mirrors
Adjust the interior and exterior rear view
mirrors before driving so that you have a
good view of the road and traffic condi-
tions.
iThe memory function (
�page 144) lets
you store the settings for the steering
wheel column together with the set-
tings for seat positions and the exterior
rear view mirrors.
Warning!
G
In case of an accident, liquid electrolyte may
escape the mirror housing if the mirror glass
breaks.
Electrolyte has an irritating effect. Do not al-
low the liquid to come into contact with
eyes, skin, clothing, or respiratory system.
In case it does, immediately flush affected
area with water, and seek medical help if
necessary.!Electrolyte drops coming into contact
with the vehicle paint finish can only be
completely removed while in their
liquid state and by applying plenty of
water.
Page 49 of 561
48 Getting startedAdjustingInterior rear view mirror�
Manually adjust the interior rear view
mirror.
For more information, see “Rear view mir-
rors” (
�page 208).
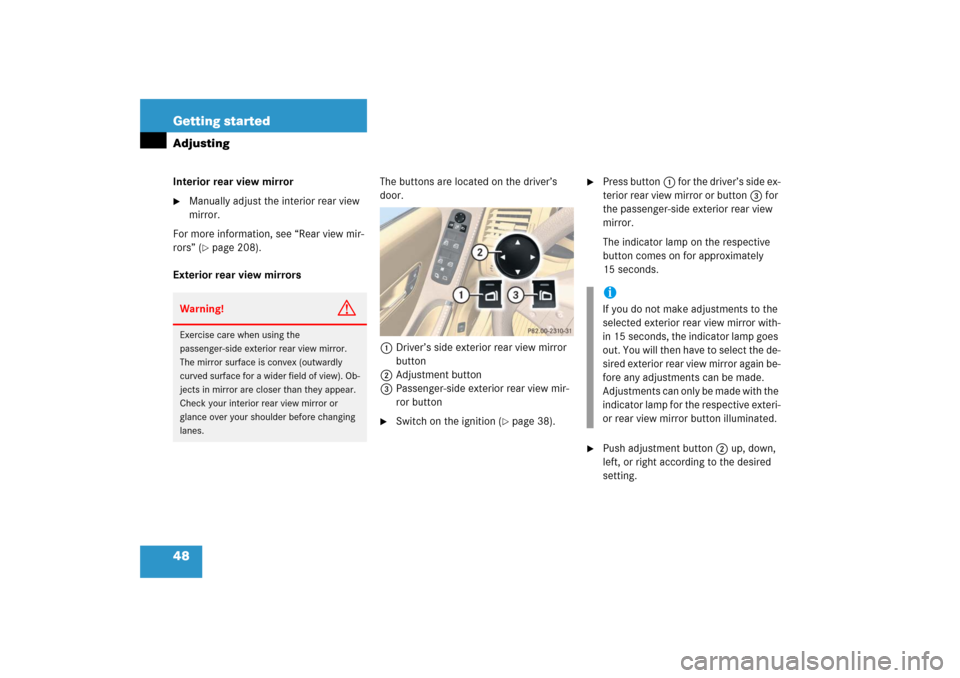
Exterior rear view mirrorsThe buttons are located on the driver’s
door.
1Driver’s side exterior rear view mirror
button
2Adjustment button
3Passenger-side exterior rear view mir-
ror button
�
Switch on the ignition (
�page 38).
�
Press button1 for the driver’s side ex-
terior rear view mirror or button3for
the passenger-side exterior rear view
mirror.
The indicator lamp on the respective
button comes on for approximately
15 seconds.
�
Push adjustment button2up, down,
left, or right according to the desired
setting.
Warning!
G
Exercise care when using the
passenger-side exterior rear view mirror.
The mirror surface is convex (outwardly
curved surface for a wider field of view). Ob-
jects in mirror are closer than they appear.
Check your interior rear view mirror or
glance over your shoulder before changing
lanes.
iIf you do not make adjustments to the
selected exterior rear view mirror with-
in 15 seconds, the indicator lamp goes
out. You will then have to select the de-
sired exterior rear view mirror again be-
fore any adjustments can be made.
Adjustments can only be made with the
indicator lamp for the respective exteri-
or rear view mirror button illuminated.
Page 50 of 561
49 Getting started
Adjusting
For more information, see “Rear view mir-
rors” (
�page 208) and “Storing exterior
rear view mirror parking position”
(
�page 146).
!If an exterior rear view mirror was forc-
ibly pushed forward (hit from the rear)
or forcibly pushed rearward (hit from
the front), reposition it by applying firm
pressure until it snaps into place. The
mirror housing is then properly posi-
tioned and you can adjust the mirror in
the usual manner.!Vehicles with power folding exterior
rear view mirrors*:
If an exterior rear view mirror housing
is forcibly pushed forward (hit from the
rear) or forcibly pushed rearward (hit
from the front) press button1 to fold
mirrors in, then press button1 again
to fold mirrors out. Do not force mirrors
by hand as this may damage the adjust-
ment mechanism.
The mirror housing is then properly po-
sitioned and you can adjust the mirror
in the usual manner.
iThe memory function* (
�page 144)
lets you store the settings for the exte-
rior rear view mirrors together with the
setting for the steering wheel column
and the seat positions.
At low ambient temperatures, the
exterior rear view mirrors will be heat-
ed automatically.
Page 51 of 561
50 Getting startedDrivingFastening the seat beltsWarning!
G
Do not lay any objects in the driver’s foot-
well. Be careful that floor mats or carpets in
the driver’s footwell have sufficient clear-
ance for the pedals.
During sudden driving or braking maneu-
vers, the objects could get caught between
the pedals. You could then no longer brake
or accelerate.Warning!
G
Always fasten your seat belt before driving
off. Always make sure your passengers are
properly restrained, even those sitting in the
rear and pregnant women.
Failure to wear and properly fasten and po-
sition your seat belt greatly increases your
risk of injuries and their likely severity in an
accident. You and your passengers should
always wear seat belts.
If you are ever in an accident, your injuries
can be considerably more severe without
your seat belt properly buckled. Without
your seat belt buckled, you are much more
likely to hit the interior of the vehicle or be
ejected from it. You can be seriously injured
or killed.
In the same crash, the possibility of injury or
death is lessened if you are wearing your
seat belt. The airbags can only provide the
protection they were designed to afford if
the occupants are using their seat belts
(�page 77).
Warning!
G
According to accident statistics, children
are safer when properly restrained in the
rear seating positions than in the front seat-
ing position. Thus, we strongly recommend
that children be placed in the rear seats. Re-
gardless of seating position, children 12
years old and under must be seated and
properly secured in an appropriate infant or
toddler restraint, or booster seat recom-
mended for the size and weight of the child.
For additional information, see “Children in
the vehicle” (
�page 82).
A child’s risk of serious or fatal injuries is
significantly increased if the child restraints
are not properly secured in the vehicle and
the child is not properly secured in the child
restraint.