Page 443 of 539
442 Practical hintsReplacing SmartKey batteries�
Pull out batteries3.
�
Using a line-free cloth, insert new
batteries3 with the plus (+) side fac-
ing up underneath the contact
spring4.
�
Return battery compartment2 into
housing until it locks into place.
�
Slide mechanical key1 back into the
SmartKey.
�
Check the operation of the SmartKey
and the KEYLESS-GO*.
��
Page 454 of 539
453 Practical hints
Replacing wiper blades
�Replacing wiper blades
Removing front wiper blades�
Fold wiper arm forward until it engag-
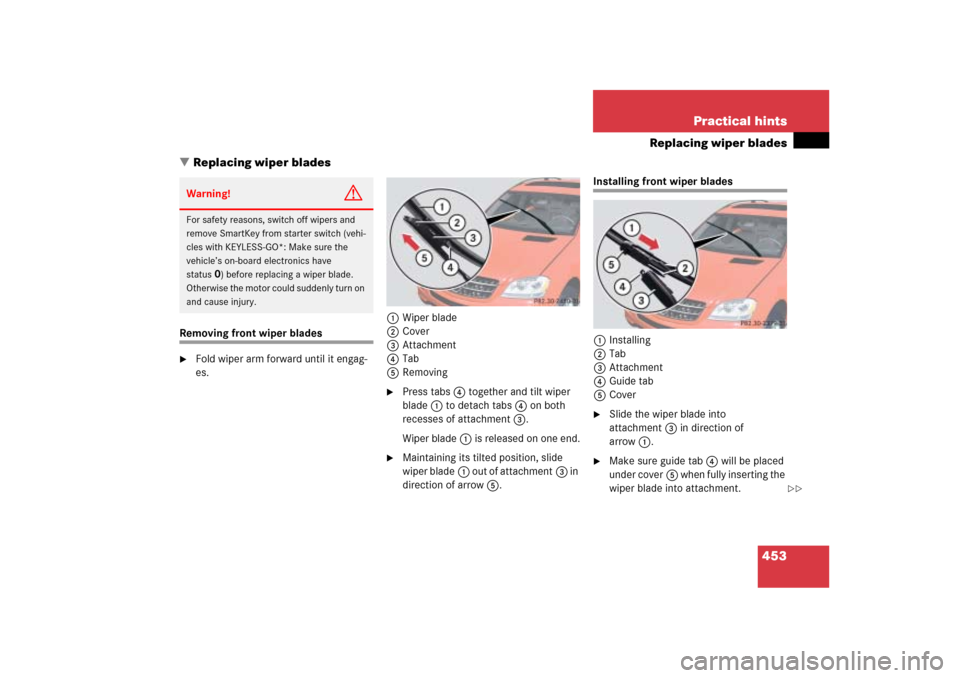
es.1Wiper blade
2Cover
3Attachment
4Tab
5Removing
�
Press tabs4 together and tilt wiper
blade1 to detach tabs4 on both
recesses of attachment3.
Wiper blade1 is released on one end.
�
Maintaining its tilted position, slide
wiper blade1 out of attachment3 in
direction of arrow5.
Installing front wiper blades
1Installing
2Tab
3Attachment
4Guide tab
5Cover�
Slide the wiper blade into
attachment3 in direction of
arrow1.
�
Make sure guide tab4 will be placed
under cover5 when fully inserting the
wiper blade into attachment.
Warning!
G
For safety reasons, switch off wipers and
remove SmartKey from starter switch (vehi-
cles with KEYLESS-GO*: Make sure the
vehicle’s on-board electronics have
status
0) before replacing a wiper blade.
Otherwise the motor could suddenly turn on
and cause injury.
��
Page 455 of 539

454 Practical hintsReplacing wiper blades�
Let tab2 latch into both recesses of
attachment3.
�
Check if the wiper blade is securely
fastened.
�
Fold the wiper arm backward to rest on
the windshield.
Make sure you hold on to the wiper arm
when folding it back.
Removing rear wiper blade�
Fold wiper arm1 (
�page 455) for-
ward until it engages.
!Never open the hood when the wiper
arms are folded forward.
Hold on to the wiper when folding the
wiper arm back. If released, the force
of the impact from the tensioning
spring could crack the windshield.
Do not allow the wiper arms to contact
the windshield glass without a wiper
blade inserted.
Make certain that the wiper blades are
properly installed. Improperly installed
wiper blades may cause windshield
damage.
For your convenience, we recommend
that you have this work carried out by
an authorized Mercedes-Benz Light
Truck Center.
Warning!
G
For safety reasons, switch off wipers and
remove SmartKey from starter switch (vehi-
cles with KEYLESS-GO*: Make sure the
vehicle’s on-board electronics have
status
0) before replacing a wiper blade.
Otherwise the motor could suddenly turn on
and cause injury.
��
Page 457 of 539

456 Practical hintsFlat tire
Preparing the vehicle�
Park the vehicle as far as possible from
moving traffic on a hard surface.
�
Turn on the hazard warning flashers.
�
Turn the steering wheel so that the
front wheels are in a straight ahead po-
sition.
�
Set the parking brake.
�
Shift automatic transmission to park
positionP.
Vehicles with Air suspension package*:
�
Do not open or close a door or tailgate
while mounting the spare wheel.
Vehicles with SmartKey:
�
Turn off the engine (
�page 34).
�
Remove the SmartKey from the starter
switch.Vehicles with KEYLESS-GO*:
�
Turn off the engine by pressing the
KEYLESS-GO* button once
(�page 63).
�
Open the driver’s door (this puts the
starter switch in position0, same as
with the SmartKey removed from the
starter switch). The driver’s door then
can be closed again.
�
Have any passenger exit the vehicle at
a safe distance from the roadway.
Warning!
G
The dimensions of the Minispare wheel are
different from those of the road wheels. As
a result, the vehicle handling characteristics
change when driving with a mounted
Minispare wheel. Adapt your driving style
accordingly.
The Minispare wheel is for temporary use
only. When driving with a Minispare wheel
mounted, ensure proper tire pressure and
do not exceed a vehicle speed of
50 mph (80 km/h).
Drive to the nearest Mercedes-Benz Light
Truck Center as soon as possible to have the
Minispare wheel replaced with a regular
road wheel.
Never operate the vehicle with more than
one spare wheel mounted.
Do not switch off the ESP
® when a
Minispare wheel is mounted.
iOpen doors only when conditions are
safe to do so.
Page 465 of 539

464 Practical hintsBattery
Disconnecting, removing, reinstalling and reconnecting the battery
Warning!
G
Failure to follow these instructions can re-
sult in severe injury or death.
Observe all safety instructions and precau-
tions when handling automotive batteries
(�page 462).
Never lean over batteries while connecting,
you might get injured.
Battery fluid contains sulfuric acid. Do not
allow this fluid to come in contact with eyes,
skin or clothing. In case it does, immediately
flush affected area with water and seek
medical help if necessary.
A battery will also produce hydrogen gas,
which is flammable and explosive. Keep
flames or sparks away from battery, avoid
improper connection of jumper cables,
smoking etc.
!Never loosen or detach battery termi-
nal clamps while the engine is running
or the SmartKey is in the starter switch.
Otherwise the alternator and other
electronic components could be se-
verely damaged.
Have the battery checked regularly by
an authorized Mercedes-Benz Light
Truck Center.
Refer to Maintenance Booklet for main-
tenance intervals or contact your au-
thorized Mercedes-Benz Light Truck
Center for further information.Warning!
G
Do not place metal objects on the battery as
this could result in a short circuit.
Use leak-proof battery only to avoid the risk
of acid burns in the event of an accident.
Warning!
G
Disconnecting, removing, reinstalling and
reconnecting the battery is a complicated
and technically demanding procedure that
also requires safety precautions to avoid the
r i s k o f i n j u r y . W e s t r o n g l y r e c o m m e n d t h a t i t
be performed by a qualified technician only.
Please read the instructions fully before
beginning operation and only undertake it if
you feel fully capable of performing all of the
tasks involved as described in these instruc-
tions. Observe all safety instructions and
precautions when handling automotive bat-
teries (
�page 462). Performing the tasks
involved incorrectly can cause damage to
the vehicle and impair the operating safety
o f t h e v e h i c l e , a n d / o r c a u s e s e v e r e i n j u r y t o
you or others.
Page 466 of 539

�
Turn off the engine and leave the igni-
tion switched on (
�page 34).
�
Depress parking brake firmly and set
automatic transmission to positionP.")
465 Practical hints
Battery
Step 1 (Disconnecting)
�
Turn off the engine and leave the igni-
tion switched on (
�page 34).
�
Depress parking brake firmly and set
automatic transmission to positionP.
�
Turn off all electrical consumers.
�
Read and observe safety instructions
and precautions (
�page 462).
�
Move the front passenger seat to the
most forward position (
�page 39).
Step 2 (Disconnecting)
1Battery cover
�
Enter the rear passenger compartment
and remove main battery cover1.Step 3 (Disconnecting)
2Perforated floor carpet
�
Cut the floor carpet2 along the
dotted white line (see illustration) until
you reach the perforated part. Start
cutting at the point indicated by the
arrows. Cut carpet using a sharp object
(knife etc.).
�
Enter the front passenger compart-
ment.
�
Move the front passenger seat to the
most rearward position (
�page 39).
iWith a disconnected battery you will no
longer be able to turn the SmartKey in
the starter switch and pressing the
KEYLESS-GO* start/stop button will
have no effect.iIf your battery is discharged, the vehi-
cle must be jump started (
�page 470)
using the jump start contacts in the
engine compartment, or an accessory
battery charge unit* approved by
Mercedes-Benz must be connected
using the jump start contacts in the
engine compartment (see separate
instructions for the accessory battery
charge unit*) before any of the follow-
ing steps can be performed. If the
battery cannot be jumped or charged,
please contact an authorized
Mercedes-Benz Light Truck Center.
��
Page 467 of 539
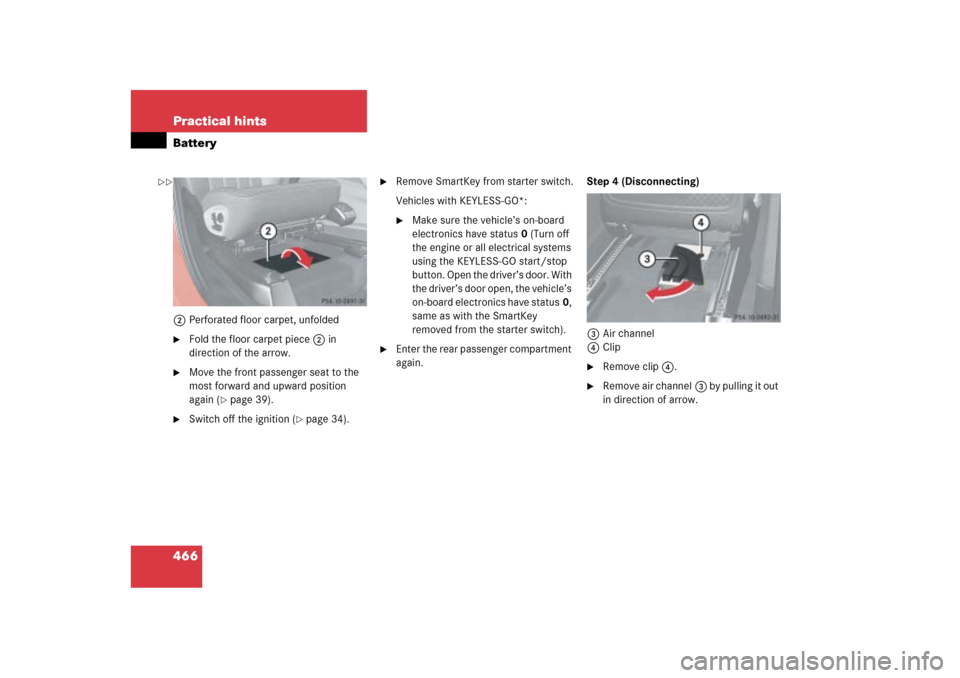
466 Practical hintsBattery2Perforated floor carpet, unfolded�
Fold the floor carpet piece2 in
direction of the arrow.
�
Move the front passenger seat to the
most forward and upward position
again (
�page 39).
�
Switch off the ignition (
�page 34).
�
Remove SmartKey from starter switch.
Vehicles with KEYLESS-GO*:�
Make sure the vehicle’s on-board
electronics have status0 (Turn off
the engine or all electrical systems
using the KEYLESS-GO start/stop
button. Open the driver’s door. With
the driver’s door open, the vehicle’s
on-board electronics have status0,
same as with the SmartKey
removed from the starter switch).
�
Enter the rear passenger compartment
again.Step 4 (Disconnecting)
3Air channel
4Clip
�
Remove clip4.
�
Remove air channel3 by pulling it out
in direction of arrow.
��
Page 469 of 539

cBattery�
Tilt the batteryc with the negative
terminal side upwards.
�
Take out the battery maintaining its
tilted position in the direction of the
arrow")
468 Practical hintsBatteryStep 8 (Removing)
cBattery�
Tilt the batteryc with the negative
terminal side upwards.
�
Take out the battery maintaining its
tilted position in the direction of the
arrow.Step 9 (Reinstalling)
�
Carry out step 8 in reverse order
(�page 468).
Battery, shown removed for illustration9Battery ventilation tube
dVent plug
�
Carry out step 10 to reconnect the
battery (
�page 468).
�
Follow steps 5 to 1 in reverse order to
completely reinstall the battery
(�page 467) to (
�page 465).
Step 10 (Reconnecting)
�
If the battery has been removed, first
carry out step 8 in reverse order
(�page 468).
�
Open the driver’s door.
�
Make sure all electrical consumers are
turned off.
�
Make sure the SmartKey has been re-
moved from the starter switch.
Vehicles with KEYLESS-GO*:�
Make sure the vehicle’s on-board
electronics have status0 (Open the
driver’s door. With the driver’s door
open, the vehicle’s on-board elec-
tronics have status0, same as with
the SmartKey removed from the
starter switch).
!The battery, the battery ventilation
tube9 and the vent plugd must
always be securely installed when the
vehicle is in operation.