Page 9 of 539

Contents
Replacing bulbs ................................. 443
Bulbs ............................................ 443
Replacing bulbs for front lamps ... 445
Replacing bulbs for rear lamps..... 450
Adjusting headlamp aim............... 451
Replacing wiper blades ...................... 453
Removing front wiper blades........ 453
Installing front wiper blades ......... 453
Removing rear wiper blade........... 454
Installing rear wiper blade ............ 455
Flat tire .............................................. 456
Preparing the vehicle ................... 456
Mounting the spare wheel............ 457
Battery ............................................... 462
Disconnecting, removing,
reinstalling and
reconnecting the battery.............. 464
Charging the battery .................... 469
Jump starting ..................................... 470
Towing the vehicle ............................. 472
Installing towing eye bolt ............. 474
Stranded vehicle .......................... 476Fuses .................................................. 477
Aids for changing fuses................. 478
Main fuse box ............................... 478
Fuse box in
cargo compartment ...................... 479
Fuse box in
passenger compartment ............... 479
Technical data.................................. 481
Parts service....................................... 482
Warranty coverage ............................. 483
Loss of Service and Warranty
Information Booklet ...................... 483
Identification labels ............................ 484
Layout of poly-V-belt drive .................. 485
ML 350 ......................................... 485
ML 500 ......................................... 485
Engine ................................................ 486
Rims and tires .................................... 487
Rims and tires ............................... 488
Minispare wheel............................ 489Electrical system ................................ 490
Main Dimensions................................ 491
Weights .............................................. 492
Fuels, coolants, lubricants, etc. .......... 493
Capacities ..................................... 493
Engine oils .................................... 495
Engine oil additives ....................... 495
Air conditioning refrigerant ........... 495
Brake fluid .................................... 495
Premium unleaded gasoline.......... 496
Fuel requirements......................... 496
Gasoline additives......................... 497
Coolants ....................................... 497
Windshield washer and
headlamp cleaning* system ......... 500
Windshield and headlamp
washer fluid mixing ratio............... 500
Technical terms............................... 501Index................................................. 507
Page 382 of 539
381 Practical hints
What to do if …
Where will I find ...?
Unlocking/locking in an emergency
Opening/closing in an emergency
Replacing SmartKey batteries
Replacing bulbs
Replacing wiper blades
Flat tire
Battery
Jump starting
Towing the vehicle
Fuses
Page 431 of 539
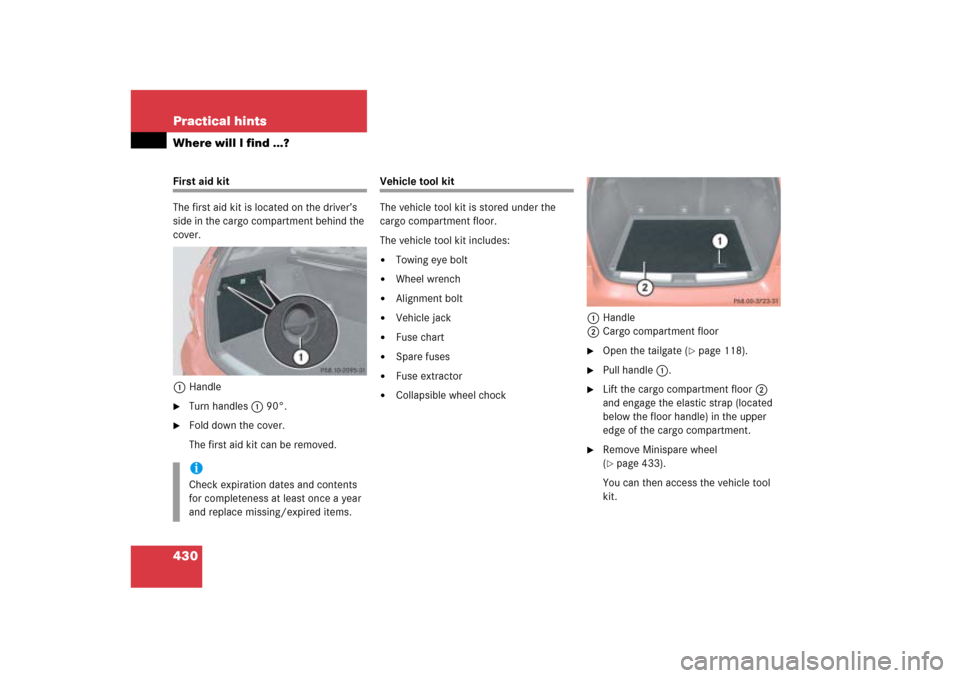
430 Practical hintsWhere will I find ...?First aid kit
The first aid kit is located on the driver’s
side in the cargo compartment behind the
cover.
1Handle�
Turn handles1 90°.
�
Fold down the cover.
The first aid kit can be removed.
Vehicle tool kit
The vehicle tool kit is stored under the
cargo compartment floor.
The vehicle tool kit includes:�
Towing eye bolt
�
Wheel wrench
�
Alignment bolt
�
Vehicle jack
�
Fuse chart
�
Spare fuses
�
Fuse extractor
�
Collapsible wheel chock1Handle
2Cargo compartment floor
�
Open the tailgate (
�page 118).
�
Pull handle1.
�
Lift the cargo compartment floor2
and engage the elastic strap (located
below the floor handle) in the upper
edge of the cargo compartment.
�
Remove Minispare wheel
(�page 433).
You can then access the vehicle tool
kit.
iCheck expiration dates and contents
for completeness at least once a year
and replace missing/expired items.
Page 432 of 539

431 Practical hints
Where will I find ...?
Trunk area shown with spare wheel
removed1Wheel bolt wrench with screwdriver
2Vehicle jack
3Collapsible wheel chock
4Spare fuses, fuse chart, fuse extractor
5Towing eye bolt
6Alignment bolt
7Wheel bolts for 17" light alloy rims or
Minispare wheel1Wheel bolt wrench
2Screwdriver
3Interchangeable slot
Screwdriver2 is placed inside the handle
of wheelbolt wrench1.Vehicle jack
iVehicles with scissors-type jack see
separate instructions.
!To prevent damage, always disengage
the elastic strap and lower the cargo
compartment floor (
�page 430) be-
fore closing the tailgate.
Warning!
G
The jack is designed exclusively for jacking
up the vehicle at the jack take-up brackets
built into both sides of the vehicle. To help
avoid personal injury, use the jack only to lift
the vehicle during a wheel change. Never
get beneath the vehicle while it is supported
by the jack. Keep hands and feet away from
the area under the lifted vehicle. Always
firmly set parking brake and block wheels
before raising vehicle with jack.
Do not disengage parking brake while the
vehicle is raised. Be certain that the jack is
always vertical (plumb line) when in use, es-
pecially on hills. Always try to use the jack
on level surface.
Make sure that the jack arm is fully seated
in the jack take-up bracket. Always lower
the vehicle onto sufficient capacity jack-
stands before working under the vehicle.
Page 478 of 539

477 Practical hintsFuses
�Fuses
The electrical fuses in your vehicle serve to
stop the supply of electricity to a device
that is malfunctioning. This helps to
prevent damage to the other vehicle
electronics. If a fuse is blown, the compo-
nents and systems secured by this fuse
will stop operating.
The following aids are available to help you
change fuses (
�page 478):
�
Fuse chart
�
Spare fuses
�
Fuse extractorThe electrical fuses are located in different
fuse boxes:
�
Main fuse box in engine compartment
(�page 478)
�
Fuse box in cargo compartment
(�page 479)
�
Fuse box in passenger compartment
(�page 479)
Warning!
G
Only use fuses approved for Mercedes-Benz
with the specified amperage for the system
in question. Never attempt to repair or
bridge a blown fuse. Otherwise, a short cir-
cuit could result and cause a fire.!Only install fuses that have been tested
and approved by Mercedes-Benz and
that have the specified amperage
rating. Otherwise, electrical parts or
systems could be damaged.
Never attempt to repair or bridge a
blown fuse. Have the cause determined
and remedied by an authorized
Mercedes-Benz Light Truck Center.
!Keep the fuse boxes free by contamina-
tion and wetness. Otherwise, electrical
parts or systems could be damaged.
Page 479 of 539
478 Practical hintsFusesAids for changing fuses
Fuse chart
A chart explaining fuse allocation and fuse
amperages can be found near the vehicle
tool kit in the cargo compartment
(�page 431).
Spare fuses
Spare fuses are found near the vehicle tool
kit in the cargo compartment
(�page 431).
Fuse extractor
The fuse extractor is found near the vehicle
tool kit in the cargo compartment
(�page 431).
Main fuse box
The main fuse box is located in the engine
compartment on the passenger side.ML 3501Clamp
2Main fuse box cover
ML 5001Clamp
2Main fuse box cover
Removing/installing main fuse box
cover�
Open the hood (
�page 326).
�
Pull clamp1 in direction of arrow.
�
Lift fuse box cover2 up.
�
Install main fuse box cover in reverse
order.
!When closing the main fuse box, make
sure to fit cover2 on the fuse box
properly and engage clamp1.
Page 480 of 539
479 Practical hintsFuses
Fuse box in cargo compartment
The fuse box is located on the
passenger-side in the cargo compartment
behind the cover.
1Lock
2CoverRemoving/installing cover
�
Open the tailgate.
�
Turn both locks1 90°, e.g. with a coin
or a screwdriver.
�
Remove cover2.
�
Install cover2 in reverse order.
Fuse box in passenger compartment
The fuse box is located in the dashboard
on the front passenger side.
1CoverOpening
�
Open the passenger door.
�
Open the glove box (
�page 270).
�
Insert flat, blunt object as a lever into
the edge of the cover1 at the position
indicated by the arrow.
�
Loosen cover1 from dashboard using
lever.
�
Using your hands, pull cover1 out
and remove.
Closing
�
Hook cover1 into the opening at the
front.
�
Press cover1 back on until it engag-
es.!Do not use sharp objects such as a
screwdriver to open the fuse box
cover1 in the dashboard, as this
could damage it.
Page 515 of 539
 243
Switching off 245
Switchi")
514 IndexDoors
Message in display 413
Opening from inside vehicle 117
Opening from outside 108
DOT 365
Downhill driving
Cruise control 240
Downhill Speed Regulation (DSR) 243
Switching off 245
Switching on 245
Drink holder see Cup holder
Drinking and driving 299
Drive sensibly-save fuel 299
Driving 46, 52
Abroad 319
In winter 304
Problems 58
Safety systems 93
Through standing water 305Driving abroad 319
Driving instructions
Towing a trailer 317
Driving off 301
Driving safety systems
4-ETS 98
ABS 93
BAS 95
ESP
®
95
Driving systems 238
Cruise control 238
Driving safety systems 93
EBP 98
Parktronic* 254
Driving through water 310
Driving tips 190
Accelerator position 190
Kickdown 190E
Easy-entry/exit feature
Vehicles with memory function* 128
Easy-entry/exit feature*
Activating 173
EBP 98
Electrical connections
Trailer 314
Electrical fuses 477
Electrical system
Technical data 490
Electronic Brake Proportioning see EBP
Electronic Stability Program
® see ESP
®
Electronic Traction System see 4-ETS
Emergency
Unlocking and opening
the tailgate in an 437
Emergency calls
Initiating an emergency call 284
With Tele Aid* 282
Emergency operation
(Limp Home Mode) 192