Page 433 of 539
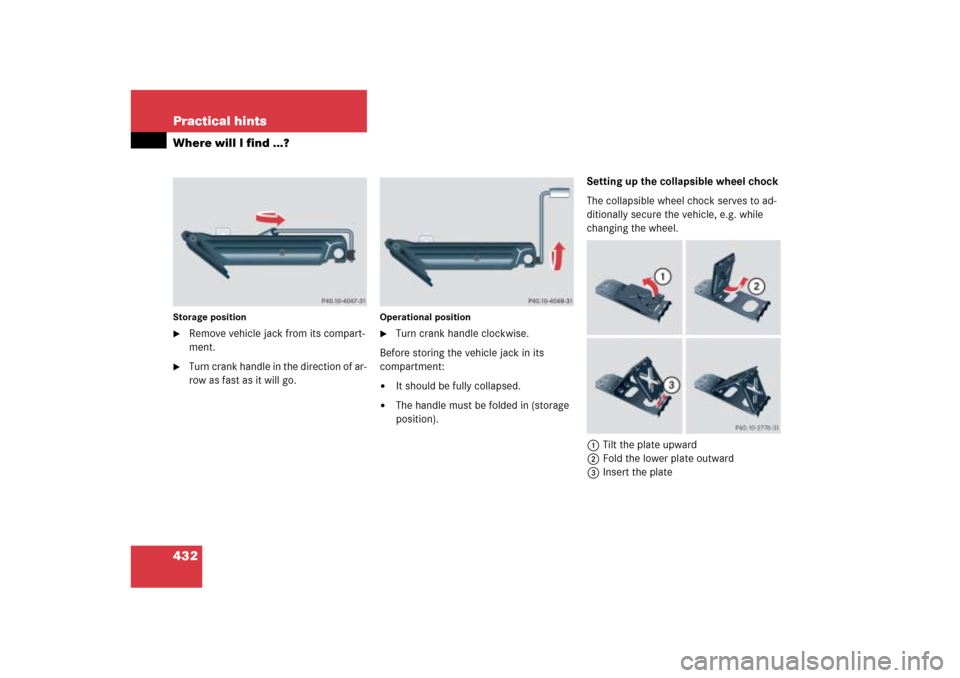
432 Practical hintsWhere will I find ...?Storage position�
Remove vehicle jack from its compart-
ment.
�
Turn crank handle in the direction of ar-
row as fast as it will go.
Operational position�
Turn crank handle clockwise.
Before storing the vehicle jack in its
compartment:
�
It should be fully collapsed.
�
The handle must be folded in (storage
position).Setting up the collapsible wheel chock
The collapsible wheel chock serves to ad-
ditionally secure the vehicle, e.g. while
changing the wheel.
1Tilt the plate upward
2Fold the lower plate outward
3Insert the plate
Page 440 of 539
439 Practical hints
Opening/closing in an emergency
�Opening/closing in an emergency
Power tilt/sliding sunroof*
You can open or close the tilt/sliding
sunroof manually should an electrical
malfunction occur.
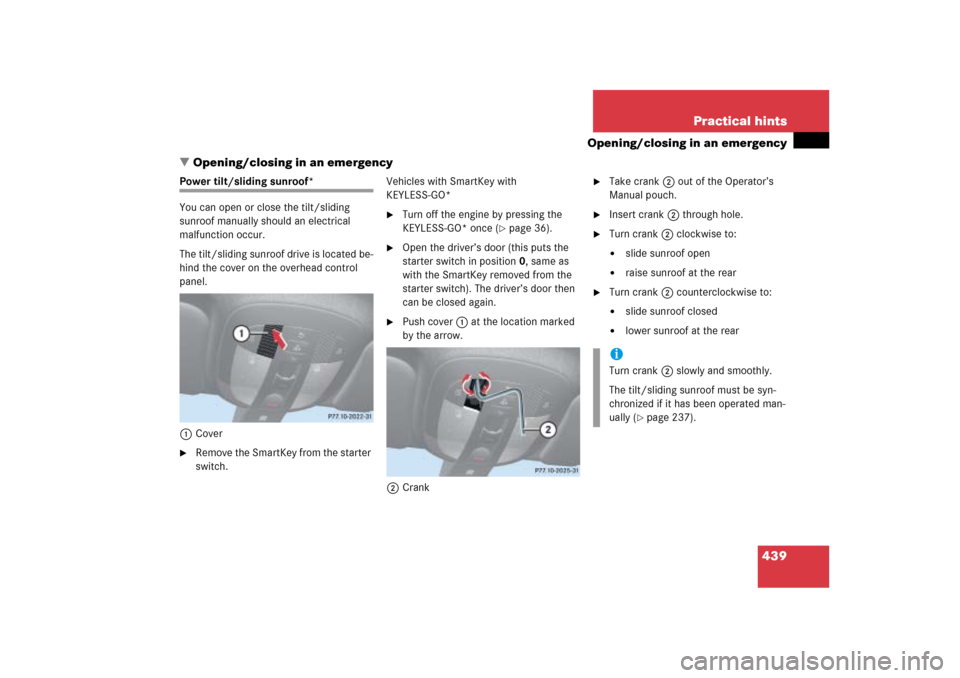
The tilt/sliding sunroof drive is located be-
hind the cover on the overhead control
panel.
1Cover�
Remove the SmartKey from the starter
switch.Vehicles with SmartKey with
KEYLESS-GO*
�
Turn off the engine by pressing the
KEYLESS-GO* once (
�page 36).
�
Open the driver’s door (this puts the
starter switch in position 0, same as
with the SmartKey removed from the
starter switch). The driver’s door then
can be closed again.
�
Push cover1 at the location marked
by the arrow.
2Crank
�
Take crank2 out of the Operator’s
Manual pouch.
�
Insert crank2 through hole.
�
Turn crank2 clockwise to:�
slide sunroof open
�
raise sunroof at the rear
�
Turn crank2 counterclockwise to:�
slide sunroof closed
�
lower sunroof at the rear
iTurn crank2 slowly and smoothly.
The tilt/sliding sunroof must be syn-
chronized if it has been operated man-
ually (
�page 237).
Page 461 of 539

460 Practical hintsFlat tire�
Clean contact surfaces of wheel and
wheel hub.
�
Guide spare wheel onto the alignment
bolt and push it on the wheel hub.
�
Insert wheel bolts and tighten them
slightly.
�
Unscrew the alignment bolt.
�
Insert the remaining wheel bolt and
tighten it slightly.Lowering the vehicle
�
Lower vehicle by turning crank coun-
terclockwise until vehicle is resting ful-
ly on its own weight.
�
Remove the jack.
!To avoid paint damage, place wheel flat
against hub and hold it there while
installing first wheel bolt.Warning!
G
Always replace wheel bolts that are
damaged or rusted.
Never apply oil or grease to wheel bolts.
Damaged wheel hub threads should be
repaired immediately. Do not continue to
drive under these circumstances! Contact
an authorized Mercedes-Benz Light Truck
Center or call Roadside Assistance.
Incorrect wheel bolts or improperly tight-
ened wheel bolts can cause the wheel to
come off. This could cause an accident.
Make sure to use the correct wheel bolts.
Warning!
G
Use only genuine equipment
Mercedes-Benz wheel bolts. Other wheel
bolts may come loose.
Do not tighten the wheel bolts when the ve-
hicle is raised. Otherwise the vehicle could
fall off the jack.
��
Page 486 of 539
485 Technical data
Layout of poly-V-belt drive
�Layout of poly-V-belt drive
ML 350
1Idler pulley
2Idler pulley
3Automatic belt tensioner
4Power steering pump
5Air conditioning compressor
6Crankshaft
7Coolant pump
8Generator (alternator)
ML 500
1Automatic belt tensioner
2Power steering pump
3Air conditioning compressor
4Crankshaft
5Coolant pump
6Generator (alternator)
7Idler pulley