Page 422 of 539
421 Practical hints
What to do if …
Display symbol
Display messages
Possible cause
Possible solution
.
Reverse lamp,
left
The left reverse light is malfunc-
tioning.
�
Replace the bulb as soon as possible.
Reverse lamp,
right
The right reverse light is mal-
functioning.
�
Replace the bulb as soon as possible.
Switch off lights
Lamps have been turned on al-
though the SmartKey in the
starter switch is in position0.
�
Switch off the headlights.
Tail lamp, left
Substitute bulb on
The left tail lamp is malfunction-
ing. A substitute bulb is being
used.
�
Visit an authorized Mercedes-Benz Light
Truck Center as soon as possible.
Tail lamp, right
Substitute bulb on
The right tail lamp is malfunc-
tioning. A substitute bulb is be-
ing used.
�
Visit an authorized Mercedes-Benz Light
Truck Center as soon as possible.
Page 426 of 539
425 Practical hints
What to do if …
Display symbol
Display messages
Possible cause
Possible solution
<
Seat belt system
Drive to workshop
The seat belt system is malfunctioning.
�
Visit an authorized Mercedes-Benz
Light Truck Center as soon as possi-
ble.
9
Service memory full
See Operator’s Manual
The maintenance service memory cannot
save any more data.
�
Have the service memory checked by
an authorized Mercedes-Benz Light
Truck Center.
K
Close
tilt/sliding sunroof
You have opened the driver’s door with
the SmartKey removed from the starter
switch and the sliding portion of the
tilt/sliding sunroof* open.
�
Close the tilt/sliding sunroof*
(�page 235).
J
Close
tilt/sliding sunroof
You have opened the driver’s door with
the SmartKey removed from the starter
switch and the tilt portion of the
tilt/sliding sunroof* open.
�
Close the tilt/sliding sunroof*
(�page 235).
Page 436 of 539
435 Practical hints
Unlocking/locking in an emergency
�Unlocking/locking in an emergency
Unlocking the vehicle
If you cannot unlock the vehicle using the
SmartKey or SmartKey with
KEYLESS-GO*, open the driver’s door us-
ing the mechanical key.
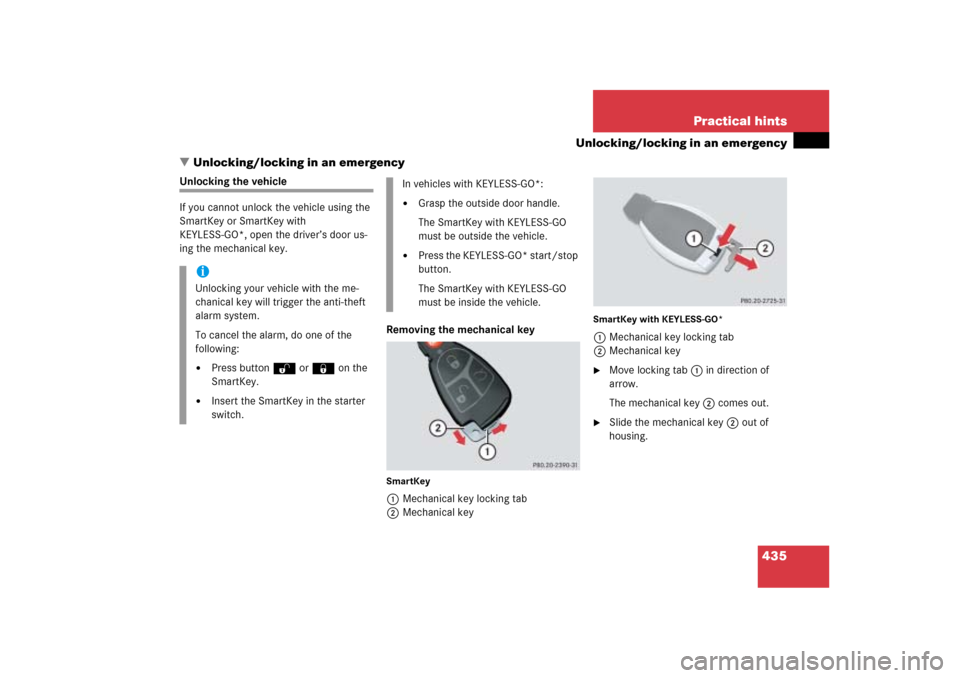
Removing the mechanical key
SmartKey1Mechanical key locking tab
2Mechanical key
SmartKey with KEYLESS-GO*1Mechanical key locking tab
2Mechanical key�
Move locking tab1 in direction of
arrow.
The mechanical key2 comes out.
�
Slide the mechanical key2 out of
housing.
iUnlocking your vehicle with the me-
chanical key will trigger the anti-theft
alarm system.
To cancel the alarm, do one of the
following:�
Press buttonŒ or‹on the
SmartKey.
�
Insert the SmartKey in the starter
switch.
In vehicles with KEYLESS-GO*:�
Grasp the outside door handle.
The SmartKey with KEYLESS-GO
must be outside the vehicle.
�
Press the KEYLESS-GO* start/stop
button.
The SmartKey with KEYLESS-GO
must be inside the vehicle.
Page 437 of 539

436 Practical hintsUnlocking/locking in an emergencyUnlocking the driver’s door
1Unlocking
2Mechanical key�
Insert the mechanical key2 into the
driver’s door lock until it stops.
�
Turn the mechanical key2 counter-
clockwise to position1.
�
Pull the door handle until the locking
knob moves up (
�page 117).
The driver’s door is unlocked.
�
Pull the door handle again to open the
driver’s door.
Locking the vehicle
If you cannot lock the vehicle using the
SmartKey or KEYLESS-GO*, do the follow-
ing:�
Close the passenger door, the rear
doors and the tailgate.
�
Press the lower part of the central
locking switch in the door control panel
(�page 126).
�
Check to see whether the locking
knobs on the doors have moved down.
�
If necessary push them down manually.
Except for the driver’s door, the vehicle
should now be locked.1Locking
2Mechanical key
�
Remove the mechanical key out of the
SmartKey (
�page 435).
�
Insert the mechanical key2 into the
driver’s door lock until it stops.
�
Turn the mechanical key2 clockwise
to position1.
The driver’s door is locked.
Page 438 of 539
 is required to open the tailgate.
If the tailgate can no longer be")
437 Practical hints
Unlocking/locking in an emergency
Unlocking and opening the tailgate
A minimum height clearance of 7 ft
(2.15 m) is required to open the tailgate.
If the tailgate can no longer be unlocked
and opened using the Œbutton on the
SmartKey or the KEYLESS-GO* function,
use the manual release to unlock and open
the tailgate.
The manual release is located on the inside
of the tailgate.
1Release lever
2Cover�
Remove cover2 from the trim on the
tailgate.
�
Push release lever1 all the way to the
left.
�
Lift the tailgate.!Always make sure there is sufficient
overhead clearance.iIf the vehicle has previously been
locked from the outside using the
SmartKey or SmartKey with
KEYLESS-GO*, opening the tailgate
from the inside will trigger the
anti-theft alarm system.
To cancel the alarm, do one of the
following:
With the SmartKey:�
Press buttonŒ or‹ on the
SmartKey.
�
Insert the SmartKey in the starter
switch.
With KEYLESS-GO*:�
Grasp an outside door handle.
The SmartKey with KEYLESS-GO
must be within 3 ft (1 m) of the ve-
hicle.
or
�
Press the KEYLESS-GO start/stop
button.
The SmartKey with KEYLESS-GO
must be inside the vehicle.
Page 440 of 539

439 Practical hints
Opening/closing in an emergency
�Opening/closing in an emergency
Power tilt/sliding sunroof*
You can open or close the tilt/sliding
sunroof manually should an electrical
malfunction occur.
The tilt/sliding sunroof drive is located be-
hind the cover on the overhead control
panel.
1Cover�
Remove the SmartKey from the starter
switch.Vehicles with SmartKey with
KEYLESS-GO*
�
Turn off the engine by pressing the
KEYLESS-GO* once (
�page 36).
�
Open the driver’s door (this puts the
starter switch in position 0, same as
with the SmartKey removed from the
starter switch). The driver’s door then
can be closed again.
�
Push cover1 at the location marked
by the arrow.
2Crank
�
Take crank2 out of the Operator’s
Manual pouch.
�
Insert crank2 through hole.
�
Turn crank2 clockwise to:�
slide sunroof open
�
raise sunroof at the rear
�
Turn crank2 counterclockwise to:�
slide sunroof closed
�
lower sunroof at the rear
iTurn crank2 slowly and smoothly.
The tilt/sliding sunroof must be syn-
chronized if it has been operated man-
ually (
�page 237).
Page 441 of 539

440 Practical hintsReplacing SmartKey batteriesIf the batteries in the SmartKey or the
SmartKey with KEYLESS-GO* are dis-
charged, the vehicle can no longer be
locked or unlocked. It is recommended to
have the batteries replaced at an autho-
rized Mercedes-Benz Light Truck Center.
Batteries contain materials that can harm
the environment if disposed of improperly.
Recycling of batteries is the preferred
method of disposal. Many states require
sellers of batteries to accept old batteries
for recycling.
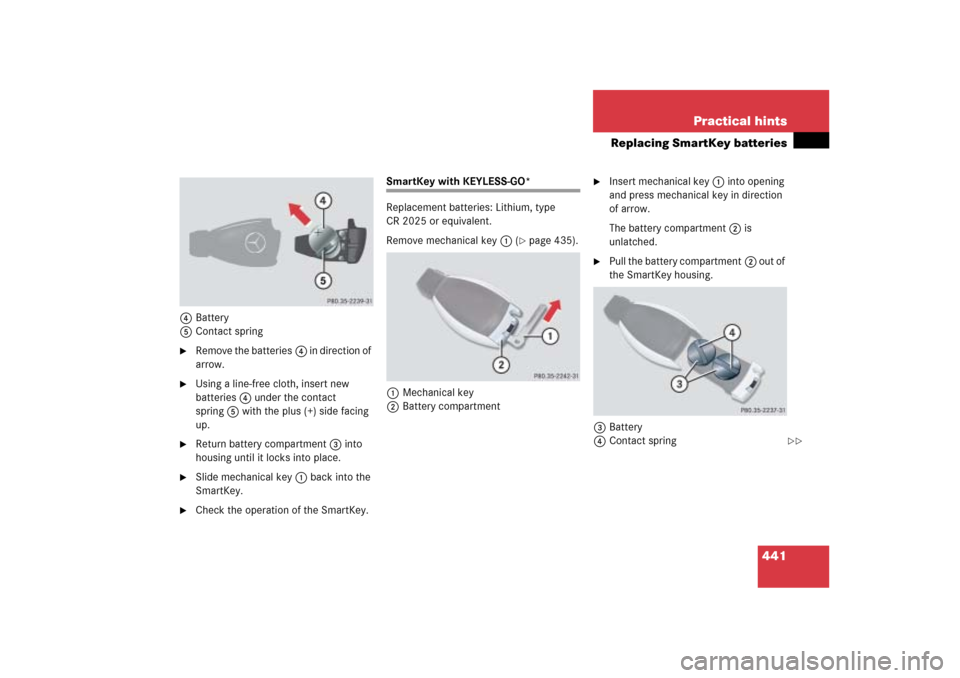
SmartKey
Replacement batteries: Lithium, type
CR 2025 or equivalent.�
Remove mechanical key1
(�page 435).1Mechanical key
2Slide
3Battery compartment
�
Insert the mechanical key1 in direc-
tion of arrow in side opening.
�
Using mechanical key1 push gray
slide2 to unlatch battery
compartment3.
�
Pull the battery compartment3 out of
the housing in direction of arrow.
Warning!
G
Keep the batteries out of reach of children.
If a battery is swallowed, seek medical help
immediately.
iWhen inserting the batteries, make
sure they are clean and free of lint.iWhen replacing batteries, always
replace both batteries.
The required replacement batteries are
available at any Mercedes-Benz Light
Truck Center.
Page 442 of 539
441 Practical hints
Replacing SmartKey batteries
4Battery
5Contact spring�
Remove the batteries4 in direction of
arrow.
�
Using a line-free cloth, insert new
batteries4 under the contact
spring5 with the plus (+) side facing
up.
�
Return battery compartment3 into
housing until it locks into place.
�
Slide mechanical key1 back into the
SmartKey.
�
Check the operation of the SmartKey.
SmartKey with KEYLESS-GO*
Replacement batteries: Lithium, type
CR 2025 or equivalent.
Remove mechanical key1 (
�page 435).
1Mechanical key
2Battery compartment
�
Insert mechanical key1 into opening
and press mechanical key in direction
of arrow.
The battery compartment2 is
unlatched.
�
Pull the battery compartment2 out of
the SmartKey housing.
3Battery
4Contact spring
��