Page 252 of 539
251 Controls in detail
Driving systems
!
Keep in mind that in rough or uneven
terrain, adjusting the vehicle to a lower
level may cause the vehicle underbody
to come in contact with the ground and
result in damage to the vehicle under-
body. Always make sure the vehicle
has sufficient ground clearance before
adjusting it to a lower level.!Before jacking up the vehicle with
equipment that lifts one or more of the
wheels completely off of the ground,
remove the SmartKey from the starter
switch.!Please also note the information in the
section on towing (
�page 472).
iThe activation thresholds are defined
by the set suspension tuning
(�page 249).
iThe high-speed level is not available if
towing a trailer. For more information
on towing a trailer, see “Trailer towing”
(�page 314).
iFor off-road driving, please observe the
corresponding section in this manual
(�page 306).
Page 432 of 539

431 Practical hints
Where will I find ...?
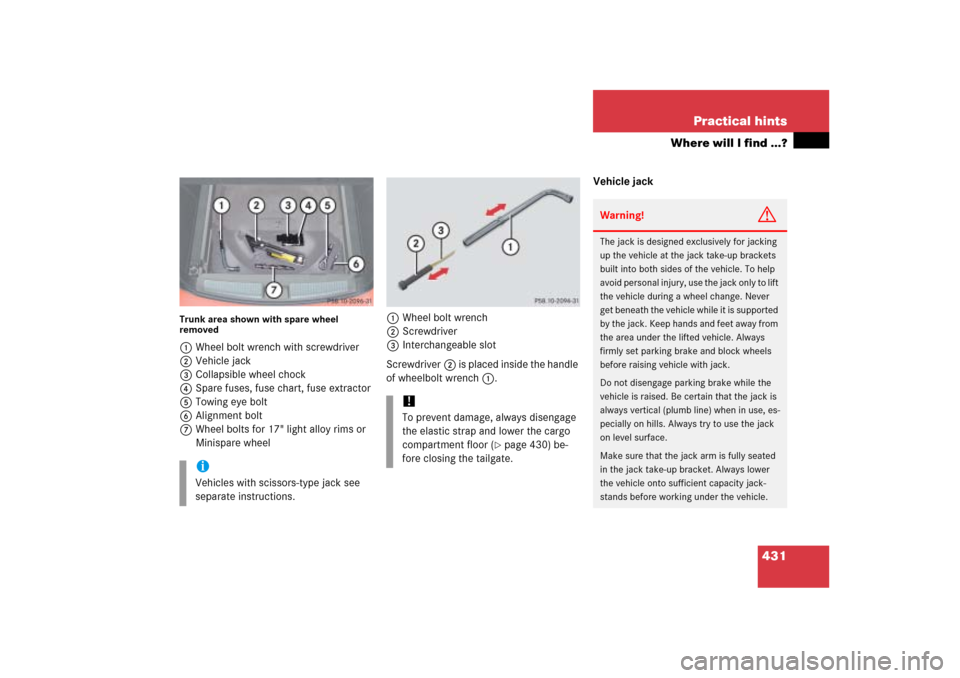
Trunk area shown with spare wheel
removed1Wheel bolt wrench with screwdriver
2Vehicle jack
3Collapsible wheel chock
4Spare fuses, fuse chart, fuse extractor
5Towing eye bolt
6Alignment bolt
7Wheel bolts for 17" light alloy rims or
Minispare wheel1Wheel bolt wrench
2Screwdriver
3Interchangeable slot
Screwdriver2 is placed inside the handle
of wheelbolt wrench1.Vehicle jack
iVehicles with scissors-type jack see
separate instructions.
!To prevent damage, always disengage
the elastic strap and lower the cargo
compartment floor (
�page 430) be-
fore closing the tailgate.
Warning!
G
The jack is designed exclusively for jacking
up the vehicle at the jack take-up brackets
built into both sides of the vehicle. To help
avoid personal injury, use the jack only to lift
the vehicle during a wheel change. Never
get beneath the vehicle while it is supported
by the jack. Keep hands and feet away from
the area under the lifted vehicle. Always
firmly set parking brake and block wheels
before raising vehicle with jack.
Do not disengage parking brake while the
vehicle is raised. Be certain that the jack is
always vertical (plumb line) when in use, es-
pecially on hills. Always try to use the jack
on level surface.
Make sure that the jack arm is fully seated
in the jack take-up bracket. Always lower
the vehicle onto sufficient capacity jack-
stands before working under the vehicle.
Page 458 of 539

457 Practical hints
Flat tire
Mounting the spare wheel
Preparing the vehicle�
Prepare the vehicle as described
(�page 456).
�
Take the wheel wrench, the collapsible
wheel chock, and the vehicle jack out
of the cargo compartment
(�page 430).
�
Take the Minispare wheel out of the
cargo compartment (
�page 433).Lifting the vehicle
�
Prevent the vehicle from rolling away
by blocking wheels with wheel chocks
or other sizable objects.
A collapsible wheel chock is included
with the vehicle tool kit (
�page 430).
For information on setting up the col-
lapsible wheel chock, see
(
�page 432).
When changing wheel on a level surface:
�
Place one wheel chock in front of and
another sizeable object behind the
wheel that is diagonally opposite to the
wheel being changed.
Always try lifting the vehicle using the jack
on a level surface. However, should
circumstances require you to do so on a
hill, place the wheel chock and other size-
able object as follows:
�
Place the wheel chock and another
sizable object on the downhill side
blocking both wheels of the axle not
being worked on.
!Vehicles with factory-mounted
running-boards*:
Your vehicle is equipped with a scis-
sors-type jack (located under the cargo
compartment floor) designed for use
with factory-mounted running boards.
Only use this jack when jacking up ve-
hicles with factory-mounted running
boards as otherwise the vehicle’s
underbody can be damaged. See sepa-
rate instructions for scissors-type jack.
Warning!
G
The jack is designed exclusively for jacking
up the vehicle at the jack take-up brackets
built into both sides of the vehicle. To help
avoid personal injury, use the jack only to lift
the vehicle during a wheel change. Never
get beneath the vehicle while it is supported
by the jack. Keep hands and feet away from
the area under the lifted vehicle. Always
firmly set parking brake and block wheels
before raising vehicle with jack.
Do not disengage parking brake while the
vehicle is raised. Be certain that the jack is
always vertical (plumb line) when in use, es-
pecially on hills. Always try to use the jack
on level surface. Make sure that the jack
arm is fully seated in the jack take-up brack-
et. Always lower the vehicle onto sufficient
capacity jackstands before working under
the vehicle.
Page 459 of 539

458 Practical hintsFlat tire�
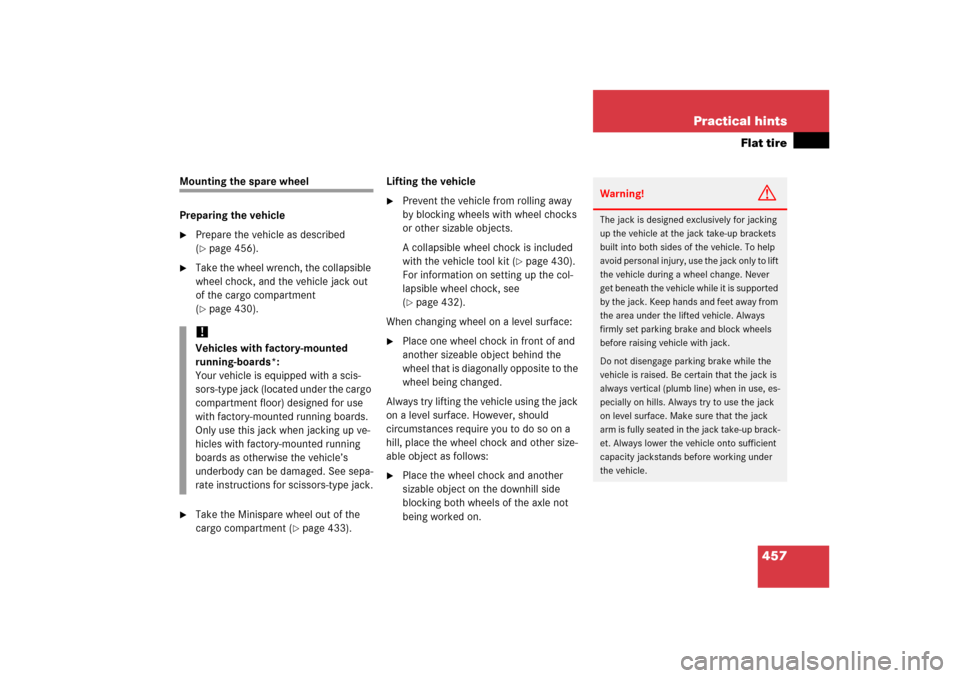
On wheel to be changed, loosen but do
not yet remove the wheel bolts
(approximately one full turn with
wrench).
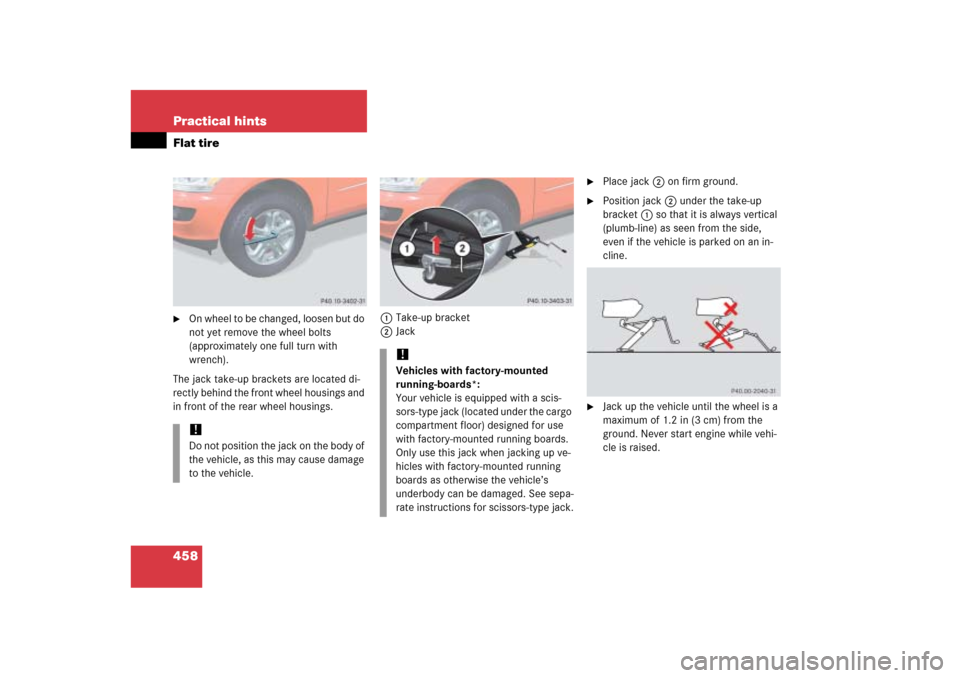
The jack take-up brackets are located di-
rectly behind the front wheel housings and
in front of the rear wheel housings.1Take-up bracket
2Jack
�
Place jack2 on firm ground.
�
Position jack2 under the take-up
bracket1 so that it is always vertical
(plumb-line) as seen from the side,
even if the vehicle is parked on an in-
cline.
�
Jack up the vehicle until the wheel is a
maximum of 1.2 in (3 cm) from the
ground. Never start engine while vehi-
cle is raised.
!Do not position the jack on the body of
the vehicle, as this may cause damage
to the vehicle.
!Vehicles with factory-mounted
running-boards*:
Your vehicle is equipped with a scis-
sors-type jack (located under the cargo
compartment floor) designed for use
with factory-mounted running boards.
Only use this jack when jacking up ve-
hicles with factory-mounted running
boards as otherwise the vehicle’s
underbody can be damaged. See sepa-
rate instructions for scissors-type jack.