Page 461 of 539

460 Practical hintsFlat tire�
Clean contact surfaces of wheel and
wheel hub.
�
Guide spare wheel onto the alignment
bolt and push it on the wheel hub.
�
Insert wheel bolts and tighten them
slightly.
�
Unscrew the alignment bolt.
�
Insert the remaining wheel bolt and
tighten it slightly.Lowering the vehicle
�
Lower vehicle by turning crank coun-
terclockwise until vehicle is resting ful-
ly on its own weight.
�
Remove the jack.
!To avoid paint damage, place wheel flat
against hub and hold it there while
installing first wheel bolt.Warning!
G
Always replace wheel bolts that are
damaged or rusted.
Never apply oil or grease to wheel bolts.
Damaged wheel hub threads should be
repaired immediately. Do not continue to
drive under these circumstances! Contact
an authorized Mercedes-Benz Light Truck
Center or call Roadside Assistance.
Incorrect wheel bolts or improperly tight-
ened wheel bolts can cause the wheel to
come off. This could cause an accident.
Make sure to use the correct wheel bolts.
Warning!
G
Use only genuine equipment
Mercedes-Benz wheel bolts. Other wheel
bolts may come loose.
Do not tighten the wheel bolts when the ve-
hicle is raised. Otherwise the vehicle could
fall off the jack.
��
Page 470 of 539
.
�
Connect the negative lead.
Charging the battery
If the battery is discharged, the battery can
be charged")
469 Practical hints
Battery
�
Connect the positive lead and fasten its
cover (
�page 467).
�
Connect the negative lead.
Charging the battery
If the battery is discharged, the battery can
be charged using the jump-start contacts
located in the engine compartment
(�page 471).
�
Charge the battery in accordance with
the instructions of the battery charger
manufacturer.
Batteries contain materials that can harm
the environment if disposed of improperly.
Large 12 volt storage batteries contain
lead. Recycling of batteries is the preferred
method of disposal. Many states require
sellers of batteries to accept old batteries
for recycling.
!NEVER invert the terminal connections!iThe following procedures must be car-
ried out following any interruption of
battery power (e.g. due to reconnec-
tion):�
Set the clock (
�page 165)
(see Modular COMAND system
operator’s manual).
�
Resynchronize the power windows
(�page 232).
�
Resynchronize the power tilt/slid-
ing sunroof* (
�page 237).
Warning!
G
Never charge a battery while still installed in
the vehicle unless the accessory battery
charge unit approved by Mercedes-Benz is
being used. Gases may escape during charg-
ing and cause explosions that may result in
paint damage, corrosion or personal injury.
An accessory battery charge unit specially
adapted for Mercedes-Benz vehicles and
tested and approved by Mercedes-Benz is
available, permitting the charging of the
battery in its installed position. Contact an
authorized Mercedes-Benz Light Truck
Center for information and availability.
Charge battery in accordance with the
separate instructions for the accessory
battery charger.
Page 476 of 539
475 Practical hints
Towing the vehicle
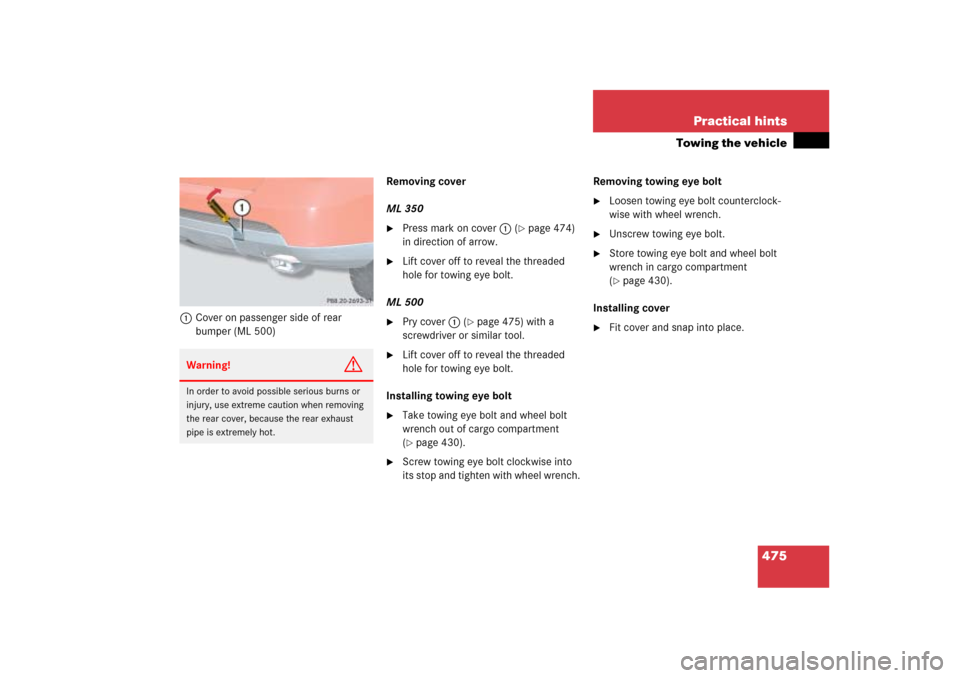
1Cover on passenger side of rear
bumper (ML 500)Removing cover
ML 350
�
Press mark on cover1 (
�page 474)
in direction of arrow.
�
Lift cover off to reveal the threaded
hole for towing eye bolt.
ML 500
�
Pry cover1 (
�page 475) with a
screwdriver or similar tool.
�
Lift cover off to reveal the threaded
hole for towing eye bolt.
Installing towing eye bolt
�
Take towing eye bolt and wheel bolt
wrench out of cargo compartment
(�page 430).
�
Screw towing eye bolt clockwise into
its stop and tighten with wheel wrench.Removing towing eye bolt
�
Loosen towing eye bolt counterclock-
wise with wheel wrench.
�
Unscrew towing eye bolt.
�
Store towing eye bolt and wheel bolt
wrench in cargo compartment
(�page 430).
Installing cover
�
Fit cover and snap into place.
Warning!
G
In order to avoid possible serious burns or
injury, use extreme caution when removing
the rear cover, because the rear exhaust
pipe is extremely hot.
Page 512 of 539
 328
Engine oil with the
oil dipstick (ML 350 only) 330
Oil level 327
Tire inflate pressure 325
Vehicle lighting 32")
511 Index
Checking
Coolant level 332
Engine oil with the
control system (ML 500 only) 328
Engine oil with the
oil dipstick (ML 350 only) 330
Oil level 327
Tire inflate pressure 325
Vehicle lighting 325
Checking tire pressure
electronically with the
Advanced Tire Pressure Monitoring
System* (Advanced TPMS*) 351
Checking weights
Trailer and vehicle 315
Checklist
Off-road driving 307
Returning from off-road driving 313
Child safety 78
Air bags 68
Infant and child
restraint systems 73, 78
LATCH type child seat mounts 88Child safety switch see Blocking of rear
door window operation
Cigarette lighter*
Front center console 275
Cleaning
Carpet 379
Cup holder 379
Gear selector lever 379
Hard plastic trim items 379
Headlamps 194
Headliner 379
Instrument cluster 379
Leather upholstery* 380
Light alloy wheels 379
MB Tex upholstery 380
Plastic and rubber parts 380
Seat belts 379
Steering wheel 379
Windows 378
Windshield 56
Wiper blades 378
Cleaning and care of the vehicle 374
Cleaning tires 337Climate control 202
Adjusting 207
Adjusting air volume 208
deactivating 206
Defrosting 208
Rear passenger compartment 213
Rear window defroster 200
Setting the temperature 207
Clock 165
Closing
Glove box 270
Hood 327
Power tilt/sliding sunroof* 439
Side windows 231
Side windows with
KEYLESS-GO* 234
Tailgate 120
Vehicle with KEYLESS-GO* 123,
124
Tilt/sliding sunroof* 235
Tilt/sliding sunroof* with
KEYLESS-GO* 234
Windows 230
Page 528 of 539
 128
He")
527 Index
Seat cushion depth
Adjusting 132
Seat heating*
Switching off 134
Switching on 134
Seating capacity 340
Seats 128
Adjusting 38
Easy entry/exit feature
(Vehicles with memory
function*) 128
Heater* 133
Multicontour seat* 132
Securing cargo
Cargo tie-down rings 260
Selecting display 165
Self-test
Occupant Classification System 86
Tele Aid* 282
Service
Calling up the service indicator 372
Parts 482Service and Warranty Booklet
Loss of 483
Service and warranty information 10
Service indicator
Calling up 372
Clearing 372
Service life (tires) 336
Setting
Convenience functions 163, 173
Cruise control 239
Day (clock) 166
Daytime running lamp mode 167,
168
Higher speed in cruise control 241
Hours (clock) 165
Individual vehicle settings 161
Interior lighting delayed
switch-off 170
Lamps and lighting (control
system) 167
Language, multifunction display 164
Locator lighting 168
Lower speed in cruise control 242
Miles/kilometers in
speedometer 164Minutes (clock) 166
Month (clock) 166
Parking position* for exterior
rear view mirrors 174
Slower speed in cruise control 242
Speed in cruise control 243
Speedometer display mode 164
Temperature (interior) 207, 221
Units
Speedometer 164
Year (clock) 167
Setting current speed 239
Setting the vehicle level* 252
Setting up the collapsible wheel chock
Vehicle tool kit 432
Settings
Convenience functions 173
Factory, SmartKey 108
Lighting (control system) 167
Menus and submenus 152
Resetting all (control system) 161
Resetting in the submenu 162
Selective 108, 114
Page:
< prev 1-8 9-16 17-24