Page 440 of 539

439 Practical hints
Opening/closing in an emergency
�Opening/closing in an emergency
Power tilt/sliding sunroof*
You can open or close the tilt/sliding
sunroof manually should an electrical
malfunction occur.
The tilt/sliding sunroof drive is located be-
hind the cover on the overhead control
panel.
1Cover�
Remove the SmartKey from the starter
switch.Vehicles with SmartKey with
KEYLESS-GO*
�
Turn off the engine by pressing the
KEYLESS-GO* once (
�page 36).
�
Open the driver’s door (this puts the
starter switch in position 0, same as
with the SmartKey removed from the
starter switch). The driver’s door then
can be closed again.
�
Push cover1 at the location marked
by the arrow.
2Crank
�
Take crank2 out of the Operator’s
Manual pouch.
�
Insert crank2 through hole.
�
Turn crank2 clockwise to:�
slide sunroof open
�
raise sunroof at the rear
�
Turn crank2 counterclockwise to:�
slide sunroof closed
�
lower sunroof at the rear
iTurn crank2 slowly and smoothly.
The tilt/sliding sunroof must be syn-
chronized if it has been operated man-
ually (
�page 237).
Page 447 of 539
446 Practical hintsReplacing bulbsReplacing low beam bulbs
1Housing cover for low beam halogen or
Bi-Xenon* headlamp
2Electrical connector for low beam
headlamp bulb (halogen headlamps
only)Bi-Xenon* headlamp Low beam halogen headlamp
�
Turn housing cover1 counterclock-
wise and remove it.
�
Turn electrical connector2 with bulb
counterclockwise out of housing.
�
Remove old bulb from connector.
�
Insert the new bulb so that its socket
locates in the recess of the lamp hous-
ing.
�
Place electrical connector2 with bulb
into housing and turn clockwise.
�
Align housing cover1 and turn it
clockwise.
Warning!
G
Do not remove the cover
1
for the
Bi-Xenon* headlamp. Because of high volt-
age in Xenon* lamps, it is dangerous to re-
place the bulb or repair the lamp and its
components. We recommend that you have
such work done by a qualified technician.
Page 448 of 539
447 Practical hints
Replacing bulbs
Replacing high beam halogen bulb,
parking and standing lamp
1Housing cover for high beam halogen
bulb (vehicles with halogen bulbs: high
beam and high beam flasher; vehicles
with Bi-Xenon* headlamps: high beam
flasher only), parking and standing
lamp2Electrical connector for high beam
halogen bulb (vehicles with halogen
bulbs: high beam and high beam flash-
er; vehicles with Bi-Xenon* headlamps:
high beam flasher only)High beam halogen bulb
�
Turn housing cover1 counterclock-
wise and remove it.
�
Turn electrical connector2 with bulb
counterclockwise out of housing.
�
Remove old bulb from connector.
�
Insert the new bulb so that its socket
locates in the recess of the lamp hous-
ing.
�
Place electrical connector2 with bulb
into housing and turn clockwise.
�
Align housing cover1 and turn it
clockwise.
Page 449 of 539
.
�
Pull out bulb socket3 with the bulb.
�
Press gently onto the bulb and tu")
448 Practical hintsReplacing bulbsParking/standing lamp bulb�
Turn bulb socket3 counterclockwise
and remove it (
�page 445).
�
Pull out bulb socket3 with the bulb.
�
Press gently onto the bulb and turn
counterclockwise out of bulb
socket3.
�
Press the new bulb gently into bulb
socket3 and turn clockwise until it
engages.
�
Press bulb socket3 back into the
lamp.
�
Align bulb socket3 and turn it clock-
wise.Turn signal bulb
1Bulb socket
�
Turn bulb socket1 counterclockwise
and pull it out.
�
Press the new bulb gently into
socket1, turn socket counterclock-
wise and remove it.
�
Insert the new bulb in socket1, push
and turn the bulb clockwise.
�
Align bulb socket1 and turn bulb
socket clockwise.Side marker lamp bulb
�
Turn bulb socket5 counterclockwise
and remove it (
�page 445).
�
Pull out bulb socket5 with the bulb.
�
Press gently onto the bulb and turn
counterclockwise out of bulb
socket5.
�
Press the new bulb gently into bulb
socket5 and turn clockwise until it
engages.
�
Press bulb socket5 back into the
lamp.
�
Align bulb socket5 and turn it clock-
wise.
Page 450 of 539
449 Practical hints
Replacing bulbs
Front fog lamp
Remove front fog lamp cover (ML 350,
ML 500):
1Cover
2Front fog lamp
�
Use a suitable object (e.g. screwdriver)
to press on the release lever behind the
front panel.
Cover1 releases.
�
Pull cover1 out of the bumper.
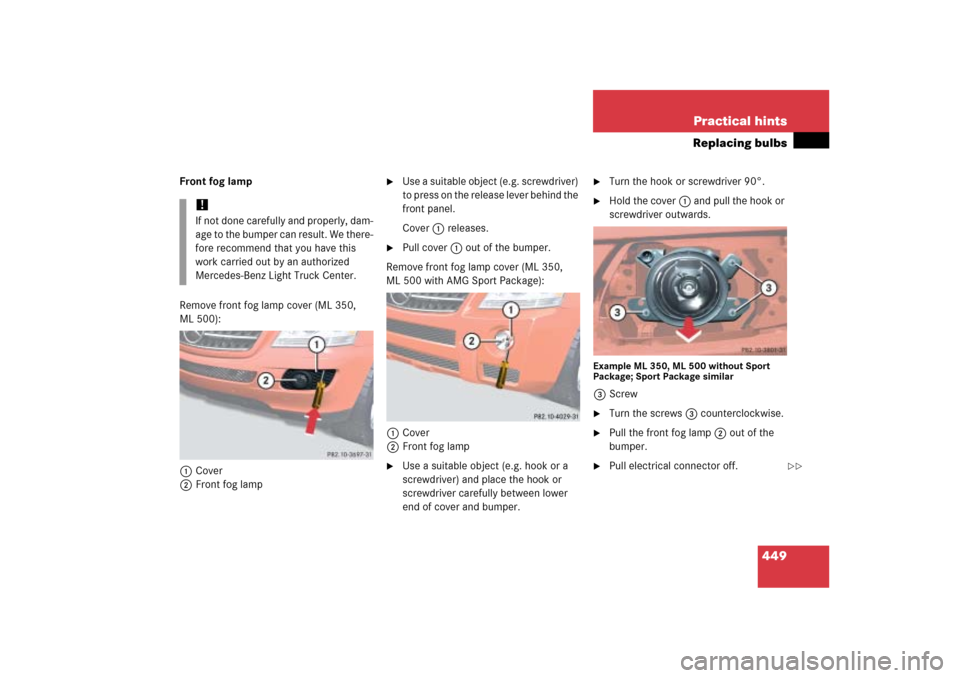
Remove front fog lamp cover (ML 350,
ML 500 with AMG Sport Package):
1Cover
2Front fog lamp
�
Use a suitable object (e.g. hook or a
screwdriver) and place the hook or
screwdriver carefully between lower
end of cover and bumper.
�
Turn the hook or screwdriver 90°.
�
Hold the cover1 and pull the hook or
screwdriver outwards.
Example ML 350, ML 500 without Sport
Package; Sport Package similar3Screw�
Turn the screws3 counterclockwise.
�
Pull the front fog lamp2 out of the
bumper.
�
Pull electrical connector off.
!If not done carefully and properly, dam-
age to the bumper can result. We there-
fore recommend that you have this
work carried out by an authorized
Mercedes-Benz Light Truck Center.
��
Page 451 of 539
450 Practical hintsReplacing bulbs4Bulb socket of front fog lamp bulb�
Turn bulb socket4 with the bulb
counterclockwise and remove it.
�
Insert new bulb socket4 with the bulb
into the lamp and turn it clockwise.
�
Plug electrical connector onto the bulb
socket4.
�
Reinstall front fog lamp2 into the
bumper.
�
Reinstall cover1 into the bumper un-
til it engages.
Replacing bulbs for rear lamps
Before you start to replace a bulb for a rear
lamp, do the following first:�
Turn the exterior lamp switch to
positionM (
�page 138).
�
Open the tailgate.
�
Open the cover in the cargo compart-
ment.
For the driver’s side rear lamps, see
“First aid kit” (
�page 430).
For the passenger-side rear lamps, see
“Fuse box in cargo compartment”
(
�page 479).Vehicles without sound system*:
�
Remove the additional cover on the
driver’s side.
1Screw
�
Turn the screws1 90° counterclock-
wise and remove the storage bin.
��
Page 452 of 539
451 Practical hints
Replacing bulbs
Example rear lamp passenger-side1Brake lamp
2Backup lamp
3Rear fog lamp (only driver’s side), tail
lamp, parking and standing lamp
4Side marker lamp
5Turn signal lamp�
Turn the respective bulb socket with
the bulb counterclockwise and remove
it.
�
Press gently onto the respective bulb
and turn counterclockwise out of its
bulb socket.
�
Press the new bulb gently into its bulb
socket and turn clockwise until it en-
gages.
�
Align bulb socket and turn it clockwise.
License plate lamp
1License plate lamp cover
2Screw
�
Loosen both screws2.
�
Remove license plate lamp cover1.
�
Replace the tubular bulb.
�
Reinstall license plate lamp cover1.
�
Retighten screws2.
Adjusting headlamp aim
VVertical centerline
HHeadlamp mounting high, measured
from the center
iHigh beam adjustments simultaneous-
ly aim the low beam.
Vehicle should have a normal tailgate
load.
Page 453 of 539
452 Practical hintsReplacing bulbsCorrect headlamp adjustment is extremely
important. To check and readjust a head-
lamp, follow the steps described:�
Park the vehicle on a level surface
25 feet (7.6 m) from a vertical test
screen or wall.
�
Switch the headlamps on
(�page 138).
If the beam does not show a beam pattern
as indicated in the figure left, then follow
the steps below:
�
Open hood (
�page 326).
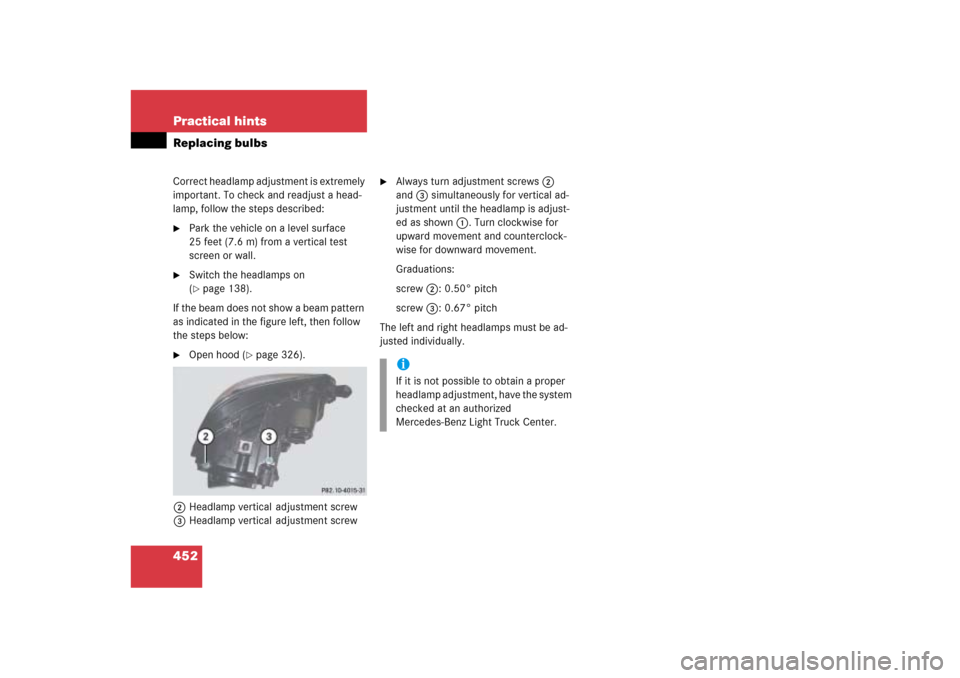
2Headlamp vertical adjustment screw
3Headlamp vertical adjustment screw
�
Always turn adjustment screws2
and3 simultaneously for vertical ad-
justment until the headlamp is adjust-
ed as shown1. Turn clockwise for
upward movement and counterclock-
wise for downward movement.
Graduations:
screw2:0.50° pitch
screw3:0.67° pitch
The left and right headlamps must be ad-
justed individually.iIf it is not possible to obtain a proper
headlamp adjustment, have the system
checked at an authorized
Mercedes-Benz Light Truck Center.
Bi-Xeno")


, tail
lamp, parking and standing lamp
4Side marker lamp
5Turn signal")