Page 227 of 539
226 Controls in detail3-zone automatic climate control*Deactivating
It is possible to deactivate the air condi-
tioning (cooling) function of the automatic
climate control system. The air in the vehi-
cle will then no longer be cooled or dehu-
midified.�
Press button2 (
�page 218).
The indicator lamp on button2
goes out.
The cooling function switches off after
a short delay.Activating
Moist air can fog up the windows. You can
dehumidify the air with the air condition-
ing.
�
Press button2 again.
The indicator lamp on button2
comes on.
The air conditioning system uses the refrig-
erant R-134a. This refrigerant is free of
CFCs which are harmful to the ozone layer.
Residual heat and ventilation
With the engine switched off, it is possible
to continue to heat or ventilate the interior
for up to 30 minutes. This feature makes
use of the residual heat produced by the
engine.
!If the air conditioning cannot be turned
on again, this indicates that the air
conditioning is losing refrigerant. The
compressor has turned itself off.
Have the air conditioning checked at
the nearest authorized Mercedes-Benz
Light Truck Center.
iHow long the system will provide heat-
ing depends on the coolant tempera-
ture and the battery voltage.
Regardless of the temperature and air
volume set on the climate control panel
an interior temperature is aimed at by
72°F (22°C) and the blower runs for
the protection of the battery on low
stage.
Page 230 of 539
229 Controls in detail
3-zone automatic climate control*
Increasing/decreasing the temperature�
Turn the temperature control3 slight-
ly left or right until the desired temper-
ature is selected.
The rear air conditioning will corre-
spondingly adjust the interior air tem-
perature for the rear passenger
compartment.
Adjusting air volume
�
Press� to decrease orQ to in-
crease air volume to the desired level.
Page 231 of 539
230 Controls in detailPower windowsOpening and closing the windows
The side windows are opened and closed
electrically. The switches for all of the side
windows are on the driver’s door. The
switches for the respective windows are
on the front passenger door and the rear
doors.
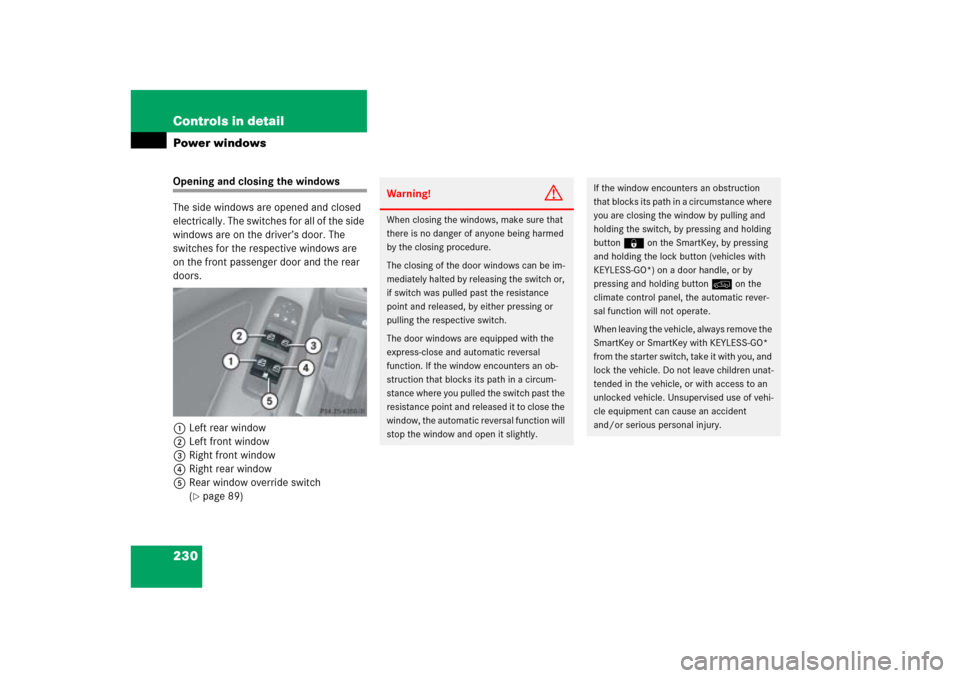
1Left rear window
2Left front window
3Right front window
4Right rear window
5Rear window override switch
(
�page 89)
Warning!
G
When closing the windows, make sure that
there is no danger of anyone being harmed
by the closing procedure.
The closing of the door windows can be im-
mediately halted by releasing the switch or,
if switch was pulled past the resistance
point and released, by either pressing or
pulling the respective switch.
The door windows are equipped with the
express-close and automatic reversal
function. If the window encounters an ob-
struction that blocks its path in a circum-
stance where you pulled the switch past the
resistance point and released it to close the
window, the automatic reversal function will
stop the window and open it slightly.
If the window encounters an obstruction
that blocks its path in a circumstance where
you are closing the window by pulling and
holding the switch, by pressing and holding
button‹on the SmartKey, by pressing
and holding the lock button (vehicles with
KEYLESS-GO*) on a door handle, or by
pressing and holding button: on the
climate control panel, the automatic rever-
sal function will not operate.
When leaving the vehicle, always remove the
SmartKey or SmartKey with KEYLESS-GO*
from the starter switch, take it with you, and
lock the vehicle. Do not leave children unat-
tended in the vehicle, or with access to an
unlocked vehicle. Unsupervised use of vehi-
cle equipment can cause an accident
and/or serious personal injury.
Page 233 of 539

232 Controls in detailPower windowsFully opening the windows
(Express-open)�
Press switch1 to4 past the resis-
tance point and release.
The corresponding window opens com-
pletely.
Fully closing the windows
(Express-close)
�
Pull switch1 to4 past the resis-
tance point and release.
The corresponding window closes com-
pletely.
Stopping windows during
Express-operation
�
Press or pull respective power window
switch again.
Synchronizing power windows
The power window must be resynchro-
nized each time�
after the battery has been
disconnected
�
if the power windows cannot be fully
opened (Express-open) or closed
(Express-close)
Synchronizing
�
Close all doors.
�
Switch on the ignition (
�page 34).
�
Pull and hold the power window
switches1 to4 until the side win-
dows are completely closed.
With the side windows completely
closed, hold the switches for approxi-
mately three seconds.
The power windows are synchronized.
Warning!
G
Driver’s door only:
If within five seconds switch is again pulled
past the resistance point and released, the
automatic reversal will not operate.
!If the upward movement of the window
is blocked during the closing proce-
dure, the window will stop and open
slightly.
Remove the obstruction, pull the re-
spective power window switch again
past the resistance point and release.
If the window still does not close when
there is no obstruction, then pull and
hold the respective power window
switch. The side window will then close
without the obstruction sensor func-
tion.
Page 238 of 539
237 Controls in detail
Power tilt/sliding sunroof*
Opening and closing the power
tilt/sliding sunroof�
To open, close, raise, or lower the
tilt/sliding sunroof, move the sunroof
switch to the resistance point in the
required direction of arrows1to4.
Release the sunroof switch when the
tilt/sliding sunroof has reached the de-
sired position.
Fully opening (Express-open) and
closing (Express-close) the power
tilt/sliding sunroof
�
To open or close the tilt/sliding sun-
roof, move the sunroof switch past the
resistance point in the direction of
arrow1to2 and release.
The tilt/sliding sunroof opens or closes
completely.Stopping the power tilt/sliding sunroof
during Express-open
�
Move the sunroof switch in any direc-
tion.
The movement of the tilt/sliding sun-
roof stops.
Synchronizing the power tilt/sliding
sunroof
The tilt/sliding sunroof must be
synchronized each time�
after the battery has been
disconnected or discharged
�
after the tilt/sliding sunroof has been
closed manually (
�page 439)
�
after a malfunction
�
the tilt/sliding sunroof does not open
smoothly
�
Switch on the ignition (
�page 34).
�
Press and hold the sunroof switch in
the direction of arrow1 (
�page 235)
until the tilt/sliding sunroof is fully
raised at the rear.
Keep holding the sunroof switch in the
direction of arrow1 for approximately
one second.
�
Check the Express-open feature
(�page 237).
If the tilt/sliding sunroof opens
completely, the tilt/sliding sunroof is
synchronized. Otherwise repeat the
above steps.
iIf the movement of the tilt/sliding sun-
roof is blocked during the closing pro-
cedure, the tilt/sliding sunroof will
stop and reopen slightly.
Page 245 of 539
244 Controls in detailDriving systemsFor more information, see “Off-road driv-
ing” (
�page 306).
The DSR is an aid for driving downhill. DSR
regulates your vehicle’s speed when driv-
ing downhill to the value set in the control
system (�page 176). The steeper the
downhill gradient is, the greater the brake
application. On flat road surfaces, DSR
brakes only slightly or not at all.
DSR regulates the vehicle’s speed in auto-
matic transmission positionsD, orR.
You can drive slower or faster than the set
speed at any time by braking the vehicle or
depressing the accelerator pedal.
iWhenever DSR is switched on, DSR will
use the programmed default speed to
regulate the vehicle’s speed. The de-
fault speed programmed at the factory
is 4 mph (Canada: 6 km / h). The de-
fault speed can be reprogrammed us-
ing the control system (
�page 176).
The next time DSR is switched on, DSR
will use the newly programmed default
speed to regulate the vehicle’s speed.
Once DSR is switched on, you can ad-
just the set speed using the cruise con-
trol lever (
�page 238). Keep in mind
that adjusting the set speed using the
cruise control lever with DSR switched
on will not change the programmed de-
fault speed. If DSR is switched off and
then switched on again, DSR will use
the programmed default speed.
Whenever the DSR is switched on, the
programmed default speed will be
used. That value can be changed
through the multifunction display. The
next time the DSR is switched on, it will
use that newly programmed default
speed.
Depending on the road surface and lev-
el of downhill grade, the DSR may not
be able to maintain the set speed. To
maintain the set speed, apply the
brakes if necessary.
Page 259 of 539

258 Controls in detailDriving systems
Parktronic* system malfunction
If only the red distance segments illumi-
nate and an acoustic warning sounds,
there is a malfunction in the Parktronic
system. The Parktronic system will auto-
matically switch off after 20 seconds.�
Have the Parktronic system checked
by an authorized Mercedes-Benz Light
Truck Center as soon as possible.
If only the red distance segments illumi-
nate and no acoustic warning sounds, the
Parktronic system sensors are dirty or
there is an interference from other radio or
ultrasonic signals. The Parktronic system
will automatically switch off after
20 seconds.
�
Switch off the ignition (
�page 34).
�
Clean the Parktronic system sensors
(�page 377).
�
Switch on the ignition.
or
�
Check the Parktronic system operation
at another location to rule out interfer-
ence from outside radio or ultrasonic
signals.
iThe message
Parktronic on
reappears
as soon as the system senses that you
get closer to the object again, even if
you cleared the message before by
pressingèÿk or
buttonj on the multifunction
steering wheel.
iThe Parktronic system is automatically
switched on when the ignition is
switched on.
Vehicles with original equipment
Mercedes-Benz Trailer Hitch Kit:
The rear Parktronic sensor will auto-
matically disengage when towing a
trailer as soon as the electrical connec-
tion between the vehicle and the trailer
has been established.
��
Page 262 of 539
261 Controls in detail
Loading
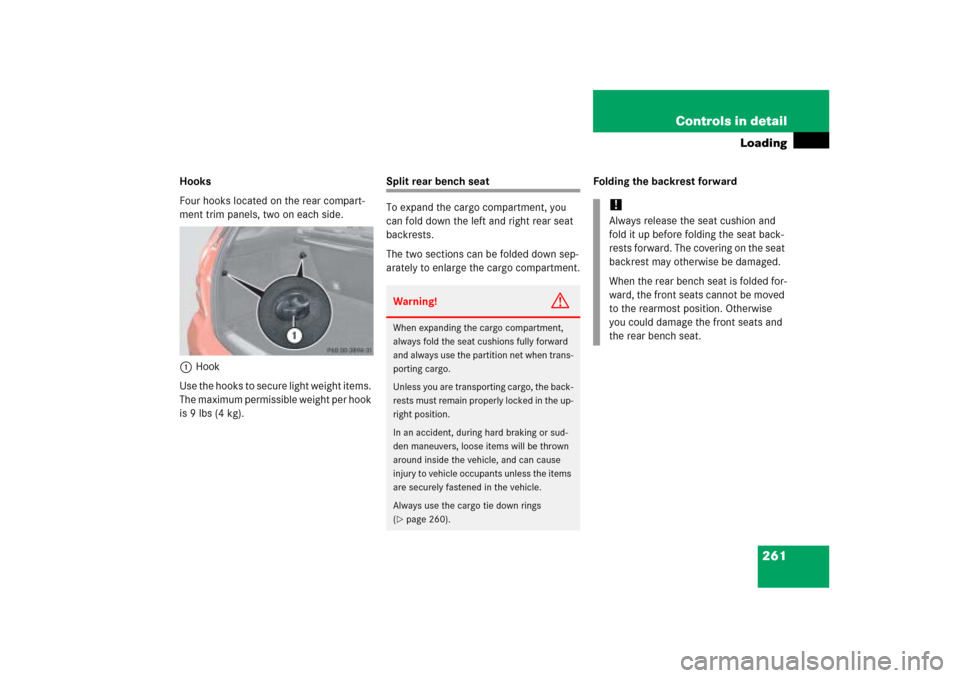
Hooks
Four hooks located on the rear compart-
ment trim panels, two on each side.
1Hook
Use the hooks to secure light weight items.
The maximum permissible weight per hook
is 9 lbs (4 kg).
Split rear bench seat
To expand the cargo compartment, you
can fold down the left and right rear seat
backrests.
The two sections can be folded down sep-
arately to enlarge the cargo compartment.Folding the backrest forwardWarning!
G
When expanding the cargo compartment,
always fold the seat cushions fully forward
and always use the partition net when trans-
porting cargo.
Unless you are transporting cargo, the back-
rests must remain properly locked in the up-
right position.
In an accident, during hard braking or sud-
den maneuvers, loose items will be thrown
around inside the vehicle, and can cause
injury to vehicle occupants unless the items
are securely fastened in the vehicle.
Always use the cargo tie down rings
(�page 260).
!Always release the seat cushion and
fold it up before folding the seat back-
rests forward. The covering on the seat
backrest may otherwise be damaged.
When the rear bench seat is folded for-
ward, the front seats cannot be moved
to the rearmost position. Otherwise
you could damage the front seats and
the rear bench seat.