Page 151 of 539

150 Controls in detailControl systemThe control system is activated as soon as
the SmartKey in the starter switch is
turned to position1 or as soon as the
KEYLESS-GO start/stop button* is in
position1. The control system enables you
to:�
call up information about your vehicle
�
change vehicle settings
For example, you can use the control sys-
tem to find out when your vehicle is next
due for service, to set the language for
messages in the instrument cluster dis-
play, and much more.
The control system relays information to
the multifunction display.
Multifunction display
1Trip odometer
2Main odometer
3Gear position indicator (currently se-
lected gear position highlighted)
4Outside temperature
For more information on menus displayed
in the multifunction display, see “Menus”
(�page 153).
iThe displays for the audio systems (ra-
dio, CD player etc.) will appear in
English, regardless of the language
selected.
Warning!
G
A driver’s attention to the road and traffic
conditions must always be his/her primary
focus when driving.
For your safety and the safety of others, se-
lecting features through the multifunction
steering wheel should only be done by the
driver when traffic and road conditions per-
mit it to be done safely.
Bear in mind that at a speed of just 30 mph
(approximately 50 km/h), your vehicle is
covering a distance of 44 feet (approximate-
ly 14 m) every second.
Page 155 of 539
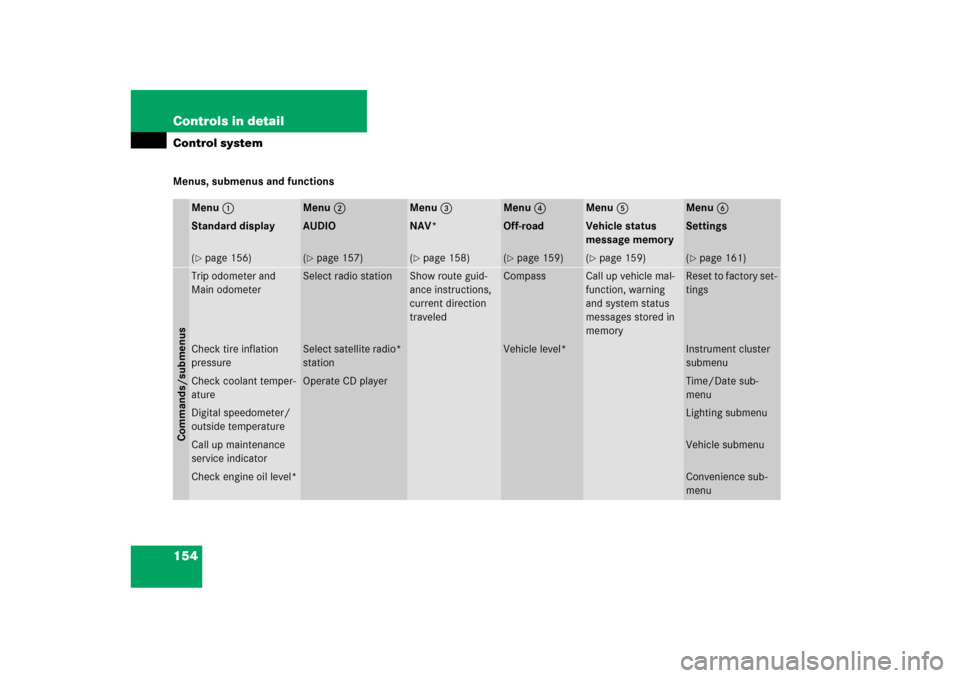
154 Controls in detailControl systemMenus, submenus and functions
Menu1
Menu2
Menu3
Menu4
Menu5
Menu6
Standard display
AUDIO
NAV*
Off-road
Vehicle status
message memory
Settings
(�page 156)
(�page 157)
(�page 158)
(�page 159)
(�page 159)
(�page 161)
Commands/submenusTrip odometer and
Main odometer
Select radio station
Show route guid-
ance instructions,
current direction
traveled
Compass
Call up vehicle mal-
function, warning
and system status
messages stored in
memory
Reset to factory set-
tings
Check tire inflation
pressure
Select satellite radio*
station
Vehicle level*
Instrument cluster
submenu
Check coolant temper-
ature
Operate CD player
Time/Date sub-
menu
Digital speedometer/
outside temperature
Lighting submenu
Call up maintenance
service indicator
Vehicle submenu
Check engine oil level*
Convenience sub-
menu
Page 159 of 539

158 Controls in detailControl system�
Press buttonk orj repeatedly
until the desired channel is found.Operate the CD player
�
Turn on the Modular COMAND System
and press AUDIO on the COMAND
headunit until you see the CD soft keys
for CD operation. Refer to separate
Modular COMAND System operating
instructions.
�
Press buttonè orÿ repeatedly
until you see the display for the CD
currently being played in the multifunc-
tion display.
1Current CD (for CD changer*)
2Current track
�
Press buttonk orj repeatedly
until the desired track is selected.
NAV* menu
The
NAV
menu contains the functions
needed to operate your navigation system.
�
Press buttonè orÿ repeatedly
until you see the navigation display in
the multifunction display:
�
If the Modular COMAND System is
switched off, the message
NAV off
is
shown in the display.
�
With the Modular COMAND System
switched on but route guidance not
activated, the direction of travel and, if
available, the name of the street cur-
rently traveled on appear in the multi-
function display.
iFeature description is based on prelim-
inary information available at time of
printing.
Additional optional satellite radio
equipment and a subscription to satel-
lite radio service provider are required
for satellite radio operation. At time of
printing, no date for the availability of
optional equipment required for satel-
lite radio operation had been set. Con-
tact an authorized Mercedes-Benz
Light Truck Center for details and avail-
ability for your vehicle.
For more information, refer to separate
Modular COMAND System operating
instructions.
iTo select a CD from the magazine,
press a number on the Modular
COMAND system key pad located in
the center console.
��
Page 160 of 539

159 Controls in detail
Control system
�
With the Modular COMAND system
switched on and route guidance acti-
vated, the direction of travel and
maneuver instructions appear in the
multifunction display.
Please refer to the COMAND manual for in-
structions on how to activate the route
guidance system.
Off-road menu
Use the
Off-road
menu to display the
settings for Air suspension* and compass.
�
Press buttonè orÿ repeatedly
until you see one of the following mes-
sages in the multifunction display (de-
pending on vehicle configuration):
Compass
Example Vehicle level* settings�
Press buttonk orj repeatedly
until the desired setting is found.
Vehicle status message memory menu
Use the vehicle status message memory
menu to scan malfunction and warning
messages that may be stored in the
system. Such messages appear in the mul-
tifunction display and are based on condi-
tions or system status the vehicle’s system
has recorded.Warning!
G
Malfunction and warning messages are only
indicated for certain systems and are inten-
tionally not very detailed. The malfunction
and warning messages are simply a remind-
er with respect to the operation of certain
systems and do not replace the owner’s
and/or driver’s responsibility to maintain
the vehicle’s operating safety by having all
required maintenance and safety checks
performed on the vehicle and by bringing
the vehicle to an authorized Mercedes-Benz
Light Truck Center to address the malfunc-
tion and warning messages.
Page 164 of 539
163 Controls in detail
Control system
The table below shows what settings can
be changed within the various menus. De-
tailed instructions on making individual
settings can be found on the following pag-
es.INSTRUMENT CLUSTER
TIME/DATE
LIGHTING
VEHICLE
CONVENIENCE
Select speedometer display
mode
Set time (hours)
Set daytime running
lamp mode (USA only)
Adjusting compass
zone
Activate easy-entry/exit
feature*
Select language
Set time (minutes)
Set locator lighting
Calibrating compass
Set parking position for
exterior rear view mirror*
Select display (speed display
or outside temperature) for
status line
Set date (month)
Exterior lamps delayed
shut-off
Display when ignition is
switched off
Set fold-in function for
exterior rear view mir-
rors*
Set date (day)
Interior lighting delayed
shut-off
Set automatic locking
Set date (year)
Limiting opening height
of tailgate*
Page 168 of 539

This function is not available if your vehicle
is equipped with the Modular COMAND
System and navigation module*.�
Move the selection marker to")
167 Controls in detail
Control system
Set date (year)
This function is not available if your vehicle
is equipped with the Modular COMAND
System and navigation module*.�
Move the selection marker to the Time/Date
submenu using theæ or
çbutton.
�
Press buttonj ork repeatedly
until you see this message in the dis-
play:
Date Set year
.
The selection marker is on the year set-
ting.
�
Press buttonæ orç to set the
year.Lighting submenu
Access the
Lighting
submenu via the
Settings...
menu. Use the
Lighting
submenu to change the lamp and lighting
settings on your vehicle. The following
functions are available:Setting daytime running lamp mode
(USA only)
�
Move the selection marker to the Lighting
submenu using theæ
orç button.
�
Press buttonj ork repeatedly
until you see this message in the dis-
play:
Light circuit headlamp mode
.
The selection marker is on the current
setting.
Function
Page
Set daytime running lamp mode
(USA only)
167
Set locator lighting
168
Exterior lamps delayed shut-off
169
Interior lighting delayed shut-off
170
iThis function is not available in coun-
tries where daytime running lamps are
mandatory.
��
Page 169 of 539

mode.
With daytime running lamp mode se-
lected and the exterior lamp switch at
positionM,")
168 Controls in detailControl system�
Pressæ orç to select
Manual
or
daytime running lamp (
Constant
)
mode.
With daytime running lamp mode se-
lected and the exterior lamp switch at
positionM, the following lamps will
come on automatically when the en-
gine is turned on:
�
Parking lamps and low beam
headlamps
�
License plate lamps (in low ambient
light conditions)Setting locator lighting
With the locator lighting feature activated
and the exterior lamp switch in
position
U
, the following lamps will
switch on during darkness when the vehi-
cle is unlocked with SmartKey:
�
Parking lamps
�
Tail lamps
�
License plate lamps
�
Side marker lamps
�
Front fog lamps
The locator lighting switches off when the
driver’s door is opened. It switches off au-
tomatically after a period of approximately
40 seconds.
iIf you turn the exterior lamp switch to
another position, the corresponding
lamp(s) will switch on.
For safety reasons, resetting the Lighting
submenu to factory settings
while driving will not reset the daytime
running lamp mode.
In the display you will then see the mes-
sage:
Lighting - Cannot be com-
pletely reset to factory settings
while driving.
��
Page 170 of 539

169 Controls in detail
Control system
�
Move the selection marker to the Lighting
submenu using theæ
orç button.
�
Press buttonj ork repeatedly
until you see this message in the dis-
play:
Function Surround lighting
.
The selection marker is on the current
setting.
�
Press buttonæ orç to select
the desired setting.
The locator lighting will be switched on
or off.
�
Turn the exterior lamp switch to
positionU when exiting the vehicle
(�page 138).Setting night security illumination
(Headlamps delayed shut-off)
Use this function to set whether and how
long you would like the exterior lamps to
illuminate during darkness after exiting the
vehicle and all doors closed.
With the delayed shut-off feature activated
and the exterior lamp switch in
position
U
before the engine is turned
off, the following lamps will switch on
when the engine is turned off:
�
Parking lamps
�
Tail lamps
�
License plate lamps
�
Side marker lamps
�
Front fog lamps
�
Move the selection marker to the Lighting
submenu using theæ
orç button.
�
Press buttonj ork repeatedly
until you see this message in the dis-
play:
Headlmp. delayed shut-off
.
The selection marker is on the current
setting.
iYou can reactivate this function within
ten minutes by opening a door.
If after turning off the engine you do not
open a door or do not close an opened
door, the lamps will automatically
switch off after 60 seconds.
��