Page 171 of 539

170 Controls in detailControl system�
Press buttonæ orç to select
the desired lamp-on period.
You can select:�
0 s
, the delayed shut-off feature is
deactivated.
�
15 s
, 30 s
, 45 s
or
60 s
, the delayed
shut-off feature is activated.
�
Turn the exterior lamp switch to posi-
tion U before turning the engine off.
You can temporarily deactivate the de-
layed shut-off feature:
�
Before leaving the vehicle, turn the
SmartKey in the starter switch to
position0.
�
Then turn the SmartKey in the starter
switch to position2 and back to0.
The delayed shut-off feature is deacti-
vated. It will reactivate as soon as you
reinsert the SmartKey in the starter
switch.Vehicles with KEYLESS-GO*:
�
Press KEYLESS-GO start/stop button
in the starter switch (
�page 35).
Interior lighting delayed shut-off
Use this function to set whether and for
how long you would like the interior light-
ing to remain lit during darkness after the
SmartKey is removed from the starter
switch.
�
Move the selection marker to the Lighting
submenu using theæ
orç button.
�
Press buttonj ork repeatedly
until you see this message in the dis-
play:
Int. illum. delayed shut-off
.
The selection marker is on the current
setting.
�
Press buttonæ orç to select
the desired lamp-on time period. You
can select:�
0 s
, the delayed shut-off feature is
deactivated.
�
5 s
, 10 s
, 15 s
, or
20 s
, the delayed
shut-off feature is activated.
��
Page 191 of 539
.
The transmission will automatically")
190 Controls in detailAutomatic transmissionShifting into optimal gear range�
Press and hold the inside of one of the
buttons1 on the steering wheel
(�page 189).
The transmission will automatically select
the gear range suited for optimal
acceleration and deceleration. This will
involve shifting down one or more gears.
Canceling gear range limit�
Press and hold the outside of one of the
buttons2 on the steering wheel
(�page 189) until
D reappears in the
multifunction display.
The transmission will shift from the current
gear range directly to gear rangeD.
Driving tips
Accelerator position
Your driving style influences the
transmission’s shifting behavior:
Less throttle Earlier upshifting
More throttle Later upshifting
Kickdown
Use kickdown when you want maximum
acceleration.�
Press the accelerator past the point of
resistance.
The transmission shifts into a lower
gear.
�
Ease on the accelerator when you have
reached the desired speed.
The transmission shifts up again.Stopping
When you stop briefly, e.g. at traffic lights:
�
Leave the transmission in gear.
�
Hold the vehicle with the brake.
When you stop longer with the engine
idling and/or on a hill:
�
Set the parking brake.
�
Shift into park positionP.
Maneuvering
When you maneuver in tight areas,
e.g. when pulling into a parking space:
�
Control the vehicle speed by gradually
releasing the brakes.
�
Accelerate gently.
�
Never abruptly step on the accelerator.
Page 193 of 539
192 Controls in detailAutomatic transmissionEmergency operation (Limp Home Mode)
If vehicle acceleration worsens or the
transmission no longer shifts, the trans-
mission is most likely operating in limp
home (emergency operation) mode. In this
mode only second gear and reverse gear
can be activated.�
Stop the vehicle.
�
Shift to park positionP.
�
Turn off the engine.
�
Wait at least ten seconds before
restarting.
�
Restart the engine.
�
Shift to drive positionD (for second
gear) or reverse gearR.
�
Have the transmission checked at an
authorized Mercedes-Benz Light Truck
Center as soon as possible.
Page 196 of 539

195 Controls in detail
Good visibility
Auto-dimming rear view mirror*
The reflection brightness of the exterior
rear view mirror on the driver’s side and
the interior rear view mirror will respond
automatically to glare when�
the ignition is switched on
�
incoming light from headlamps falls on
the sensor in the interior rear view
mirror
The rear view mirror will not react if
�
reverse gearR is engaged
�
the interior light is turned on
Warning!
G
The auto-dimming function does not react if
incoming light is not aimed directly at sen-
sors in the interior rear view mirror.
The interior rear view mirror and the exterior
rear view mirror on the driver’s side do not
react, for example, when transporting cargo
which covers the rear window.
Glare can endanger you and others.Warning!
G
In case of an accident, liquid electrolyte may
escape from the mirror housing if the mirror
glass breaks.
Electrolyte has an irritating effect. Do not
allow the liquid to come into contact with
eyes, skin, clothing, or respiratory system.
In case it does, immediately flush affected
area with water, and seek medical help if
necessary.
!Electrolyte drops coming into contact
with the vehicle paint finish can be
completely removed only while in the
liquid state and by applying plenty of
water.Warning!
G
Exercise care when using the passen-
ger-side exterior rear view mirror. The mirror
surface is convex (outwardly curved surface
for a wider field of view). Objects in mirror
are closer than they appear. Check your
interior rear view mirror or glance over your
shoulder before changing lanes.
Page 200 of 539
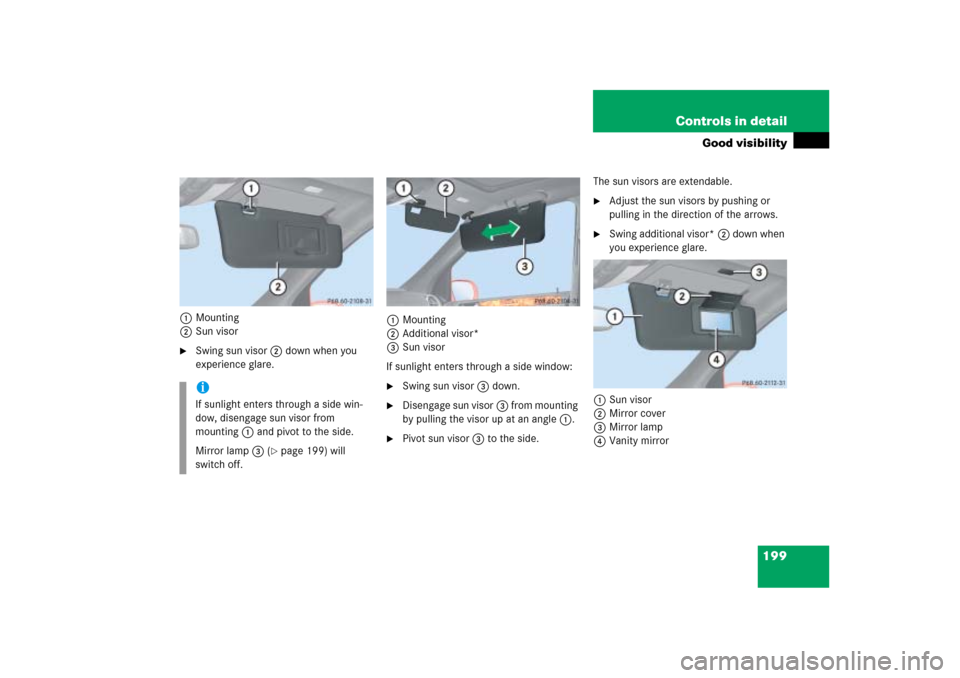
199 Controls in detail
Good visibility
1Mounting
2Sun visor�
Swing sun visor2 down when you
experience glare.1Mounting
2Additional visor*
3Sun visor
If sunlight enters through a side window:
�
Swing sun visor3 down.
�
Disengage sun visor3 from mounting
by pulling the visor up at an angle1.
�
Pivot sun visor3 to the side.The sun visors are extendable.
�
Adjust the sun visors by pushing or
pulling in the direction of the arrows.
�
Swing additional visor*2 down when
you experience glare.
1Sun visor
2Mirror cover
3Mirror lamp
4Vanity mirror
iIf sunlight enters through a side win-
dow, disengage sun visor from
mounting1 and pivot to the side.
Mirror lamp3 (
�page 199) will
switch off.
Page 208 of 539
 to separately adjust the air
temperature on each side of the passenger
compartment. You sho")
207 Controls in detail
Climate control
Setting the temperature
Use temperature controls1 and7
(�page 204) to separately adjust the air
temperature on each side of the passenger
compartment. You should raise or lower
the temperature setting in small incre-
ments, preferably starting at 72°F (22°C).
The climate control will adjust to the set
temperature as fast as possible.Increasing
�
Turn the temperature control1
and/or7 slightly to the right.
The climate control system will corre-
spondingly adjust the interior air tem-
perature.
Decreasing
�
Turn the temperature control1
and/or7 slightly to the left.
The climate control system will corre-
spondingly adjust the interior air tem-
perature.
Adjusting air distribution
Use air distribution control5,9, ora
(�page 204) to adjust the air distribution.
The following symbols are found on the
controls:
Adjusting manually
�
Press the desired air distribution con-
trol.
The indicator lamp on the buttonU
goes out.
Symbol
Function
Z
Directs air to the windshield
and side air vents
a
Directs air through the center
and side air vents
Y
Directs air to the footwells and
side air vents
Page 213 of 539

212 Controls in detailClimate controlActivating
Moist air can fog up the windows. You can
dehumidify the air with the air condition-
ing.�
Press button2 again.
The indicator lamp on button2
comes on.
The air conditioning uses the refrigerant
R134a. This refrigerant is free of CFCs
which are harmful to the ozone layer.
Residual heat and ventilation
With the engine switched off, it is possible
to continue to heat or ventilate the interior
for up to 30 minutes. This feature makes
use of the residual heat produced by the
engine.Activating
�
Turn the SmartKey in the starter switch
to position0or1, or remove it from
the starter switch.
�
Press buttonT (
�page 204).
The indicator lamp on buttonT
comes on.
Deactivating
�
Press buttonT (
�page 204).
The indicator lamp on buttonT
goes out.
!If the air conditioning cannot be turned
on again, this indicates that the air con-
ditioning is losing refrigerant. The com-
pressor has turned itself off.
Have the air conditioning checked at
the nearest authorized Mercedes-Benz
Light Truck Center.
iHow long the system will provide heat-
ing depends on the coolant tempera-
ture and the battery voltage.
Regardless of the temperature and air
volume set on the climate control panel
an interior temperature is aimed at by
72°F (22°C) and the blower runs for
the protection of the battery on low
stage.
Page 222 of 539

221 Controls in detail
3-zone automatic climate control*
Rear air conditioning
You can switch on and off the rear air con-
ditioning with the climate control panel in
the front.
Deactivating�
Press button> on the climate con-
trol panel (
�page 218).
The indicator lamp on button>
comes on. The rear air conditioning is
switched off. REAR OFF
appears in the
climate control display.
Activating
�
Press button> on the climate con-
trol panel (
�page 218).The indicator lamp on button>
goes out. The rear air conditioning is
adjusted automatically.
REAR ON
ap-
pears in the climate control display.
For more information on rear air condition-
ing, see “Rear air conditioning”
(
�page 227).
Setting the temperature
Use temperature control1 and9
(�page 218) to separately adjust the air
temperature on each side of the passenger
compartment. You should raise or lower
the temperature setting in small incre-
ments, preferably starting at 72°F (22°C).
The climate control will adjust to the set
temperature as fast as possible.Increasing
�
Turn the temperature control1
and/or9 slightly to the right.
The climate control system will corre-
spondingly adjust the interior air tem-
perature.
Decreasing
�
Turn the temperature control1
and/or9 slightly to the left.
The climate control system will corre-
spondingly adjust the interior air tem-
perature.
iFor information on operating the rear
climate control panel from the rear
seats, see “Rear air conditioning”
(�page 227).
iYou can switch on and off the rear air
conditioning by pressing the respective
button on the rear climate control pan-
el.

If vehicle acceleration worsens or the
transmission no longer shifts, the trans-
mission is most likely operating in l")