Page 45 of 202
43 Audio
Radio operation
Automatic seek tuning
�Press g or h.
or
�Push the joystick to gor G.
The radio will tune in to the next
receivable station (FM, AM) or channel
(WB) with descending/ascending
frequency depending on the direction
of seek.
WB direct channel selection
�Press a number key 1 through 7.Manual tuning (FM, AM)
�Activate the desired wave band
(
�page 41).
�Press g or h longer than 2 se-
conds.
The function rapidly scans the
frequencies.
�Press g or h repeatedly to
change the frequency step by step.
or
�Push the joystick to H or h.
Each push of the joystick will change
the frequency by one step.
FM Band
The frequency displayed will change in in-
crements of 0.2 MHz.
AM Band
Tuning will take place in increments of
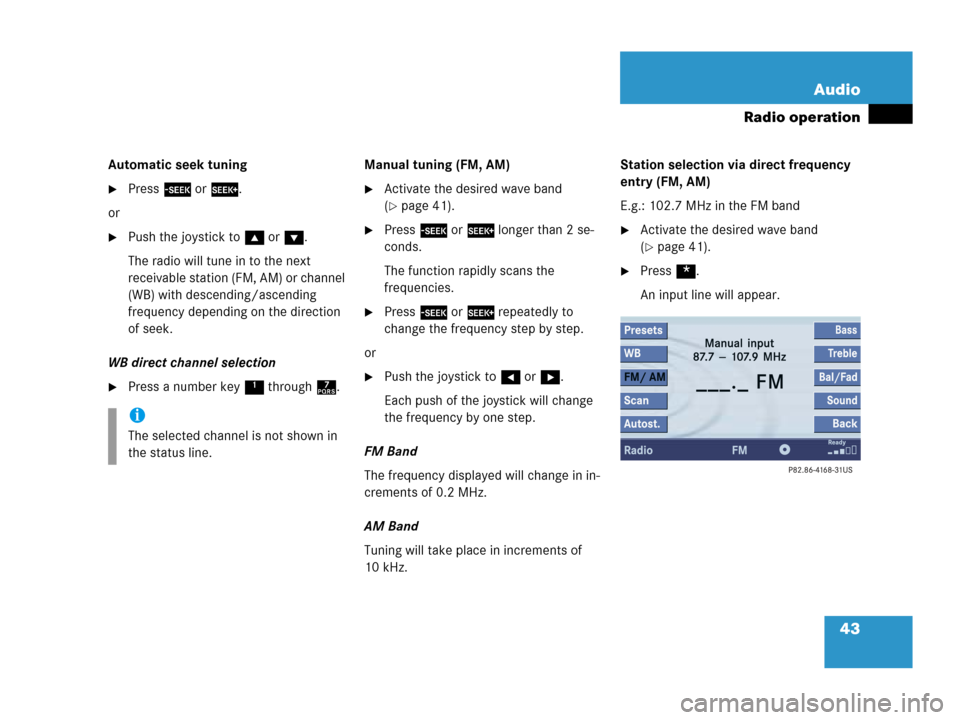
10 kHz.Station selection via direct frequency
entry (FM, AM)
E.g.: 102.7 MHz in the FM band
�Activate the desired wave band
(
�page 41).
�Press *.
An input line will appear.
i
The selected channel is not shown in
the status line.
Page 46 of 202

44 Audio
Radio operation
�Enter the desired frequency with the
number keys within 8 seconds, e.g.
1027 for 102.7 MHz.
The station you have selected will
begin to play.
FM, AM band
Entries outside the frequency range are
not accepted. The message
Please
observe frequency range 87.7 -
107.9 MHz
will appear briefly.Preset station selection via number
keypad
FM- and AM-Bands
�Press one of the number keys, such as
2 briefly.
The radio will tune to the frequency as-
signed to that memory location. If none
has been set by you, the radio will not
change the station.Automatic station scan (FM, AM)
The stations on the same band (FM, AM)
can be scanned one after the other for 8
seconds each.
Start scan function
�Activate the desired wave band
(
�page 41).
�Press the Scan soft key.
Frequency bandFrequency range
FM
AM87.7 - 107.9 MHz
530 - 1710 kHz
i
If you do not make another entry within
8 seconds, the function will be canceled
and you will continue listening to the
station last tuned to.
i
FM and AM presets are independent
and can only be accessed while in the
corresponding band.
Saving stations for FM and AM
(
�page 46).
i
In the AM band, two search runs take
place. During the first run, stations with
good reception are played. During the
second run, stations with weaker
reception are played.
Page 47 of 202
45 Audio
Radio operation
The scan function will begin.End scan function and play a station
�Press the Scan soft key again if you
hear the desired station.
or
The scan function stops automatically
when the first station received has been
scanned twice.
Page 48 of 202

�Saving stations automatically FM, AM
(
�page 48)
�Selecting a station from the FM/AM
preset menu (
�")
46 Audio
Radio operation
You can use the following functions:
�Saving stations manually (FM, AM)
�Saving stations automatically FM, AM
(
�page 48)
�Selecting a station from the FM/AM
preset menu (
�page 49)
�Selecting a station from the FM/AM
Auto presets (
�page 49)Saving stations manually (FM, AM)
In the Radio main menu
�Activate the desired wave band
(
�page 41).
�Press one of the number keys, e.g. 2,
longer than 2 seconds.
You will hear a verification beep if the
beep tones option was activated in the
system settings (
�page 178).
The radio saves the current station at
the memory preset selected. The me-
mory preset selected will appear in the
status bar, e.g.
FM2.On the memory list
�Activate the desired wave band
(
�page 41).
�Press the Presets soft key.
The memory Preset menu will appear.
�Push the joystick to H, h or g,
G to highlight the desired memory
preset.
Memory functions
i
There are 10 presets available (1 -
9, 0).
An existing entry is overwritten in the
memory list when a new input is given.
Page 49 of 202
47 Audio
Radio operation
�Press E longer than 2 seconds.
You will hear a verification beep if the
beep tones option was activated in the
system settings (
�page 178).
The current station will be saved at the
memory preset selected.You will see the Radio main menu
�automatically after 8 seconds
�if you press the Back soft key.
i
There are 2 presets for each of the FM
and AM waveband
�standard FM/AM presets (saving
stations manually) and
�Auto presets (saving stations
automatically).
The standard FM/AM presets are not
affected by the Auto presets. This is a
second option for storing a station ran-
ge you are currently receiving.
Page 50 of 202
48 Audio
Radio operation
Saving stations automatically (FM, AM)
�Activate the desired wave band
(
�page 41).
�Press the Autost. soft key.
The autostore preset menu will appear.
�Press E to start Begin new search.The autostore function is active. The
message
Autostore being
reloaded
will appear. The radio
stores the 10 stations with the
strongest signal. The station
frequencies available will appear in the
memory list.
i
There are max. 10 presets available (1
- 9, 0).
The autostore function assigns the sta-
tions to the memory locations in the or-
der of their reception quality. The
strongest station is available on
preset 1. The number of available
stations depends on the stations avai-
lable in the area the vehicle is operated
in.
Page 51 of 202

�Activate the FM or AM memory
(
�page 46).
You can use one of the following two ways
to select a station from the FM/AM
p")
49 Audio
Radio operation
Selecting a station from the preset
menu (FM, AM)
�Activate the FM or AM memory
(
�page 46).
You can use one of the following two ways
to select a station from the FM/AM
presets
�Press the corresponding number key,
e.g. 3, to select the desired station.
or
�Push the joystick to H, h or g,
G to highlight a memory preset in the
FM/AM preset list (
�page 46).
�Press E.
In both cases, you will see the main
radio menu
�automatically after 8 seconds
�if you press the Back soft key.
The Radio main menu indicating the
memory preset number.Selecting a station from the FM/AM
autostore presets
�Activate the FM or AM autostore preset
menu (
�page 48).
You can use one of the following two ways
to select a station from the FM/AM
autostore presets
�Press the corresponding number key,
e.g. 3, to select the desired station.
or
�Push the joystick to H, h or g,
G to highlight a memory position.
�Press E.
In both cases, you will see the main
radio menu
�automatically after 8 seconds
�if you press the Back soft key.
Page 52 of 202

50 Audio
CD operation
� CD operation
General Information on CD operation
WarningG
In order to avoid distraction which could
lead to an accident, the driver should insert
CDs with the vehicle at a standstill and
operate the audio system only if permitted
by road, weather and traffic conditions.
Bear in mind that at a speed of just 30 mph
(approximately 50 km/h), your car covers a
distance of 44 feet (approximately 14 m)
every second.
Health hazardG
The CD drive and CD changer* are Class 1
laser products. There is a danger of invisible
laser radiation when you open or damage
the cover.
Do not remove the cover. The CD drive and
the CD changer* do not contain any parts
which can be serviced by the user. For safe-
ty reasons, have any necessary service work
performed by qualified personnel.
i
Only use CDs, which bear the label
shown and that conform to the compact
standard (IEC 60908). You can there-
fore only use CDs with a maximum
thickness of 1.3 mm.
i
The system may not be able to
play CDs with copy protection or
copied CDs.
!
Use only CDs with a diameter of 12 cm,
do not use 8-cm CDs.
An 8-cm CD adapter may cause dama-
ge to the CD drive and to the CD chan-
ger* and should not be used.
i
Your CD drive has been designed to
play CDs which correspond to the IEC
60908 standard.
If you insert thicker data carriers, e.g.
ones that have data on both sides (one
side with DVD data, the other side with
audio data), they cannot be ejected
and will damage the drive.