Page 2793 of 3383

RF-18
SUNROOF
Revision: November 20092006 QX56
BCM Power Supply and Ground Circuit CheckEIS004W1
1. CHECK FUSE
Check the following BCM fuse and fusible link.
NOTE:
Refer to RF-10, "
Component Parts and Harness Connector Location" .
OK or NG
OK >> GO TO 2.
NG >> If fuse is blown, be sure to eliminate cause of problem before installing new fuse. Refer to PG-4,
"POWER SUPPLY ROUTING CIRCUIT" .
2. CHECK POWER SUPPLY CIRCUIT
1. Turn ignition switch OFF.
2. Disconnect BCM connectors.
3. Check voltage between BCM connectors M18 and M20 termi- nals 38, 70 and ground.
OK or NG
OK >> GO TO 3.
NG >> Repair or replace harness.
3. CHECK GROUND CIRCUIT
Check continuity between BCM connector M20 terminal 67 and
ground.
OK or NG
OK >> Power supply and ground circuit is OK.
NG >> Repair or replace harness.
Retained power operation does not operate properly. 1. Check the retained power operation mode setting
RF-112. BCM power supply and ground circuit checkRF-18
3. Door switch checkRF-21
4. Replace sunroof motor assemblyRF-27
Motor does not stop at the sunroof fully-open or fully-
closed position.1. Initialization procedure check
RF-11
2. Replace sunroof motor assemblyRF-27
Sunroof does not do the interruption detection.1. Replace sunroof motor assembly RF-27
SymptomDiagnostic procedure and repair order Refer to page
Component PartsTerminal No. (SIGNAL) AmpereNo. Location
BCM 38 (IGN power supply)
10A59 Fuse and relay box
70 (BAT power supply) 50Af Fuse and fusible link box
ConnectorTe r m i n a l s
ConditionVoltage
(Approx.)
(+) (– )
M18 38
Ground Ignition switch ON
Battery voltage
M20 70 Igniting switch OFF
WIIA0229E
Connector TerminalsContinuity
M20 67Ground YES
LIIA0915E
Page 2915 of 3383

SC-10
STARTING SYSTEM
Revision: November 20092006 QX56
STARTING SYSTEMPFP:23300
System DescriptionEKS00B7B
Power is supplied at all times:
�through 40A fusible link (letter m , located in the fuse and fusible link box)
�to ignition switch terminal B.
With the ignition switch in the START position, power is supplied:
�from ignition switch terminal ST
�to IPDM E/R terminal 21.
With the ignition switch in the ON or START position, power is supplied to IPDM E/R (intelligent power distribu-
tion module engine room) CPU.
With the selector lever in the P or N position, power is supplied:
�through A/T assembly terminal 9
�to IPDM E/R terminal 48.
Ground is supplied at all times:
�to IPDM E/R terminals 38 and 59
�through body grounds E9, E15 and E24.
Then the starter relay is turned on.
The IPDM E/R is energized and power is supplied:
�from terminal 19 of the IPDM E/R
�to terminal 1 of the starter motor windings.
The starter motor plunger closes and provides a closed circuit between the battery and the starter motor. The
starter motor is grounded to the cylinder block. With power and ground supplied, the starter motor operates.
Page 2920 of 3383

STARTING SYSTEMSC-15
C
DE
F
G H
I
J
L
M A
B
SC
Revision: November 2009 2006 QX56
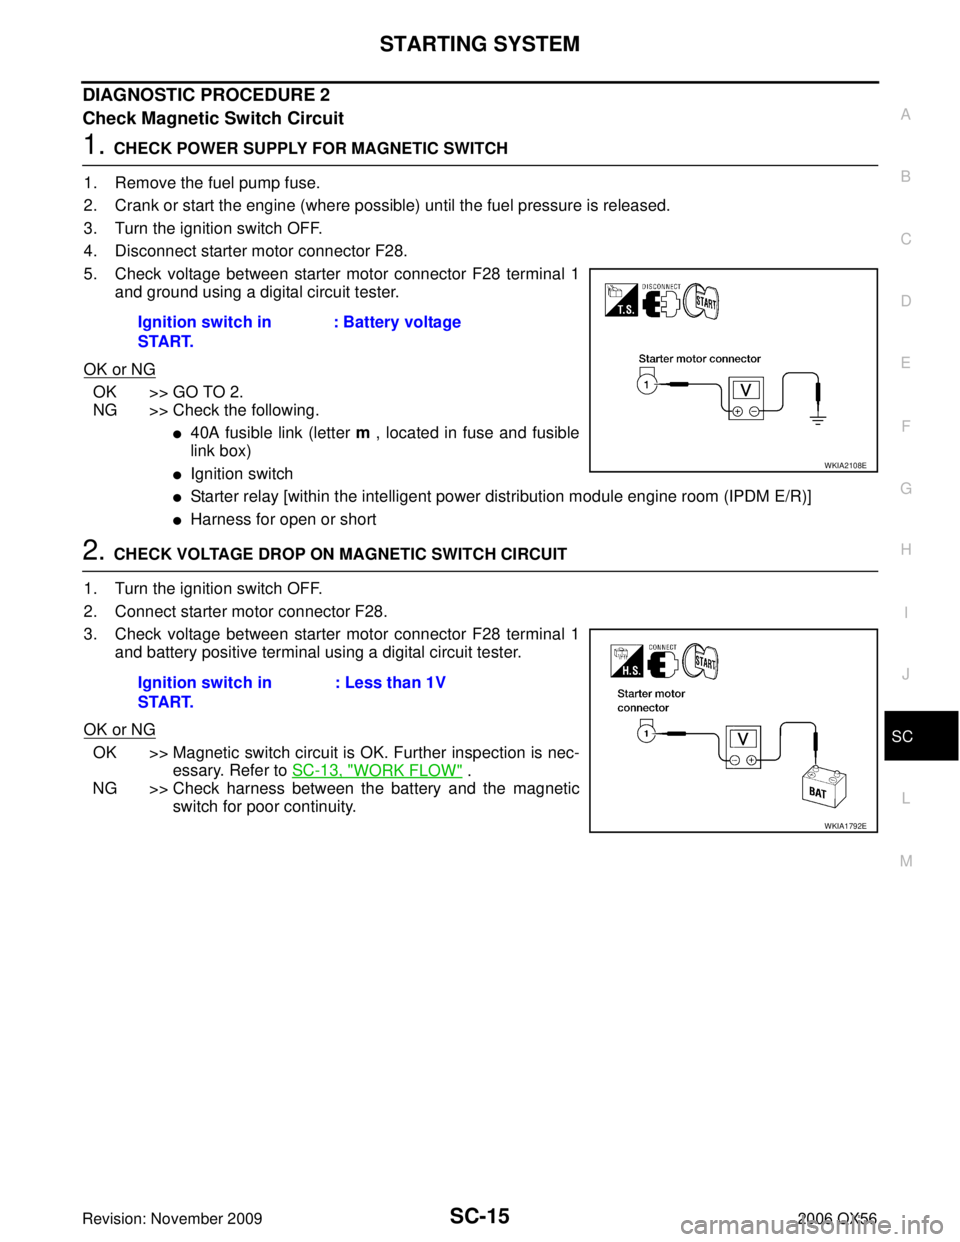
DIAGNOSTIC PROCEDURE 2
Check Magnetic Switch Circuit
1. CHECK POWER SUPPLY FOR MAGNETIC SWITCH
1. Remove the fuel pump fuse.
2. Crank or start the engine (where possible) until the fuel pressure is released.
3. Turn the ignition switch OFF.
4. Disconnect starter motor connector F28.
5. Check voltage between starter motor connector F28 terminal 1 and ground using a digital circuit tester.
OK or NG
OK >> GO TO 2.
NG >> Check the following.
�40A fusible link (letter m , located in fuse and fusible
link box)
�Ignition switch
�Starter relay [within the intelligent power distribution module engine room (IPDM E/R)]
�Harness for open or short
2. CHECK VOLTAGE DROP ON MAGNETIC SWITCH CIRCUIT
1. Turn the ignition switch OFF.
2. Connect starter motor connector F28.
3. Check voltage between starter motor connector F28 terminal 1 and battery positive terminal using a digital circuit tester.
OK or NG
OK >> Magnetic switch circuit is OK. Further inspection is nec- essary. Refer to SC-13, "
WORK FLOW" .
NG >> Check harness between the battery and the magnetic
switch for poor continuity.
Ignition switch in
START.
: Battery voltage
WKIA2108E
Ignition switch in
START. : Less than 1V
WKIA1792E
Page 2922 of 3383

CHARGING SYSTEMSC-17
C
DE
F
G H
I
J
L
M A
B
SC
Revision: November 2009 2006 QX56
CHARGING SYSTEMPFP:23100
System DescriptionEKS00B7H
The generator provides DC voltage to operate the vehicle's electrical system and to keep the battery charged.
The voltage output is controlled by the IC regulator.
Power is supplied at all times:
�to generator terminal 4
�through 10A fuse (No. 30, located in the fuse and fusible link box).
Terminal 1 supplies power to charge the battery and operate the vehicle's electrical system. Output voltage is
controlled by the IC regulator at terminal 4 detecting the input voltage. The charging circuit is protected by the
140A fusible link (letter a , located in the fusible link box).
Ground is supplied:
�to generator terminal 2
�through body ground E203.
With the ignition switch in the ON or START position, power is supplied:
�through 10A fuse [No. 14, located in the fuse block (J/B)]
�to combination meter terminal 24 for the charge warning lamp.
Ground is supplied to terminal 13 of the combination meter through terminal 3 of the generator. With power
and ground supplied, the charge warning lamp will illuminate. When the generator is providing sufficient volt-
age with the engine running, the ground is opened and the charge warning lamp will go off.
If the charge warning lamp illuminates with the engine running, a fault is indicated.
Page 2929 of 3383

SC-24
CHARGING SYSTEM
Revision: November 20092006 QX56
DIAGNOSTIC PROCEDURE 3
Check Voltage Regulator Circuit
1. CHECK VOLTAGE REGULATOR CIRCUIT CONNECTION
1. Turn the ignition switch OFF.
2. Check to see if terminal 4 is clean and tight.
OK or NG
OK >> GO TO 2.
NG >> Repair terminal 4 connection. Confirm repair by performing complete Battery/Starting/Charging system test.
2. CHECK VOLTAGE REGULATOR CIRCUIT
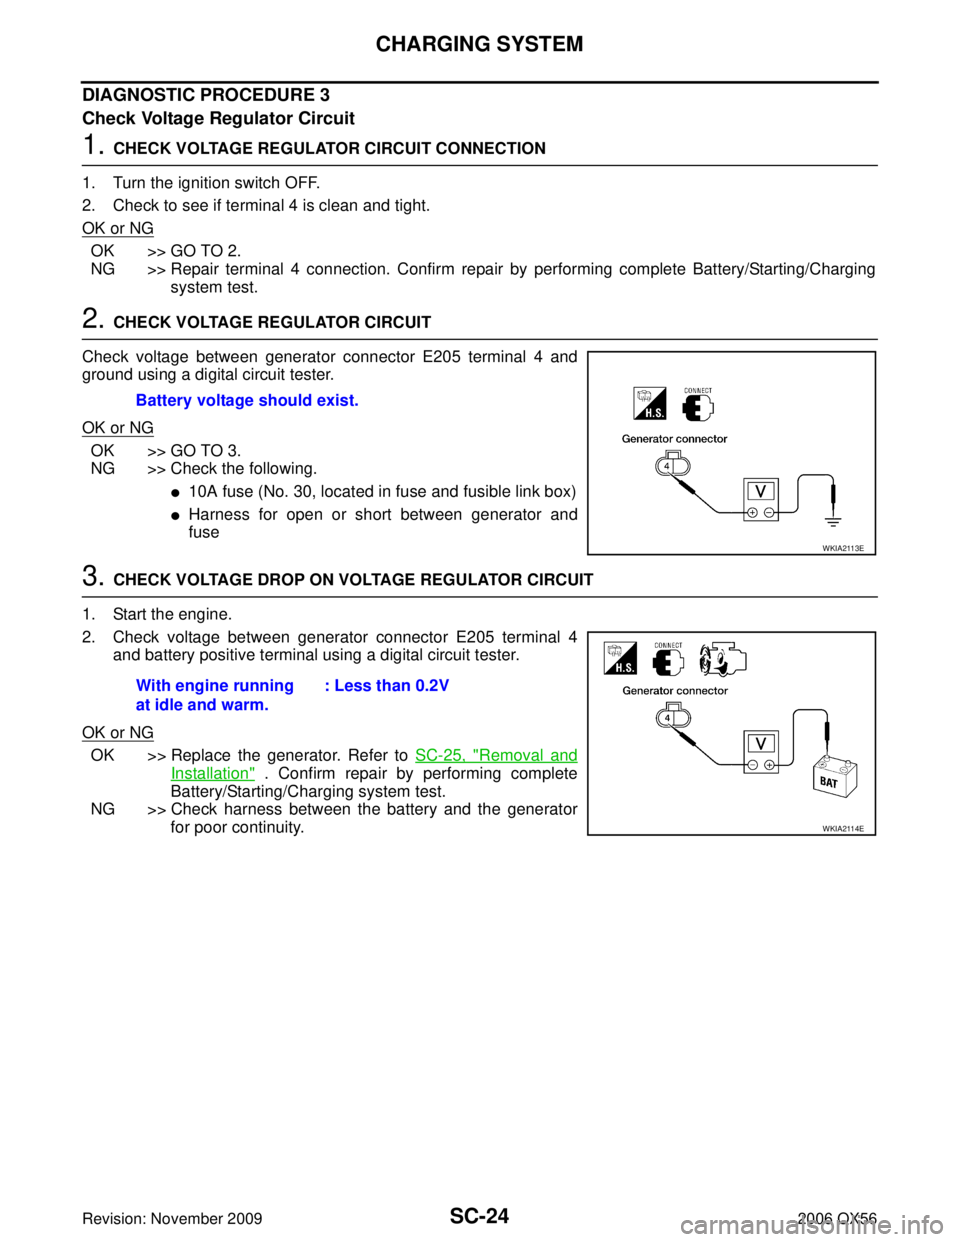
Check voltage between generator connector E205 terminal 4 and
ground using a digital circuit tester.
OK or NG
OK >> GO TO 3.
NG >> Check the following.
�10A fuse (No. 30, located in fuse and fusible link box)
�Harness for open or short between generator and
fuse
3. CHECK VOLTAGE DROP ON VOLTAGE REGULATOR CIRCUIT
1. Start the engine.
2. Check voltage between generator connector E205 terminal 4 and battery positive terminal using a digital circuit tester.
OK or NG
OK >> Replace the generator. Refer to SC-25, "Removal and
Installation" . Confirm repair by performing complete
Battery/Starting/Charging system test.
NG >> Check harness between the battery and the generator for poor continuity.
Battery voltage should exist.
WKIA2113E
With engine running
at idle and warm.
: Less than 0.2V
WKIA2114E
Page 2942 of 3383
AUTOMATIC DRIVE POSITIONERSE-11
C
DE
F
G H
J
K L
M A
B
SE
Revision: November 2009 2006 QX56
AUTOMATIC DRIVE POSITIONERPFP:28491
Component Parts And Harness Connector LocationEIS0058U
1. Fuse block (J/B)2. Fuse and relay box3. Fuse and fusible link box
4. A. Automatic drive positioner control unit M33, M34
B. Pedal adjusting motor E109,
E110 5. A. Steering column
B. Key switch and key lock solenoid
M27
C. BCM M18, M19, M20 (View with
instrument panel removed) 6. A. Door mirror remote control switch
D10
B. Seat memory switch D5
LIIA2361E
Page 3160 of 3383

TROUBLE DIAGNOSIS FOR SYSTEMTF-55
CE F
G H
I
J
K L
M A
B
TF
Revision: November 2009 2006 QX56
DIAGNOSTIC PROCEDURE
1. CHECK POWER SUPPLY
1. Turn ignition switch “OFF”. (Stay for at least 5 seconds.)
2. Connect transfer control unit harness connector.
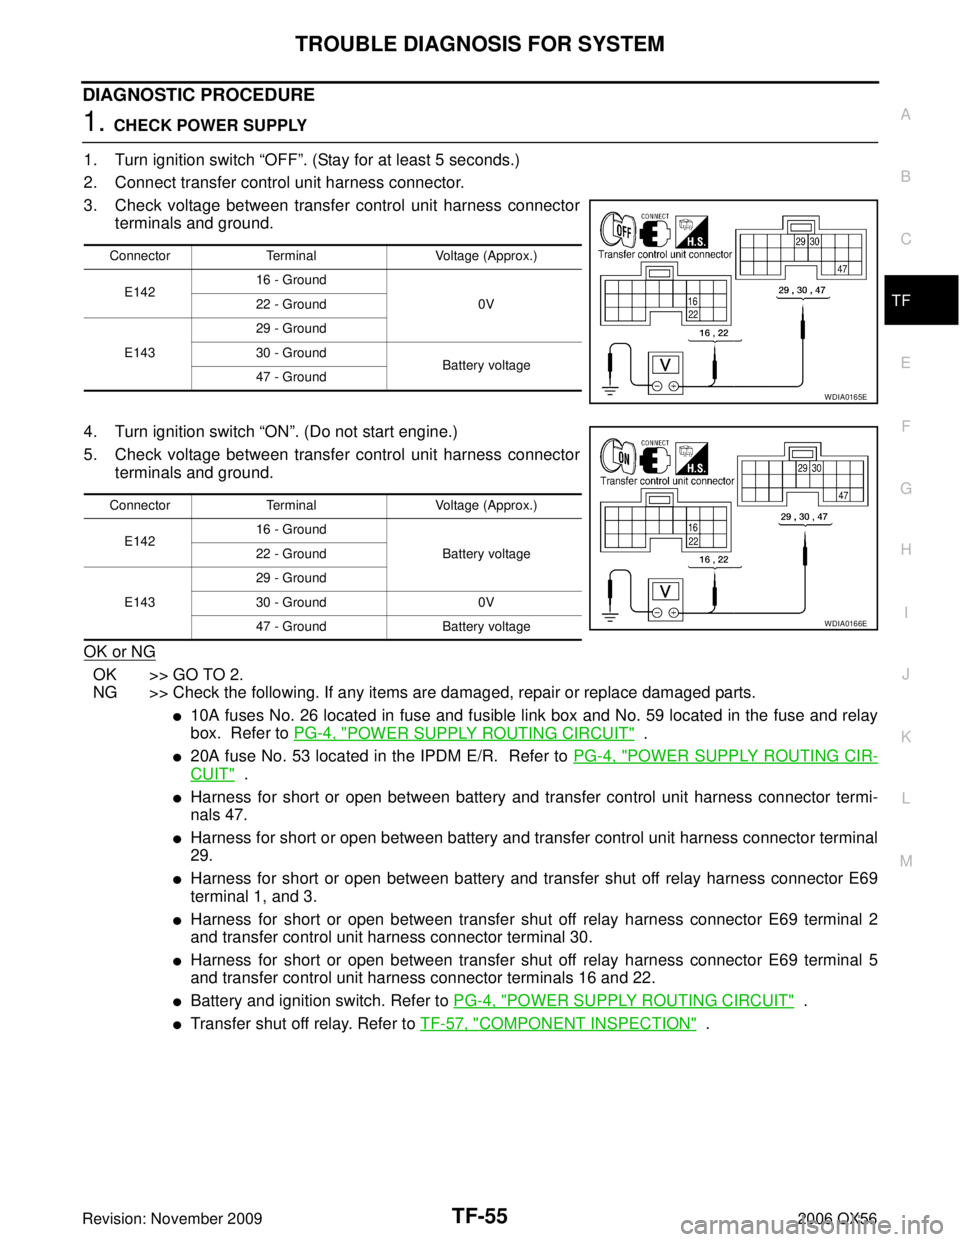
3. Check voltage between transfer control unit harness connector terminals and ground.
4. Turn ignition switch “ON”. (Do not start engine.)
5. Check voltage between transfer control unit harness connector terminals and ground.
OK or NG
OK >> GO TO 2.
NG >> Check the following. If any items are damaged, repair or replace damaged parts.
�10A fuses No. 26 located in fuse and fusible link box and No. 59 located in the fuse and relay
box. Refer to PG-4, "
POWER SUPPLY ROUTING CIRCUIT" .
�20A fuse No. 53 located in the IPDM E/R. Refer to PG-4, "POWER SUPPLY ROUTING CIR-
CUIT" .
�Harness for short or open between battery and transfer control unit harness connector termi-
nals 47.
�Harness for short or open between battery and transfer control unit harness connector terminal
29.
�Harness for short or open between battery and transfer shut off relay harness connector E69
terminal 1, and 3.
�Harness for short or open between transfer shut off relay harness connector E69 terminal 2
and transfer control unit harness connector terminal 30.
�Harness for short or open between transfer shut off relay harness connector E69 terminal 5
and transfer control unit harness connector terminals 16 and 22.
�Battery and ignition switch. Refer to PG-4, "POWER SUPPLY ROUTING CIRCUIT" .
�Transfer shut off relay. Refer to TF-57, "COMPONENT INSPECTION" .
ConnectorTerminal Voltage (Approx.)
E142 16 - Ground
0V
22 - Ground
E143 29 - Ground
30 - Ground
Battery voltage
47 - Ground
WDIA0165E
Connector Terminal Voltage (Approx.)
E142 16 - Ground
Battery voltage
22 - Ground
E143 29 - Ground
30 - Ground
0V
47 - Ground Battery voltage
WDIA0166E
Page 3187 of 3383

TF-82
TROUBLE DIAGNOSIS FOR SYSTEM
Revision: November 20092006 QX56
DIAGNOSTIC PROCEDURE
1. CHECK POWER SUPPLY
1. Turn ignition switch “ OFF”. (Stay for at least 5 seconds.)
2. Connect transfer control unit harness connector.
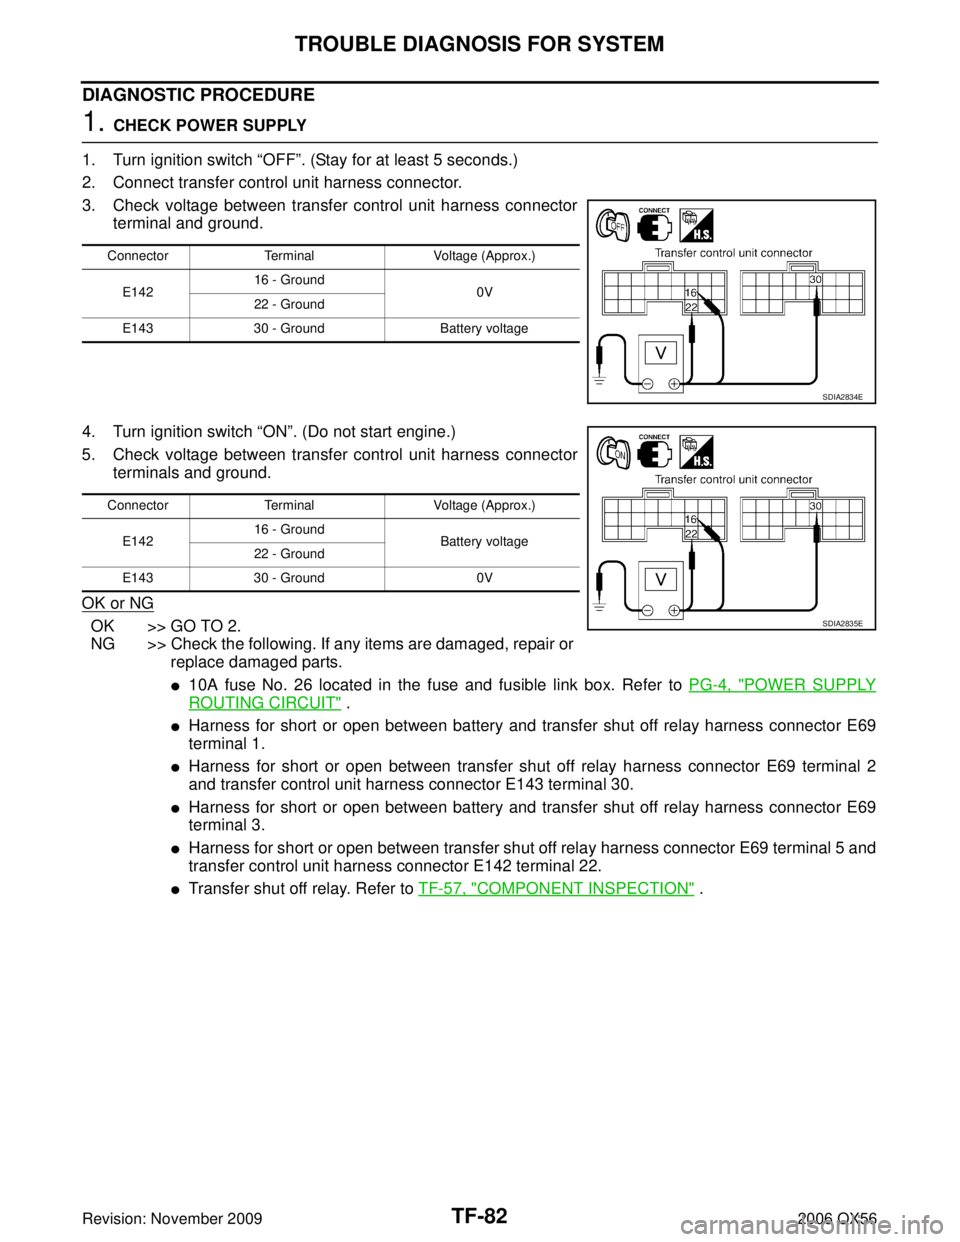
3. Check voltage between transfer control unit harness connector terminal and ground.
4. Turn ignition switch “ ON”. (Do not start engine.)
5. Check voltage between transfer control unit harness connector terminals and ground.
OK or NG
OK >> GO TO 2.
NG >> Check the following. If any items are damaged, repair or replace damaged parts.
�10A fuse No. 26 located in the fuse and fusible link box. Refer to PG-4, "POWER SUPPLY
ROUTING CIRCUIT" .
�Harness for short or open between battery and transfer shut off relay harness connector E69
terminal 1.
�Harness for short or open between transfer shut off relay harness connector E69 terminal 2
and transfer control unit harness connector E143 terminal 30.
�Harness for short or open between battery and transfer shut off relay harness connector E69
terminal 3.
�Harness for short or open between transfer shut off relay harness connector E69 terminal 5 and
transfer control unit harness connector E142 terminal 22.
�Transfer shut off relay. Refer to TF-57, "COMPONENT INSPECTION" .
ConnectorTerminal Voltage (Approx.)
E142 16 - Ground
0V
22 - Ground
E143 30 - Ground Battery voltage
SDIA2834E
ConnectorTerminal Voltage (Approx.)
E142 16 - Ground
Battery voltage
22 - Ground
E143 30 - Ground 0V
SDIA2835E