Page 1815 of 3383
EC-604Revision: November 2009
FUEL PUMP
2006 QX56
FUEL PUMPPFP:17042
DescriptionUBS00HDB
SYSTEM DESCRIPTION
*: ECM determines the start signal status by the signals of engine speed and battery voltage.
The ECM activates the fuel pump for several seconds after the ignition switch is turned ON to improve engine
startability. If the ECM receives a engine speed signal from the camshaft position sensor (PHASE), it knows
that the engine is rotating, and causes the pump to operate. If the engine speed signal is not received when
the ignition switch is ON, the engine stalls. The ECM stops pump operation and prevents battery discharging,
thereby improving safety. The ECM does not directly drive the fuel pump. It controls the ON/OFF fuel pump
relay, which in turn controls the fuel pump.
COMPONENT DESCRIPTION
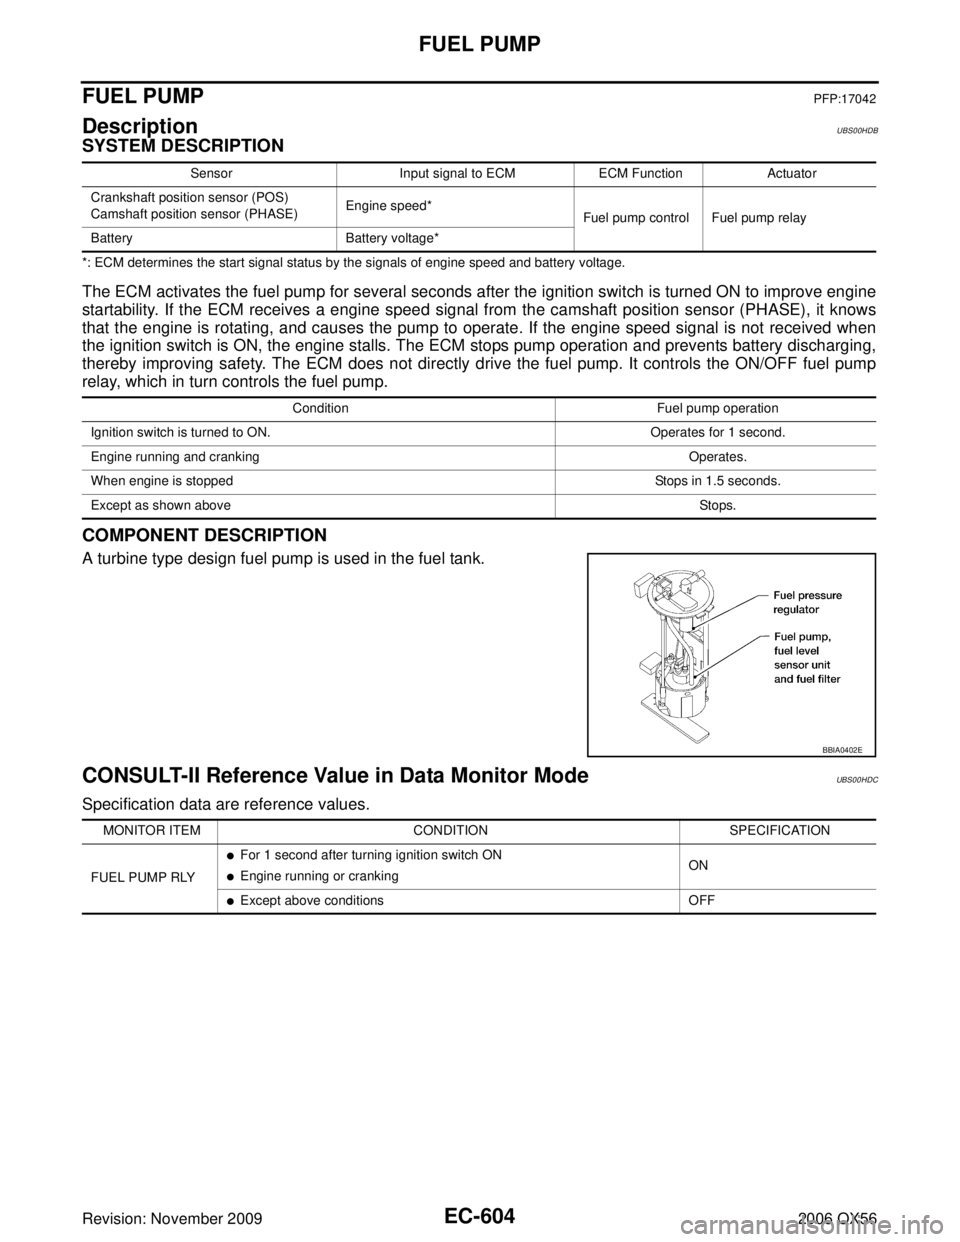
A turbine type design fuel pump is used in the fuel tank.
CONSULT-II Reference Value in Data Monitor ModeUBS00HDC
Specification data are reference values.
SensorInput signal to ECMECM FunctionActuator
Crankshaft position sensor (POS)
Camshaft position sensor (PHASE) Engine speed*
Fuel pump control Fuel pump relay
Battery Battery voltage*
Condition Fuel pump operation
Ignition switch is turned to ON. Operates for 1 second.
Engine running and cranking Operates.
When engine is stopped Stops in 1.5 seconds.
Except as shown above Sto ps.
BBIA0402E
MONITOR ITEMCONDITION SPECIFICATION
FUEL PUMP RLY
�For 1 second after turning ignition switch ON
�Engine running or cranking ON
�Except above conditions
OFF
Page 1817 of 3383
EC-606Revision: November 2009
FUEL PUMP
2006 QX56
Specification data are reference values and are measured between each terminal and ground.
CAUTION:
Do not use ECM ground terminals when measuring input/output voltage. Doing so may result in dam-
age to the ECM's transistor. Use a ground other than ECM terminals, such as the ground.
Diagnostic ProcedureUBS00HDE
1. CHECK OVERALL FUNCTION
1. Turn ignition switch ON.
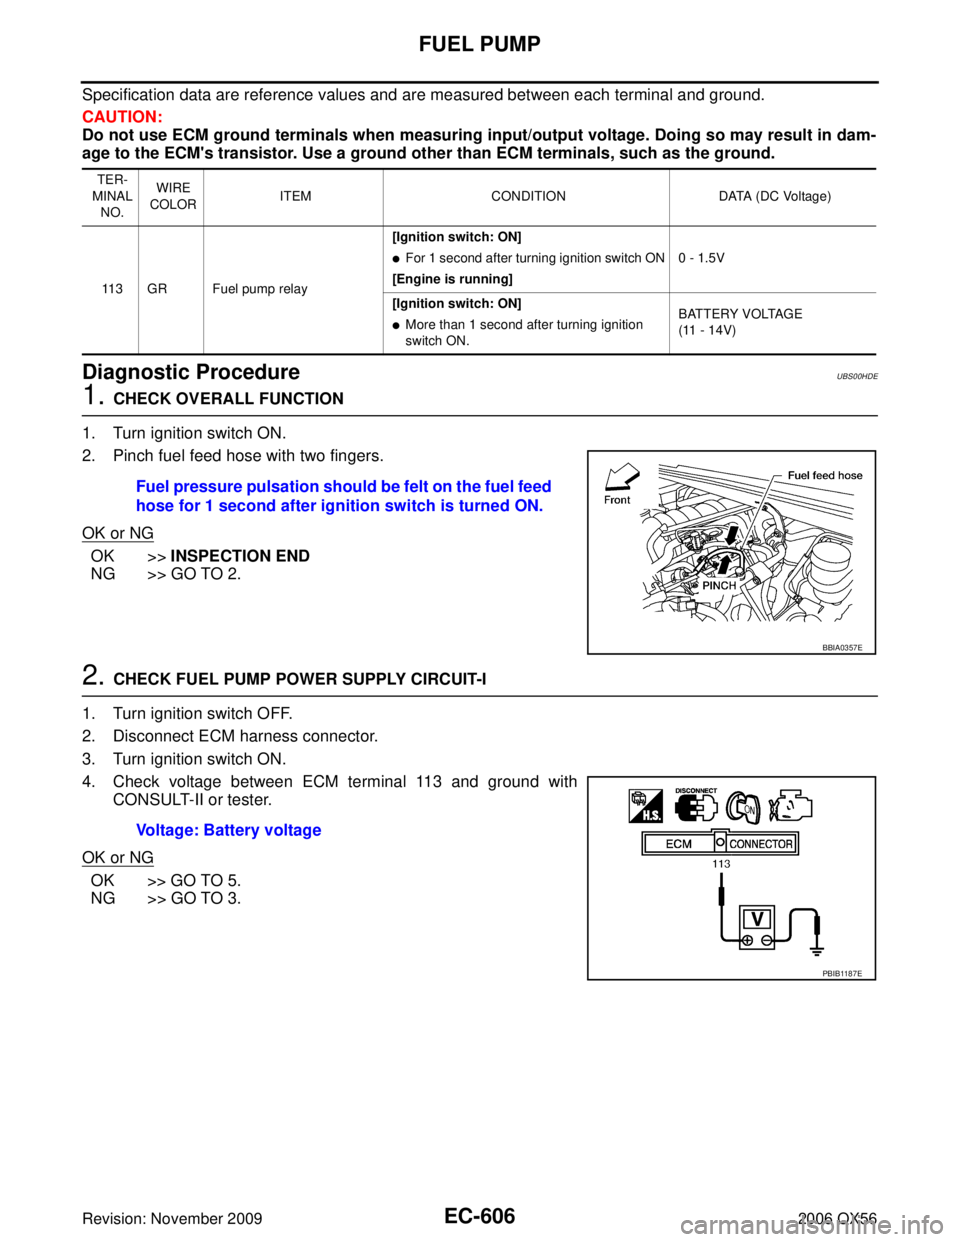
2. Pinch fuel feed hose with two fingers.
OK or NG
OK >> INSPECTION END
NG >> GO TO 2.
2. CHECK FUEL PUMP POWER SUPPLY CIRCUIT-I
1. Turn ignition switch OFF.
2. Disconnect ECM harness connector.
3. Turn ignition switch ON.
4. Check voltage between ECM terminal 113 and ground with CONSULT-II or tester.
OK or NG
OK >> GO TO 5.
NG >> GO TO 3.
TER-
MINAL NO. WIRE
COLOR ITEM
CONDITION DATA (DC Voltage)
11 3 G R F u e l p u m p r e l a y [Ignition switch: ON]
�For 1 second after turning ignition switch ON
[Engine is running] 0 - 1.5V
[Ignition switch: ON]
�More than 1 second after turning ignition
switch ON. BATTERY VOLTAGE
(11 - 14V)
Fuel pressure pulsation should be felt on the fuel feed
hose for 1 second after ignition switch is turned ON.
BBIA0357E
Voltage: Battery voltage
PBIB1187E
Page 1831 of 3383
EC-620Revision: November 2009
IGNITION SIGNAL
2006 QX56
Specification data are reference values and are measured between each terminal and ground.
CAUTION:
Do not use ECM ground terminals when measuring input/output voltage. Doing so may result in dam-
age to the ECM's transistor. Use a ground other than ECM terminals, such as the ground.
TER-
MINAL NO. WIRE
COLOR ITEM
CONDITION DATA (DC Voltage)
111 W / B ECM relay
(Self shut-off) [Engine is running]
[Ignition switch: OFF]
�For a few seconds after turning ignition
switch OFF
0 - 1.5V
[Ignition switch: OFF]
�More than a few seconds after turning igni-
tion switch OFF BATTERY VOLTAGE
(11 - 14V)
11 9
120 BR
BR
Power supply for ECM
[Ignition switch: ON] BATTERY VOLTAGE
(11 - 14V)
Page 1833 of 3383
EC-622Revision: November 2009
IGNITION SIGNAL
2006 QX56
Specification data are reference values and are measured between each terminal and ground.
Pulse signal is measured by CONSULT-II.
CAUTION:
Do not use ECM ground terminals when measuring input/output voltage. Doing so may result in dam-
age to the ECM's transistor. Use a ground other than ECM terminals, such as the ground.
: Average voltage for pulse signal (Actual pulse signal can be confirmed by oscilloscope.)TER-
MINAL NO. WIRE
COLOR ITEM
CONDITION DATA (DC Voltage)
46
60
61
62 L/R
GR/R
O/W
Y/R Ignition signal No. 7
Ignition signal No. 5
Ignition signal No. 3
Ignition signal No. 1 [Engine is running]
�Warm-up condition
�Idle speed
NOTE:
The pulse cycle changes depending on rpm at
idle. 0 - 0.2V
[Engine is running]
�Warm-up condition
�Engine speed: 2,000 rpm. 0.1 - 0.4V
PBIB0044E
PBIB0045E
Page 1835 of 3383
EC-624Revision: November 2009
IGNITION SIGNAL
2006 QX56
Specification data are reference values and are measured between each terminal and ground.
Pulse signal is measured by CONSULT-II.
CAUTION:
Do not use ECM ground terminals when measuring input/output voltage. Doing so may result in dam-
age to the ECM's transistor. Use a ground other than ECM terminals, such as the ground.
: Average voltage for pulse signal (Actual pulse signal can be confirmed by oscilloscope.)
Diagnostic ProcedureUBS00L1C
1. CHECK ENGINE START
Turn ignition switch OFF, and restart engine.
Is engine running?
Ye s o r N o
Yes (With CONSULT-II)>>GO TO 2.
Yes (Without CONSULT-II)>>GO TO 3.
No >> GO TO 4.
2. CHECK OVERALL FUNCTION
With CONSULT-II
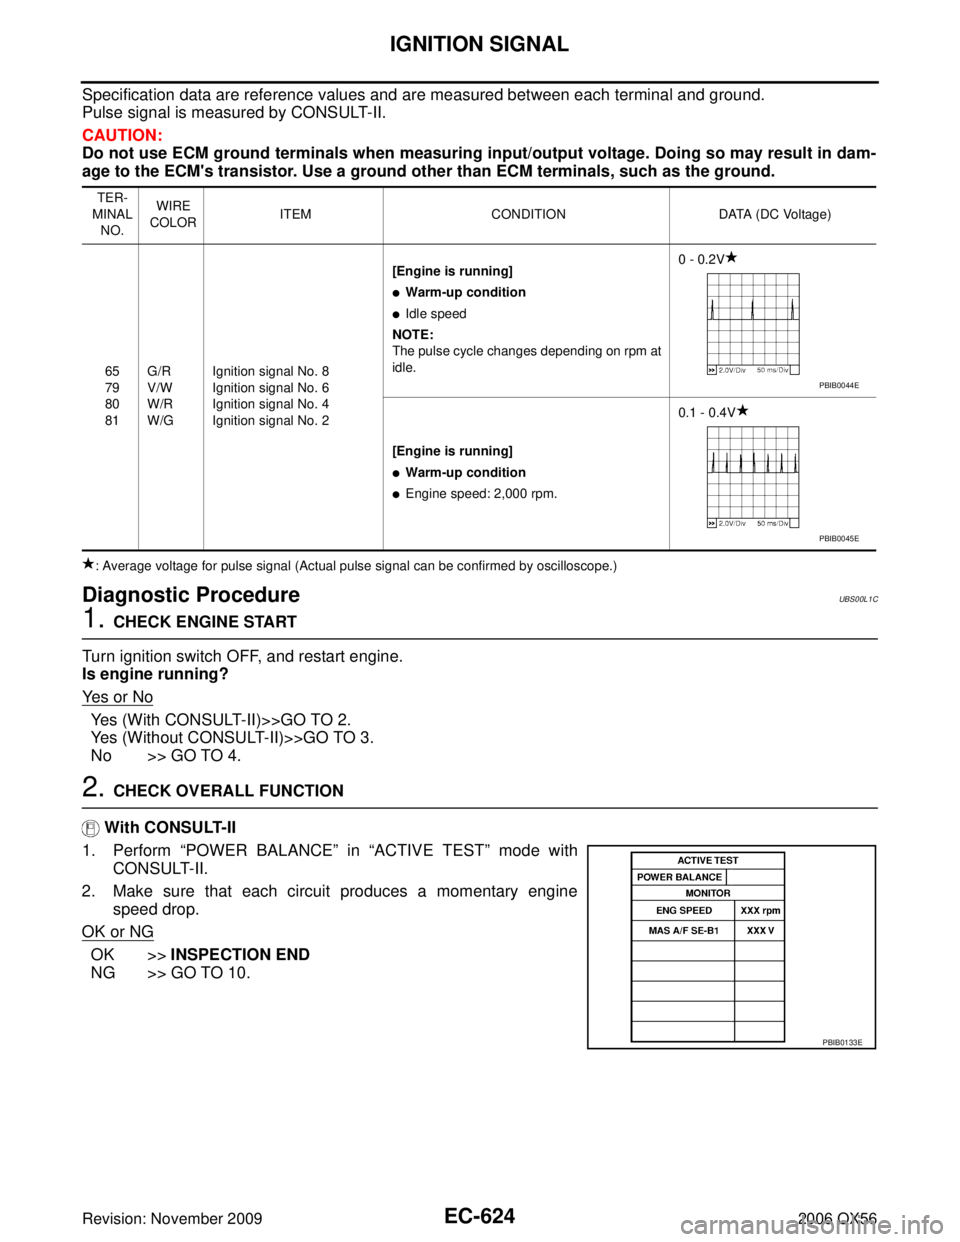
1. Perform “POWER BALANCE ” in “ACTIVE TEST” mode with
CONSULT-II.
2. Make sure that each circuit produces a momentary engine speed drop.
OK or NG
OK >> INSPECTION END
NG >> GO TO 10.
TER-
MINAL NO. WIRE
COLOR ITEM
CONDITION DATA (DC Voltage)
65
79
80
81 G/R
V/W
W/R
W/G Ignition signal No. 8
Ignition signal No. 6
Ignition signal No. 4
Ignition signal No. 2 [Engine is running]
�Warm-up condition
�Idle speed
NOTE:
The pulse cycle changes depending on rpm at
idle. 0 - 0.2V
[Engine is running]
�Warm-up condition
�Engine speed: 2,000 rpm. 0.1 - 0.4V
PBIB0044E
PBIB0045E
PBIB0133E
Page 1836 of 3383
IGNITION SIGNALEC-625
C
DE
F
G H
I
J
K L
M A
EC
Revision: November 2009 2006 QX56
3. CHECK OVERALL FUNCTION
Without CONSULT-II
1. Let engine idle.
2. Read the voltage signal between ECM terminals 46, 60, 61, 62, 65, 79, 80, 81 and ground with an oscilloscope.
3. Verify that the oscilloscope screen shows the signal wave as shown below.
NOTE:
The pulse cycle changes depending on rpm at idle.
OK or NG
OK >> INSPECTION END
NG >> GO TO 10.
4. CHECK IGNITION COIL POWER SUPPLY CIRCUIT-I
1. Turn ignition switch OFF, wait at least 10 seconds and then turn ON.
2. Check voltage between ECM terminals 119, 120 and ground with CONSULT-II or tester.
OK or NG
OK >> GO TO 5.
NG >> Go to EC-145, "
POWER SUPPLY AND GROUND CIR-
CUIT" .
PBIB2094E
PBIB0044E
Voltage: Battery voltage
MBIB0034E
Page 1840 of 3383
IGNITION SIGNALEC-629
C
DE
F
G H
I
J
K L
M A
EC
Revision: November 2009 2006 QX56
7. Remove fuel pump fuse in fuse block No. 1 to release fuel pres-
sure.
NOTE:
Do not use CONSULT-II to release fuel pressure, or fuel pres-
sure applies again during the following procedure.
8. Start engine.
9. After engine stalls, crank it two or three times to release all fuel pressure.
10. Turn ignition switch OFF.
11. Remove all ignition coil harness connectors to avoid the electri- cal discharge from the ignition coils.
12. Remove ignition coil and spark plug of the cylinder to be checked.
13. Crank engine for 5 seconds or more to remove combustion gas in the cylinder.
14. Connect spark plug and harness connector to ignition coil.
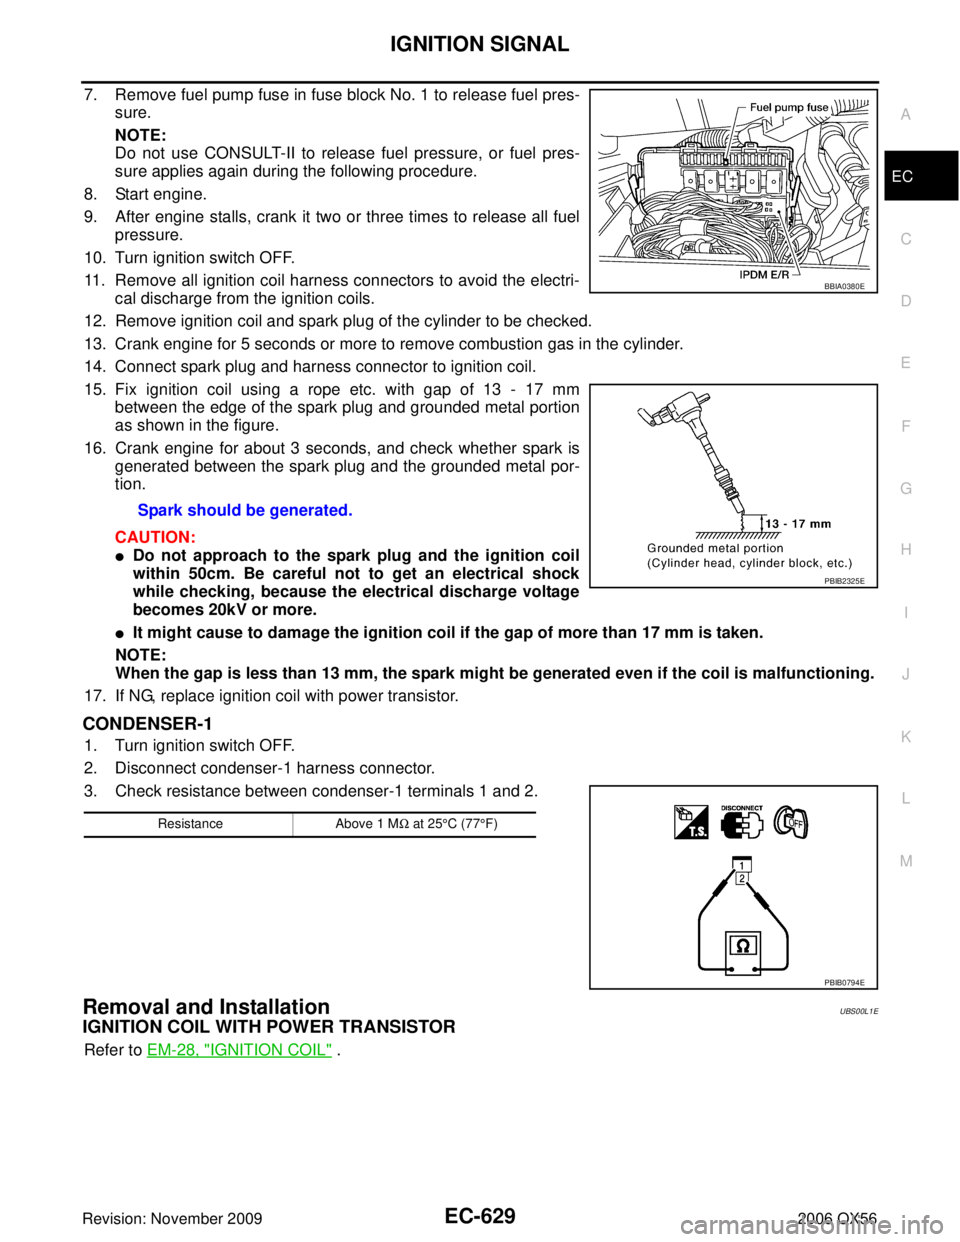
15. Fix ignition coil using a rope etc. with gap of 13 - 17 mm between the edge of the spark plug and grounded metal portion
as shown in the figure.
16. Crank engine for about 3 seconds, and check whether spark is generated between the spark plug and the grounded metal por-
tion.
CAUTION:
�Do not approach to the spark plug and the ignition coil
within 50cm. Be careful not to get an electrical shock
while checking, because the electrical discharge voltage
becomes 20kV or more.
�It might cause to damage the ignition coil if the gap of more than 17 mm is taken.
NOTE:
When the gap is less than 13 mm, the spark might be generated even if the coil is malfunctioning.
17. If NG, replace ignition coil with power transistor.
CONDENSER-1
1. Turn ignition switch OFF.
2. Disconnect condenser-1 harness connector.
3. Check resistance between condenser-1 terminals 1 and 2.
Removal and InstallationUBS00L1E
IGNITION COIL WITH POWER TRANSISTOR
Refer to EM-28, "IGNITION COIL" .
Spark should be generated.
BBIA0380E
PBIB2325E
Resistance
Above 1 MΩ at 25 °C (77 °F)
PBIB0794E
Page 1843 of 3383
EC-632Revision: November 2009
REFRIGERANT PRESSURE SENSOR
2006 QX56
Specification data are reference values and are measured between each terminal and ground.
CAUTION:
Do not use ECM ground terminals when measuring input/output voltage. Doing so may result in dam-
age to the ECM's transistor. Use a ground other than ECM terminals, such as the ground.
Diagnostic ProcedureUBS00HDJ
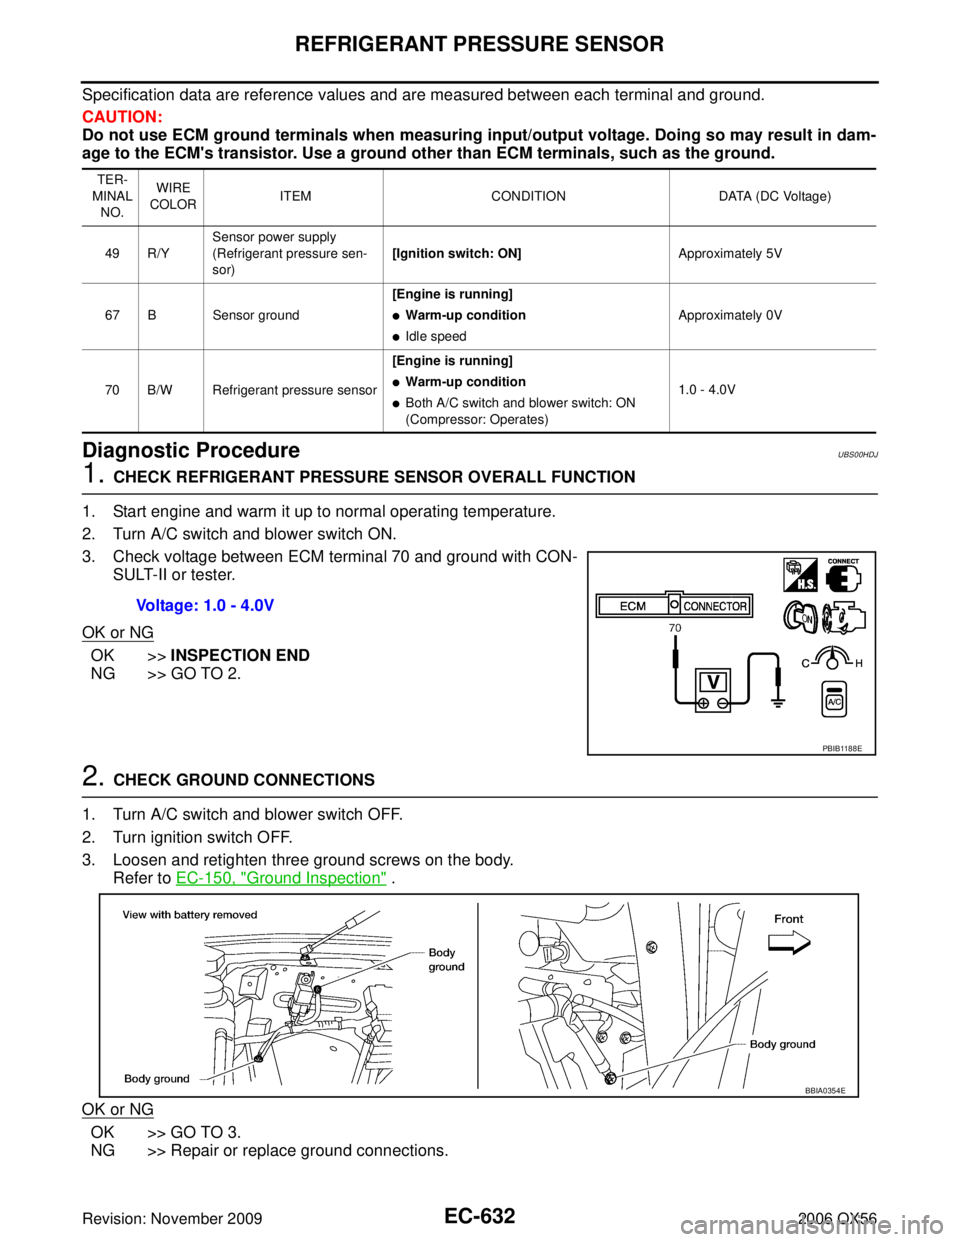
1. CHECK REFRIGERANT PRESSURE SENSOR OVERALL FUNCTION
1. Start engine and warm it up to normal operating temperature.
2. Turn A/C switch and blower switch ON.
3. Check voltage between ECM terminal 70 and ground with CON- SULT-II or tester.
OK or NG
OK >> INSPECTION END
NG >> GO TO 2.
2. CHECK GROUND CONNECTIONS
1. Turn A/C switch and blower switch OFF.
2. Turn ignition switch OFF.
3. Loosen and retighten three ground screws on the body. Refer to EC-150, "
Ground Inspection" .
OK or NG
OK >> GO TO 3.
NG >> Repair or replace ground connections.
TER-
MINAL NO. WIRE
COLOR ITEM
CONDITION DATA (DC Voltage)
49 R/Y Sensor power supply
(Refrigerant pressure sen-
sor)
[Ignition switch: ON]
Approximately 5V
67 B Sensor ground [Engine is running]
�Warm-up condition
�Idle speedApproximately 0V
70 B/W Refrigerant pressure sensor [Engine is running]
�Warm-up condition
�Both A/C switch and blower switch: ON
(Compressor: Operates)1.0 - 4.0V
Voltage: 1.0 - 4.0V
PBIB1188E
BBIA0354E