Page 3249 of 3383
TF-144
TRANSFER OIL FILTER
Revision: November 20092006 QX56
3. Apply ATF to the two new O-rings (1), and install them on the oil
filter (2).
CAUTION:
Do not reuse O-rings.
4. Install the oil filter to the transfer assembly. Tighten the bolts to the specified torque. Refer to TF-146, "
COMPONENTS" .
CAUTION:
�Do not damage oil filter.
�Attach oil filter and tighten bolts evenly.
5. Check the transfer fluid. Refer to TF-11, "
TRANSFER FLUID" .
6. Start the engine and let it run for one minute. Then stop the engine and recheck the transfer fluid. Refer to TF-11, "
TRANS-
FER FLUID" .
WDIA0285E
SDIA2136E
Page 3250 of 3383

TRANSFER ASSEMBLYTF-145
CE F
G H
I
J
K L
M A
B
TF
Revision: November 2009 2006 QX56
TRANSFER ASSEMBLYPFP:33100
Removal and InstallationEDS003BF
REMOVAL
1. Remove the drain plug and gasket. Drain the fluid. Refer to TF-11, "DRAINING" .
2. Remove the A/T undercover using power tool.
3. Remove the center exhaust tube and main muffler. Refer to EX-3, "
Removal and Installation" .
4. Remove the front and rear propeller shafts. Refer to PR-4, "
Removal and Installation" (front), PR-8,
"Removal and Installation" (rear).
CAUTION:
Do not damage spline, sleeve yoke and rear oil seal when removing rear propeller shaft.
NOTE:
Insert a plug into the rear oil seal after removing the rear propeller shaft.
5. Remove the A/T nuts from the A/T crossmember.
6. Position two suitable jacks under the A/T and transfer assembly.
7. Remove the crossmember. Refer to AT- 2 4 6 , "
COMPONENTS" .
WARNING:
Support A/T and transfer assembly using two suitable jacks while removing crossmember.
8. Disconnect the electrical connectors from the following:
�AT P s w i t c h
�Neutral 4LO switch
�Wait detection switch
�Transfer motor
�Transfer control device
�Transfer terminal cord assembly
9. Disconnect each air breather hose from the following. Refer to TF-139, "
Removal and Installation" .
�Actuator
�Breather tube (transfer)
�Transfer motor (case connector)
10. Remove the transfer control device from the extension housing.
11. Remove the transfer to A/T and A/T to transfer bolts. WARNING:
Support transfer assembly with suitable jack while removing it.
12. Remove the transfer assembly.
INSTALLATION
Installation is in the reverse order of removal.
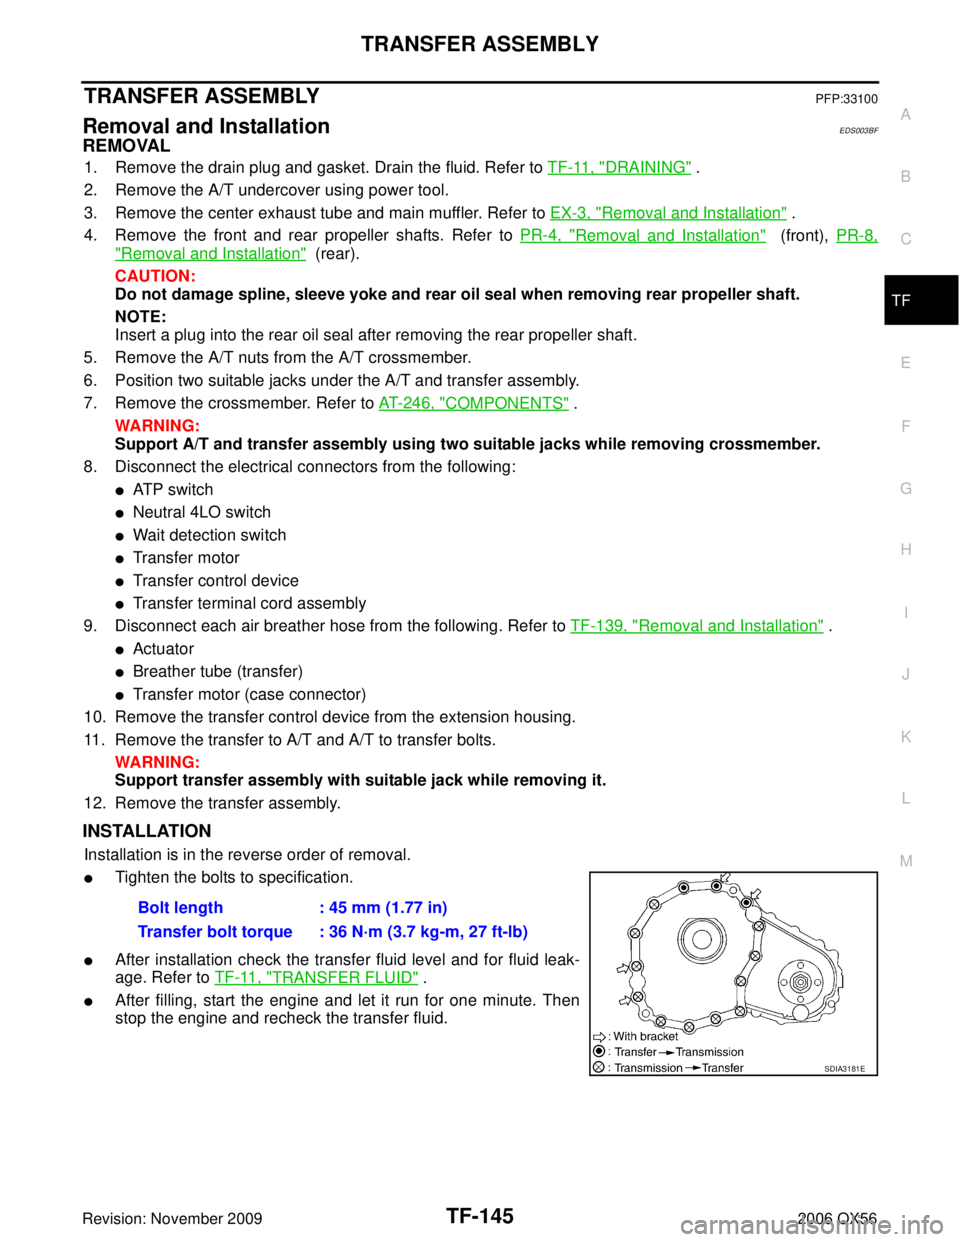
�Tighten the bolts to specification.
�After installation check the transfer fluid level and for fluid leak-
age. Refer to TF-11, "
TRANSFER FLUID" .
�After filling, start the engine and let it run for one minute. Then
stop the engine and recheck the transfer fluid.Bolt length : 45 mm (1.77 in)
Transfer bolt torque : 36 N·m (3.7 kg-m, 27 ft-lb)
SDIA3181E
Page 3331 of 3383

WW-4
FRONT WIPER AND WASHER SYSTEM
Revision: November 20092006 QX56
FRONT WIPER AND WASHER SYSTEMPFP:28810
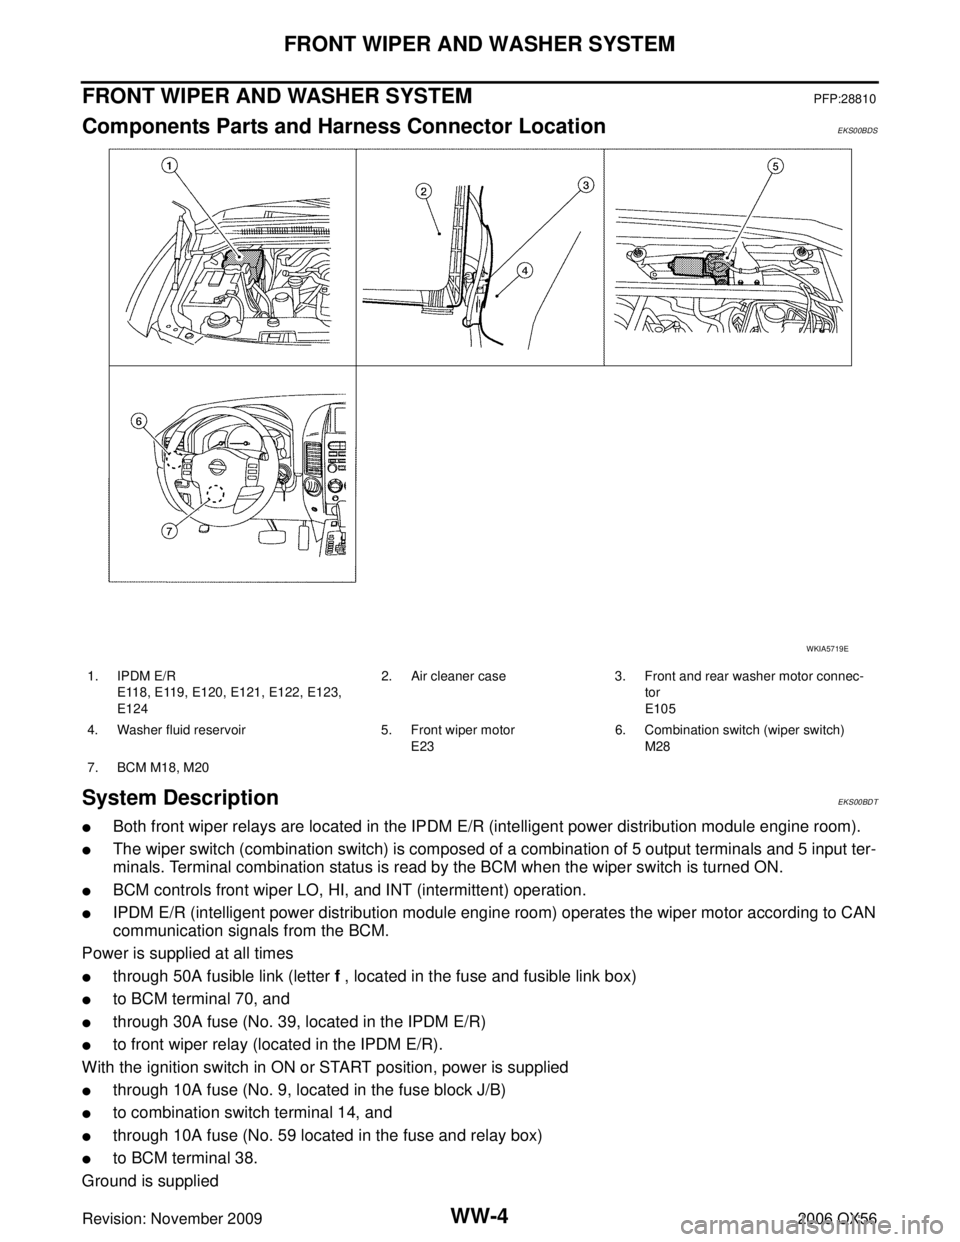
Components Parts and Harness Connector LocationEKS00BDS
System DescriptionEKS00BDT
�Both front wiper relays are located in the IPDM E/R (intelligent power distribution module engine room).
�The wiper switch (combination switch) is composed of a combination of 5 output terminals and 5 input ter-
minals. Terminal combination status is read by the BCM when the wiper switch is turned ON.
�BCM controls front wiper LO, HI, and INT (intermittent) operation.
�IPDM E/R (intelligent power distribution module engine room) operates the wiper motor according to CAN
communication signals from the BCM.
Power is supplied at all times
�through 50A fusible link (letter f , located in the fuse and fusible link box)
�to BCM terminal 70, and
�through 30A fuse (No. 39, located in the IPDM E/R)
�to front wiper relay (located in the IPDM E/R).
With the ignition switch in ON or START position, power is supplied
�through 10A fuse (No. 9, located in the fuse block J/B)
�to combination switch terminal 14, and
�through 10A fuse (No. 59 located in the fuse and relay box)
�to BCM terminal 38.
Ground is supplied
WKIA5719E
1. IPDM E/R E118, E119, E120, E121, E122, E123,
E124 2. Air cleaner case 3. Front and rear washer motor connec-
tor
E105
4. Washer fluid reservoir 5. Front wiper motor E236. Combination switch (wiper switch)
M28
7. BCM M18, M20