2006 INFINITI M35 power steering
[x] Cancel search: power steeringPage 4275 of 5621
![INFINITI M35 2006 Factory Service Manual LAN-606
[CAN]
CAN SYSTEM (TYPE 12)
Revision: 2006 January2006 M35/M45
19. CHECK SYMPTOM
1. Fill in described symptoms on the column “Symptom” in the check sheet.
2. Connect all connectors, and the INFINITI M35 2006 Factory Service Manual LAN-606
[CAN]
CAN SYSTEM (TYPE 12)
Revision: 2006 January2006 M35/M45
19. CHECK SYMPTOM
1. Fill in described symptoms on the column “Symptom” in the check sheet.
2. Connect all connectors, and the](/manual-img/42/57023/w960_57023-4274.png)
LAN-606
[CAN]
CAN SYSTEM (TYPE 12)
Revision: 2006 January2006 M35/M45
19. CHECK SYMPTOM
1. Fill in described symptoms on the column “Symptom” in the check sheet.
2. Connect all connectors, and then make sure that the symptom is reproduced.
OK or NG
OK >> GO TO 20.
NG >> Refer to LAN-18, "
Example of Filling in Check Sheet When Initial Conditions Are Not Reproduced"
.
20. CHECK UNIT REPRODUCIBILITY
Performs the following procedure for each unit, and then perform reproducibility test.
1. Turn ignition switch OFF.
2. Disconnect the battery cable from the negative terminal.
3. Disconnect the unit connector.
4. Connect the battery cable to the negative terminal.
5. Make sure that the symptom filled in the “Symptom” of the check sheet is reproduced. (Do not confuse it
with the symptom related to removed unit.)
6. Make sure that the same symptom is reproduced.
–A/T assembly
–AWD control unit
–BCM
–Low tire pressure warning control unit
–Steering angle sensor
–Intelligent Key unit
–Unified meter and A/C amp.
–NAVI control unit
–Driver seat control unit
–ABS actuator and electric unit (control unit)
–ECM
–IPDM E/R
Check results
Reproduce>>Install removed unit, and then check the other unit.
Not reproduced>>Replace removed unit.
IPDM E/R Ignition Relay Circuit InspectionNKS0045Y
Check the following. If no malfunction is found, replace the IPDM E/R.
IPDM E/R power supply circuit. Refer to PG-30, "Check IPDM E/R Power Supply and Ground Circuit" .
Ignition power supply circuit. Refer to PG-12, "IGNITION POWER SUPPLY — IGNITION SW. IN “ON”
AND/OR “START”" .
Page 4427 of 5621
![INFINITI M35 2006 Factory Service Manual LAN-758
[CAN]
CAN SYSTEM (TYPE 15)
Revision: 2006 January2006 M35/M45
22. CHECK UNIT REPRODUCIBILITY
Performs the following procedure for each unit, and then perform reproducibility test.
1. Turn igni INFINITI M35 2006 Factory Service Manual LAN-758
[CAN]
CAN SYSTEM (TYPE 15)
Revision: 2006 January2006 M35/M45
22. CHECK UNIT REPRODUCIBILITY
Performs the following procedure for each unit, and then perform reproducibility test.
1. Turn igni](/manual-img/42/57023/w960_57023-4426.png)
LAN-758
[CAN]
CAN SYSTEM (TYPE 15)
Revision: 2006 January2006 M35/M45
22. CHECK UNIT REPRODUCIBILITY
Performs the following procedure for each unit, and then perform reproducibility test.
1. Turn ignition switch OFF.
2. Disconnect the battery cable from the negative terminal.
3. Disconnect the unit connector.
4. Connect the battery cable to the negative terminal.
5. Make sure that the symptom filled in the “Symptom” of the check sheet is reproduced. (Do not confuse it
with the symptom related to removed unit.)
6. Make sure that the same symptom is reproduced.
–A/T assembly
–AWD control unit
–AFS control unit
–BCM
–LDW camera unit
–Low tire pressure warning control unit
–Steering angle sensor
–Intelligent Key unit
–Unified meter and A/C amp.
–NAVI control unit
–Pre-crash seat belt control unit
–Driver seat control unit
–ABS actuator and electric unit (control unit)
–ICC sensor integrated unit
–ECM
–IPDM E/R
Check results
Reproduce>>Install removed unit, and then check the other unit.
Not reproduced>>Replace removed unit.
IPDM E/R Ignition Relay Circuit InspectionNKS00484
Check the following. If no malfunction is found, replace the IPDM E/R.
IPDM E/R power supply circuit. Refer to PG-30, "Check IPDM E/R Power Supply and Ground Circuit" .
Ignition power supply circuit. Refer to PG-12, "IGNITION POWER SUPPLY — IGNITION SW. IN “ON”
AND/OR “START”" .
Page 4430 of 5621
LT-3
C
D
E
F
G
H
I
J
L
MA
B
LT
Revision: 2006 January2006 M35/M45 OUTLINE ...........................................................136
AFS OPERATION .............................................137
HEADLAMP AUTO AIMING OPERATION ........139
CAN COMMUNICATION SYSTEM DESCRIP-
TION ..................................................................139
CAN COMMUNICATION UNIT .........................139
Component Parts Description ..............................140
AFS CONTROL UNIT .......................................140
SWIVEL ACTUATOR ........................................140
AIMING MOTOR ...............................................140
AFS SWITCH ....................................................141
HEIGHT SENSOR ............................................141
STEERING ANGLE SENSOR ..........................141
IPDM E/R ..........................................................141
ECM ..................................................................141
TCM ..................................................................141
UNIFIED METER AND A/C AMP. .....................141
COMBINATION METER ...................................141
Schematic ............................................................142
Wiring Diagram — AFS — ...................................143
Terminals and Reference Values for AFS Control
Unit .......................................................................149
How to Proceed with Trouble Diagnosis ..............151
Preliminary Check ................................................151
CONSULT-II Function (ADAPTIVE LIGHT) ..........152
CONSULT-II BASIC OPERATION .....................152
WORK SUPPORT (STEERING ANGLE SEN-
SOR ADJUSTMENT) ........................................153
WORK SUPPORT (LEVELIZER ADJUSTMENT)
.153
SELF-DIAG RESULTS ......................................154
DATA MONITOR ...............................................158
ACTIVE TEST ...................................................160
Symptom Chart ....................................................161
DTC B2503 SWIVEL ACTUATOR RH .................162
DTC B2504 SWIVEL ACTUATOR LH ..................168
DTC B2514 HI SEN UNUSUAL RR .....................174
DTC B2521 ECU CIRC ........................................178
AFS Operation Check (Function Test) .................181
Auto Aiming Operation Check (Function Test) .....183
AFS Switch Does Not Operate .............................185
Auto Aiming Does Not Operate (Check Aiming
Motor System Circuit) ..........................................
.187
AFS OFF Indicator Does Not Operate .................190
Removal and Installation of Steering Angle Sensor .190
Removal and Installation of Front Combination
Lamp ....................................................................190
Removal and Installation of AFS Control Unit ......191
REMOVAL ........................................................
.191
INSTALLATION .................................................191
Removal and Installation of AFS Switch ..............191
REMOVAL ........................................................
.191
INSTALLATION .................................................191
Removal and Installation of Height Sensor ..........192
REMOVAL ........................................................
.192
INSTALLATION .................................................192
FRONT FOG LAMP ................................................193
Component Parts and Harness Connector Location .193
System Description ..............................................193OUTLINE ...........................................................194
COMBINATION SWITCH READING FUNCTION .195
EXTERIOR LAMP BATTERY SAVER CONTROL .195
CAN Communication System Description ............195
CAN Communication Unit .....................................195
Schematic .............................................................196
Wiring Diagram — F/FOG — ................................197
Terminals and Reference Values for BCM ............201
Terminals and Reference Values for IPDM E/R ....202
How to Perform Trouble Diagnoses .....................202
Preliminary Check ................................................202
CHECK POWER SUPPLY AND GROUND CIR-
CUIT ..................................................................202
CONSULT-II Functions (BCM) ..............................203
CONSULT-II Functions (IPDM E/R) ......................203
Front Fog Lamps Do Not Illuminate (Both Sides) . 204
Front Fog Lamp Does Not Illuminate (One Side) . 207
Front Fog Lamps Do Not Turn OFF ......................208
Aiming Adjustment ................................................209
Bulb Replacement ................................................210
Removal and Installation ......................................210
REMOVAL ........................................................
.210
INSTALLATION .................................................210
TURN SIGNAL AND HAZARD WARNING LAMPS .211
Component Parts and Harness Connector Location .211
System Description ...............................................211
TURN SIGNAL OPERATION ............................211
HAZARD LAMP OPERATION ...........................212
COMBINATION SWITCH READING FUNCTION .213
CAN Communication System Description ............213
CAN Communication Unit .....................................213
Schematic .............................................................214
Wiring Diagram — TURN — .................................215
Terminals and Reference Values for BCM ............219
How to Perform Trouble Diagnoses .....................220
Preliminary Check ................................................221
CHECK POWER SUPPLY AND GROUND CIR-
CUIT ..................................................................221
CONSULT-II Functions (BCM) ..............................223
CONSULT-II BASIC OPERATION .....................223
DATA MONITOR ...............................................224
ACTIVE TEST ...................................................224
Turn Signal Lamp Does Not Operate ...................225
H a z a r d W a r n i n g L a m p D o e s N o t O p e r a t e B u t T u r n
Signal Lamp Operate ............................................227
Turn Signal Indicator Lamp Does Not Operate ....228
Bulb Replacement/Removal and Installation of Side
Turn Signal Lamp .................................................229
REMOVAL ........................................................
.229
INSTALLATION .................................................229
Bulb Replacement (Front Turn Signal Lamp) .......229
Bulb Replacement (Rear Turn Signal Lamp) ........229
Removal and Installation of Front Turn Signal Lamp .229
Removal and Installation of Rear Turn Signal Lamp .229
LIGHTING AND TURN SIGNAL SWITCH ..............230
Removal and Installation ......................................230
REMOVAL ........................................................
.230
INSTALLATION .................................................230
Switch Circuit Inspection ......................................230
Page 4564 of 5621
ACTIVE AFS
LT-137
C
D
E
F
G
H
I
J
L
MA
B
LT
Revision: 2006 January2006 M35/M45
AFS OPERATION
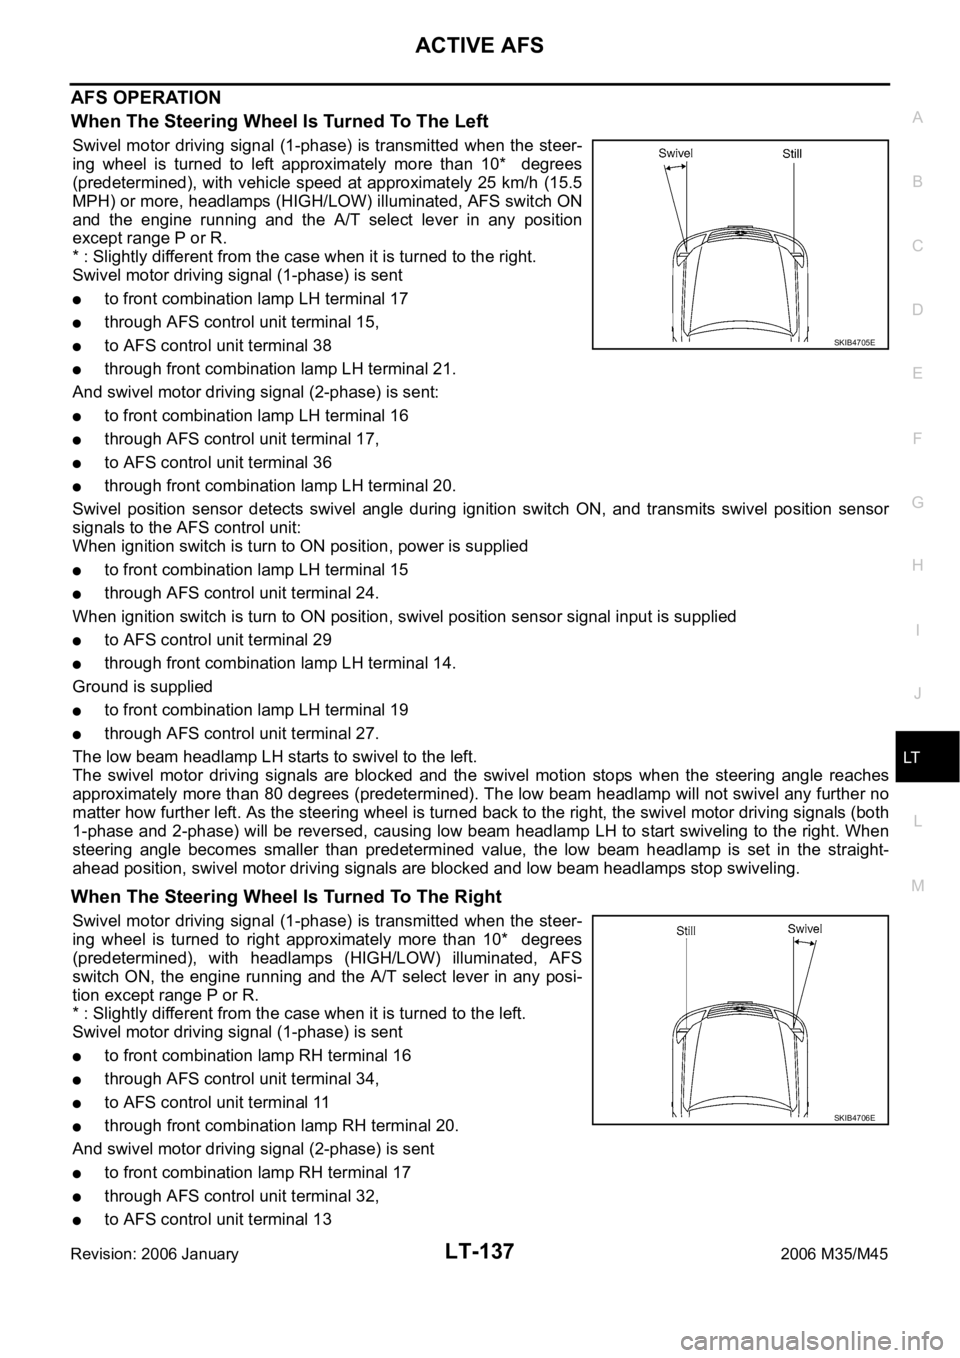
When The Steering Wheel Is Turned To The Left
Swivel motor driving signal (1-phase) is transmitted when the steer-
ing wheel is turned to left approximately more than 10* degrees
(predetermined), with vehicle speed at approximately 25 km/h (15.5
MPH) or more, headlamps (HIGH/LOW) illuminated, AFS switch ON
and the engine running and the A/T select lever in any position
except range P or R.
* : Slightly different from the case when it is turned to the right.
Swivel motor driving signal (1-phase) is sent
to front combination lamp LH terminal 17
through AFS control unit terminal 15,
to AFS control unit terminal 38
through front combination lamp LH terminal 21.
And swivel motor driving signal (2-phase) is sent:
to front combination lamp LH terminal 16
through AFS control unit terminal 17,
to AFS control unit terminal 36
through front combination lamp LH terminal 20.
Swivel position sensor detects swivel angle during ignition switch ON, and transmits swivel position sensor
signals to the AFS control unit:
When ignition switch is turn to ON position, power is supplied
to front combination lamp LH terminal 15
through AFS control unit terminal 24.
When ignition switch is turn to ON position, swivel position sensor signal input is supplied
to AFS control unit terminal 29
through front combination lamp LH terminal 14.
Ground is supplied
to front combination lamp LH terminal 19
through AFS control unit terminal 27.
The low beam headlamp LH starts to swivel to the left.
The swivel motor driving signals are blocked and the swivel motion stops when the steering angle reaches
approximately more than 80 degrees (predetermined). The low beam headlamp will not swivel any further no
matter how further left. As the steering wheel is turned back to the right, the swivel motor driving signals (both
1-phase and 2-phase) will be reversed, causing low beam headlamp LH to start swiveling to the right. When
steering angle becomes smaller than predetermined value, the low beam headlamp is set in the straight-
ahead position, swivel motor driving signals are blocked and low beam headlamps stop swiveling.
When The Steering Wheel Is Turned To The Right
Swivel motor driving signal (1-phase) is transmitted when the steer-
ing wheel is turned to right approximately more than 10* degrees
(predetermined), with headlamps (HIGH/LOW) illuminated, AFS
switch ON, the engine running and the A/T select lever in any posi-
tion except range P or R.
* : Slightly different from the case when it is turned to the left.
Swivel motor driving signal (1-phase) is sent
to front combination lamp RH terminal 16
through AFS control unit terminal 34,
to AFS control unit terminal 11
through front combination lamp RH terminal 20.
And swivel motor driving signal (2-phase) is sent
to front combination lamp RH terminal 17
through AFS control unit terminal 32,
to AFS control unit terminal 13
SKIB4705E
SKIB4706E
Page 4565 of 5621
LT-138
ACTIVE AFS
Revision: 2006 January2006 M35/M45
through front combination lamp RH terminal 21.
Swivel position sensor detects swivel angle during ignition switch ON, and transmits swivel position sensor
signals to the AFS control unit:
When ignition switch is turn to ON position, power is supplied
to front combination lamp RH terminal 15
through AFS control unit terminal 4.
When ignition switch is turn to ON position, swivel position sensor input signal is supplied
to AFS control unit terminal 9
through front combination lamp RH terminal 14.
Ground is supplied
to front combination lamp RH terminal 19
through AFS control unit terminal 2.
The low beam headlamp RH starts to swivel to the right.
The swivel motor driving signals are blocked and the swivel motion stops when the steering angle reaches
approximately more than 80 degrees (predetermined). The low beam headlamp will not swivel any further no
matter how further right. As the steering wheel is turned back to the left, the swivel motor driving signals (both
1-phase and 2-phase) will be reversed, causing low beam headlamp RH to start swiveling to the left. When
steering angle becomes smaller than predetermined value, the low beam headlamp is set in the straight-
ahead position, swivel motor driving signals are blocked and low beam headlamps stop swiveling.
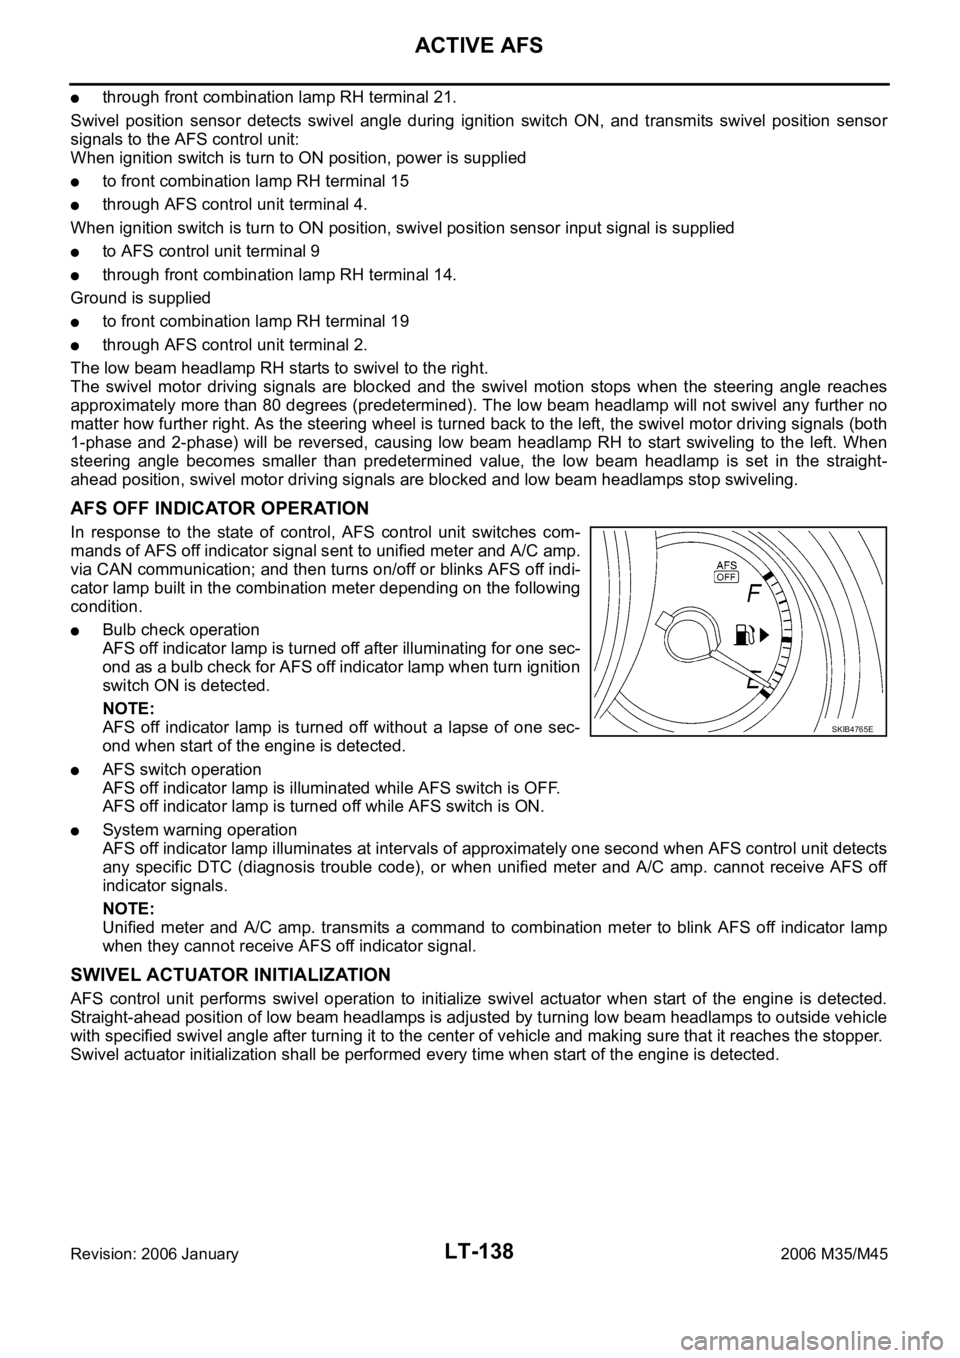
AFS OFF INDICATOR OPERATION
In response to the state of control, AFS control unit switches com-
mands of AFS off indicator signal sent to unified meter and A/C amp.
via CAN communication; and then turns on/off or blinks AFS off indi-
cator lamp built in the combination meter depending on the following
condition.
Bulb check operation
AFS off indicator lamp is turned off after illuminating for one sec-
ond as a bulb check for AFS off indicator lamp when turn ignition
switch ON is detected.
NOTE:
AFS off indicator lamp is turned off without a lapse of one sec-
ond when start of the engine is detected.
AFS switch operation
AFS off indicator lamp is illuminated while AFS switch is OFF.
AFS off indicator lamp is turned off while AFS switch is ON.
System warning operation
AFS off indicator lamp illuminates at intervals of approximately one second when AFS control unit detects
any specific DTC (diagnosis trouble code), or when unified meter and A/C amp. cannot receive AFS off
indicator signals.
NOTE:
Unified meter and A/C amp. transmits a command to combination meter to blink AFS off indicator lamp
when they cannot receive AFS off indicator signal.
SWIVEL ACTUATOR INITIALIZATION
AFS control unit performs swivel operation to initialize swivel actuator when start of the engine is detected.
Straight-ahead position of low beam headlamps is adjusted by turning low beam headlamps to outside vehicle
with specified swivel angle after turning it to the center of vehicle and making sure that it reaches the stopper.
Swivel actuator initialization shall be performed every time when start of the engine is detected.
SKIB4765E
Page 4579 of 5621
LT-152
ACTIVE AFS
Revision: 2006 January2006 M35/M45
CONSULT-II Function (ADAPTIVE LIGHT)NKS003QM
CONSULT-II can display each diagnostic item using diagnostic test modes shown following.
CONSULT-II BASIC OPERATION
CAUTION:
If CONSULT-II is used with no connection of CONSULT-II CONVERTER, malfunctions might be
detected in self-diagnosis depending on control unit which carry out CAN communication.
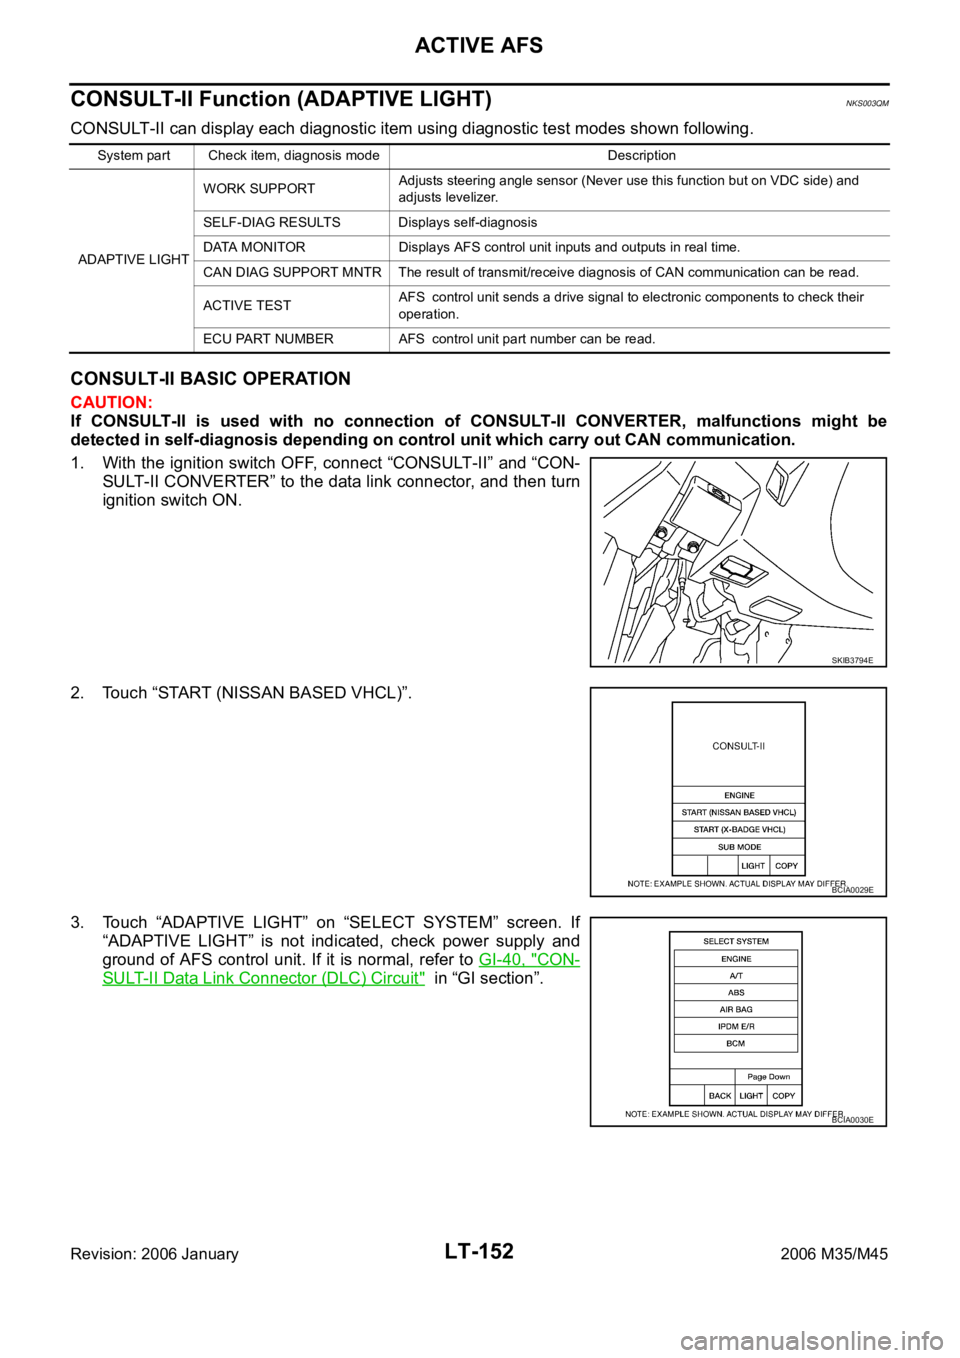
1. With the ignition switch OFF, connect “CONSULT-II” and “CON-
SULT-II CONVERTER” to the data link connector, and then turn
ignition switch ON.
2. Touch “START (NISSAN BASED VHCL)”.
3. Touch “ADAPTIVE LIGHT” on “SELECT SYSTEM” screen. If
“ADAPTIVE LIGHT” is not indicated, check power supply and
ground of AFS control unit. If it is normal, refer to GI-40, "
CON-
SULT-II Data Link Connector (DLC) Circuit" in “GI section”.
System part Check item, diagnosis mode Description
ADAPTIVE LIGHTWORK SUPPORTAdjusts steering angle sensor (Never use this function but on VDC side) and
adjusts levelizer.
SELF-DIAG RESULTS Displays self-diagnosis
DATA MONITOR Displays AFS control unit inputs and outputs in real time.
CAN DIAG SUPPORT MNTR The result of transmit/receive diagnosis of CAN communication can be read.
ACTIVE TESTAFS control unit sends a drive signal to electronic components to check their
operation.
ECU PART NUMBER AFS control unit part number can be read.
SKIB3794E
BCIA0029E
BCIA0030E
Page 4588 of 5621
ACTIVE AFS
LT-161
C
D
E
F
G
H
I
J
L
MA
B
LT
Revision: 2006 January2006 M35/M45
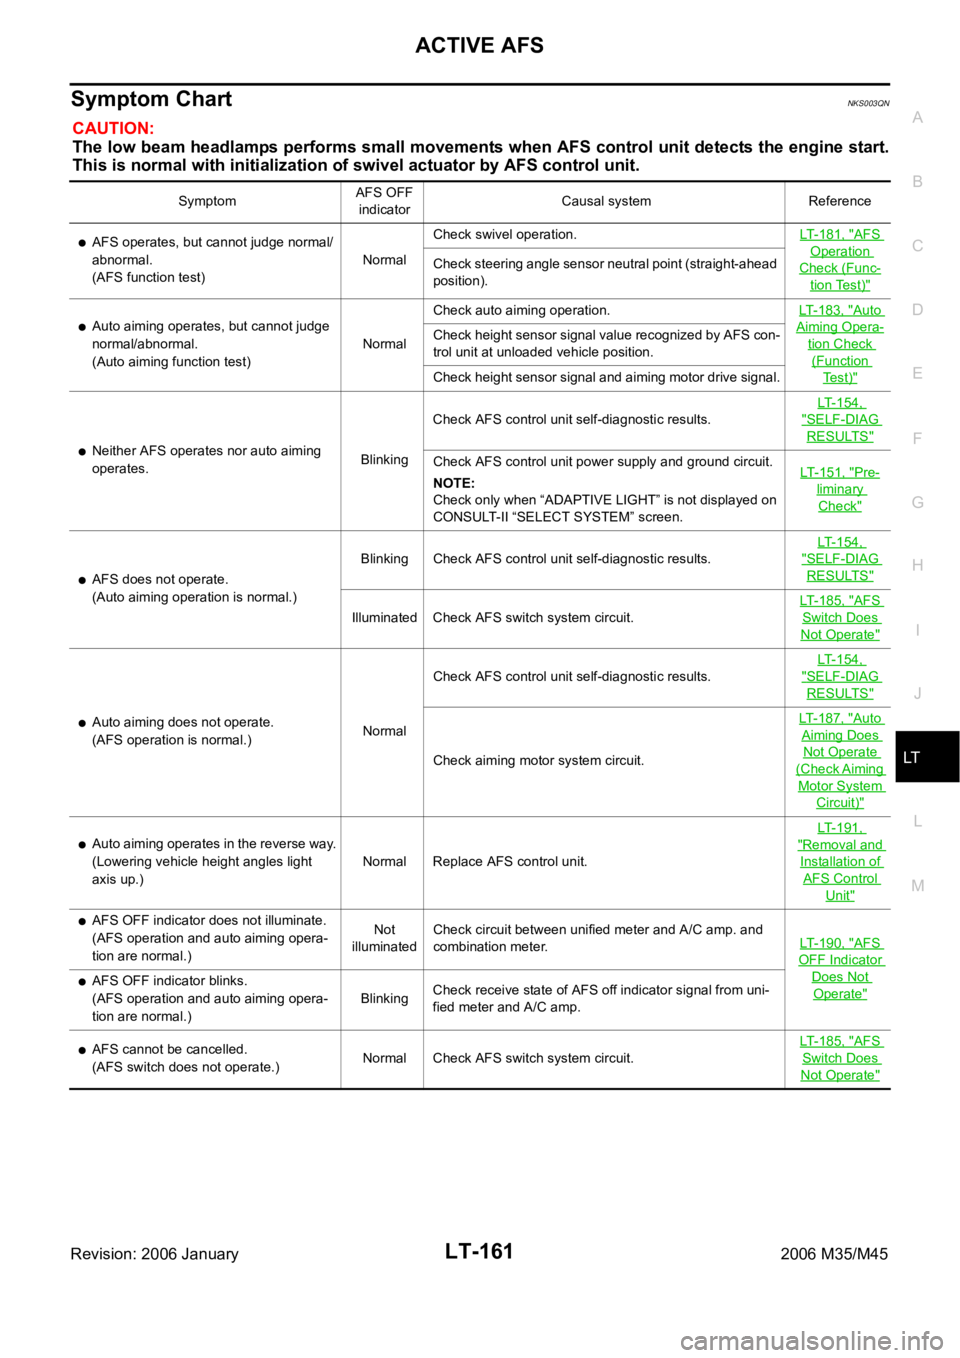
Symptom ChartNKS003QN
CAUTION:
The low beam headlamps performs small movements when AFS control unit detects the engine start.
This is normal with initialization of swivel actuator by AFS control unit.
SymptomAFS OFF
indicatorCausal system Reference
AFS operates, but cannot judge normal/
abnormal.
(AFS function test)NormalCheck swivel operation.LT-181, "AFS
Operation
Check (Func-
tion Test)"
Check steering angle sensor neutral point (straight-ahead
position).
Auto aiming operates, but cannot judge
normal/abnormal.
(Auto aiming function test)NormalCheck auto aiming operation.LT-183, "Auto
Aiming Opera-
tion Check
(Function
Te s t )"
Check height sensor signal value recognized by AFS con-
trol unit at unloaded vehicle position.
Check height sensor signal and aiming motor drive signal.
Neither AFS operates nor auto aiming
operates.BlinkingCheck AFS control unit self-diagnostic results. LT-154,
"SELF-DIAG
RESULTS"
Check AFS control unit power supply and ground circuit.
NOTE:
Check only when “ADAPTIVE LIGHT” is not displayed on
CONSULT-II “SELECT SYSTEM” screen.LT-151, "Pre-
liminary
Check"
AFS does not operate.
(Auto aiming operation is normal.)Blinking Check AFS control unit self-diagnostic results. LT-154,
"SELF-DIAG
RESULTS"
Illuminated Check AFS switch system circuit.LT-185, "
AFS
Switch Does
Not Operate"
Auto aiming does not operate.
(AFS operation is normal.)NormalCheck AFS control unit self-diagnostic results. LT-154,
"SELF-DIAG
RESULTS"
Check aiming motor system circuit.LT-187, "
Auto
Aiming Does
Not Operate
(Check Aiming
Motor System
Circuit)"
Auto aiming operates in the reverse way.
(Lowering vehicle height angles light
axis up.)Normal Replace AFS control unit.LT-191, "Removal and
Installation of
AFS Control
Unit"
AFS OFF indicator does not illuminate.
(AFS operation and auto aiming opera-
tion are normal.)Not
illuminatedCheck circuit between unified meter and A/C amp. and
combination meter.LT-190, "
AFS
OFF Indicator
Does Not
Operate"AFS OFF indicator blinks.
(AFS operation and auto aiming opera-
tion are normal.)BlinkingCheck receive state of AFS off indicator signal from uni-
fied meter and A/C amp.
AFS cannot be cancelled.
(AFS switch does not operate.)Normal Check AFS switch system circuit.LT-185, "AFS
Switch Does
Not Operate"
Page 4778 of 5621
MA-1
MAINTENANCE
L MAINTENANCE
CONTENTS
C
D
E
F
G
H
I
J
K
M
SECTION MA
A
B
MA
Revision: 2006 January2006 M35/M45
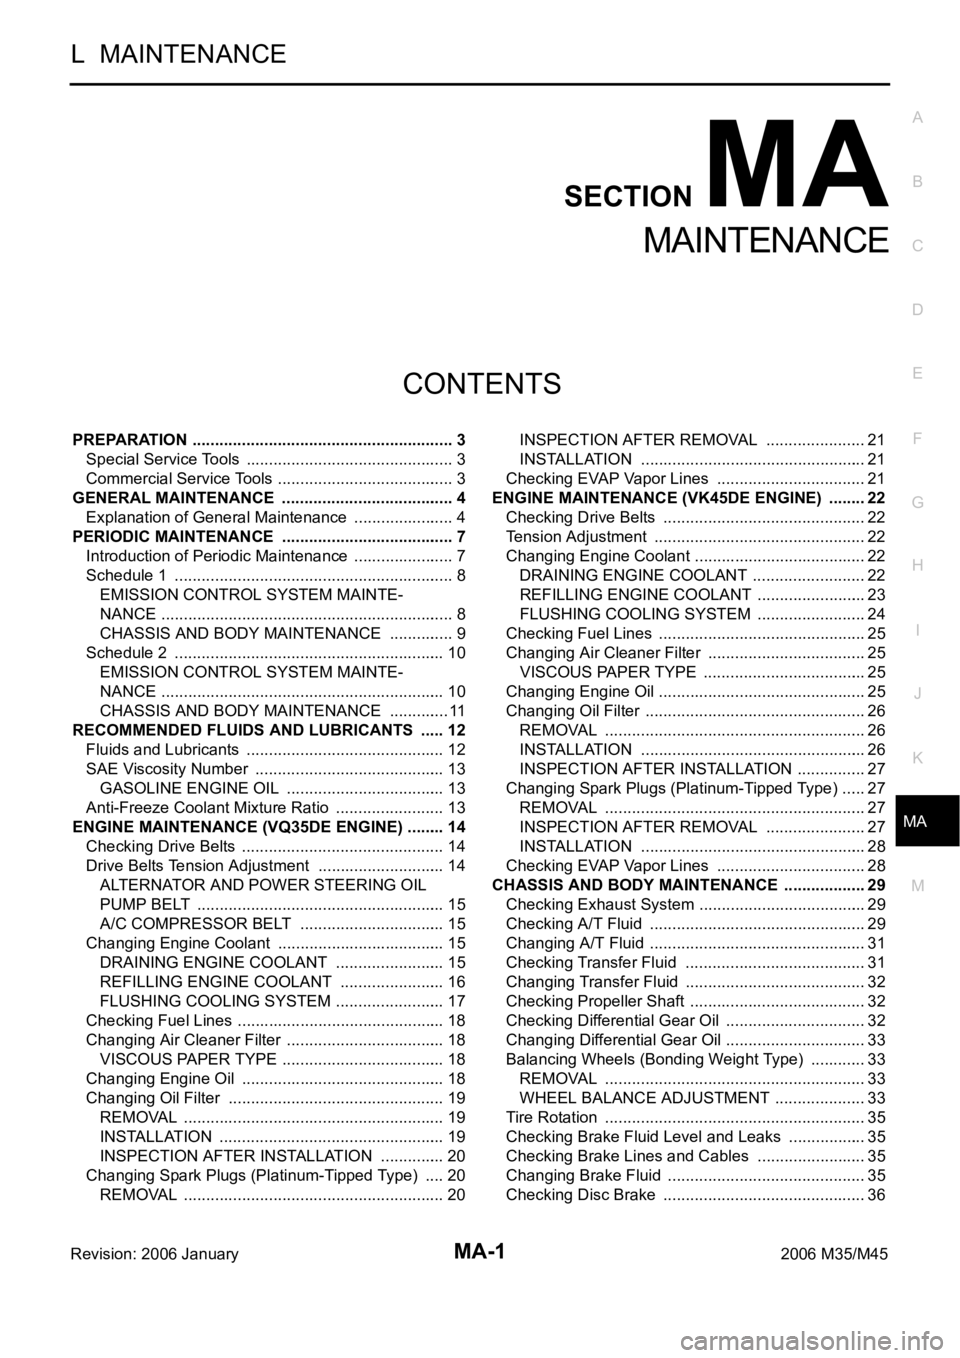
MAINTENANCE
PREPARATION ........................................................... 3
Special Service Tools ............................................... 3
Commercial Service Tools ........................................ 3
GENERAL MAINTENANCE ....................................... 4
Explanation of General Maintenance ....................... 4
PERIODIC MAINTENANCE ....................................... 7
Introduction of Periodic Maintenance ....................... 7
Schedule 1 ............................................................... 8
EMISSION CONTROL SYSTEM MAINTE-
NANCE .................................................................. 8
CHASSIS AND BODY MAINTENANCE ............... 9
Schedule 2 ............................................................. 10
EMISSION CONTROL SYSTEM MAINTE-
NANCE ................................................................ 10
CHASSIS AND BODY MAINTENANCE .............. 11
RECOMMENDED FLUIDS AND LUBRICANTS ...... 12
Fluids and Lubricants ............................................. 12
SAE Viscosity Number ........................................... 13
GASOLINE ENGINE OIL .................................... 13
Anti-Freeze Coolant Mixture Ratio ......................... 13
ENGINE MAINTENANCE (VQ35DE ENGINE) ......... 14
Checking Drive Belts .............................................. 14
Drive Belts Tension Adjustment ............................. 14
ALTERNATOR AND POWER STEERING OIL
PUMP BELT ........................................................ 15
A/C COMPRESSOR BELT ................................. 15
Changing Engine Coolant ...................................... 15
DRAINING ENGINE COOLANT ......................... 15
REFILLING ENGINE COOLANT ........................ 16
FLUSHING COOLING SYSTEM ......................... 17
Checking Fuel Lines ............................................ ... 18
Changing Air Cleaner Filter .................................... 18
VISCOUS PAPER TYPE ..................................... 18
Changing Engine Oil .............................................. 18
Changing Oil Filter ................................................. 19
REMOVAL ........................................................
... 19
INSTALLATION ................................................... 19
INSPECTION AFTER INSTALLATION ............... 20
Changing Spark Plugs (Platinum-Tipped Type) ..... 20
REMOVAL ........................................................
... 20INSPECTION AFTER REMOVAL ....................... 21
INSTALLATION ................................................... 21
Checking EVAP Vapor Lines .................................. 21
ENGINE MAINTENANCE (VK45DE ENGINE) ......... 22
Checking Drive Belts .............................................. 22
Tension Adjustment .............................................
... 22
Changing Engine Coolant ....................................... 22
DRAINING ENGINE COOLANT .......................... 22
REFILLING ENGINE COOLANT ......................... 23
FLUSHING COOLING SYSTEM ......................... 24
Checking Fuel Lines ............................................ ... 25
Changing Air Cleaner Filter .................................... 25
VISCOUS PAPER TYPE ..................................... 25
Changing Engine Oil ............................................
... 25
Changing Oil Filter .................................................. 26
REMOVAL ........................................................
... 26
INSTALLATION ................................................... 26
INSPECTION AFTER INSTALLATION ................ 27
Changing Spark Plugs (Platinum-Tipped Type) ...... 27
REMOVAL ........................................................
... 27
INSPECTION AFTER REMOVAL ....................... 27
INSTALLATION ................................................... 28
Checking EVAP Vapor Lines .................................. 28
CHASSIS AND BODY MAINTENANCE ................... 29
Checking Exhaust System ...................................... 29
Checking A/T Fluid ................................................. 29
Changing A/T Fluid ................................................. 31
Checking Transfer Fluid ......................................... 31
Changing Transfer Fluid ......................................... 32
Checking Propeller Shaft ........................................ 32
Checking Differential Gear Oil ................................ 32
Changing Differential Gear Oil ................................ 33
Balancing Wheels (Bonding Weight Type) ............. 33
REMOVAL ........................................................
... 33
WHEEL BALANCE ADJUSTMENT ..................... 33
Tire Rotation ........................................................... 35
Checking Brake Fluid Level and Leaks .................. 35
Checking Brake Lines and Cables ......................... 35
Changing Brake Fluid ............................................. 35
Checking Disc Brake .............................................. 36