2006 INFINITI M35 ESP
[x] Cancel search: ESPPage 3482 of 5621
HOW TO USE THIS MANUAL
GI-19
C
D
E
F
G
H
I
J
K
L
MB
GI
Revision: 2006 January2006 M35/M45
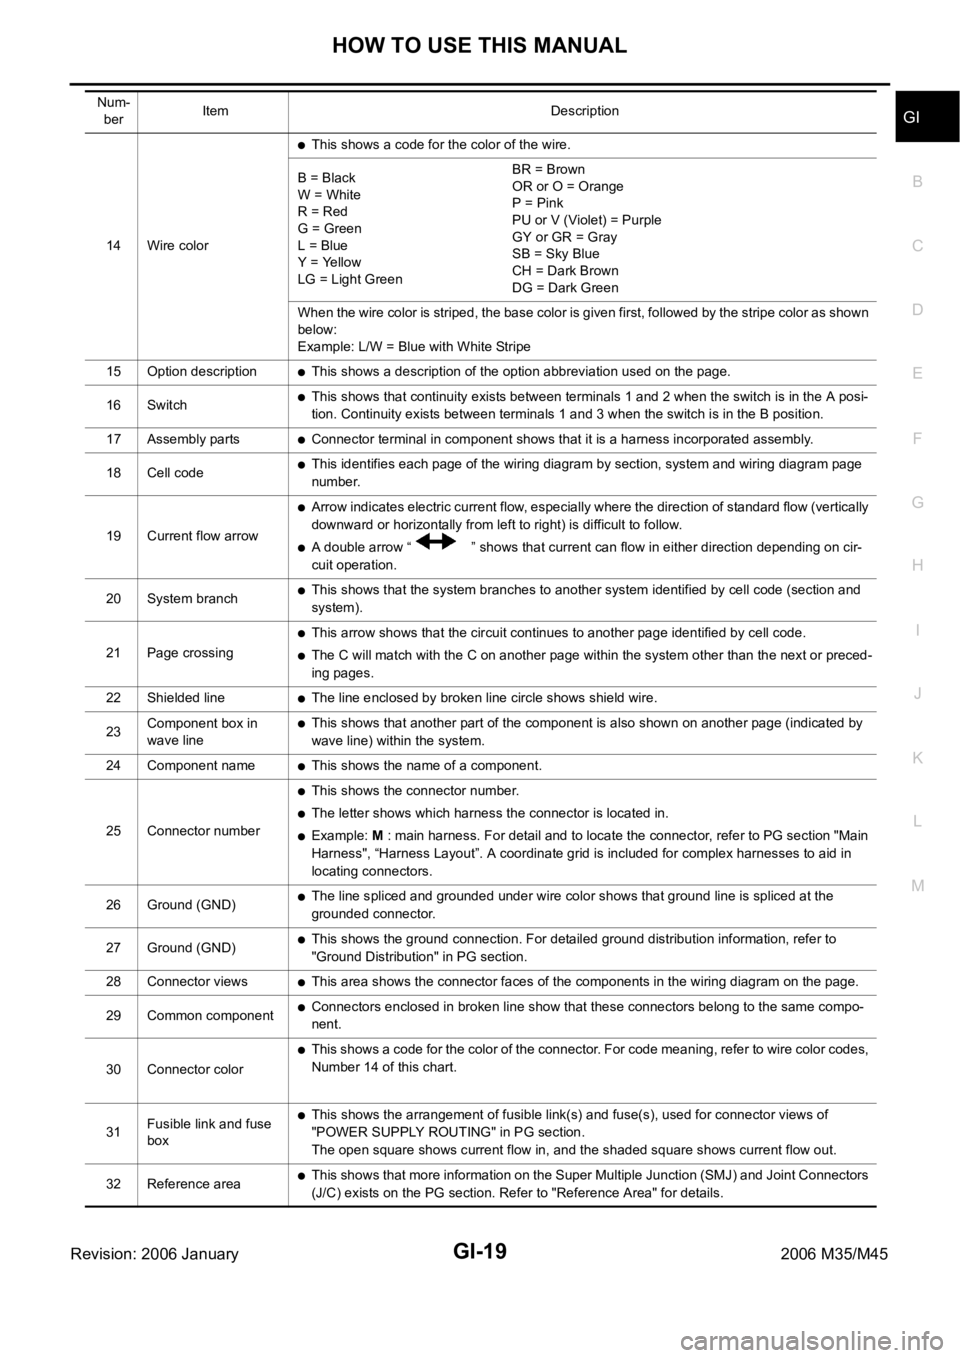
14 Wire color
This shows a code for the color of the wire.
B = Black
W = White
R = Red
G = Green
L = Blue
Y = Yellow
LG = Light GreenBR = Brown
OR or O = Orange
P = Pink
PU or V (Violet) = Purple
GY or GR = Gray
SB = Sky Blue
CH = Dark Brown
DG = Dark Green
When the wire color is striped, the base color is given first, followed by the stripe color as shown
below:
Example: L/W = Blue with White Stripe
15 Option description
This shows a description of the option abbreviation used on the page.
16 Switch
This shows that continuity exists between terminals 1 and 2 when the switch is in the A posi-
tion. Continuity exists between terminals 1 and 3 when the switch is in the B position.
17 Assembly parts
Connector terminal in component shows that it is a harness incorporated assembly.
18 Cell code
This identifies each page of the wiring diagram by section, system and wiring diagram page
number.
19 Current flow arrow
Arrow indicates electric current flow, especially where the direction of standard flow (vertically
downward or horizontally from left to right) is difficult to follow.
A double arrow “ ” shows that current can flow in either direction depending on cir-
cuit operation.
20 System branch
This shows that the system branches to another system identified by cell code (section and
system).
21 Page crossing
This arrow shows that the circuit continues to another page identified by cell code.
The C will match with the C on another page within the system other than the next or preced-
ing pages.
22 Shielded line
The line enclosed by broken line circle shows shield wire.
23Component box in
wave line
This shows that another part of the component is also shown on another page (indicated by
wave line) within the system.
24 Component name
This shows the name of a component.
25 Connector number
This shows the connector number.
The letter shows which harness the connector is located in.
Example: M : main harness. For detail and to locate the connector, refer to PG section "Main
Harness", “Harness Layout”. A coordinate grid is included for complex harnesses to aid in
locating connectors.
26 Ground (GND)
The line spliced and grounded under wire color shows that ground line is spliced at the
grounded connector.
27 Ground (GND)
This shows the ground connection. For detailed ground distribution information, refer to
"Ground Distribution" in PG section.
28 Connector views
This area shows the connector faces of the components in the wiring diagram on the page.
29 Common component
Connectors enclosed in broken line show that these connectors belong to the same compo-
nent.
30 Connector color
This shows a code for the color of the connector. For code meaning, refer to wire color codes,
Number 14 of this chart.
31Fusible link and fuse
box
This shows the arrangement of fusible link(s) and fuse(s), used for connector views of
"POWER SUPPLY ROUTING" in PG section.
The open square shows current flow in, and the shaded square shows current flow out.
32 Reference area
This shows that more information on the Super Multiple Junction (SMJ) and Joint Connectors
(J/C) exists on the PG section. Refer to "Reference Area" for details. Num-
berItem Description
Page 3524 of 5621
SQUEAK AND RATTLE TROUBLE DIAGNOSES
GW-5
C
D
E
F
G
H
J
K
L
MA
B
GW
Revision: 2006 January2006 M35/M45
SQUEAK AND RATTLE TROUBLE DIAGNOSESPFP:00000
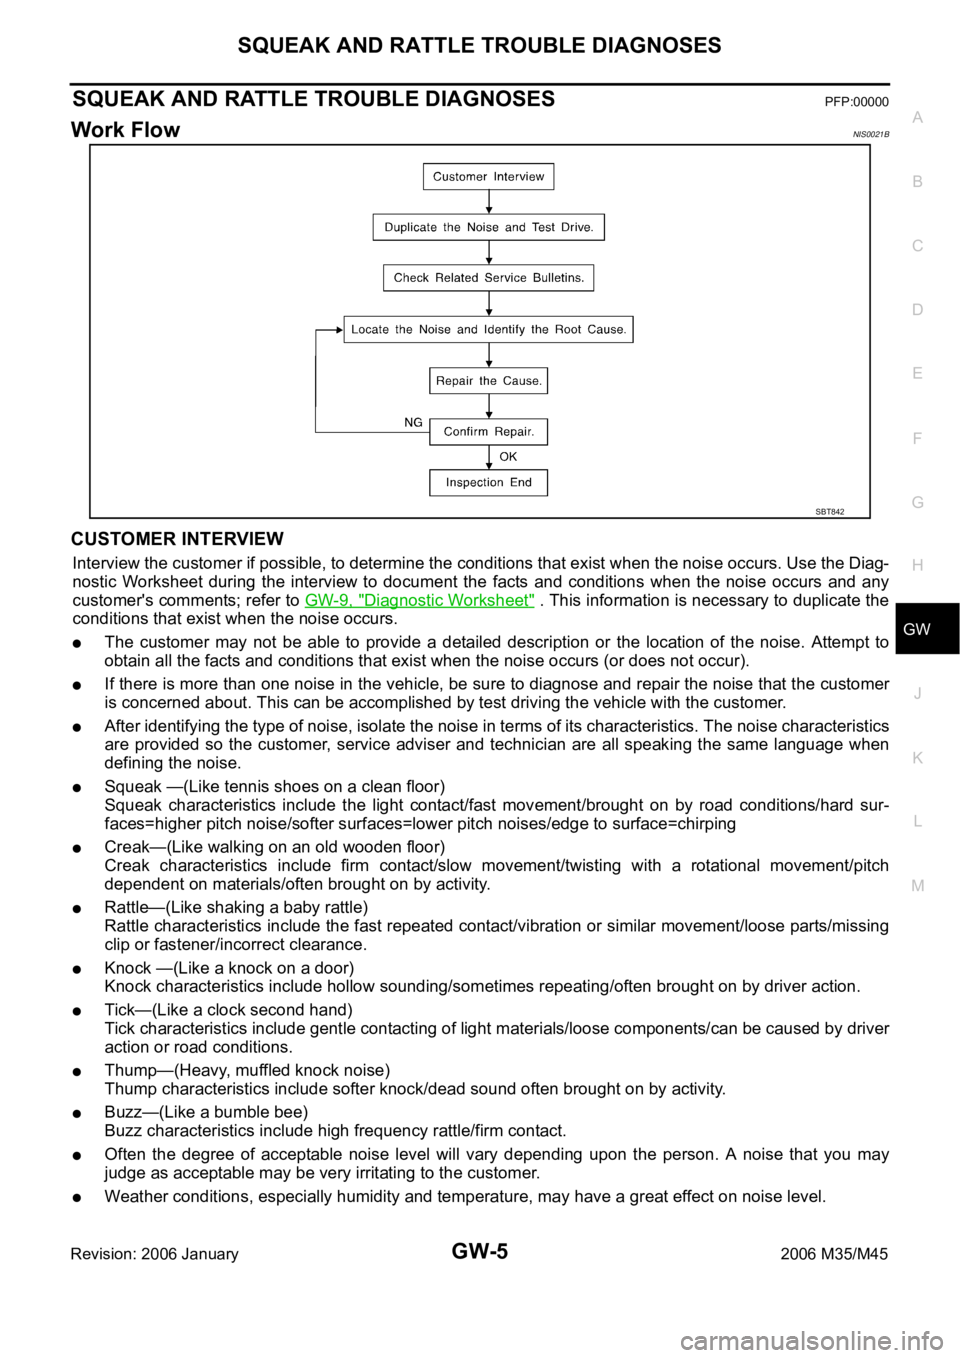
Work FlowNIS0021B
CUSTOMER INTERVIEW
Interview the customer if possible, to determine the conditions that exist when the noise occurs. Use the Diag-
nostic Worksheet during the interview to document the facts and conditions when the noise occurs and any
customer's comments; refer to GW-9, "
Diagnostic Worksheet" . This information is necessary to duplicate the
conditions that exist when the noise occurs.
The customer may not be able to provide a detailed description or the location of the noise. Attempt to
obtain all the facts and conditions that exist when the noise occurs (or does not occur).
If there is more than one noise in the vehicle, be sure to diagnose and repair the noise that the customer
is concerned about. This can be accomplished by test driving the vehicle with the customer.
After identifying the type of noise, isolate the noise in terms of its characteristics. The noise characteristics
are provided so the customer, service adviser and technician are all speaking the same language when
defining the noise.
Squeak —(Like tennis shoes on a clean floor)
Squeak characteristics include the light contact/fast movement/brought on by road conditions/hard sur-
faces=higher pitch noise/softer surfaces=lower pitch noises/edge to surface=chirping
Creak—(Like walking on an old wooden floor)
Creak characteristics include firm contact/slow movement/twisting with a rotational movement/pitch
dependent on materials/often brought on by activity.
Rattle—(Like shaking a baby rattle)
Rattle characteristics include the fast repeated contact/vibration or similar movement/loose parts/missing
clip or fastener/incorrect clearance.
Knock —(Like a knock on a door)
Knock characteristics include hollow sounding/sometimes repeating/often brought on by driver action.
Tick—(Like a clock second hand)
Tick characteristics include gentle contacting of light materials/loose components/can be caused by driver
action or road conditions.
Thump—(Heavy, muffled knock noise)
Thump characteristics include softer knock/dead sound often brought on by activity.
Buzz—(Like a bumble bee)
Buzz characteristics include high frequency rattle/firm contact.
Often the degree of acceptable noise level will vary depending upon the person. A noise that you may
judge as acceptable may be very irritating to the customer.
Weather conditions, especially humidity and temperature, may have a great effect on noise level.
SBT842
Page 3653 of 5621
IP-4
SQUEAK AND RATTLE TROUBLE DIAGNOSES
Revision: 2006 January2006 M35/M45
SQUEAK AND RATTLE TROUBLE DIAGNOSESPFP:00000
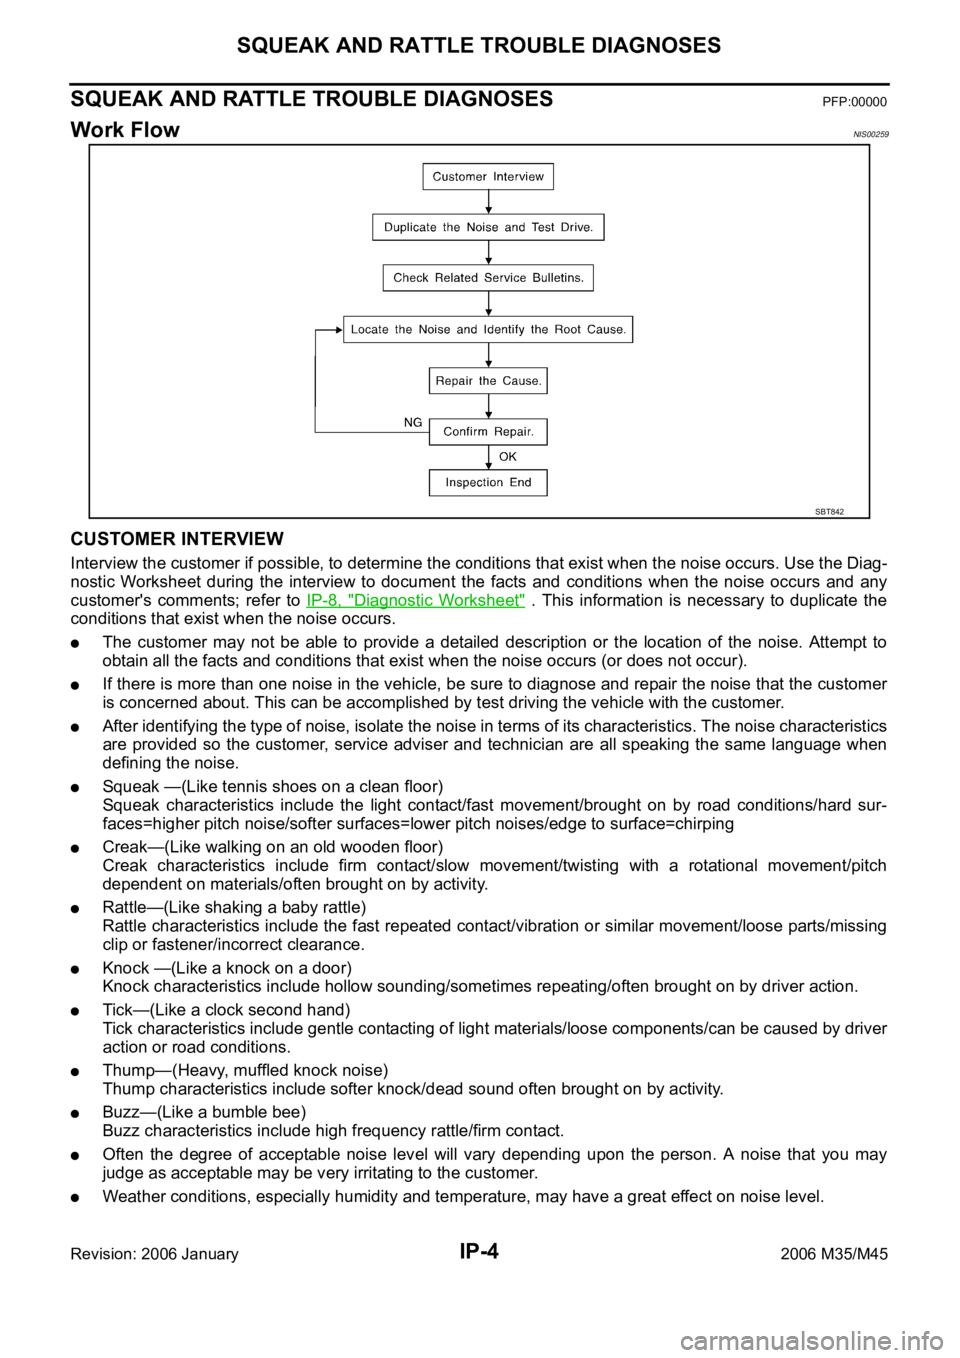
Work FlowNIS00259
CUSTOMER INTERVIEW
Interview the customer if possible, to determine the conditions that exist when the noise occurs. Use the Diag-
nostic Worksheet during the interview to document the facts and conditions when the noise occurs and any
customer's comments; refer to IP-8, "
Diagnostic Worksheet" . This information is necessary to duplicate the
conditions that exist when the noise occurs.
The customer may not be able to provide a detailed description or the location of the noise. Attempt to
obtain all the facts and conditions that exist when the noise occurs (or does not occur).
If there is more than one noise in the vehicle, be sure to diagnose and repair the noise that the customer
is concerned about. This can be accomplished by test driving the vehicle with the customer.
After identifying the type of noise, isolate the noise in terms of its characteristics. The noise characteristics
are provided so the customer, service adviser and technician are all speaking the same language when
defining the noise.
Squeak —(Like tennis shoes on a clean floor)
Squeak characteristics include the light contact/fast movement/brought on by road conditions/hard sur-
faces=higher pitch noise/softer surfaces=lower pitch noises/edge to surface=chirping
Creak—(Like walking on an old wooden floor)
Creak characteristics include firm contact/slow movement/twisting with a rotational movement/pitch
dependent on materials/often brought on by activity.
Rattle—(Like shaking a baby rattle)
Rattle characteristics include the fast repeated contact/vibration or similar movement/loose parts/missing
clip or fastener/incorrect clearance.
Knock —(Like a knock on a door)
Knock characteristics include hollow sounding/sometimes repeating/often brought on by driver action.
Tick—(Like a clock second hand)
Tick characteristics include gentle contacting of light materials/loose components/can be caused by driver
action or road conditions.
Thump—(Heavy, muffled knock noise)
Thump characteristics include softer knock/dead sound often brought on by activity.
Buzz—(Like a bumble bee)
Buzz characteristics include high frequency rattle/firm contact.
Often the degree of acceptable noise level will vary depending upon the person. A noise that you may
judge as acceptable may be very irritating to the customer.
Weather conditions, especially humidity and temperature, may have a great effect on noise level.
SBT842
Page 4435 of 5621
LT-8
HEADLAMP (FOR USA) - CONVENTIONAL TYPE -
Revision: 2006 January2006 M35/M45
HEADLAMP (FOR USA) - CONVENTIONAL TYPE -PFP:26010
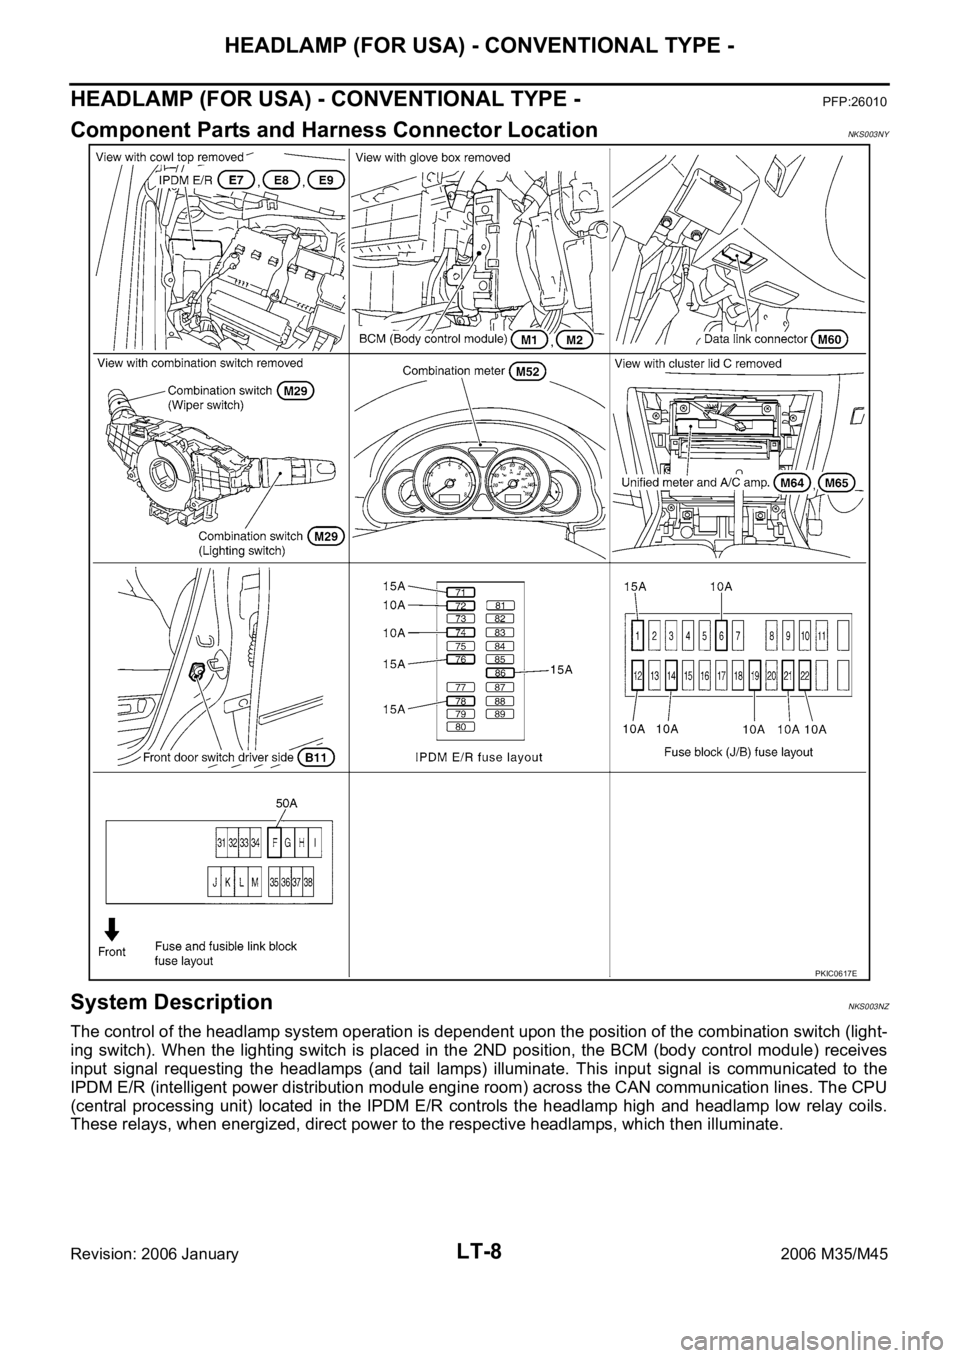
Component Parts and Harness Connector LocationNKS003NY
System DescriptionNKS003NZ
The control of the headlamp system operation is dependent upon the position of the combination switch (light-
ing switch). When the lighting switch is placed in the 2ND position, the BCM (body control module) receives
input signal requesting the headlamps (and tail lamps) illuminate. This input signal is communicated to the
IPDM E/R (intelligent power distribution module engine room) across the CAN communication lines. The CPU
(central processing unit) located in the IPDM E/R controls the headlamp high and headlamp low relay coils.
These relays, when energized, direct power to the respective headlamps, which then illuminate.
PKIC0617E
Page 4470 of 5621
HEADLAMP (FOR USA) - XENON TYPE -
LT-43
C
D
E
F
G
H
I
J
L
MA
B
LT
Revision: 2006 January2006 M35/M45
HEADLAMP (FOR USA) - XENON TYPE -PFP:26010
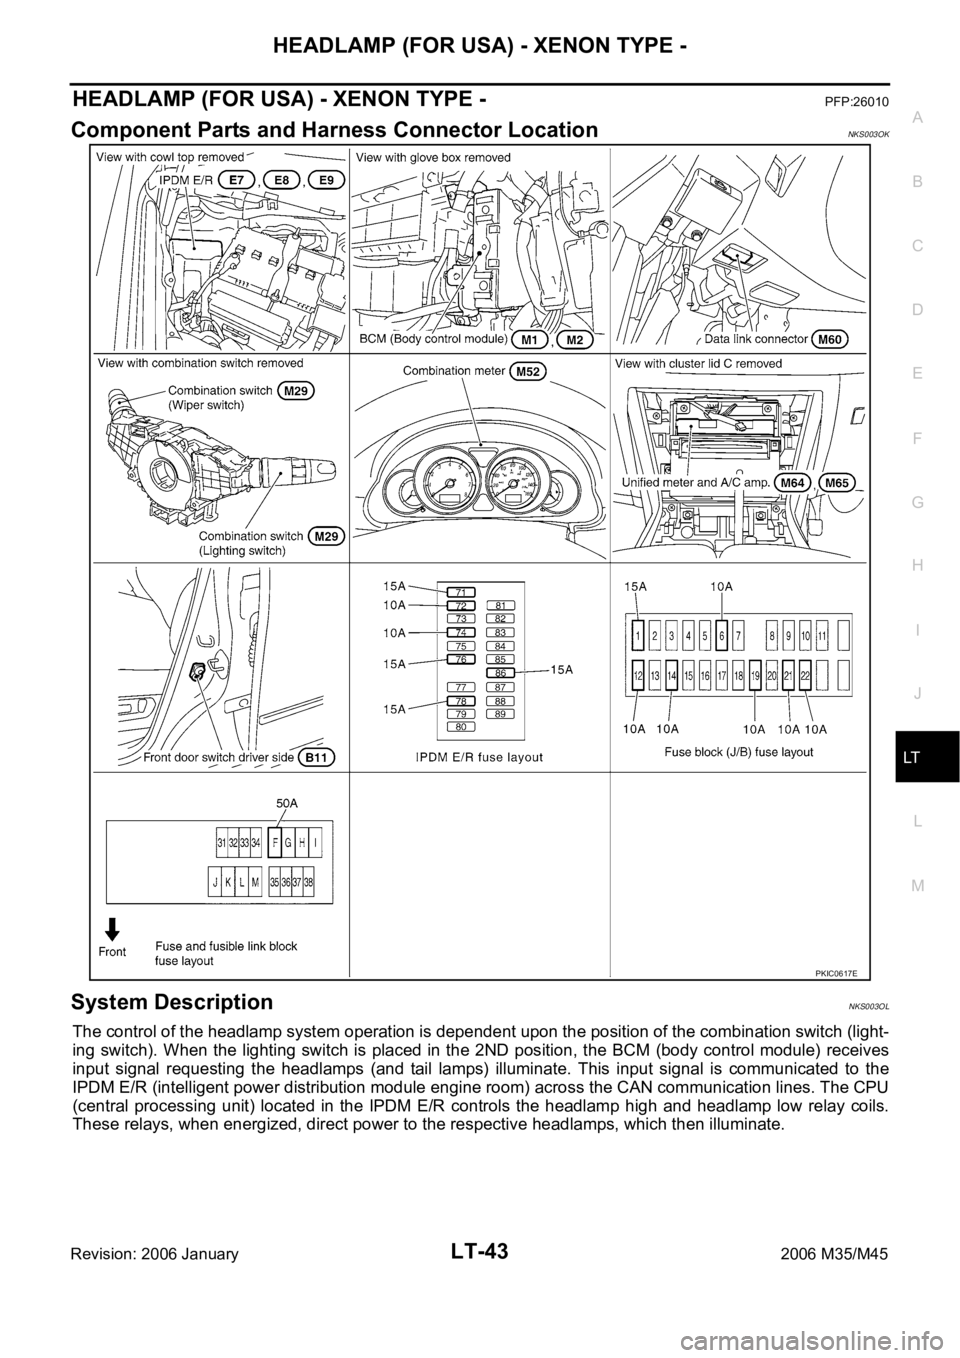
Component Parts and Harness Connector LocationNKS003OK
System DescriptionNKS003OL
The control of the headlamp system operation is dependent upon the position of the combination switch (light-
ing switch). When the lighting switch is placed in the 2ND position, the BCM (body control module) receives
input signal requesting the headlamps (and tail lamps) illuminate. This input signal is communicated to the
IPDM E/R (intelligent power distribution module engine room) across the CAN communication lines. The CPU
(central processing unit) located in the IPDM E/R controls the headlamp high and headlamp low relay coils.
These relays, when energized, direct power to the respective headlamps, which then illuminate.
PKIC0617E
Page 4500 of 5621

HEADLAMP (FOR USA) - XENON TYPE -
LT-73
C
D
E
F
G
H
I
J
L
MA
B
LT
Revision: 2006 January2006 M35/M45
General Information for Xenon Headlamp Trouble DiagnosisNKS003P2
In most cases, malfunction of xenon headlamp - "does not illuminate", "flickers" or "dark" - is caused by a mal-
functioning xenon bulb. A HID control unit or lamp housing, however, may be a cause of malfunction. Be sure
to perform trouble diagnosis following the steps described below.
Caution:NKS003P3
Installation or removal of connector must be done with lighting switch OFF.
Disconnect the battery cable from the negative terminal or remove power fuse.
When the lamp is illuminated (when lighting switch is ON), never touch harness, HID control unit, inside of
lamp, or lamp metal parts.
To check illumination, temporarily install lamp in vehicle. Be sure to connect power at vehicle side connec-
tor.
If error can be traced directly to electrical system, first check for items such as blown fuses and fusible
links, broken wires or loose connectors, dislocated terminals, and improper connections.
Never work with wet hands.
Using a tester for HID control unit circuit trouble diagnosis is prohibited.
Disassembling HID control unit or harnesses (bulb socket harness, ECM harness) is prohibited.
Immediately after illumination, light intensity and color will fluctuate, but there is nothing wrong.
When bulb has come to end of its life, brightness will drop significantly, it will flash repeatedly, or light color
will turn reddish.
Xenon Headlamp Trouble DiagnosisNKS003P4
1. CHECK 1: XENON HEADLAMP LIGHTING
Install normal xenon bulb to corresponding xenon bulb headlamp, and check if lamp lights up.
OK or NG
OK >> Replace xenon bulb.
NG >> GO TO 2.
2. CHECK 2: XENON HEADLAMP LIGHTING
Install normal HID control unit to corresponding xenon headlamp, and check if lamp lights up.
OK or NG
OK >> Replace HID control unit.
NG >> GO TO 3.
3. CHECK 3: XENON HEADLAMP LIGHTING
Install normal xenon lamp housing assembly to corresponding xenon headlamp, and check if lamp lights up.
OK or NG
OK >> Replace xenon headlamp housing assembly. [Malfunction in starter (boosting circuit) in xenon
headlamp housing]
NG >> INSPECTION END
Page 4542 of 5621
HEADLAMP (FOR CANADA) - DAYTIME LIGHT SYSTEM -
LT-115
C
D
E
F
G
H
I
J
L
MA
B
LT
Revision: 2006 January2006 M35/M45
General Information for Xenon Headlamp Trouble DiagnosisNKS003PR
In most cases, malfunction of xenon headlamp - "does not illuminate", "flickers" or "dark" - is caused by a mal-
functioning xenon bulb. A HID control unit or lamp housing, however, may be a cause of malfunction. Be sure
to perform trouble diagnosis following the steps described below.
CAUTION:NKS003PS
Installation or removal of connector must be done with lighting switch OFF.
When lamp is illuminated (when lighting switch is ON), do not touch harness, HID control unit, inside of
lamp, or lamp metal parts.
To check illumination, temporarily install lamp in the vehicle. Be sure to connect power at the vehicle-side
connector.
If the error can be traced directly to the electrical system, first check for items such as burned-out fuses
and fusible links, broken wires or loose connectors, pulled-out terminals, and improper connections.
Do not work with wet hands.
Using a tester for HID control unit circuit trouble diagnosis is prohibited.
Disassembling the HID control unit or harnesses (bulb socket harness, ECM harness) is prohibited.
Immediately after illumination, the light intensity and color will fluctuate, but there is nothing wrong.
When the bulb has reached the end of its lifetime, the brightness may drop significantly, it may flash
repeatedly, or the light may turn a reddish color.
Xenon Headlamp Trouble DiagnosisNKS003PT
1. CHECK 1: XENON HEADLAMP LIGHTING
Install normal xenon bulb to corresponding xenon bulb headlamp, and check if lamp lights up.
OK or NG
OK >> Replace xenon bulb.
NG >> GO TO 2.
2. CHECK 2: XENON HEADLAMP LIGHTING
Install normal HID control unit to corresponding xenon headlamp, and check if lamp lights up.
OK or NG
OK >> Replace HID control unit.
NG >> GO TO 3.
3. CHECK 3: XENON HEADLAMP LIGHTING
Install normal xenon lamp housing assembly to corresponding xenon headlamp, and check if lamp lights up.
OK or NG
OK >> Replace xenon headlamp housing assembly. [Malfunction in starter (boosting circuit) in xenon
headlamp housing]
NG >> INSPECTION END
Aiming AdjustmentNKS003PU
Refer to LT- 7 4 , "Aiming Adjustment" .
Bulb ReplacementNKS003PV
Refer to LT- 7 5 , "Bulb Replacement" .
Removal and InstallationNKS003PW
Refer to LT- 4 1 , "Removal and Installation" .
Disassembly and AssemblyNKS003PX
Refer to LT- 7 7 , "Disassembly and Assembly" .
Page 4562 of 5621

ACTIVE AFS
LT-135
C
D
E
F
G
H
I
J
L
MA
B
LT
Revision: 2006 January2006 M35/M45
System DescriptionNKS003QF
AFS control unit controls AFS and headlamp auto aiming.
The following signals are input to AFS control unit via CAN communication:
Steering angle sensor signal
A/T position indicator signal
Low beam status signal
Vehicle speed signal
Engine speed signal
Other signals are input as follows:
AFS switch signal from AFS switch connected to AFS control unit
Height sensor signal from height sensor connected to AFS control unit
Swivel position sensor signal from swivel position sensor built into both right and left swivel actuators con-
nected to AFS control unit
In response to the state of control, AFS control unit switches commands of AFS off indicator signal sent to uni-
fied meter and A/C amp. via CAN communication; and then turns on/off or blinks AFS off indicator lamp built in
the combination meter.
AFS (ADAPTIVE FRONT-LIGHTING SYSTEM)
AFS increases viewability of cornering direction by changing light axis automatically to the direction of travel
with low beam headlamps during vehicle's cornering.
AFS switch allows AFS function to be stopped.
AFS control unit determines the current vehicle conditions by each received signals, and sends commands to
the low beam headlamp to swivel. With the headlamps (HIGH/LOW) illuminated, the AFS switch on, engine
running and the A/T select lever in any position but range P or range R, the low beam headlamps are opera-
tive by AFS control unit commands.
As the steering wheel is turned to the left (right), the left (right) low beam headlamp will automatically swivel
angle in accordance with the steering angle and vehicle speed, and stop the operation when the steering
wheel is returned to the straight-ahead position.
Swivel operation allows drive signal to be sent to the swivel actuator on the side that AFS control unit is actu-
ated. Step motor built in swivel actuator adjusts low beam projector of headlamp to swivel angle that matches
drive signal. Swivel position sensor built in swivel actuator detects swivel angle and transmits a swivel position
sensor signal to the AFS control unit. AFS control unit monitors if swivel operation is performed normally via
swivel position sensor signal.
Swivel operation
*1: Included high beam illuminated.
*2: The swivel operates when running at approx. 25 km/h (15.5 MPH). When swivel operation is started, it works on until vehicle
stops.
*3: The low beam headlamps perform small movements when AFS control unit detects start of the engine. This is normal with ini-
tialization of swivel actuator by AFS control unit.Low beam
statusA/T selector
lever positionVehicle speed AFS switch Engine speed Low beam
headlamp LH
(swivel)Low beam
headlamp RH
(swivel)
Left turn
Illuminated*
1Except P, R
Running*2ONWhile engine
running*3
Right turn
Illuminated*1Except P, R Irrespective ONWhile engine
running*3