2006 INFINITI M35 sensor
[x] Cancel search: sensorPage 5410 of 5621

OCCUPANT CLASSIFICATION SYSTEM CONTROL UNIT
SRS-49
C
D
E
F
G
I
J
K
L
MA
B
SRS
Revision: 2006 January2006 M35/M45
OCCUPANT CLASSIFICATION SYSTEM CONTROL UNITPFP:98852
Removal and InstallationNHS0009K
The occupant classification system control unit, seat pressure sensor, and bladder are an integral part of the
front passenger seat cushion and are replaced as an assembly. Refer to SE-165, "
Passenger's Seat Compo-
nents" .
Page 5411 of 5621

SRS-50
COLLISION DIAGNOSIS
Revision: 2006 January2006 M35/M45
COLLISION DIAGNOSISPFP:00015
For Frontal CollisionNHS0009L
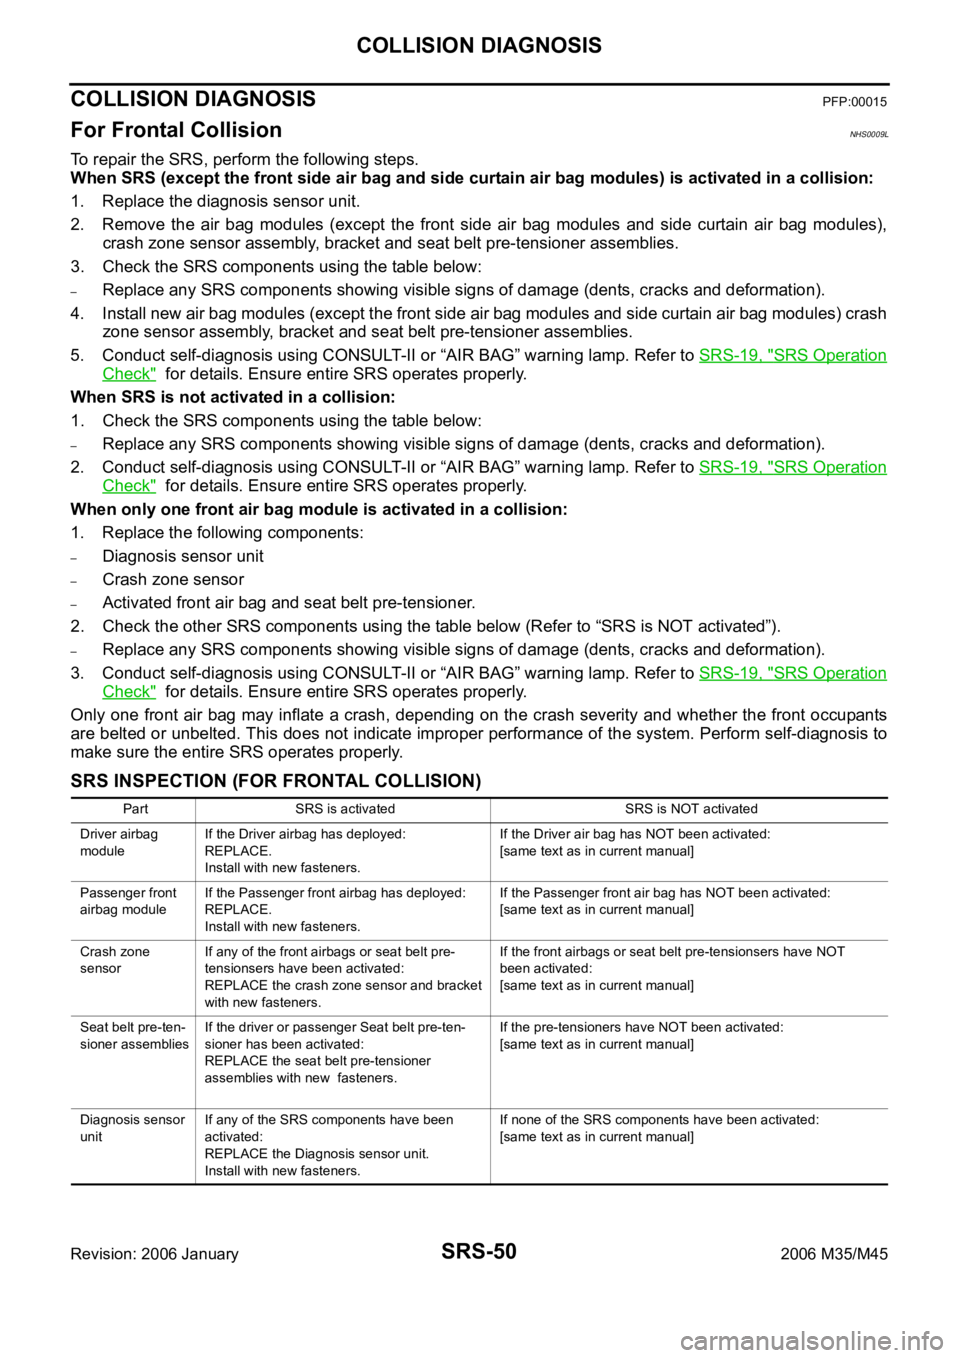
To repair the SRS, perform the following steps.
When SRS (except the front side air bag and side curtain air bag modules) is activated in a collision:
1. Replace the diagnosis sensor unit.
2. Remove the air bag modules (except the front side air bag modules and side curtain air bag modules),
crash zone sensor assembly, bracket and seat belt pre-tensioner assemblies.
3. Check the SRS components using the table below:
–Replace any SRS components showing visible signs of damage (dents, cracks and deformation).
4. Install new air bag modules (except the front side air bag modules and side curtain air bag modules) crash
zone sensor assembly, bracket and seat belt pre-tensioner assemblies.
5. Conduct self-diagnosis using CONSULT-II or “AIR BAG” warning lamp. Refer to SRS-19, "
SRS Operation
Check" for details. Ensure entire SRS operates properly.
When SRS is not activated in a collision:
1. Check the SRS components using the table below:
–Replace any SRS components showing visible signs of damage (dents, cracks and deformation).
2. Conduct self-diagnosis using CONSULT-II or “AIR BAG” warning lamp. Refer to SRS-19, "
SRS Operation
Check" for details. Ensure entire SRS operates properly.
When only one front air bag module is activated in a collision:
1. Replace the following components:
–Diagnosis sensor unit
–Crash zone sensor
–Activated front air bag and seat belt pre-tensioner.
2. Check the other SRS components using the table below (Refer to “SRS is NOT activated”).
–Replace any SRS components showing visible signs of damage (dents, cracks and deformation).
3. Conduct self-diagnosis using CONSULT-II or “AIR BAG” warning lamp. Refer to SRS-19, "
SRS Operation
Check" for details. Ensure entire SRS operates properly.
Only one front air bag may inflate a crash, depending on the crash severity and whether the front occupants
are belted or unbelted. This does not indicate improper performance of the system. Perform self-diagnosis to
make sure the entire SRS operates properly.
SRS INSPECTION (FOR FRONTAL COLLISION)
Part SRS is activated SRS is NOT activated
Driver airbag
moduleIf the Driver airbag has deployed:
REPLACE.
Install with new fasteners.If the Driver air bag has NOT been activated:
[same text as in current manual]
Passenger front
airbag moduleIf the Passenger front airbag has deployed:
REPLACE.
Install with new fasteners.If the Passenger front air bag has NOT been activated:
[same text as in current manual]
Crash zone
sensorIf any of the front airbags or seat belt pre-
tensionsers have been activated:
REPLACE the crash zone sensor and bracket
with new fasteners. If the front airbags or seat belt pre-tensionsers have NOT
been activated:
[same text as in current manual]
Seat belt pre-ten-
sioner assembliesIf the driver or passenger Seat belt pre-ten-
sioner has been activated:
REPLACE the seat belt pre-tensioner
assemblies with new fasteners. If the pre-tensioners have NOT been activated:
[same text as in current manual]
Diagnosis sensor
unitIf any of the SRS components have been
activated:
REPLACE the Diagnosis sensor unit.
Install with new fasteners.If none of the SRS components have been activated:
[same text as in current manual]
Page 5413 of 5621

SRS-52
COLLISION DIAGNOSIS
Revision: 2006 January2006 M35/M45
For Side CollisionNHS0009M
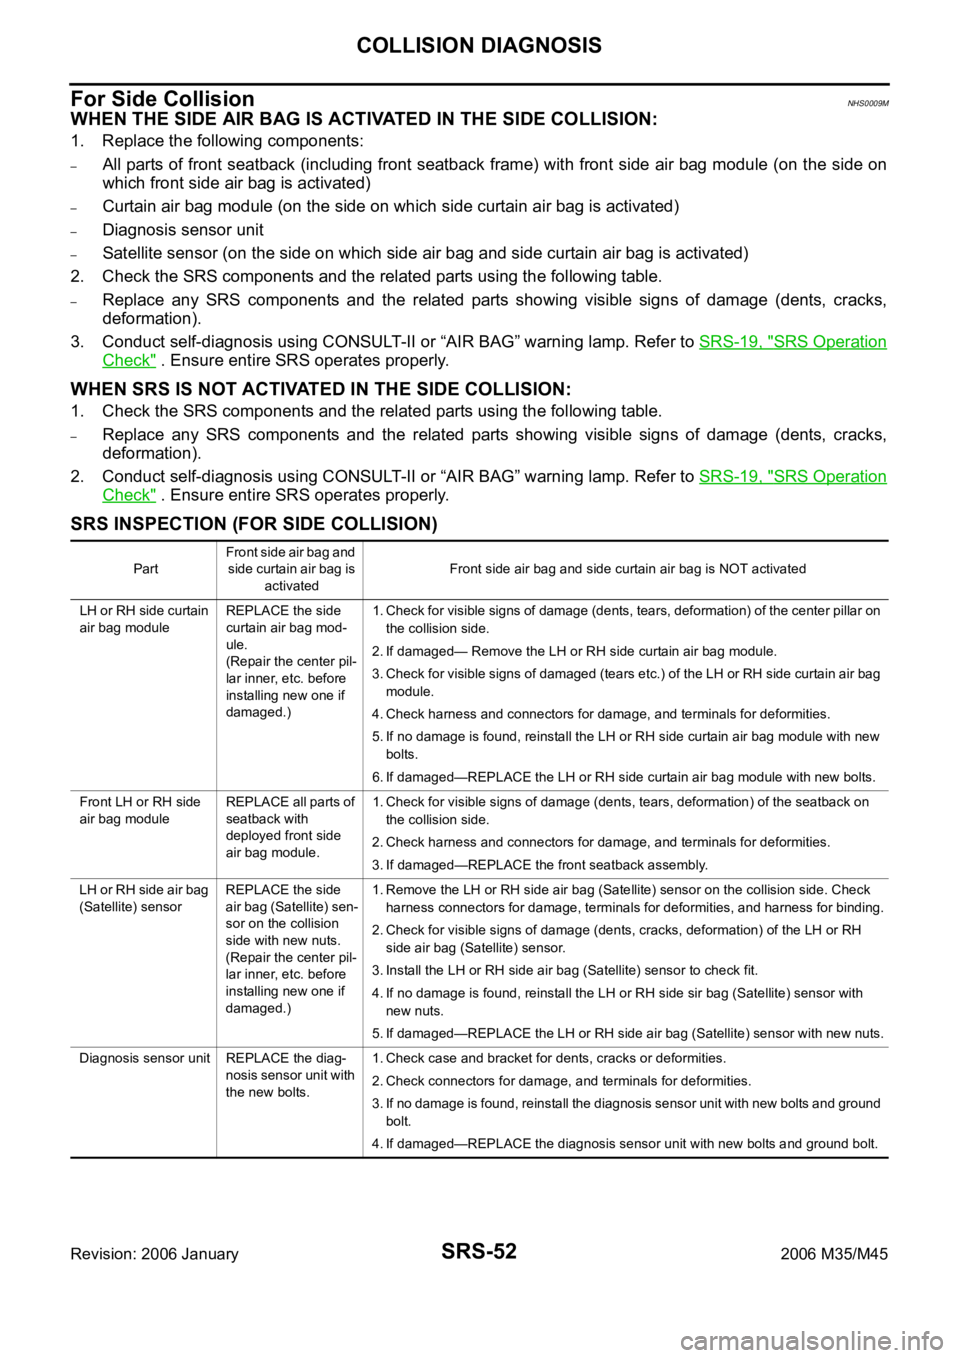
WHEN THE SIDE AIR BAG IS ACTIVATED IN THE SIDE COLLISION:
1. Replace the following components:
–All parts of front seatback (including front seatback frame) with front side air bag module (on the side on
which front side air bag is activated)
–Curtain air bag module (on the side on which side curtain air bag is activated)
–Diagnosis sensor unit
–Satellite sensor (on the side on which side air bag and side curtain air bag is activated)
2. Check the SRS components and the related parts using the following table.
–Replace any SRS components and the related parts showing visible signs of damage (dents, cracks,
deformation).
3. Conduct self-diagnosis using CONSULT-II or “AIR BAG” warning lamp. Refer to SRS-19, "
SRS Operation
Check" . Ensure entire SRS operates properly.
WHEN SRS IS NOT ACTIVATED IN THE SIDE COLLISION:
1. Check the SRS components and the related parts using the following table.
–Replace any SRS components and the related parts showing visible signs of damage (dents, cracks,
deformation).
2. Conduct self-diagnosis using CONSULT-II or “AIR BAG” warning lamp. Refer to SRS-19, "
SRS Operation
Check" . Ensure entire SRS operates properly.
SRS INSPECTION (FOR SIDE COLLISION)
PartFront side air bag and
side curtain air bag is
activatedFront side air bag and side curtain air bag is NOT activated
LH or RH side curtain
air bag moduleREPLACE the side
curtain air bag mod-
ule.
(Repair the center pil-
lar inner, etc. before
installing new one if
damaged.)1. Check for visible signs of damage (dents, tears, deformation) of the center pillar on
the collision side.
2. If damaged— Remove the LH or RH side curtain air bag module.
3. Check for visible signs of damaged (tears etc.) of the LH or RH side curtain air bag
module.
4. Check harness and connectors for damage, and terminals for deformities.
5. If no damage is found, reinstall the LH or RH side curtain air bag module with new
bolts.
6. If damaged—REPLACE the LH or RH side curtain air bag module with new bolts.
Front LH or RH side
air bag moduleREPLACE all parts of
seatback with
deployed front side
air bag module.1. Check for visible signs of damage (dents, tears, deformation) of the seatback on
the collision side.
2. Check harness and connectors for damage, and terminals for deformities.
3. If damaged—REPLACE the front seatback assembly.
LH or RH side air bag
(Satellite) sensorREPLACE the side
air bag (Satellite) sen-
sor on the collision
side with new nuts.
(Repair the center pil-
lar inner, etc. before
installing new one if
damaged.)1. Remove the LH or RH side air bag (Satellite) sensor on the collision side. Check
harness connectors for damage, terminals for deformities, and harness for binding.
2. Check for visible signs of damage (dents, cracks, deformation) of the LH or RH
side air bag (Satellite) sensor.
3. Install the LH or RH side air bag (Satellite) sensor to check fit.
4. If no damage is found, reinstall the LH or RH side sir bag (Satellite) sensor with
new nuts.
5. If damaged—REPLACE the LH or RH side air bag (Satellite) sensor with new nuts.
Diagnosis sensor unit REPLACE the diag-
nosis sensor unit with
the new bolts.1. Check case and bracket for dents, cracks or deformities.
2. Check connectors for damage, and terminals for deformities.
3. If no damage is found, reinstall the diagnosis sensor unit with new bolts and ground
bolt.
4. If damaged—REPLACE the diagnosis sensor unit with new bolts and ground bolt.
Page 5417 of 5621

STC-2Revision: 2006 January2006 M35/M45 Inspection 2: Motor Power Supply System ............. 35
Inspection 3: RAS Motor Output Malfunction ......... 37
Inspection 4: Vehicle Speed Signal ........................ 38
Inspection 5: Steering Angle Signal Malfunction .... 38
Inspection 6: Rear Main Signal and Rear Sub Signal
Malfunction ............................................................. 40
Inspection 7: VDC Malfunction ............................... 42
Inspection 8: Engine Speed Signal Malfunction ..... 43
Inspection 9: CAN Communication System Mal-
function ................................................................... 43Inspection 10: Stop Lamp Switch Harness ............. 44
Inspection 11: RAS Warning Lamp Harness ........... 44
Diagnosis Chart by Symptom 1 .............................. 46
Diagnosis Chart by Symptom 2 .............................. 46
Check RAS Static/Dynamic Characteristics ............ 48
Component Parts Inspection ................................... 49
RAS MOTOR RELAY ........................................... 49
RAS MOTOR ....................................................... 49
REAR WHEEL STEERING ANGLE SENSOR .... 49
Page 5429 of 5621
![INFINITI M35 2006 Factory Service Manual STC-14
[RAS]
REAR ACTIVE STEER
Revision: 2006 January2006 M35/M45
Disassembly and AssemblyNGS000E6
COMPONENTS
DISASSEMBLY
1. Remove mounting bolts of RAS motor assembly, and then remove RAS motor asse INFINITI M35 2006 Factory Service Manual STC-14
[RAS]
REAR ACTIVE STEER
Revision: 2006 January2006 M35/M45
Disassembly and AssemblyNGS000E6
COMPONENTS
DISASSEMBLY
1. Remove mounting bolts of RAS motor assembly, and then remove RAS motor asse](/manual-img/42/57023/w960_57023-5428.png)
STC-14
[RAS]
REAR ACTIVE STEER
Revision: 2006 January2006 M35/M45
Disassembly and AssemblyNGS000E6
COMPONENTS
DISASSEMBLY
1. Remove mounting bolts of RAS motor assembly, and then remove RAS motor assembly, ground terminal,
O-ring from RAS actuator.
2. Remove mounting bolt of rear wheel steering angle sensor, and then remove rear wheel steering angle
sensor, O-ring from RAS actuator.
INSPECTION AFTER DISASSEMBLY
Check RAS actuator bracket (rear wheel steering angle sensor mounting area) for crush, deformation, cracks,
or other damage. Replace the RAS actuator malfunction is detected.
ASSEMBLY
Assembly is the reverse order of disassembly. For tightening torque, refer to STC-14, "COMPONENTS" .
After assembling RAS actuator assembly (after removing and installing rear wheel angle sensor and RAS
motor), perform the neutral position adjustment.
Neutral Position AdjustmentNGS000E7
Adjust neutral position after performing the following procedure.
Removing and installing or replacing the RAS actuator assembly
Disassembling the RAS actuator assembly (when removing rear wheel steering angle sensor and RAS
motor)
CAUTION:
Perform the neutral position adjustment after installing the RAS actuator assembly to the vehicle.
Before that, remove the rear lower link from the RAS actuator.
1. Disconnect harness connector and remove rear wheel steering angle sensor from the RAS actuator
assembly.
2. Disconnect RAS motor harness connector.
3. Turn ignition switch ON.
1. Ground terminal 2. RAS motor assembly 3. O-ring
4. RAS actuator 5. Rear wheel steering angle sensor
Refer to GI-11, "
Components" , for the symbols in the figure.
SGIA1052J
Page 5430 of 5621
![INFINITI M35 2006 Factory Service Manual REAR ACTIVE STEER
STC-15
[RAS]
C
D
E
F
H
I
J
K
L
MA
B
STC
Revision: 2006 January2006 M35/M45
4. Supply 6 V voltage by connecting the four 1.5 V batteries in a
series. Connect them to the RAS motor con INFINITI M35 2006 Factory Service Manual REAR ACTIVE STEER
STC-15
[RAS]
C
D
E
F
H
I
J
K
L
MA
B
STC
Revision: 2006 January2006 M35/M45
4. Supply 6 V voltage by connecting the four 1.5 V batteries in a
series. Connect them to the RAS motor con](/manual-img/42/57023/w960_57023-5429.png)
REAR ACTIVE STEER
STC-15
[RAS]
C
D
E
F
H
I
J
K
L
MA
B
STC
Revision: 2006 January2006 M35/M45
4. Supply 6 V voltage by connecting the four 1.5 V batteries in a
series. Connect them to the RAS motor connector (motor side),
and then operate the motor and adjust the rack in the neutral
position (A).
CAUTION:
Do not supply 12 V voltage (battery, etc) to the RAS motor.
NOTE:
For right stroke, connect positive probe to the RAS motor con-
nector terminal 1. For left stroke, connect it to the terminal 2.
5. Install rear wheel steering angle sensor with O-ring to the RAS
actuator assembly. Temporarily tighten the mounting bolts in the specified torque that the sensor can be
moved by hand.
6. Turn and adjust the rear wheel steering angle sensor so as to make each sensor signal of “DATA MONI-
TOR” mode to the following standard with CONSULT-II.
CAUTION:
During DATA MONITOR mode, “MONITORING ERROR” is displayed. But there is not malfunction
in this procedure.
7. Tighten rear wheel steering angle sensor mounting bolts.
8. Perform “ERASE” with CONSULT-II, and then erase the error memory of rear wheel steering angle sen-
sor. Refer to STC-29, "
How to Erase Self-Diagnostic Results" .
9. Perform CONSULT-II “SELF-DIAG RESULTS” again, and then make sure that there is no malfunction.
Refer to STC-28, "
SELF-DIAG RESULT MODE" . Full stroke (B) : 6.8 - 7.2 mm (0.268 - 0.283 in)
STEERING ANG () L - 0, R - 0, N - 0
RR ST ANG-MAI (V) Approx. 2.4
RR ST ANG-SUB (V) Approx. 2.4
RR ST ANG-VOL (V) Approx. 5.0
SGIA1240E
Page 5431 of 5621
![INFINITI M35 2006 Factory Service Manual STC-16
[RAS]
SYSTEM DESCRIPTION
Revision: 2006 January2006 M35/M45
SYSTEM DESCRIPTIONPFP:00000
ComponentsNGS000E8
RAS (Rear Active Steer) FunctionNGS000E9
A. RAS control unit B. Model following contro INFINITI M35 2006 Factory Service Manual STC-16
[RAS]
SYSTEM DESCRIPTION
Revision: 2006 January2006 M35/M45
SYSTEM DESCRIPTIONPFP:00000
ComponentsNGS000E8
RAS (Rear Active Steer) FunctionNGS000E9
A. RAS control unit B. Model following contro](/manual-img/42/57023/w960_57023-5430.png)
STC-16
[RAS]
SYSTEM DESCRIPTION
Revision: 2006 January2006 M35/M45
SYSTEM DESCRIPTIONPFP:00000
ComponentsNGS000E8
RAS (Rear Active Steer) FunctionNGS000E9
A. RAS control unit B. Model following control C. Target vehicle dynamics model
D. Rear wheel steering angle com-
mand value operationE. Rear wheel steering angle servo F. Vehicle speed signal (CAN)
G. Steering angle signal (CAN) H. Vehicle speed sensor I. Steering angle sensor
J. RAS actuator assembly
SGIA1241E
Part name Function
RAS control unit
Calculate the vehicle speed signal from CAN communication and the signals from steering
angle sensor and rear wheel steering angle sensor by a computer, and then control the rear
wheel steering angle.
Fail-safe function is activated when the electrical system is malfunctioning. The output signal
to the actuator is turned OFF during this mode. At that time, the RAS warning lamp illumi-
nates and indicates the system is malfunctioning.
It performs the communication control function with other control units via CAN communica-
tion.
This enables system diagnosis with CONSULT-II.
RAS actuatorThe efficiency of the rear wheel steer improves by locating the electric motor actuator into the
lower link of rear suspension.
Steering angle sensor
Measure the steering angle and send it to RAS control unit via CAN communication.
It is shared with the steering angle sensor for VDC.
Rear wheel steering angle sensor
It sends the rear wheel steering angle status to RAS control unit. The accuracy of rear wheel
steer improves by comparing the vehicle speed signal from CAN communication with the
rear wheel steering angle target value calculated from the wheel angle sensor signal, and it
controls them.
There are 2 types of rear wheel steering angle sensors (main/sub). If one of them is malfunc-
tioning, the other operates the fail-safe mode and stops the control.
RAS warning lamp
It turns on when the fail-safe function is operated and indicates that a RAS control malfunc-
tion has occurred.
It turns on when ignition switch turns on and turns off after the engine is started.
It indicates the suspect system by blinking when performing the self-diagnosis (without CON-
SULT-II).
Page 5434 of 5621
![INFINITI M35 2006 Factory Service Manual TROUBLE DIAGNOSIS
STC-19
[RAS]
C
D
E
F
H
I
J
K
L
MA
B
STC
Revision: 2006 January2006 M35/M45
Component Parts LocationNGS000EC
A. RAS warning lamp B. Steering angle sensor C. RAS control unit
D. RAS mo INFINITI M35 2006 Factory Service Manual TROUBLE DIAGNOSIS
STC-19
[RAS]
C
D
E
F
H
I
J
K
L
MA
B
STC
Revision: 2006 January2006 M35/M45
Component Parts LocationNGS000EC
A. RAS warning lamp B. Steering angle sensor C. RAS control unit
D. RAS mo](/manual-img/42/57023/w960_57023-5433.png)
TROUBLE DIAGNOSIS
STC-19
[RAS]
C
D
E
F
H
I
J
K
L
MA
B
STC
Revision: 2006 January2006 M35/M45
Component Parts LocationNGS000EC
A. RAS warning lamp B. Steering angle sensor C. RAS control unit
D. RAS motor relay E. RAS motor F. Rear wheel steering angle sensor
G. Noise suppressor
SGIA1053J