Page 5523 of 5621
TF-58
TRANSFER ASSEMBLY
Revision: 2006 January2006 M35/M45
Use Genuine Silicone RTV or equivalent. Refer to GI-48, "Recommended Chemical Products and
Sealants" .
CAUTION:
Remove old sealant and oil adhering to threads.
26. Set gasket to filler plug. Install it to rear case and tighten to the specified torque. Refer to TF-45, "
COM-
PONENTS" .
CAUTION:
Do not reuse gasket.
After oil is filled, tighten filler plug to specified torque.
Page 5527 of 5621

WT-2Revision: 2006 January2006 M35/M45 MALFUNCTION CODE NO. 52 ........................... 34
Inspection 8: CAN Communication System Mal-
function ................................................................... 34
TROUBLE DIAGNOSIS FOR SYMPTOMS .............. 35
Inspection 1: Warning Lamp Does Not Come On
When Ignition Switch Is Turned On ........................ 35
Inspection 2: Warning Lamp Stays On When Ignition
Switch Is Turned On ............................................ ... 36
Inspection 3: Warning Lamp Blinks When Ignition
Switch Is Turned On ............................................ ... 37
Inspection 4: Turn Signal Lamp Blinks When Ignition
Switch Is Turned On ............................................ ... 37
Inspection 5: ID Registration Can Not Be Completed ... 38REMOVAL AND INSTALLATION .............................. 39
Transmitter .............................................................. 39
REMOVAL ............................................................ 39
INSTALLATION .................................................... 39
Low Tire Pressure Warning Control Unit ................. 40
REMOVAL ............................................................ 40
INSTALLATION .................................................... 40
Receiver .................................................................. 40
REMOVAL ............................................................ 40
INSTALLATION .................................................... 40
SERVICE DATA AND SPECIFICATIONS (SDS) ...... 41
Road Wheel ............................................................ 41
Tire .......................................................................... 41
Page 5530 of 5621

NOISE, VIBRATION AND HARSHNESS (NVH) TROUBLESHOOTING
WT-5
C
D
F
G
H
I
J
K
L
MA
B
WT
Revision: 2006 January2006 M35/M45
NOISE, VIBRATION AND HARSHNESS (NVH) TROUBLESHOOTINGPFP:00003
NVH Troubleshooting ChartNES000JN
Use chart below to help you find the cause of the symptom. If necessary, repair or replace these parts.
: ApplicableReference page
FAX-5
, FSU-6WT-6WT-7WT-41WT-8—
—
WT-41
NVH in PR section.
NVH in RFD section.
NVH in FAX and FSU sections.
NVH in RAX and RSU sections.
Refer to TIRES in this chart.
Refer to ROAD WHEEL in this chart.
NVH in FAX, RAX section.
NVH in BR section.
NVH in PS section.
Possible cause and SUSPECTED PARTS
Improper installation, looseness
Out-of-round
Imbalance
Incorrect tire pressure
Uneven tire wear
Deformation or damage
Non-uniformity
Incorrect tire size
PROPELLER SHAFT
DIFFERENTIAL
FRONT AXLE AND FRONT SUSPENSION
REAR AXLE AND REAR SUSPENSION
TIRES
ROAD WHEELS
DRIVE SHAFT
BRAKE
STEERING
SymptomTIRESNoise
Shake
Vibration
Shimmy
Judder
Poor quality ride or
handling
ROAD
WHEELNoiseShake
Shimmy, Judder
Poor quality ride or
handling
Page 5532 of 5621

ROAD WHEEL TIRE ASSEMBLY
WT-7
C
D
F
G
H
I
J
K
L
MA
B
WT
Revision: 2006 January2006 M35/M45
ROAD WHEEL TIRE ASSEMBLYPFP:40300
Balancing Wheels (Bonding Weight Type)NES000JP
REMOVAL
1. Using releasing agent, remove double-faced adhesive tape from the road wheel.
CAUTION:
Be careful not to scratch the road wheel during removal.
After removing double-faced adhesive tape, wipe clean traces of releasing agent from the road
wheel.
WHEEL BALANCE ADJUSTMENT
If a tire balance machine has adhesion balance weight mode settings and drive-in weight mode setting, select
and adjust a drive-in weight mode suitable for road wheels.
1. Set road wheel on wheel balancer using the center hole as a guide. Start the tire balance machine.
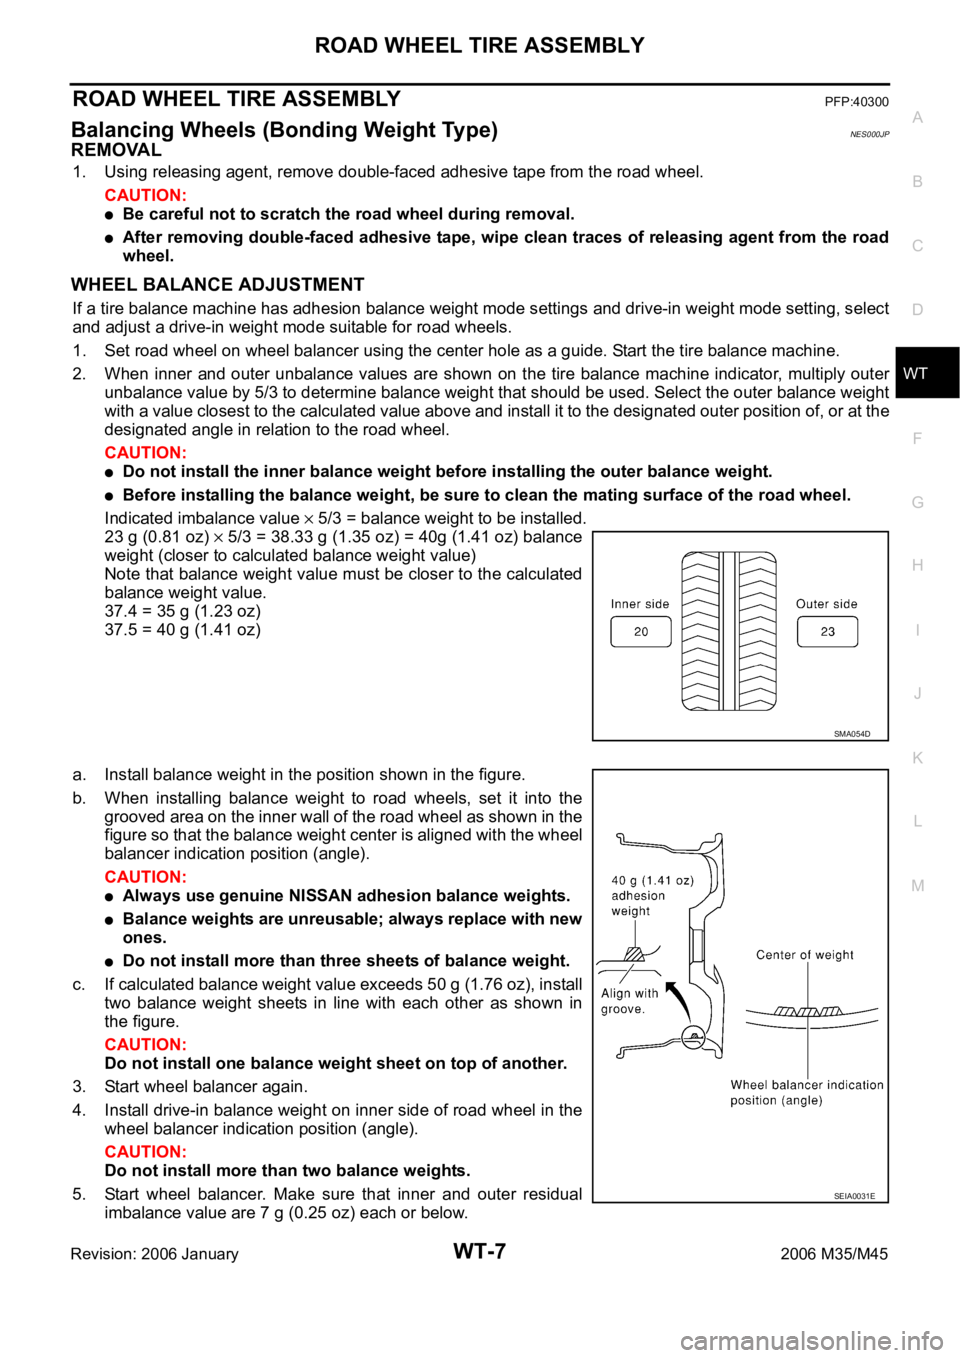
2. When inner and outer unbalance values are shown on the tire balance machine indicator, multiply outer
unbalance value by 5/3 to determine balance weight that should be used. Select the outer balance weight
with a value closest to the calculated value above and install it to the designated outer position of, or at the
designated angle in relation to the road wheel.
CAUTION:
Do not install the inner balance weight before installing the outer balance weight.
Before installing the balance weight, be sure to clean the mating surface of the road wheel.
Indicated imbalance value
5/3 = balance weight to be installed.
23 g (0.81 oz)
5/3 = 38.33 g (1.35 oz) = 40g (1.41 oz) balance
weight (closer to calculated balance weight value)
Note that balance weight value must be closer to the calculated
balance weight value.
37.4 = 35 g (1.23 oz)
37.5 = 40 g (1.41 oz)
a. Install balance weight in the position shown in the figure.
b. When installing balance weight to road wheels, set it into the
grooved area on the inner wall of the road wheel as shown in the
figure so that the balance weight center is aligned with the wheel
balancer indication position (angle).
CAUTION:
Always use genuine NISSAN adhesion balance weights.
Balance weights are unreusable; always replace with new
ones.
Do not install more than three sheets of balance weight.
c. If calculated balance weight value exceeds 50 g (1.76 oz), install
two balance weight sheets in line with each other as shown in
the figure.
CAUTION:
Do not install one balance weight sheet on top of another.
3. Start wheel balancer again.
4. Install drive-in balance weight on inner side of road wheel in the
wheel balancer indication position (angle).
CAUTION:
Do not install more than two balance weights.
5. Start wheel balancer. Make sure that inner and outer residual
imbalance value are 7 g (0.25 oz) each or below.
SMA054D
SEIA0031E
Page 5533 of 5621
WT-8
ROAD WHEEL TIRE ASSEMBLY
Revision: 2006 January2006 M35/M45
If either residual imbalance value exceeds 7 g (0.25 oz), repeat installation procedures.
RotationNES000JQ
Follow the maintenance schedule for tire rotation service intervals. Refer to MA-7, "PERIODIC MAINTE-
NANCE" .
Do not include the T-type spare tire when rotating the tires.
CAUTION:
When installing wheels, tighten them diagonally by divid-
ing the work two to three times in order to prevent the
wheels from developing any distortion.
Be careful not to tighten wheel nut at torque exceeding
the criteria for preventing strain of disc rotor.
Maximum allowable unbalanceDynamic (At rim flange) Less than 7 g (0.25 oz) (one side)
Static (At flange) Less than 14 g (0.49 oz)
Tightening torque
of wheel nut: 108 Nꞏm (11 kg-m, 80 ft-lb)
SMA829C
Page 5534 of 5621
LOW TIRE PRESSURE WARNING SYSTEM
WT-9
C
D
F
G
H
I
J
K
L
MA
B
WT
Revision: 2006 January2006 M35/M45
LOW TIRE PRESSURE WARNING SYSTEMPFP:40300
System ComponentsNES000JR
System DescriptionNES000JS
TRANSMITTER
A sensor-transmitter integrated with a valve is installed on a wheel,
and transmits a detected air pressure signal in the form of a radio
wave.
1. Tire pressure transmitter front LH 2. Tire pressure transmitter front RH 3. Tire pressure receiver front LH
4. Tire pressure receiver front RH 5. Low tire pressure warning control
unit6. Low tire pressure warning lamp
7. Display unit 8. Tire pressure transmitter rear LH 9. Tire pressure transmitter rear RH
10. Tire pressure receiver rear LH 11. Tire pressure receiver rear RH
SEIA0648E
SEIA0521E
Page 5549 of 5621

WT-24
TROUBLE DIAGNOSES
Revision: 2006 January2006 M35/M45
LOW TIRE PRESSURE WARNING CONTROL UNIT PART NUMBER
Operation Procedure
1. Perform “CONSULT-II Start Procedure”. Refer to GI-39, "CONSULT-II Start Procedure" .
2. The part number described on low tire pressure warning control unit sticker is displayed.
Diagnosis Procedure with Warning Lamp Function (Without CONSULT-II)NES000K6
DESCRIPTION
During driving, the low tire pressure warning system receives the signal transmitted from the transmitter
installed in each wheel, and gives alarms when the tire pressure becomes low. The control unit (low tire pres-
sure warning control unit) of this system has pressure judgement and trouble diagnosis functions.
FUNCTION
When the low tire pressure warning system detects low inflation pressure or another unusual symptom, the
warning lamps in the combination meter comes on. To start the self-diagnostic results mode, ground terminal
of the tire pressure warning check connector. The malfunction location is indicated by the warning lamp flash-
ing and the buzzer sounds. Regarding location of tire pressure warning check connector, refer to PG-63,
"HARNESS" .
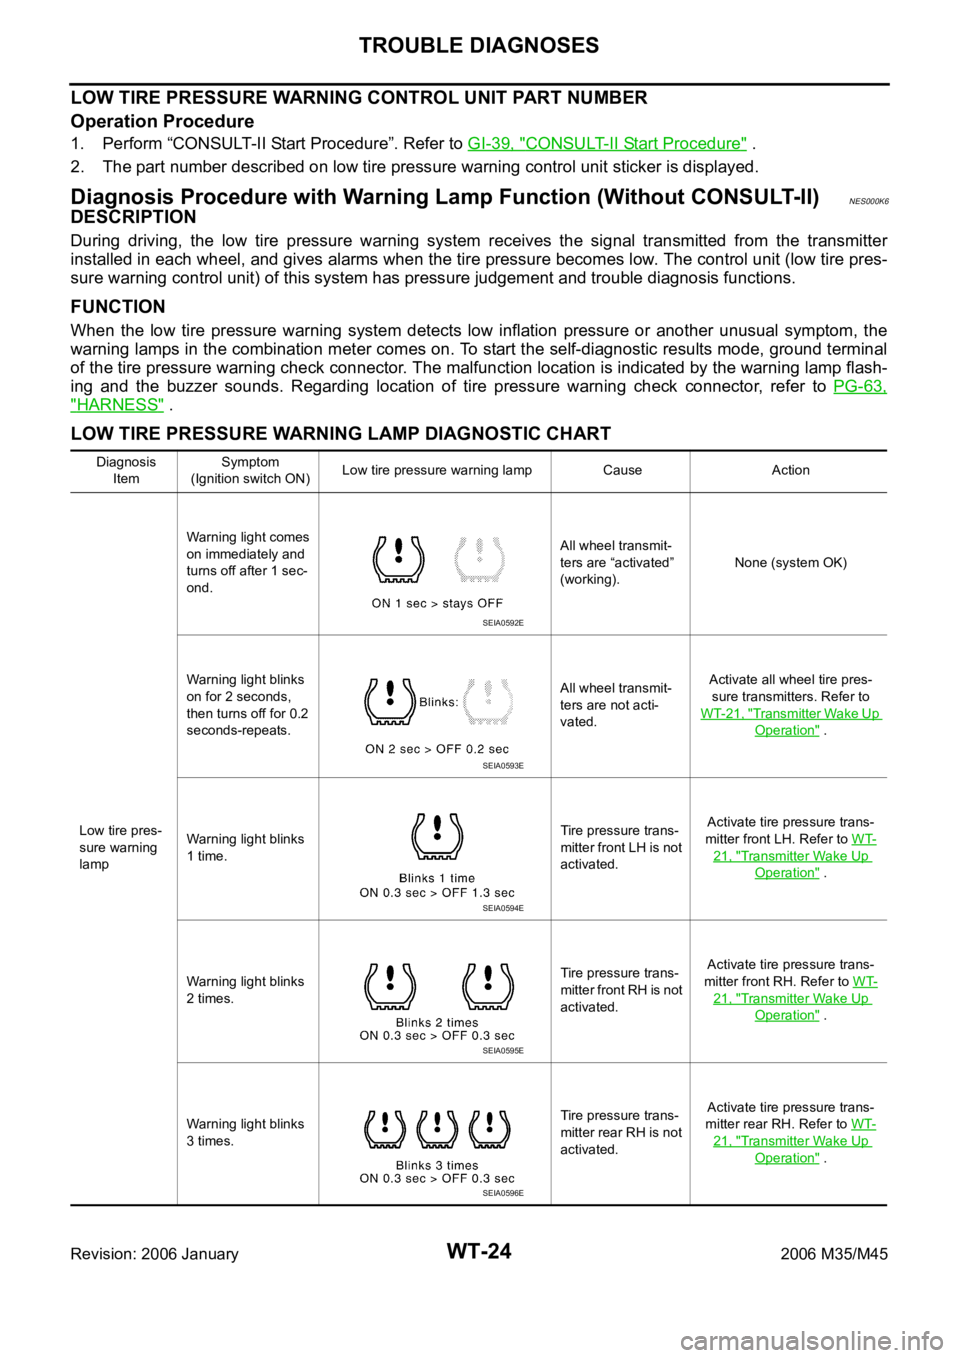
LOW TIRE PRESSURE WARNING LAMP DIAGNOSTIC CHART
Diagnosis
ItemSymptom
(Ignition switch ON)Low tire pressure warning lamp Cause Action
Low tire pres-
sure warning
lampWarning light comes
on immediately and
turns off after 1 sec-
ond.All wheel transmit-
ters are “activated”
(working).None (system OK)
Warning light blinks
on for 2 seconds,
then turns off for 0.2
seconds-repeats.All wheel transmit-
ters are not acti-
vated.Activate all wheel tire pres-
sure transmitters. Refer to
WT-21, "
Transmitter Wake Up
Operation" .
Warning light blinks
1 time.Tire pressure trans-
mitter front LH is not
activated.Activate tire pressure trans-
mitter front LH. Refer to WT-
21, "Transmitter Wake Up
Operation" .
Warning light blinks
2 times.Tire pressure trans-
mitter front RH is not
activated.Activate tire pressure trans-
mitter front RH. Refer to WT-
21, "Transmitter Wake Up
Operation" .
Warning light blinks
3 times.Tire pressure trans-
mitter rear RH is not
activated.Activate tire pressure trans-
mitter rear RH. Refer to WT-
21, "Transmitter Wake Up
Operation" .
SEIA0592E
SEIA0593E
SEIA0594E
SEIA0595E
SEIA0596E
Page 5550 of 5621

TROUBLE DIAGNOSES
WT-25
C
D
F
G
H
I
J
K
L
MA
B
WT
Revision: 2006 January2006 M35/M45
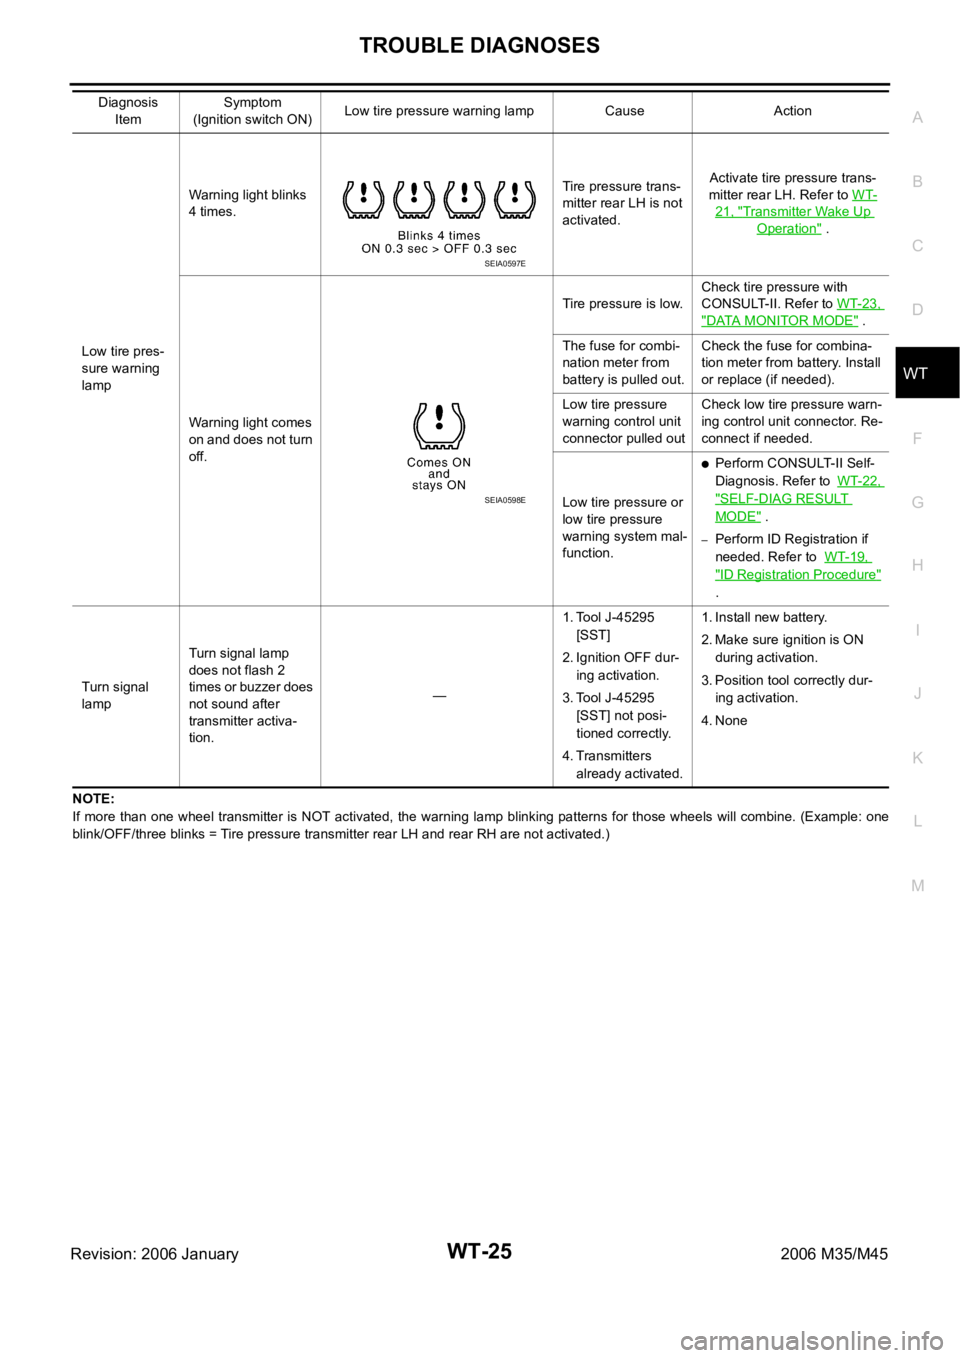
NOTE:
If more than one wheel transmitter is NOT activated, the warning lamp blinking patterns for those wheels will combine. (Example: one
blink/OFF/three blinks = Tire pressure transmitter rear LH and rear RH are not activated.) Low tire pres-
sure warning
lampWarning light blinks
4 times.Tire pressure trans-
mitter rear LH is not
activated.Activate tire pressure trans-
mitter rear LH. Refer to WT-
21, "Transmitter Wake Up
Operation" .
Warning light comes
on and does not turn
off.Tire pressure is low.Check tire pressure with
CONSULT-II. Refer to WT-23,
"DATA MONITOR MODE" .
The fuse for combi-
nation meter from
battery is pulled out.Check the fuse for combina-
tion meter from battery. Install
or replace (if needed).
Low tire pressure
warning control unit
connector pulled outCheck low tire pressure warn-
ing control unit connector. Re-
connect if needed.
Low tire pressure or
low tire pressure
warning system mal-
function.
Perform CONSULT-II Self-
Diagnosis. Refer to WT-22,
"SELF-DIAG RESULT
MODE" .
–Perform ID Registration if
needed. Refer to WT-19,
"ID Registration Procedure"
.
Turn signal
lampTurn signal lamp
does not flash 2
times or buzzer does
not sound after
transmitter activa-
tion.—1. Tool J-45295
[SST]
2. Ignition OFF dur-
ing activation.
3. Tool J-45295
[SST] not posi-
tioned correctly.
4. Transmitters
already activated.1. Install new battery.
2. Make sure ignition is ON
during activation.
3. Position tool correctly dur-
ing activation.
4. None Diagnosis
ItemSymptom
(Ignition switch ON)Low tire pressure warning lamp Cause Action
SEIA0597E
SEIA0598E