2006 INFINITI M35 stall
[x] Cancel search: stallPage 5430 of 5621
![INFINITI M35 2006 Factory Service Manual REAR ACTIVE STEER
STC-15
[RAS]
C
D
E
F
H
I
J
K
L
MA
B
STC
Revision: 2006 January2006 M35/M45
4. Supply 6 V voltage by connecting the four 1.5 V batteries in a
series. Connect them to the RAS motor con INFINITI M35 2006 Factory Service Manual REAR ACTIVE STEER
STC-15
[RAS]
C
D
E
F
H
I
J
K
L
MA
B
STC
Revision: 2006 January2006 M35/M45
4. Supply 6 V voltage by connecting the four 1.5 V batteries in a
series. Connect them to the RAS motor con](/manual-img/42/57023/w960_57023-5429.png)
REAR ACTIVE STEER
STC-15
[RAS]
C
D
E
F
H
I
J
K
L
MA
B
STC
Revision: 2006 January2006 M35/M45
4. Supply 6 V voltage by connecting the four 1.5 V batteries in a
series. Connect them to the RAS motor connector (motor side),
and then operate the motor and adjust the rack in the neutral
position (A).
CAUTION:
Do not supply 12 V voltage (battery, etc) to the RAS motor.
NOTE:
For right stroke, connect positive probe to the RAS motor con-
nector terminal 1. For left stroke, connect it to the terminal 2.
5. Install rear wheel steering angle sensor with O-ring to the RAS
actuator assembly. Temporarily tighten the mounting bolts in the specified torque that the sensor can be
moved by hand.
6. Turn and adjust the rear wheel steering angle sensor so as to make each sensor signal of “DATA MONI-
TOR” mode to the following standard with CONSULT-II.
CAUTION:
During DATA MONITOR mode, “MONITORING ERROR” is displayed. But there is not malfunction
in this procedure.
7. Tighten rear wheel steering angle sensor mounting bolts.
8. Perform “ERASE” with CONSULT-II, and then erase the error memory of rear wheel steering angle sen-
sor. Refer to STC-29, "
How to Erase Self-Diagnostic Results" .
9. Perform CONSULT-II “SELF-DIAG RESULTS” again, and then make sure that there is no malfunction.
Refer to STC-28, "
SELF-DIAG RESULT MODE" . Full stroke (B) : 6.8 - 7.2 mm (0.268 - 0.283 in)
STEERING ANG () L - 0, R - 0, N - 0
RR ST ANG-MAI (V) Approx. 2.4
RR ST ANG-SUB (V) Approx. 2.4
RR ST ANG-VOL (V) Approx. 5.0
SGIA1240E
Page 5447 of 5621
![INFINITI M35 2006 Factory Service Manual STC-32
[RAS]
TROUBLE DIAGNOSIS
Revision: 2006 January2006 M35/M45
For Fast and Accurate Trouble DiagnosisNGS000EN
Check the following items with the vehicle stopped
Is air pressure and size of tires p INFINITI M35 2006 Factory Service Manual STC-32
[RAS]
TROUBLE DIAGNOSIS
Revision: 2006 January2006 M35/M45
For Fast and Accurate Trouble DiagnosisNGS000EN
Check the following items with the vehicle stopped
Is air pressure and size of tires p](/manual-img/42/57023/w960_57023-5446.png)
STC-32
[RAS]
TROUBLE DIAGNOSIS
Revision: 2006 January2006 M35/M45
For Fast and Accurate Trouble DiagnosisNGS000EN
Check the following items with the vehicle stopped
Is air pressure and size of tires proper?
Is the specified part used for the steering wheel?
Is control unit a genuine part?
Are there any fluid leakage from steering gear assembly, power steering oil pump, and hydraulic pipes,
etc? Refer to PS-8, "
POWER STEERING FLUID" .
Is the fluid level proper? Refer to PS-8, "POWER STEERING FLUID" .
Is the wheel alignment is adjusted properly? Refer to FSU-19, "SERVICE DATA AND SPECIFICATIONS
(SDS)" (2WD), FSU-36, "SERVICE DATA AND SPECIFICATIONS (SDS)" (AWD).
Are there any damage or modification to suspension or body resulting in increased weight or altered
ground clearance?
Check each link installation condition of suspension and axle.
Is the battery voltage proper?
Check each connector connection condition.
Check the following items while driving the vehicle
Conditions when the error occurred (5W 1H).
Is the engine is normal?
Basic InspectionNGS000EO
BASIC INSPECTION 1: POWER SUPPLY CIRCUIT TERMINAL LOOSENESS AND BATTERY
Check battery terminals for looseness on both positive and negative ones and ground connection. Also make
sure that battery voltage does not drop.
BASIC INSPECTION 2: RAS WARNING LAMP INSPECTION
1. Make sure RAS warning lamp turns on when ignition switch is turned ON.
If it does not turn on, refer to STC-33, "Trouble Diagnosis Chart" .
2. Make sure that RAS warning lamp turns off when the engine is started after ignition switch is turned ON. If
it does not turn off, perform self-diagnosis. Refer to STC-28, "
SELF-DIAG RESULT MODE" .
3. Always erase DTC memory after completing self-diagnosis. Refer to STC-29, "
How to Erase Self-Diag-
nostic Results" .
BASIC INSPECTION 3: RAS CONTROL UNIT POWER SUPPLY CIRCUIT AND GROUND CIR-
CUIT INSPECTION
1. CHECK RAS CONTROL UNIT CONNECTOR
Turn ignition switch OFF, disconnect RAS control unit harness connector, and check terminal for deformation,
disconnection, looseness, etc.
OK or NG
OK >> GO TO 2.
NG >> Poor connection of connector terminal. Repair or replace the terminal.
2. CHECK RAS CONTROL UNIT GROUND CIRCUIT
1. Disconnect RAS control unit harness connector B127, and then
check continuity between RAS control unit harness connector
B127 and ground.
OK or NG
OK >> GO TO 3.
NG >> Ground circuit open or shorted. Repair or replace any
inoperative parts. Terminal 34 – Ground : Continuity
SGIA1244E
Page 5461 of 5621
![INFINITI M35 2006 Factory Service Manual STC-46
[RAS]
TROUBLE DIAGNOSIS
Revision: 2006 January2006 M35/M45
Diagnosis Chart by Symptom 1NGS000F1
1. CHECK SELF-DIAGNOSTIC RESULTS
Perform RAS self-diagnosis.
With CONSULT-II: STC-28, "SELF-D INFINITI M35 2006 Factory Service Manual STC-46
[RAS]
TROUBLE DIAGNOSIS
Revision: 2006 January2006 M35/M45
Diagnosis Chart by Symptom 1NGS000F1
1. CHECK SELF-DIAGNOSTIC RESULTS
Perform RAS self-diagnosis.
With CONSULT-II: STC-28, "SELF-D](/manual-img/42/57023/w960_57023-5460.png)
STC-46
[RAS]
TROUBLE DIAGNOSIS
Revision: 2006 January2006 M35/M45
Diagnosis Chart by Symptom 1NGS000F1
1. CHECK SELF-DIAGNOSTIC RESULTS
Perform RAS self-diagnosis.
With CONSULT-II: STC-28, "SELF-DIAG RESULT MODE"
Without CONSULT-II: STC-31, "Diagnosis Procedure with Self-Diagnosis Function (Without CONSULT-
II)"
Are malfunctioning items displayed in self-diagnosis results?
YES >> Repair or replace any malfunctioning items.
NO >> GO TO 2.
2. CHECK RAS STATIC/DYNAMIC CHARACTERISTICS
Check RAS static/dynamic characteristics. Refer to STC-48, "
Check RAS Static/Dynamic Characteristics" .
Is the malfunction corrected?
YES >> INSPECTION END
NO >> Perform the following check, and then check the symptom again.
Adjust neutral position of steering angle sensor. Refer to BRC-6, "Adjustment of Steering Angle
Sensor Neutral Position" .
Steering angle sensor mounting condition. Refer to BRC-63, "Removal and Installation" .
Diagnosis Chart by Symptom 2NGS000F2
The steering force does not change smoothly according to the vehicle speed (Heavy steering force with the
vehicle stopped/Light handle operation during high-speed driving)
1. CHECK (1): POWER STEERING SOLENOID VALVE SIGNAL
1. Start engine.
2. Change the vehicle speed from 0 to 100 km/h (0 to 62 MPH)
slowly, and then check voltage RAS control unit harness con-
nector B127.
OK or NG
OK >> GO TO 2.
NG >> GO TO 7.
2. CHECK (2): POWER STEERING SOLENOID VALVE SIGNAL
1. Activate fail-safe function by running engine speed at 1,500 rpm or higher for 10 seconds with the vehicle
stopped.
2. Change the engine speed to the idling speed, approx. 1,600
rpm, and approximately 3,000 rpm slowly, and then check volt-
age RAS control unit harness connector B127.
OK or NG
OK >> GO TO 3.
NG >> GO TO 7.Terminal 36 – 34 : The voltage has changed from
approximately 4.4 - 6.6 V to approxi-
mately 2.4 - 3.6 V.
SGIA1281E
Terminal 36 – 34 : The voltage is changed from
approximately 5.5 V to approximately
2.1 V step-by-step.
SGIA1281E
Page 5467 of 5621

TF-2Revision: 2006 January2006 M35/M45 Started .................................................................... 35
DIAGNOSTIC PROCEDURE .............................. 35
Vehicle Does Not Enter AWD Mode Even Though
AWD Warning Lamp Turned to OFF ....................... 36
DIAGNOSTIC PROCEDURE .............................. 36
While Driving, AWD Warning Lamp Flashes Rapidly
(When Flashing in Approx. 1 Minute and Then Turn-
ing OFF) ................................................................. 37
While Driving, AWD Warning Lamp Flashes Slowly
(When Continuing to Flash until Turning Ignition
Switch OFF) ............................................................ 37
DIAGNOSTIC PROCEDURE .............................. 37
AWD CONTROL UNIT .............................................. 39
Removal and Installation ........................................ 39
REMOVAL ........................................................
... 39
INSTALLATION .................................................... 39
FRONT OIL SEAL ..................................................... 40
Removal and Installation ........................................ 40
REMOVAL ........................................................
... 40
INSTALLATION .................................................... 40REAR OIL SEAL ....................................................... 41
Removal and Installation ......................................... 41
REMOVAL ............................................................ 41
INSTALLATION .................................................... 42
AIR BREATHER HOSE ............................................. 43
Removal and Installation ......................................... 43
TRANSFER ASSEMBLY ........................................... 44
Removal and Installation ......................................... 44
REMOVAL ............................................................ 44
INSTALLATION .................................................... 44
Disassembly and Assembly .................................... 45
COMPONENTS ................................................... 45
DISASSEMBLY .................................................... 46
INSPECTION ....................................................... 51
ASSEMBLY .......................................................... 52
SERVICE DATA AND SPECIFICATIONS (SDS) ...... 59
General Specifications ......................................... ... 59
Page 5468 of 5621

PRECAUTIONS
TF-3
C
E
F
G
H
I
J
K
L
MA
B
TF
Revision: 2006 January2006 M35/M45
PRECAUTIONSPFP:00001
Precautions for Supplemental Restraint System (SRS) “AIR BAG” and “SEAT
BELT PRE-TENSIONER”
NDS000D3
The Supplemental Restraint System such as “AIR BAG” and “SEAT BELT PRE-TENSIONER”, used along
with a front seat belt, helps to reduce the risk or severity of injury to the driver and front passenger for certain
types of collision. This system includes seat belt switch inputs and dual stage front air bag modules. The SRS
system uses the seat belt switches to determine the front air bag deployment, and may only deploy one front
air bag, depending on the severity of a collision and whether the front occupants are belted or unbelted.
Information necessary to service the system safely is included in the SRS and SB section of this Service Man-
ual.
WAR NING :
To avoid rendering the SRS inoperative, which could increase the risk of personal injury or death
in the event of a collision which would result in air bag inflation, all maintenance must be per-
formed by an authorized NISSAN/INFINITI dealer.
Improper maintenance, including incorrect removal and installation of the SRS, can lead to per-
sonal injury caused by unintentional activation of the system. For removal of Spiral Cable and Air
Bag Module, see the SRS section.
Do not use electrical test equipment on any circuit related to the SRS unless instructed to in this
Service Manual. SRS wiring harnesses can be identified by yellow and/or orange harnesses or
harness connectors.
PrecautionsNDS000D4
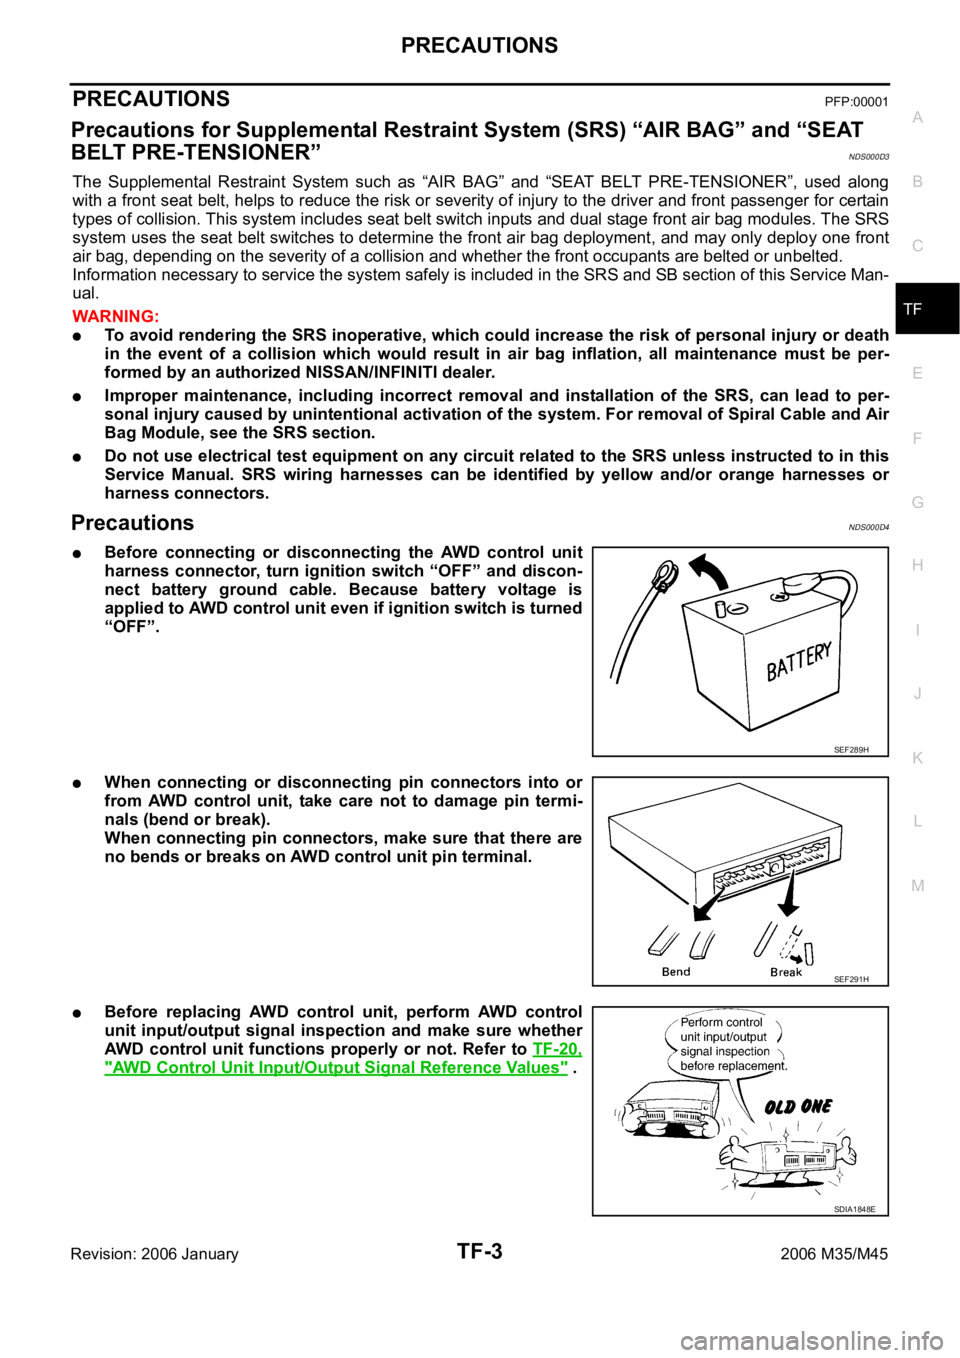
Before connecting or disconnecting the AWD control unit
harness connector, turn ignition switch “OFF” and discon-
nect battery ground cable. Because battery voltage is
applied to AWD control unit even if ignition switch is turned
“OFF”.
When connecting or disconnecting pin connectors into or
from AWD control unit, take care not to damage pin termi-
nals (bend or break).
When connecting pin connectors, make sure that there are
no bends or breaks on AWD control unit pin terminal.
Before replacing AWD control unit, perform AWD control
unit input/output signal inspection and make sure whether
AWD control unit functions properly or not. Refer to TF-20,
"AWD Control Unit Input/Output Signal Reference Values" .
SEF289H
SEF291H
SDIA1848E
Page 5469 of 5621

TF-4
PRECAUTIONS
Revision: 2006 January2006 M35/M45
Service Notice or PrecautionsNDS000D5
Do not reuse transfer fluid, once it has been drained.
Check the fluid level or replace the fluid only with the vehicle parked on level ground.
During removal or installation, keep inside of transfer clear of dust or dirt.
Replace all tires at the same time. Always use tires of the proper size and the same brand and pattern.
Fitting improper size and unusual wear tires applies excessive force to vehicle mechanism and can cause
longitudinal vibration.
Disassembly should be done in a clean work area, it is preferable to work in dustproof area.
Before proceeding with disassembly, thoroughly clean the transfer. It is important to prevent the internal
parts from becoming contaminated by dirt or other foreign matter.
All parts should be carefully cleaned with a general purpose, non-flammable solvent before inspection or
reassembly.
Check for the correct installation status prior to removal or disassembly. If matching marks are required,
be certain they do not interfere with the function of the parts when applied.
Check appearance of the disassembled parts for damage, deformation, and unusual wear. Replace them
with a new ones if necessary.
Gaskets, seals and O-rings should be replaced any time when the transfer is disassembled.
In principle, tighten bolts or nuts gradually in several steps working diagonally from inside to outside. If
tightening sequence is specified, use it.
Observe the specified torque when assembling.
Clean and flush the parts sufficiently and blow-dry them.
Be careful not to damage sliding surfaces and mating surfaces.
Clean innerparts with lint-free cloth or towels. Do not use cotton work gloves and rags to prevent adhering
fibers.
Page 5470 of 5621

PREPARATION
TF-5
C
E
F
G
H
I
J
K
L
MA
B
TF
Revision: 2006 January2006 M35/M45
PREPARATIONPFP:00002
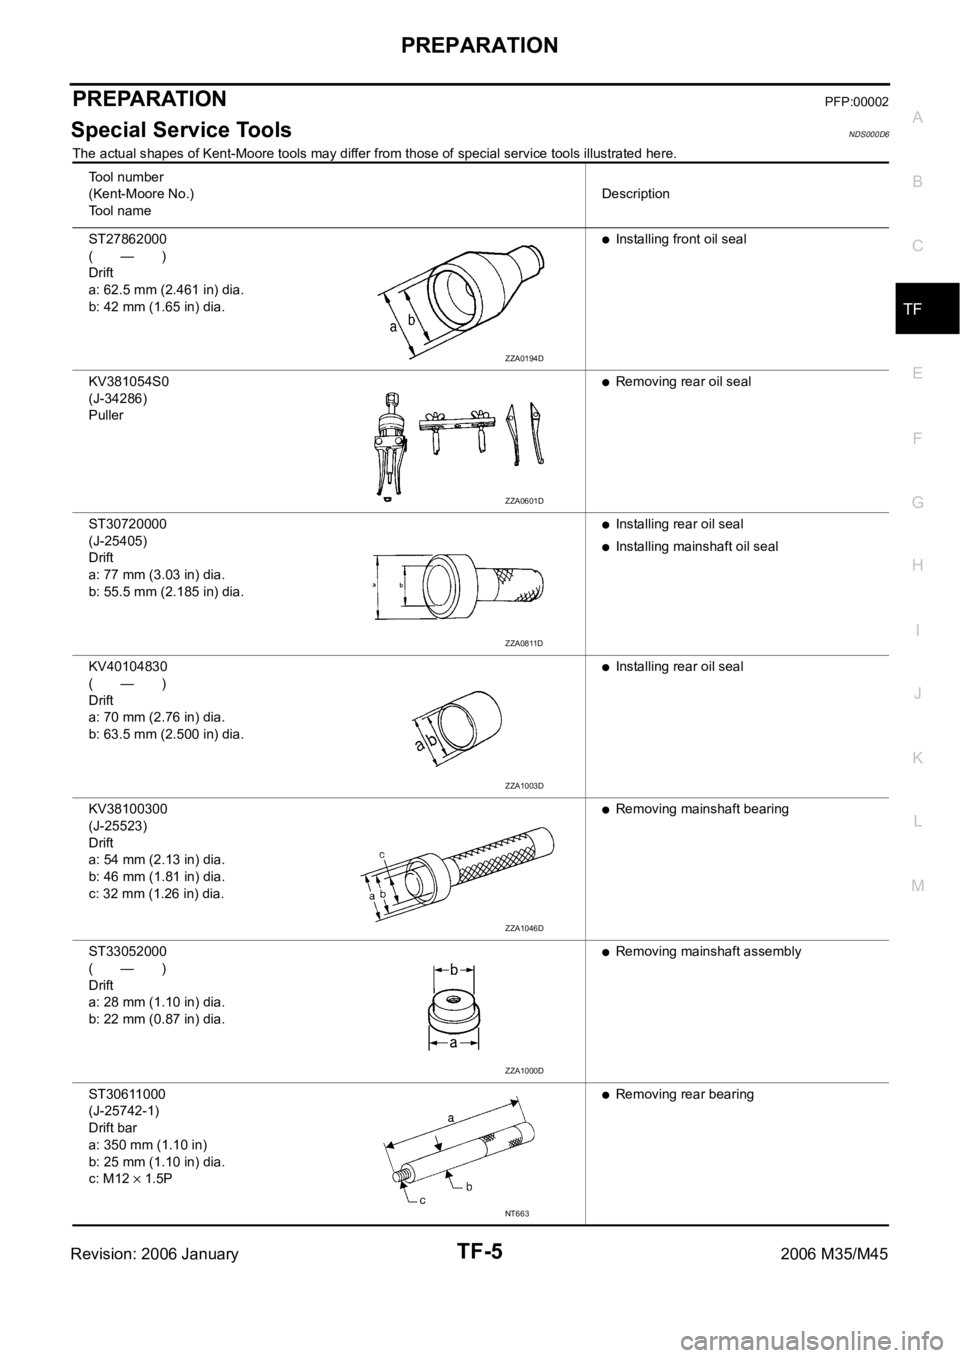
Special Service ToolsNDS000D6
The actual shapes of Kent-Moore tools may differ from those of special service tools illustrated here.
Tool number
(Kent-Moore No.)
To o l n a m eDescription
ST27862000
(—)
Drift
a: 62.5 mm (2.461 in) dia.
b: 42 mm (1.65 in) dia.
Installing front oil seal
KV381054S0
(J-34286)
Puller
Removing rear oil seal
ST30720000
(J-25405)
Drift
a: 77 mm (3.03 in) dia.
b: 55.5 mm (2.185 in) dia.
Installing rear oil seal
Installing mainshaft oil seal
KV40104830
(—)
Drift
a: 70 mm (2.76 in) dia.
b: 63.5 mm (2.500 in) dia.
Installing rear oil seal
KV38100300
(J-25523)
Drift
a: 54 mm (2.13 in) dia.
b: 46 mm (1.81 in) dia.
c: 32 mm (1.26 in) dia.
Removing mainshaft bearing
ST33052000
(—)
Drift
a: 28 mm (1.10 in) dia.
b: 22 mm (0.87 in) dia.
Removing mainshaft assembly
ST30611000
(J-25742-1)
Drift bar
a: 350 mm (1.10 in)
b: 25 mm (1.10 in) dia.
c: M12
1.5P
Removing rear bearing
ZZA0194D
ZZA0601D
ZZA0811D
ZZA1003D
ZZA1046D
ZZA1000D
NT663
Page 5471 of 5621

TF-6
PREPARATION
Revision: 2006 January2006 M35/M45
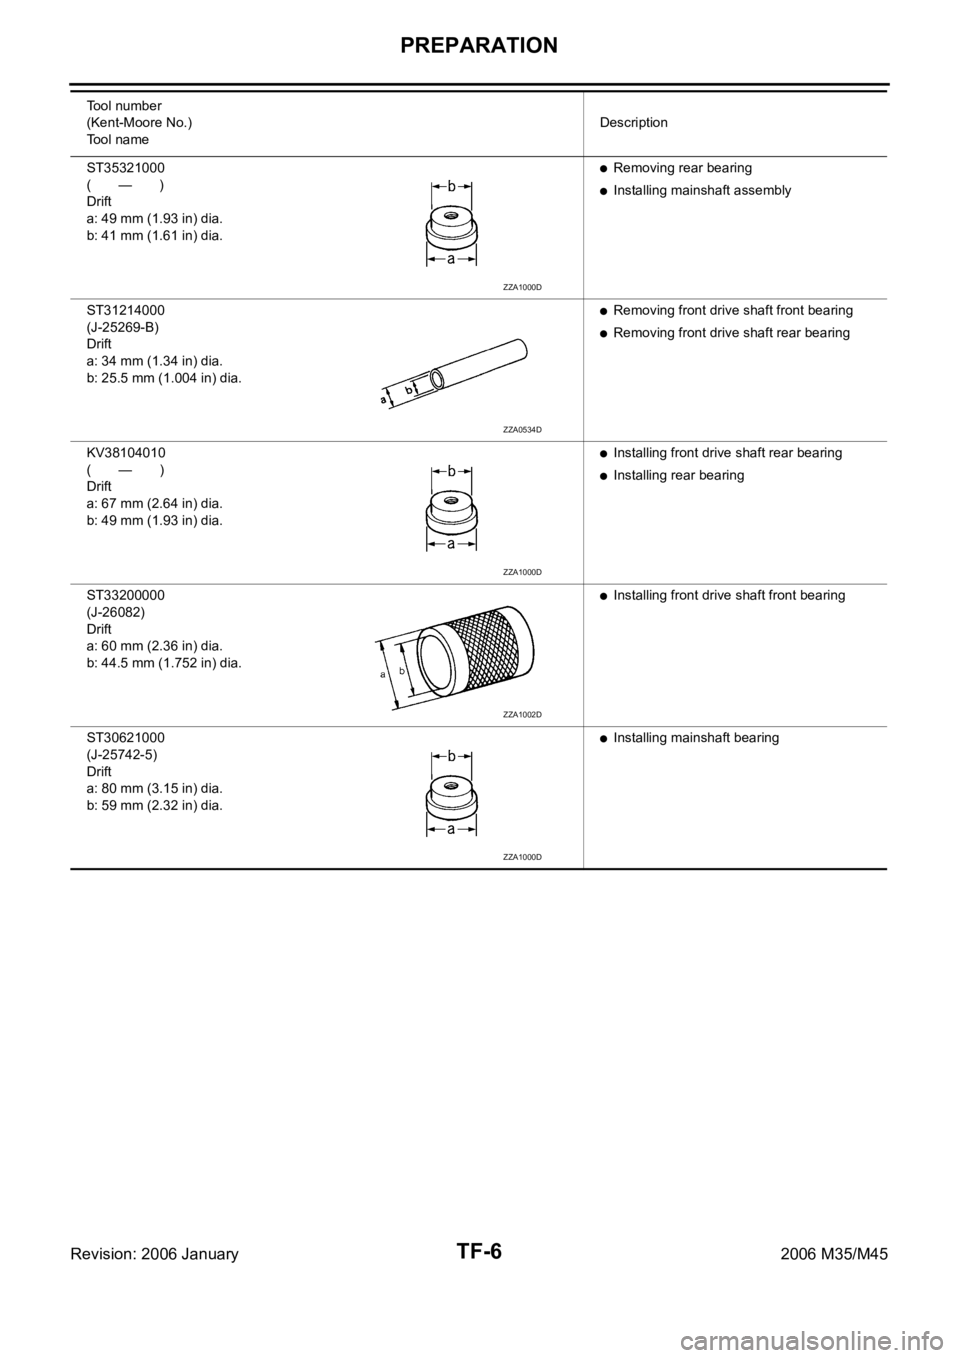
ST35321000
(—)
Drift
a: 49 mm (1.93 in) dia.
b: 41 mm (1.61 in) dia.Removing rear bearing
Installing mainshaft assembly
ST31214000
(J-25269-B)
Drift
a: 34 mm (1.34 in) dia.
b: 25.5 mm (1.004 in) dia.
Removing front drive shaft front bearing
Removing front drive shaft rear bearing
KV38104010
(—)
Drift
a: 67 mm (2.64 in) dia.
b: 49 mm (1.93 in) dia.
Installing front drive shaft rear bearing
Installing rear bearing
ST33200000
(J-26082)
Drift
a: 60 mm (2.36 in) dia.
b: 44.5 mm (1.752 in) dia.
Installing front drive shaft front bearing
ST30621000
(J-25742-5)
Drift
a: 80 mm (3.15 in) dia.
b: 59 mm (2.32 in) dia.
Installing mainshaft bearing Tool number
(Kent-Moore No.)
Tool nameDescription
ZZA1000D
ZZA0534D
ZZA1000D
ZZA1002D
ZZA1000D