2006 INFINITI M35 combination meter
[x] Cancel search: combination meterPage 5160 of 5621

CHARGING SYSTEM
SC-23
C
D
E
F
G
H
I
J
L
MA
B
SC
Revision: 2006 January2006 M35/M45
CHARGING SYSTEM PFP:00011
System Description NKS003NN
DESCRIPTION
The alternator provides DC voltage to operate the vehicle's electrical system and to keep the battery charged.
The voltage output is controlled by the IC regulator.
Power is supplied at all times
through 10A fuse [No. 36, located in the fuse, fusible link and relay block (J/B)]
to alternator terminal 4 (“S” terminal).
“B” terminal supplies power to charge the battery and operate the vehicle's electrical system. Output voltage is
controlled by the IC regulator at terminal 4 (“S” terminal) detecting the input voltage.
The alternator is grounded to the engine block.
With the ignition switch in the ON or START position, power is supplied
through 10A fuse [No. 14, located in the fuse block (J/B)]
to combination meter terminal 12 for the charge warning lamp.
Ground is supplied at signal
to combination meter terminal 22
through alternator terminal 3 (“L” terminal).
Then power and ground are supplied, the charge warning lamp will illuminate.
When the alternator is providing sufficient voltage with the engine running, the ground is opened and the
charge warning lamp will go off.
If the charge warning lamp illuminates with the engine running, a malfunction is indicated.
Ground is supplied
to alternator terminal 2 (“E” terminal)
through grounds E222, E223 and E224. (VQ35DE)
through ground E212. (VK45DE)
MALFUNCTION INDICATOR
The IC regulator warning function activates to illuminate the charge warning lamp, if any of the following symp-
toms occur while alternator is operating:
Excessive voltage is produced.
No voltage is produced.
Page 5169 of 5621

SC-32
CHARGING SYSTEM
Revision: 2006 January2006 M35/M45
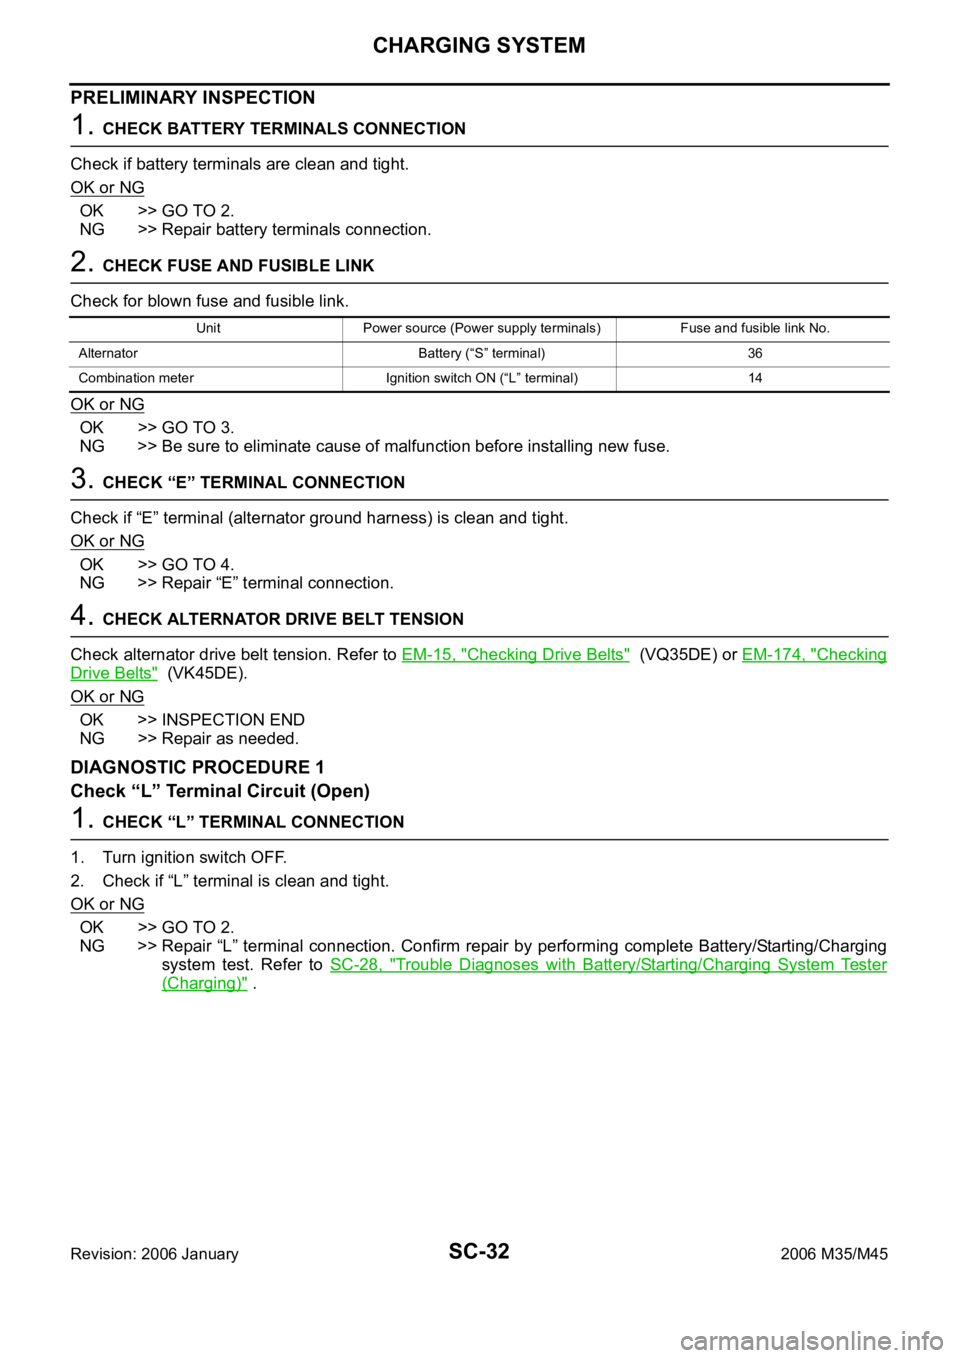
PRELIMINARY INSPECTION
1. CHECK BATTERY TERMINALS CONNECTION
Check if battery terminals are clean and tight.
OK or NG
OK >> GO TO 2.
NG >> Repair battery terminals connection.
2. CHECK FUSE AND FUSIBLE LINK
Check for blown fuse and fusible link.
OK or NG
OK >> GO TO 3.
NG >> Be sure to eliminate cause of malfunction before installing new fuse.
3. CHECK “E” TERMINAL CONNECTION
Check if “E” terminal (alternator ground harness) is clean and tight.
OK or NG
OK >> GO TO 4.
NG >> Repair “E” terminal connection.
4. CHECK ALTERNATOR DRIVE BELT TENSION
Check alternator drive belt tension. Refer to EM-15, "
Checking Drive Belts" (VQ35DE) or EM-174, "Checking
Drive Belts" (VK45DE).
OK or NG
OK >> INSPECTION END
NG >> Repair as needed.
DIAGNOSTIC PROCEDURE 1
Check “L” Terminal Circuit (Open)
1. CHECK “L” TERMINAL CONNECTION
1. Turn ignition switch OFF.
2. Check if “L” terminal is clean and tight.
OK or NG
OK >> GO TO 2.
NG >> Repair “L” terminal connection. Confirm repair by performing complete Battery/Starting/Charging
system test. Refer to SC-28, "
Trouble Diagnoses with Battery/Starting/Charging System Tester
(Charging)" .
Unit Power source (Power supply terminals) Fuse and fusible link No.
Alternator Battery (“S” terminal) 36
Combination meter Ignition switch ON (“L” terminal) 14
Page 5170 of 5621

CHARGING SYSTEM
SC-33
C
D
E
F
G
H
I
J
L
MA
B
SC
Revision: 2006 January2006 M35/M45
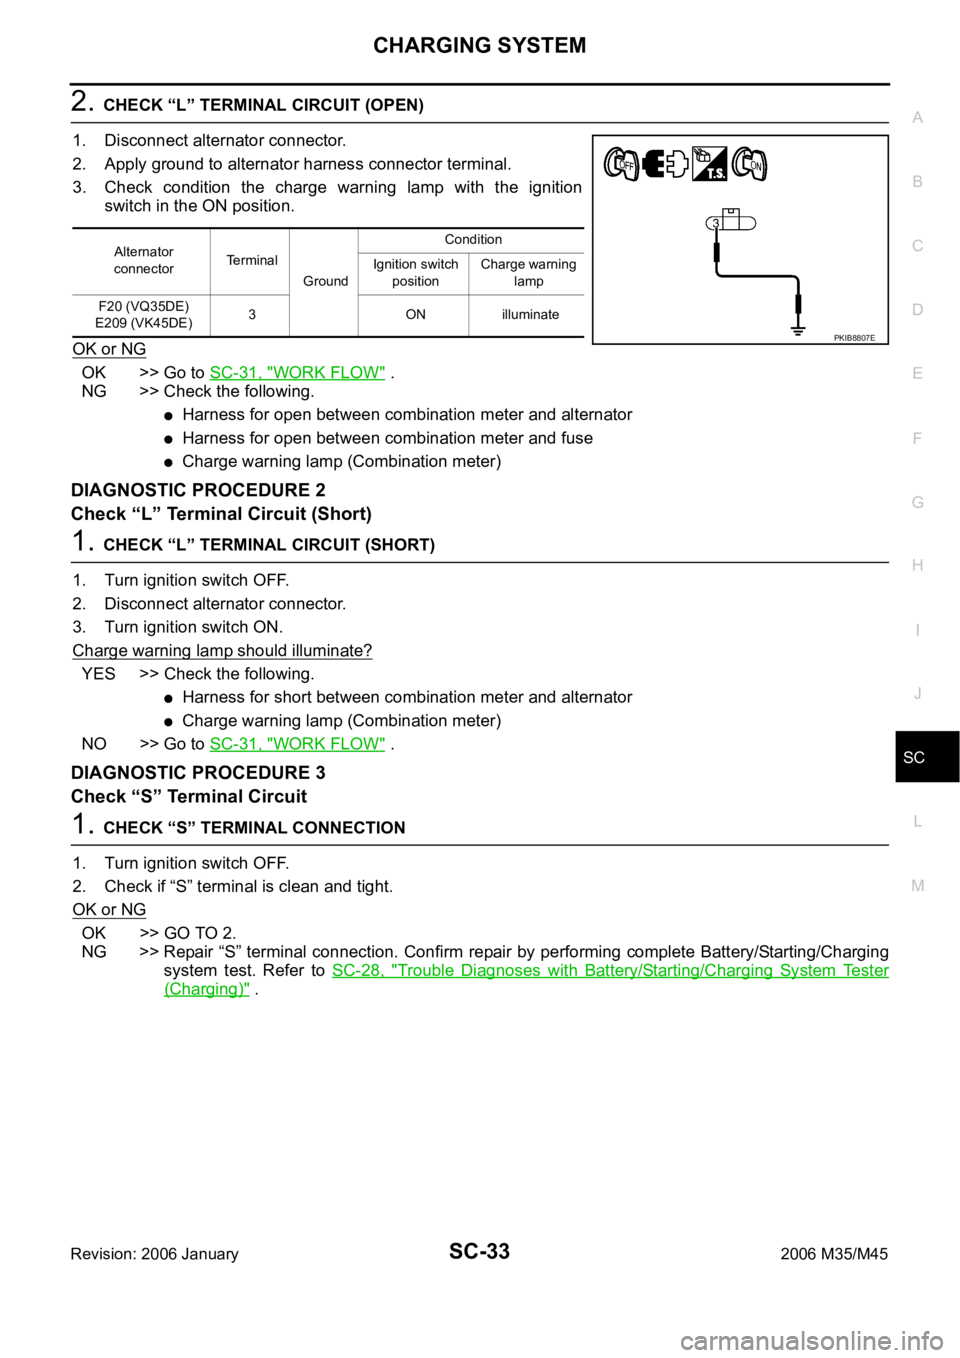
2. CHECK “L” TERMINAL CIRCUIT (OPEN)
1. Disconnect alternator connector.
2. Apply ground to alternator harness connector terminal.
3. Check condition the charge warning lamp with the ignition
switch in the ON position.
OK or NG
OK >> Go to SC-31, "WORK FLOW" .
NG >> Check the following.
Harness for open between combination meter and alternator
Harness for open between combination meter and fuse
Charge warning lamp (Combination meter)
DIAGNOSTIC PROCEDURE 2
Check “L” Terminal Circuit (Short)
1. CHECK “L” TERMINAL CIRCUIT (SHORT)
1. Turn ignition switch OFF.
2. Disconnect alternator connector.
3. Turn ignition switch ON.
Charge warning lamp should illuminate?
YES >> Check the following.
Harness for short between combination meter and alternator
Charge warning lamp (Combination meter)
NO >> Go to SC-31, "
WORK FLOW" .
DIAGNOSTIC PROCEDURE 3
Check “S” Terminal Circuit
1. CHECK “S” TERMINAL CONNECTION
1. Turn ignition switch OFF.
2. Check if “S” terminal is clean and tight.
OK or NG
OK >> GO TO 2.
NG >> Repair “S” terminal connection. Confirm repair by performing complete Battery/Starting/Charging
system test. Refer to SC-28, "
Trouble Diagnoses with Battery/Starting/Charging System Tester
(Charging)" .
Alternator
connectorTerminal
GroundCondition
Ignition switch
positionCharge warning
lamp
F20 (VQ35DE)
E209 (VK45DE)3 ON illuminate
PKIB8807E
Page 5188 of 5621

SQUEAK AND RATTLE TROUBLE DIAGNOSES
SE-7
C
D
E
F
G
H
J
K
L
MA
B
SE
Revision: 2006 January2006 M35/M45
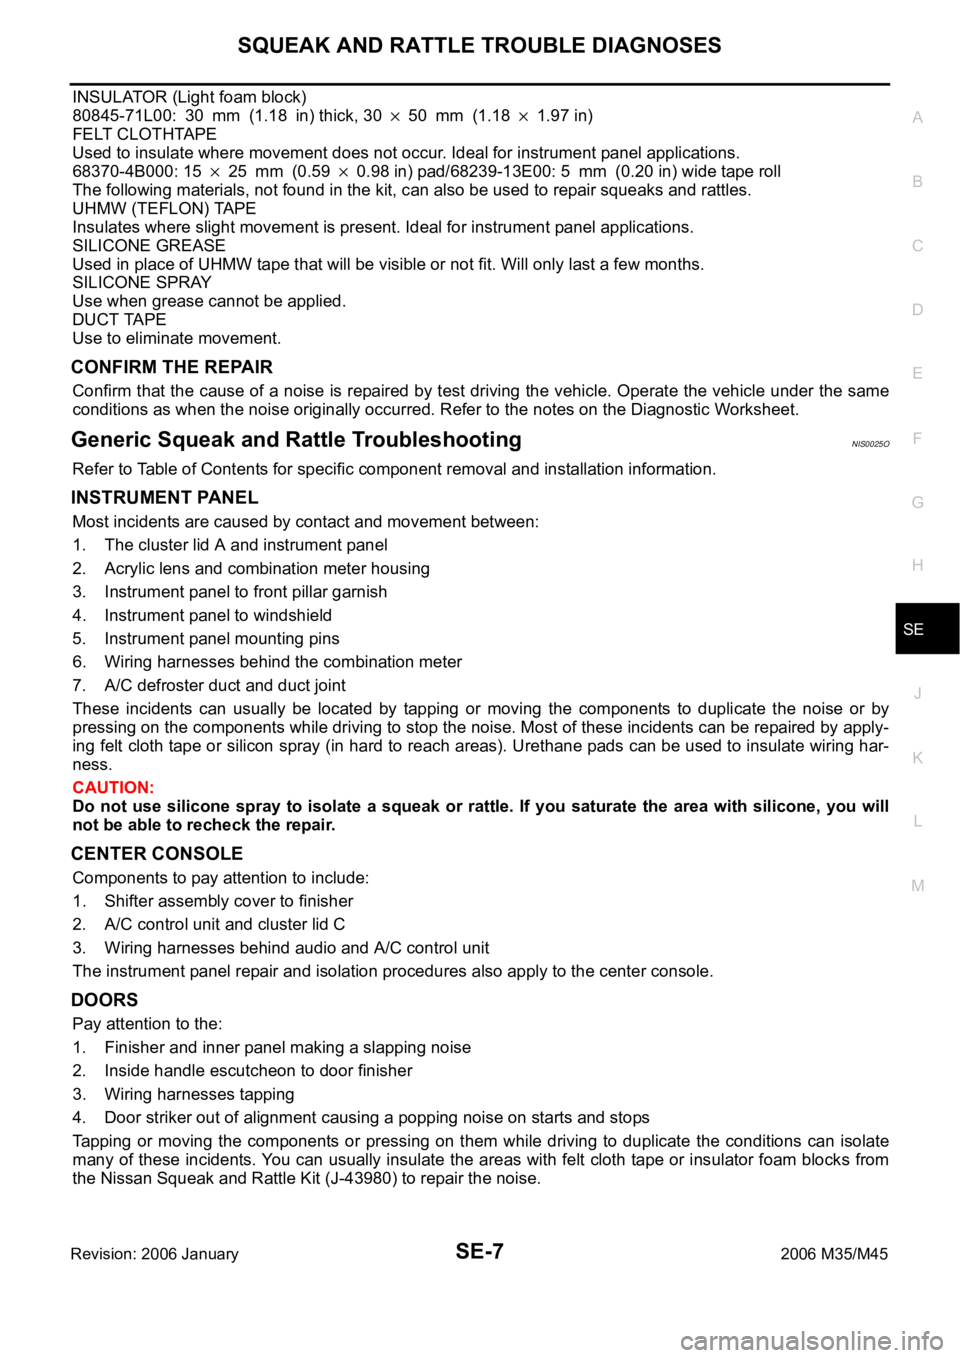
INSULATOR (Light foam block)
80845-71L00: 30 mm (1.18 in) thick, 30
50 mm (1.181.97 in)
FELT CLOTHTAPE
Used to insulate where movement does not occur. Ideal for instrument panel applications.
68370-4B000: 15
25 mm (0.590.98 in) pad/68239-13E00: 5 mm (0.20 in) wide tape roll
The following materials, not found in the kit, can also be used to repair squeaks and rattles.
UHMW (TEFLON) TAPE
Insulates where slight movement is present. Ideal for instrument panel applications.
SILICONE GREASE
Used in place of UHMW tape that will be visible or not fit. Will only last a few months.
SILICONE SPRAY
Use when grease cannot be applied.
DUCT TAPE
Use to eliminate movement.
CONFIRM THE REPAIR
Confirm that the cause of a noise is repaired by test driving the vehicle. Operate the vehicle under the same
conditions as when the noise originally occurred. Refer to the notes on the Diagnostic Worksheet.
Generic Squeak and Rattle TroubleshootingNIS0025O
Refer to Table of Contents for specific component removal and installation information.
INSTRUMENT PANEL
Most incidents are caused by contact and movement between:
1. The cluster lid A and instrument panel
2. Acrylic lens and combination meter housing
3. Instrument panel to front pillar garnish
4. Instrument panel to windshield
5. Instrument panel mounting pins
6. Wiring harnesses behind the combination meter
7. A/C defroster duct and duct joint
These incidents can usually be located by tapping or moving the components to duplicate the noise or by
pressing on the components while driving to stop the noise. Most of these incidents can be repaired by apply-
ing felt cloth tape or silicon spray (in hard to reach areas). Urethane pads can be used to insulate wiring har-
ness.
CAUTION:
Do not use silicone spray to isolate a squeak or rattle. If you saturate the area with silicone, you will
not be able to recheck the repair.
CENTER CONSOLE
Components to pay attention to include:
1. Shifter assembly cover to finisher
2. A/C control unit and cluster lid C
3. Wiring harnesses behind audio and A/C control unit
The instrument panel repair and isolation procedures also apply to the center console.
DOORS
Pay attention to the:
1. Finisher and inner panel making a slapping noise
2. Inside handle escutcheon to door finisher
3. Wiring harnesses tapping
4. Door striker out of alignment causing a popping noise on starts and stops
Tapping or moving the components or pressing on them while driving to duplicate the conditions can isolate
many of these incidents. You can usually insulate the areas with felt cloth tape or insulator foam blocks from
the Nissan Squeak and Rattle Kit (J-43980) to repair the noise.
Page 5398 of 5621

TROUBLE DIAGNOSIS
SRS-37
C
D
E
F
G
I
J
K
L
MA
B
SRS
Revision: 2006 January2006 M35/M45
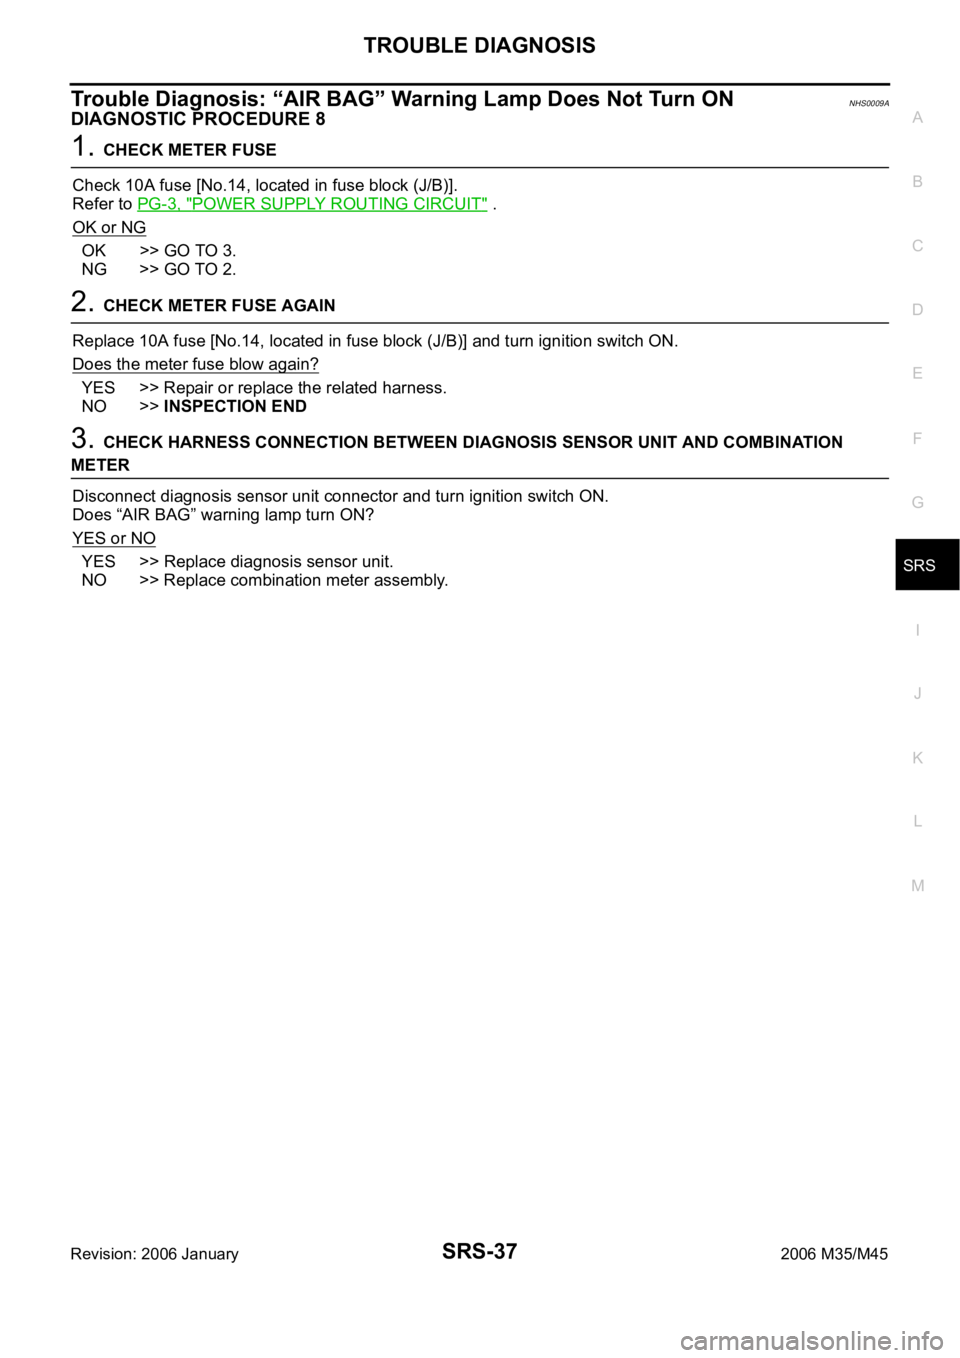
Trouble Diagnosis: “AIR BAG” Warning Lamp Does Not Turn ONNHS0009A
DIAGNOSTIC PROCEDURE 8
1. CHECK METER FUSE
Check 10A fuse [No.14, located in fuse block (J/B)].
Refer to PG-3, "
POWER SUPPLY ROUTING CIRCUIT" .
OK or NG
OK >> GO TO 3.
NG >> GO TO 2.
2. CHECK METER FUSE AGAIN
Replace 10A fuse [No.14, located in fuse block (J/B)] and turn ignition switch ON.
Does the meter fuse blow again?
YES >> Repair or replace the related harness.
NO >>INSPECTION END
3. CHECK HARNESS CONNECTION BETWEEN DIAGNOSIS SENSOR UNIT AND COMBINATION
METER
Disconnect diagnosis sensor unit connector and turn ignition switch ON.
Does “AIR BAG” warning lamp turn ON?
YES or NO
YES >> Replace diagnosis sensor unit.
NO >> Replace combination meter assembly.
Page 5453 of 5621
![INFINITI M35 2006 Factory Service Manual STC-38
[RAS]
TROUBLE DIAGNOSIS
Revision: 2006 January2006 M35/M45
Inspection 4: Vehicle Speed SignalNGS000ET
1. CHECK SPEEDOMETER
Start the engine, and then check the combination meter (speed meter) o INFINITI M35 2006 Factory Service Manual STC-38
[RAS]
TROUBLE DIAGNOSIS
Revision: 2006 January2006 M35/M45
Inspection 4: Vehicle Speed SignalNGS000ET
1. CHECK SPEEDOMETER
Start the engine, and then check the combination meter (speed meter) o](/manual-img/42/57023/w960_57023-5452.png)
STC-38
[RAS]
TROUBLE DIAGNOSIS
Revision: 2006 January2006 M35/M45
Inspection 4: Vehicle Speed SignalNGS000ET
1. CHECK SPEEDOMETER
Start the engine, and then check the combination meter (speed meter) operation.
Does it operate normally?
YES >> GO TO 2.
NO >> Combination meter. Refer to DI-5, "
COMBINATION METERS" .
2. CHECK RAS CONTROL UNIT CONNECTOR
1. Turn ignition switch OFF, disconnect RAS control unit harness connector, and check terminal for deforma-
tion, disconnection, looseness, etc.
2. Reconnect harness connector securely, and perform self-diagnosis.
With CONSULT-II
Without CONSULT-II
Is above displayed on self-diagnosis display?
YES >> RAS control unit malfunction. Replace RAS control unit.
NO >> Connector terminal connection is loose, damaged, open, or shorted. Repair or replace the termi-
nal.
Inspection 5: Steering Angle Signal MalfunctionNGS000EU
1. CHECK CONNECTOR
1. Turn ignition switch OFF, disconnect RAS control unit harness connector and steering angle sensor har-
ness connector, and check terminal for deformation, disconnection, looseness, etc.
2. Reconnect harness connector securely, and perform self-diagnosis.
With CONSULT-II
Without CONSULT-II
Is above displayed on self-diagnosis display?
YES >> GO TO 2.
NO >> Connector terminal connection is loose, damaged, open, or shorted. Repair or replace the termi-
nal.
2. ADJUST NEUTRAL POSITION OF STEERING ANGLE SENSOR
Adjust the steering angle sensor neutral position, and then perform self-diagnosis again. Refer to BRC-6,
"Adjustment of Steering Angle Sensor Neutral Position" .
Is the result of self-diagnosis normal?
OK >> Inappropriate neutral position adjustment of steering angle sensor.
NG >> GO TO 3.
Self-diagnosis results
VEHICLE_SPEED_SEN [NO_SIGNAL]
DTC (warning lamp blinks)
21
Self-diagnosis results
STEERING_ANGLE_SEN [NO_CHANGE] (ꞏ a)
STEERING_ANGLE_SEN [NO_NEUT_STATE] (ꞏ b)
STEERING_ANGLE_SEN [NO_SIGNAL]
STEERING_ANGLE_SEN
DTC (warning lamp blinks)
22
Page 5458 of 5621
![INFINITI M35 2006 Factory Service Manual TROUBLE DIAGNOSIS
STC-43
[RAS]
C
D
E
F
H
I
J
K
L
MA
B
STC
Revision: 2006 January2006 M35/M45
Inspection 8: Engine Speed Signal MalfunctionNGS000EX
1. CHECK SPEEDOMETER
Start the engine, and then check INFINITI M35 2006 Factory Service Manual TROUBLE DIAGNOSIS
STC-43
[RAS]
C
D
E
F
H
I
J
K
L
MA
B
STC
Revision: 2006 January2006 M35/M45
Inspection 8: Engine Speed Signal MalfunctionNGS000EX
1. CHECK SPEEDOMETER
Start the engine, and then check](/manual-img/42/57023/w960_57023-5457.png)
TROUBLE DIAGNOSIS
STC-43
[RAS]
C
D
E
F
H
I
J
K
L
MA
B
STC
Revision: 2006 January2006 M35/M45
Inspection 8: Engine Speed Signal MalfunctionNGS000EX
1. CHECK SPEEDOMETER
Start the engine, and then check the combination meter (tachometer) operation.
Does it operate normally?
YES >> GO TO 2.
NO >> Combination meter. Refer to DI-5, "
COMBINATION METERS"DI-5, "COMBINATION METERS" .
2. CHECK RAS CONTROL UNIT CONNECTOR
1. Turn ignition switch OFF, disconnect RAS control unit harness connector, and check terminal for deforma-
tion, disconnection, looseness, etc.
2. Reconnect harness connector securely, and perform self-diagnosis.
With CONSULT-II
Without CONSULT-II
Is above displayed on self-diagnosis display?
YES >> RAS control unit malfunction. Replace RAS control unit.
NO >> Connector terminal connection is loose, damaged, open, or shorted. Repair or replace the termi-
nal.
Inspection 9: CAN Communication System MalfunctionNGS000EY
1. CHECK RAS CONTROL UNIT CONNECTOR
1. Turn ignition switch OFF, disconnect RAS control unit harness connector and rear wheel steering angle
sensor harness connector, and check terminal for deformation, disconnection, looseness, etc.
2. Reconnect harness connector securely, and perform CONSULT-II self-diagnosis.
Is above displayed on self-diagnosis display?
YES >>If “CAN COMM [U1000]” is displayed, print out self–diagnosis. And then, GO TO LAN-7, "Pre-
cautions When Using CONSULT-II" .
Replace RAS control unit if “CONTROL_UNIT [CAN] [U1010]” is displayed.
NO >> Connector terminal connection is loose, damaged, open, or shorted. Repair or replace the termi-
nal.
Self-diagnostic results
MOTOR_OUTPUT
DTC (warning lamp blinks)
27
Self-diagnostic results
CAN COMM CIRCUIT [U1000]
CONTROL_UNIT [CAN] [U1010]
Page 5460 of 5621
![INFINITI M35 2006 Factory Service Manual TROUBLE DIAGNOSIS
STC-45
[RAS]
C
D
E
F
H
I
J
K
L
MA
B
STC
Revision: 2006 January2006 M35/M45
2. CHECK RAS WARNING LAMP HARNESS
1. Turn ignition switch OFF, disconnect RAS control unit harness INFINITI M35 2006 Factory Service Manual TROUBLE DIAGNOSIS
STC-45
[RAS]
C
D
E
F
H
I
J
K
L
MA
B
STC
Revision: 2006 January2006 M35/M45
2. CHECK RAS WARNING LAMP HARNESS
1. Turn ignition switch OFF, disconnect RAS control unit harness](/manual-img/42/57023/w960_57023-5459.png)
TROUBLE DIAGNOSIS
STC-45
[RAS]
C
D
E
F
H
I
J
K
L
MA
B
STC
Revision: 2006 January2006 M35/M45
2. CHECK RAS WARNING LAMP HARNESS
1. Turn ignition switch OFF, disconnect RAS control unit harness connector B127 and combination meter
harness connector M52.
2. Check continuity between RAS control unit harness connector
B127 and combination meter harness connector M52.
3. Check continuity between RAS control unit harness connector
B127 and ground.
OK or NG
OK >> GO TO combination meter power supply circuit.
NG >> Harness between RAS control unit and combination
meter open or shorted. Repair or replace harness. Te r m i n a l 2 6
19 : Continuity exist.
SGIA1279E
Te r m i n a l 2 6 Ground : Continuity not exist.
SGIA1280E