Page 4533 of 5621
LT-106
HEADLAMP (FOR CANADA) - DAYTIME LIGHT SYSTEM -
Revision: 2006 January2006 M35/M45
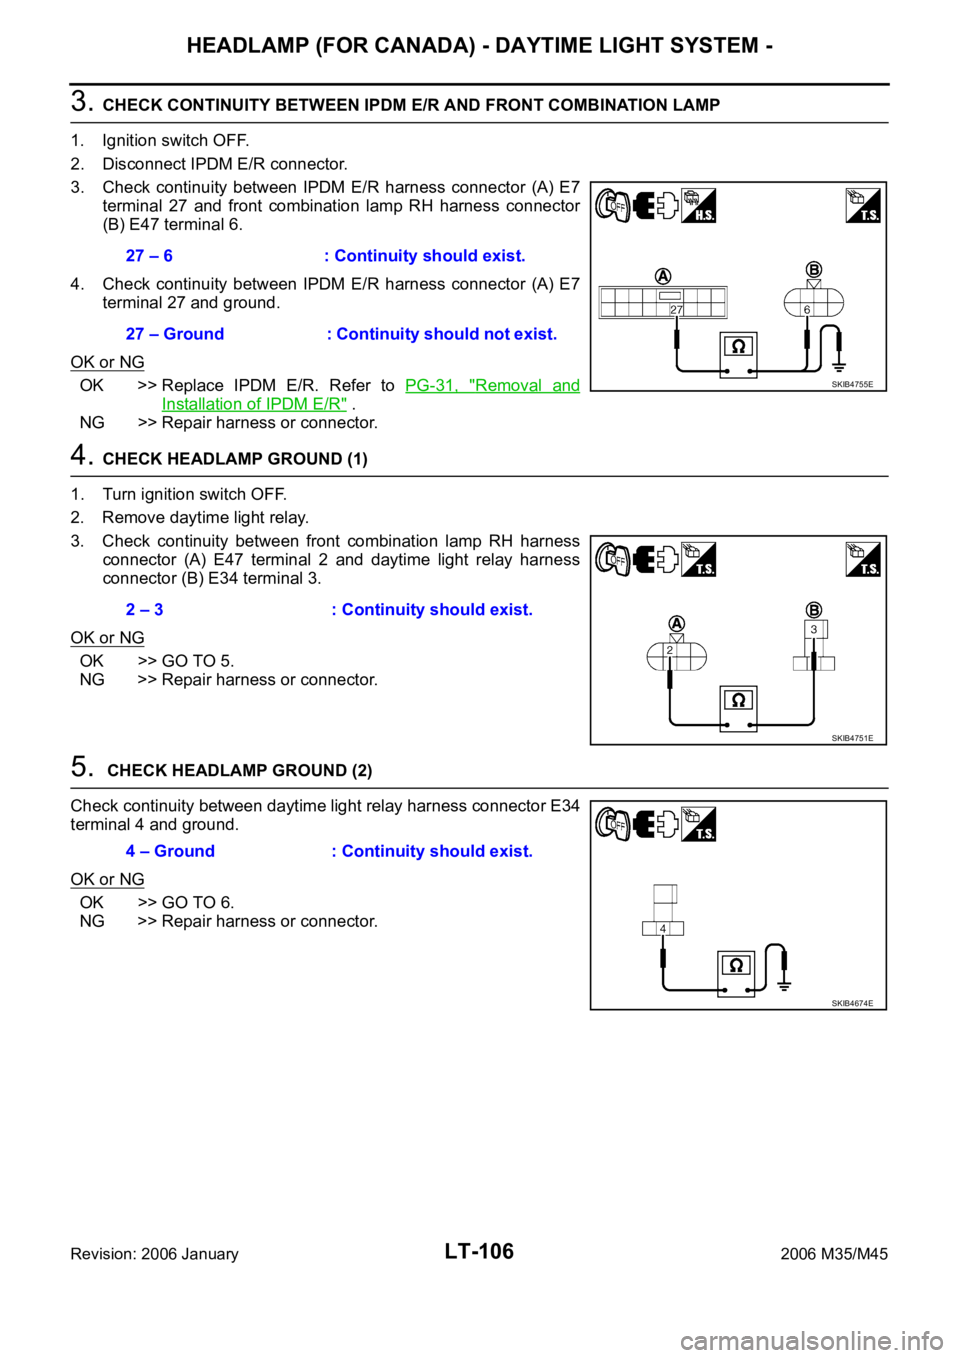
3. CHECK CONTINUITY BETWEEN IPDM E/R AND FRONT COMBINATION LAMP
1. Ignition switch OFF.
2. Disconnect IPDM E/R connector.
3. Check continuity between IPDM E/R harness connector (A) E7
terminal 27 and front combination lamp RH harness connector
(B) E47 terminal 6.
4. Check continuity between IPDM E/R harness connector (A) E7
terminal 27 and ground.
OK or NG
OK >> Replace IPDM E/R. Refer to PG-31, "Removal and
Installation of IPDM E/R" .
NG >> Repair harness or connector.
4. CHECK HEADLAMP GROUND (1)
1. Turn ignition switch OFF.
2. Remove daytime light relay.
3. Check continuity between front combination lamp RH harness
connector (A) E47 terminal 2 and daytime light relay harness
connector (B) E34 terminal 3.
OK or NG
OK >> GO TO 5.
NG >> Repair harness or connector.
5. CHECK HEADLAMP GROUND (2)
Check continuity between daytime light relay harness connector E34
terminal 4 and ground.
OK or NG
OK >> GO TO 6.
NG >> Repair harness or connector.27 – 6 : Continuity should exist.
27 – Ground : Continuity should not exist.
SKIB4755E
2 – 3 : Continuity should exist.
SKIB4751E
4 – Ground : Continuity should exist.
SKIB4674E
Page 4534 of 5621
HEADLAMP (FOR CANADA) - DAYTIME LIGHT SYSTEM -
LT-107
C
D
E
F
G
H
I
J
L
MA
B
LT
Revision: 2006 January2006 M35/M45
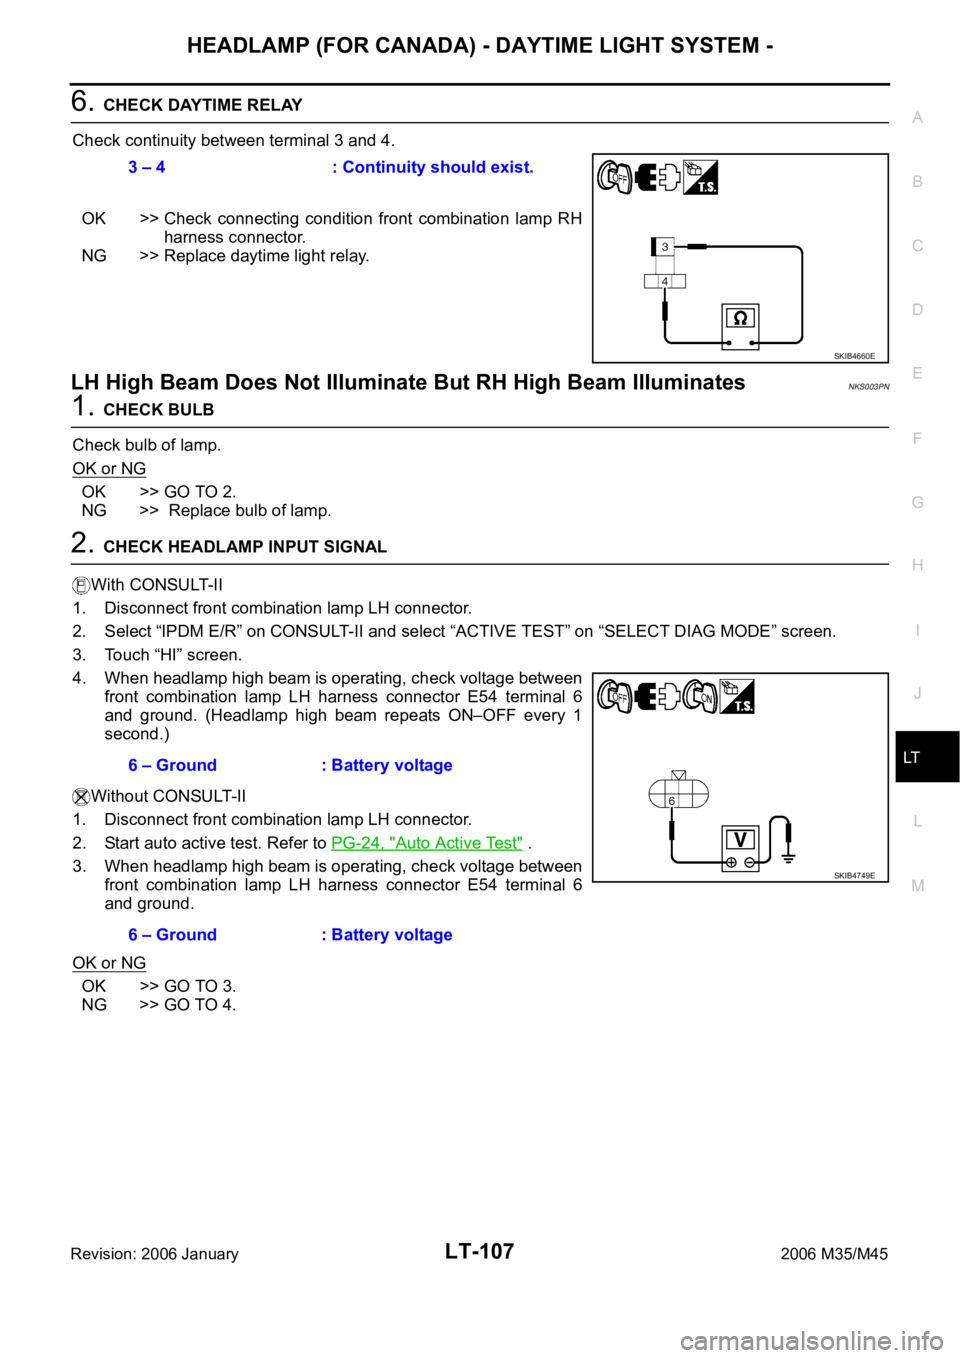
6. CHECK DAYTIME RELAY
Check continuity between terminal 3 and 4.
OK >> Check connecting condition front combination lamp RH
harness connector.
NG >> Replace daytime light relay.
LH High Beam Does Not Illuminate But RH High Beam IlluminatesNKS003PN
1. CHECK BULB
Check bulb of lamp.
OK or NG
OK >> GO TO 2.
NG >> Replace bulb of lamp.
2. CHECK HEADLAMP INPUT SIGNAL
With CONSULT-II
1. Disconnect front combination lamp LH connector.
2. Select “IPDM E/R” on CONSULT-II and select “ACTIVE TEST” on “SELECT DIAG MODE” screen.
3. Touch “HI” screen.
4. When headlamp high beam is operating, check voltage between
front combination lamp LH harness connector E54 terminal 6
and ground. (Headlamp high beam repeats ON–OFF every 1
second.)
Without CONSULT-II
1. Disconnect front combination lamp LH connector.
2. Start auto active test. Refer to PG-24, "
Auto Active Test" .
3. When headlamp high beam is operating, check voltage between
front combination lamp LH harness connector E54 terminal 6
and ground.
OK or NG
OK >> GO TO 3.
NG >> GO TO 4.3 – 4 : Continuity should exist.
SKIB4660E
6 – Ground : Battery voltage
6 – Ground : Battery voltage
SKIB4749E
Page 4535 of 5621
LT-108
HEADLAMP (FOR CANADA) - DAYTIME LIGHT SYSTEM -
Revision: 2006 January2006 M35/M45
3. CHECK HEADLAMP GROUND
1. Turn ignition switch OFF.
2. Check continuity headlamp harness connector E54 terminal 2
and ground.
OK or NG
OK >> Check connecting condition front headlamp LH connec-
tor harness.
NG >> Repair harness or connector.
4. CHECK CIRCUIT BETWEEN IPDM E/R AND FRONT COMBINATION LAMP
1. Turn ignition switch OFF.
2. Disconnect IPDM E/R connector and front combination lamp LH connector.
3. Check continuity between IPDM E/R harness connector (A) E7
terminal 28 and front combination lamp LH harness connector
(B) E54 terminal 6.
4. Check continuity between IPDM E/R harness connector (A) E7
terminal 28 and ground.
OK or NG
OK >> Replace IPDM E/R. Refer to PG-31, "Removal and
Installation of IPDM E/R" .
NG >> Repair harness or connector.2 – Ground : Continuity should exist.
SKIB4750E
28 – 6 : Continuity should exist.
28 – Ground : Continuity should not exist.
SKIB4757E
Page 4537 of 5621
LT-110
HEADLAMP (FOR CANADA) - DAYTIME LIGHT SYSTEM -
Revision: 2006 January2006 M35/M45
4. CHECK HEADLAMP INPUT SIGNAL
With CONSULT-II
1. Turn ignition switch OFF.
2. Disconnect front combination lamp RH and LH connector.
3. Select “IPDM E/R” on CONSULT-II. Select “ACTIVE TEST” on “SELECT DIAG MODE” screen.
4. Select “LAMPS” on “SELECT TEST ITEM” screen.
5. Touch “LO” screen.
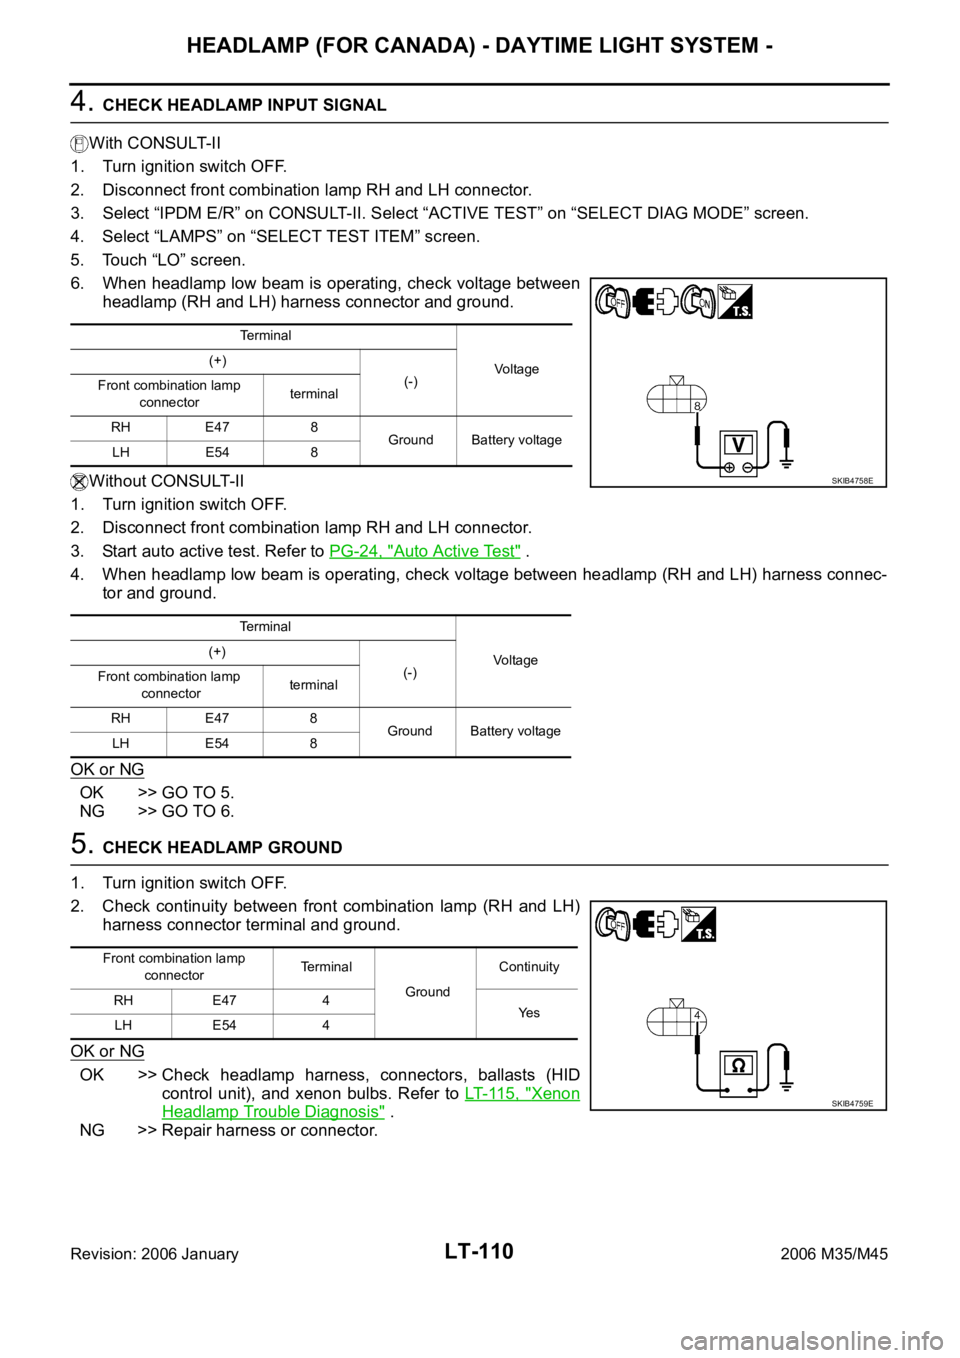
6. When headlamp low beam is operating, check voltage between
headlamp (RH and LH) harness connector and ground.
Without CONSULT-II
1. Turn ignition switch OFF.
2. Disconnect front combination lamp RH and LH connector.
3. Start auto active test. Refer to PG-24, "
Auto Active Test" .
4. When headlamp low beam is operating, check voltage between headlamp (RH and LH) harness connec-
tor and ground.
OK or NG
OK >> GO TO 5.
NG >> GO TO 6.
5. CHECK HEADLAMP GROUND
1. Turn ignition switch OFF.
2. Check continuity between front combination lamp (RH and LH)
harness connector terminal and ground.
OK or NG
OK >> Check headlamp harness, connectors, ballasts (HID
control unit), and xenon bulbs. Refer to LT- 11 5 , "
Xenon
Headlamp Trouble Diagnosis" .
NG >> Repair harness or connector.
Terminal
Vo l ta g e (+)
(-)
Front combination lamp
connectorterminal
RH E47 8
Ground Battery voltage
LH E54 8
Terminal
Voltage (+)
(-)
Front combination lamp
connectorterminal
RH E47 8
Ground Battery voltage
LH E54 8
SKIB4758E
Front combination lamp
connectorTerminal
GroundContinuity
RH E47 4
Ye s
LH E54 4
SKIB4759E
Page 4538 of 5621
HEADLAMP (FOR CANADA) - DAYTIME LIGHT SYSTEM -
LT-111
C
D
E
F
G
H
I
J
L
MA
B
LT
Revision: 2006 January2006 M35/M45
6. CHECK CIRCUIT BETWEEN IPDM E/R AND FRONT COMBINATION LAMP
1. Turn ignition switch OFF.
2. Disconnect IPDM E/R connector.
3. Check continuity between IPDM E/R harness connector (A) ter-
minal and front combination lamp (RH and LH) harness connec-
tor (B) terminal.
4. Check continuity between IPDM E/R harness connector (A) ter-
minal and ground.
OK or NG
OK >> Replace IPDM E/R. Refer to PG-31, "Removal and Installation of IPDM E/R" .
NG >> Repair harness or connector.
CircuitAB
Continuity
Connector Terminal Connector Terminal
RH
E720 E47 8
Ye s
LH 30 E54 8
A
GroundContinuity
Connector Terminal
RH
E720
No
LH 30
SKIB4760E
Page 4539 of 5621
LT-112
HEADLAMP (FOR CANADA) - DAYTIME LIGHT SYSTEM -
Revision: 2006 January2006 M35/M45
Headlamp Low Beam Does Not Illuminate (One Side)NKS003PP
1. CHECK BULB
Check ballast (HID control unit) and xenon bulb of lamp which does not illuminate. Refer to LT- 11 5 , "
Xenon
Headlamp Trouble Diagnosis" .
OK or NG
OK >> GO TO 2.
NG >> Repair malfunctioning part.
2. CHECK HEADLAMP INPUT SIGNAL
With CONSULT-II
1. Turn ignition switch OFF.
2. Disconnect front combination lamp RH or LH connector.
3. Select “IPDM E/R” on CONSULT-II. Select “ACTIVE TEST” on “SELECT DIAG MODE” screen.
4. Select “LAMPS” on “SELECT TEST ITEM” screen.
5. Touch “LO” screen.
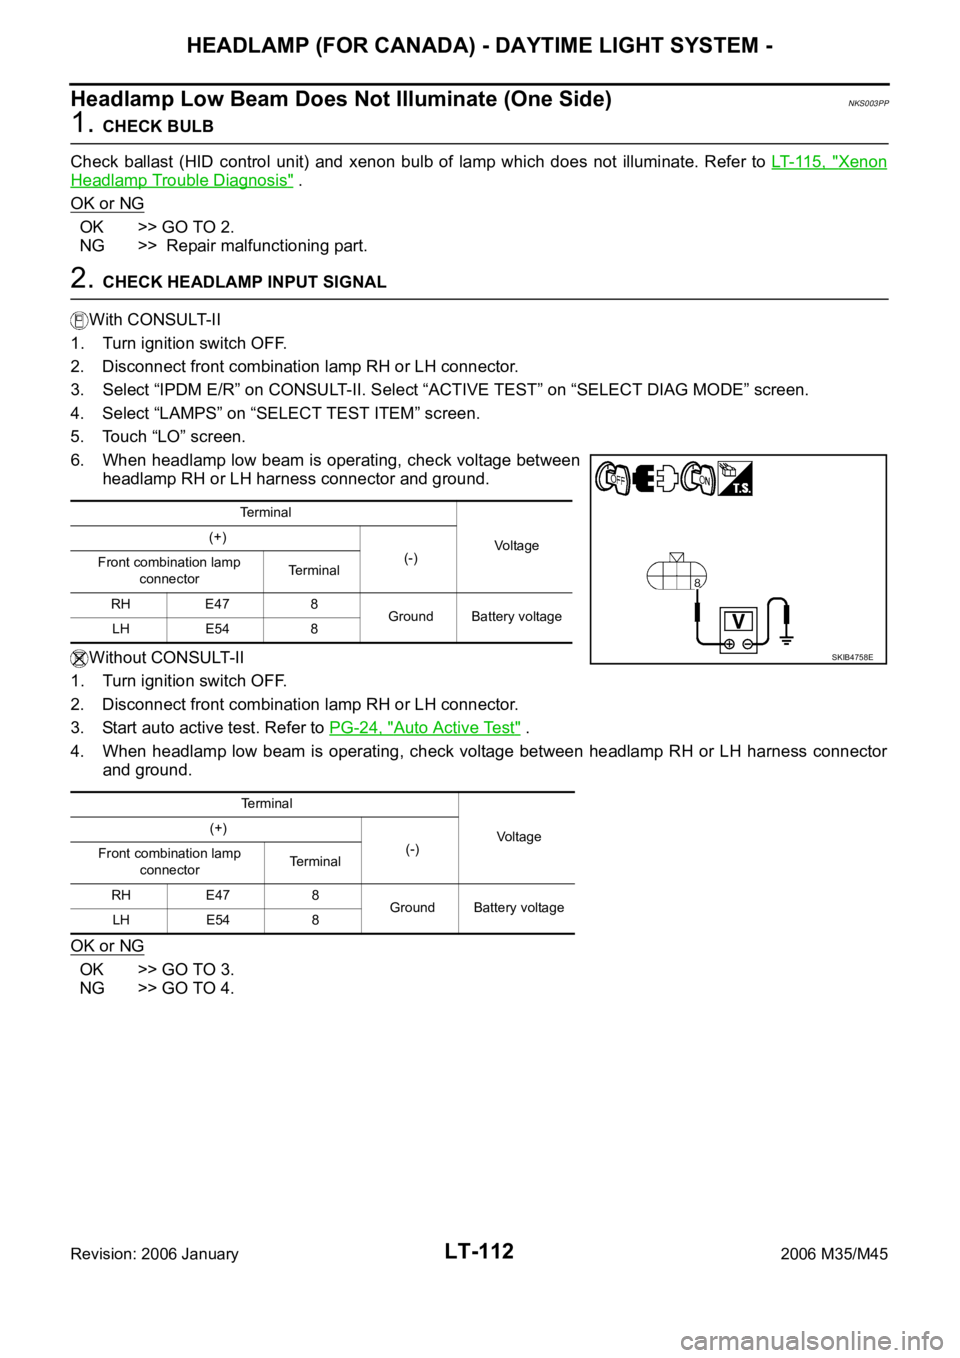
6. When headlamp low beam is operating, check voltage between
headlamp RH or LH harness connector and ground.
Without CONSULT-II
1. Turn ignition switch OFF.
2. Disconnect front combination lamp RH or LH connector.
3. Start auto active test. Refer to PG-24, "
Auto Active Test" .
4. When headlamp low beam is operating, check voltage between headlamp RH or LH harness connector
and ground.
OK or NG
OK >> GO TO 3.
NG >> GO TO 4.
Terminal
Vo l ta g e (+)
(-)
Front combination lamp
connectorTerminal
RH E47 8
Ground Battery voltage
LH E54 8
Terminal
Voltage (+)
(-)
Front combination lamp
connectorTerminal
RH E47 8
Ground Battery voltage
LH E54 8
SKIB4758E
Page 4540 of 5621
HEADLAMP (FOR CANADA) - DAYTIME LIGHT SYSTEM -
LT-113
C
D
E
F
G
H
I
J
L
MA
B
LT
Revision: 2006 January2006 M35/M45
3. CHECK HEADLAMP GROUND
1. Turn ignition switch OFF.
2. Check continuity between front combination lamp RH or LH har-
ness connector and ground.
OK or NG
OK >> Check connecting condition headlamp harness connec-
tor.
NG >> Repair harness or connector.
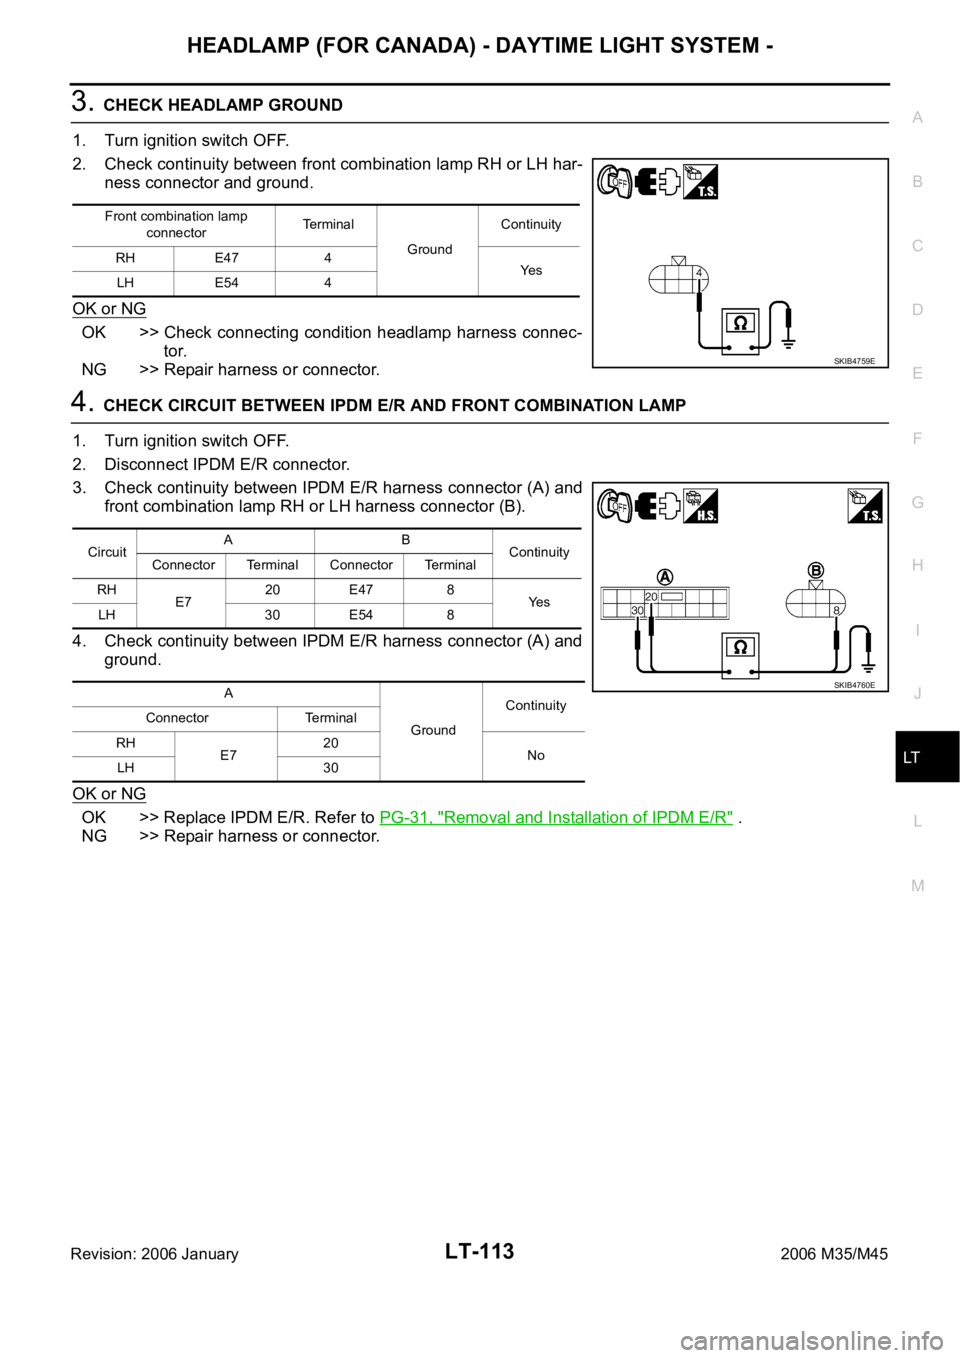
4. CHECK CIRCUIT BETWEEN IPDM E/R AND FRONT COMBINATION LAMP
1. Turn ignition switch OFF.
2. Disconnect IPDM E/R connector.
3. Check continuity between IPDM E/R harness connector (A) and
front combination lamp RH or LH harness connector (B).
4. Check continuity between IPDM E/R harness connector (A) and
ground.
OK or NG
OK >> Replace IPDM E/R. Refer to PG-31, "Removal and Installation of IPDM E/R" .
NG >> Repair harness or connector.
Front combination lamp
connectorTe r m i n a l
GroundContinuity
RH E47 4
Ye s
LH E54 4
SKIB4759E
CircuitAB
Continuity
Connector Terminal Connector Terminal
RH
E720 E47 8
Ye s
LH 30 E54 8
A
GroundContinuity
Connector Terminal
RH
E720
No
LH 30
SKIB4760E
Page 4544 of 5621
AUTO LIGHT SYSTEM
LT-117
C
D
E
F
G
H
I
J
L
MA
B
LT
Revision: 2006 January2006 M35/M45
to optical sensor terminal 1.
Optical sensor, ground is supplied
to optical sensor terminal 3
through BCM terminal 18.
When ignition switch is turn to ON position, and
When outside brightness is darker than prescribed level, input is supplied
from optical sensor terminal 2
to BCM terminal 14.
The headlamps will then illuminate. For a description of headlamp operation, Refer to LT- 11 6 , "
System
Description" .
COMBINATION SWITCH READING FUNCTION
Refer to BCS-3, "COMBINATION SWITCH READING FUNCTION" .
EXTERIOR LAMP BATTERY SAVER CONTROL
When the combination switch (lighting switch) is in the 2ND position (or if auto light system is activated), and
the ignition switch is turned from ON or ACC to OFF, the battery saver control function is activated.
Under this condition, the headlamps remain illuminated for 5 minutes, then the headlamps are turned off.
Exterior lamp battery saver control mode can be changed by the function setting of CONSULT-II.
DELAY TIMER FUNCTION
Delay timer function carries out a function that BCM activates the timer and controls lights out of headlamps by
door switch signal and lightning switch signal when turning the Ignition switch OFF while it is ON and head-
lamps are ON by the auto light function.
Timer types are a 5 minutes timer and a 45 seconds timer
When opening any door (door switch is ON), the 5 minutes timer starts and then headlamps go out five
minutes later
When all the doors are closed (from door switch ON to OFF), the 45 second timer starts and then head-
lamps go out 45 seconds later. If any door is opened (door switch ON) while the 45 seconds timer is in
operation, the 5 minutes timer starts again
The timer stops when turning on the ignition switch or turning off the auto light switch under the above
conditions.
Delay timer control mode can be changed by the function setting of CONSULT-II.
CAN Communication System DescriptionNKS003Q0
CAN (Controller Area Network) is a serial communication line for real time application. It is an on-vehicle mul-
tiplex communication line with high data communication speed and excellent error detection ability. Many elec-
tronic control units are equipped onto vehicle, and each control unit shares information and links with other
control units during operation (not independent). In CAN communication, control units are connected with 2
communication lines (CAN H line, CAN L line) allowing the high rate of information transmission with less wir-
ing. Each control unit transmits/receives data but selectively reads required data only.
CAN Communication UnitNKS003Q1
Refer to LAN-34, "CAN Communication Unit" .
Major Components and FunctionsNKS003Q2
Components Functions
BCM
Turns on/off circuits of tail light and headlamp according to signals from optical sensor, lighting switch
(AUTO), driver door switch, passenger door switch, rear door switch, and ignition switch (ON, OFF).
Optical sensor
Converts outside brightness (lux) to voltage, and sends it to BCM. (Detects brightness of 50 to 1,300 lux)