2006 INFINITI M35 ECO mode
[x] Cancel search: ECO modePage 1310 of 5621

SERVICE DATA AND SPECIFICATIONS (SDS)
BR-35
C
D
E
G
H
I
J
K
L
MA
B
BR
Revision: 2006 January2006 M35/M45
SERVICE DATA AND SPECIFICATIONS (SDS)PFP:00030
General SpecificationsNFS000PL
Unit: mm (in)
Brake PedalNFS000PM
Brake BoosterNFS000PN
Va c u u m t y p e
Check ValveNFS000PO
Front Disc BrakeNFS000PP
Front brake Brake model CLZ31VD, CLZ31VB
Cylinder bore diameter 45 (1.772)
2
Pad length
width thickness 132 50 11 (5.20 1.969 0.433)
Rotor outer diameter
thickness 320 28 (12.60 1.10)
Rear brake Brake model AD14VF, AD14VE
Cylinder bore diameter 42.86 (1.687)
Pad length
width thickness 83.0 31.9 8.5 (3.268 1.256 0.335)
Rotor outer diameter
thickness 308 16 (12.13 0.63)
Master cylinder Cylinder bore diameter 25.4 (1)
Control valve Valve model Electric brake force distribution
Brake boosterBooster model N255
Diaphragm diameter 255 (10)
Recommended brake fluid DOT 3
Brake pedal height (from dash lower panel top surface) 157 167 mm (6.18 6.57 in)
Depressed pedal height
[under a force of 490 N (50 kg, 110 lb) with engine running]90 mm (3.54 in) or more
Clearance between threaded end of the stop lamp switch/brake switch
and bracket 0.74 - 1.96 mm (0.0291 - 0.0772 in)
Pedal play3 - 11 mm (0.12 - 0.43 in)
Input rod installation standard dimension 125 mm (4.92 in)
Vacuum leakage
[at vacuum of – 66.7 kPa (– 500 mmHg, – 19.69 inHg)]Within 1.3 kPa (10 mmHg, 0.39 inHg) of vacuum for 15 seconds
Brake modelCLZ31VD, CLZ31VB
Brake padStandard thickness 11.0 mm (0.433 in)
Repair limit thickness 2.0 mm (0.079 in)
Disc rotorStandard thickness 28.0 mm (1.102 in)
Wear limit 26.0 mm (1.024 in)
Thickness variation (measured at 8 positions) 0.015 mm (0.0006 in)
Runout limit (with it attached to the vehicle) 0.035 mm (0.0014 in)
Page 1341 of 5621
![INFINITI M35 2006 Factory Service Manual BRC-30
[VDC/TCS/ABS]
TROUBLE DIAGNOSIS
Revision: 2006 January2006 M35/M45
Note 1: Confirm tire pressure is normal.
Note 2: Only AWD model.
Note 3: A brief moment of ON/OFF condition occurs every 20 se INFINITI M35 2006 Factory Service Manual BRC-30
[VDC/TCS/ABS]
TROUBLE DIAGNOSIS
Revision: 2006 January2006 M35/M45
Note 1: Confirm tire pressure is normal.
Note 2: Only AWD model.
Note 3: A brief moment of ON/OFF condition occurs every 20 se](/manual-img/42/57023/w960_57023-1340.png)
BRC-30
[VDC/TCS/ABS]
TROUBLE DIAGNOSIS
Revision: 2006 January2006 M35/M45
Note 1: Confirm tire pressure is normal.
Note 2: Only AWD model.
Note 3: A brief moment of ON/OFF condition occurs every 20 seconds after ignition switch turned ON. This is not malfunction because it
is an operation for checking.
Note 4: On and off timing for warning lamp and indicator lanp.Refer to BRC-33, "
ON and OFF Timing for Warning Lamp and Indicator
Lamp" .
Active TestNFS000QI
CAUTION:
Do not perform active test while driving vehicle.
Make sure to completely bleed air from brake system.
The active test cannot be performed with the ABS warning lamp, VDC indicator lamp, SLIP indica-
tor lamp and brake warning lamp are on.
ABS warning lamp, VDC OFF indicator lamp, SLIP indicator lamp and brake warning lamp are on
during active test.
Erase memory of ICC system after implementing active test. Refer to ACS-34, "Self-Diagnostic
Function" .
OPERATION PROCEDURE
1. Touch “START (NISSAN BASED VHCL)”, “ABS”, “ACTIVE TEST” in order on the CONSULT-II screen.
CAUTION:
When “START (NISSAN BASED VHCL)” is touched immediately after starting engine or turning on
ignition switch, “ABS” might not be displayed in the "SELECT SYSTEM" screen. In this case,
repeat the operation from step 1.
2. Touch “SELECT TEST ITEM” is displayed.
3. Touch necessary test item.
4. While “MAIN SIGNALS” indication is inverted, touch “START”.
5. “ACTIVE TEST” screen will be displayed so perform the following test.
SV/R OUTPUT
(Note 3)Solenoid valve relay activatedWhen the solenoid valve
relay is active (When igni-
tion switch OFF)ON
When the solenoid valve
relay is not active (in the
fail-safe mode)OFF
S M/R OUTPUTActuator motor and motor relay acti-
vatedWhen the actuator motor
and motor relay are active
(
ACTIVE TEST” with
CONSULT-II)ON
When the actuator motor
and motor relay are inac-
tiveOFF E: ECU INPUT SIGNALS M: MAIN SIGNALS S: SELECTION FROM MENU
SELECT
MONITOR
ITEM Monitor item Display contentData monitor
ConditionReference value in
normal operation
SFIA0591E
Page 1438 of 5621

COMBINATION METERS
DI-5
C
D
E
F
G
H
I
J
L
MA
B
DI
Revision: 2006 January2006 M35/M45
COMBINATION METERSPFP:24814
System DescriptionNKS003TV
UNIFIED METER CONTROL UNIT
Speedometer, odo/trip meter, tachometer, fuel gauge and water temperature gauge are controlled by the
unified meter control unit, which is built into the combination meter. Unified meter control unit receives sig-
nals from unified meter and A/C amp.
Warning lamp and indicator lamp of combination meter are controlled by signals drawn from the unified
meter and A/C amp.
Digital meter is adopted for odo/trip meter.
NOTE:
The record of the odo meter is kept even if the battery cable is disconnected. The record of the trip meter
is erased when the battery cable is disconnected.
Dot matrix LCD is adopted to display “push engine starter”, “A/T position” and “ICC system* ”.
Odo/trip meter and dot matrix LCD segments can be checked in self-diagnosis mode.
Meters/gauges can be checked in self-diagnosis mode.
*: With ICC system
UNIFIED METER AND A/C AMP.
Refer to DI-28, "COMBINATION METER CONTROL FUNCTION" in “UNIFIED METER AND A/C AMP”.
POWER SUPPLY AND GROUND CIRCUIT
Power is supplied at all times
through 10A fuse [No. 21, located in the fuse block (J/B)]
to combination meter terminal 23,
through 10A fuse [No. 19, located in the fuse block (J/B)]
to unified meter and A/C amp. terminal 54.
With the ignition switch in the ACC or ON position, power is supplied
through 10A fuse [No. 6, located in the fuse block (J/B)],
to combination meter terminal 2, and
to unified meter and A/C amp. terminal 41.
With the ignition switch in the ON or START position, power is supplied
through 10A fuse [No. 14, located in the fuse block (J/B)]
to combination meter terminal 12,
through 10A fuse [No. 12, located in the fuse block (J/B)]
to unified meter and A/C amp. terminal 53.
Ground is supplied
to combination meter terminals 9, 10 and 11
to unified meter and A/C amp. terminals 55 and 71
through grounds M16 and M70.
Page 1441 of 5621
DI-8
COMBINATION METERS
Revision: 2006 January2006 M35/M45
METER ILLUMINATION CONTROL
Meter illumination* is controlled by the unified meter control unit.
Ring illumination under normal operation and engine start excitement function can be turned ON/OFF with
pressing meter illumination control switch for more than 1 second.
*: Illumination for ring, meter face, pointer, dot matrix LCD and odo/trip meter
Daytime Mode
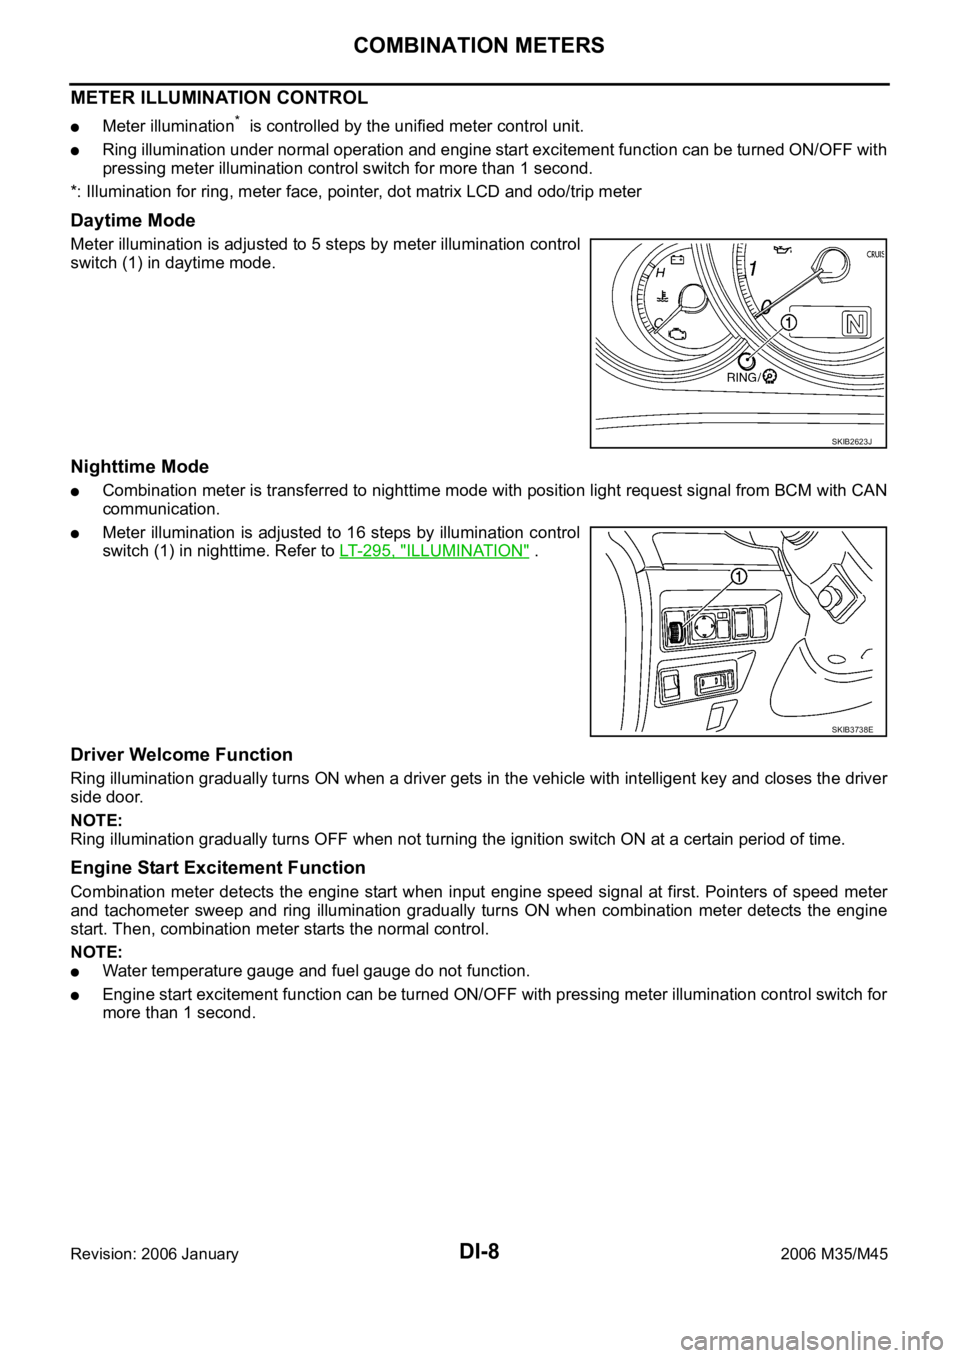
Meter illumination is adjusted to 5 steps by meter illumination control
switch (1) in daytime mode.
Nighttime Mode
Combination meter is transferred to nighttime mode with position light request signal from BCM with CAN
communication.
Meter illumination is adjusted to 16 steps by illumination control
switch (1) in nighttime. Refer to LT- 2 9 5 , "
ILLUMINATION" .
Driver Welcome Function
Ring illumination gradually turns ON when a driver gets in the vehicle with intelligent key and closes the driver
side door.
NOTE:
Ring illumination gradually turns OFF when not turning the ignition switch ON at a certain period of time.
Engine Start Excitement Function
Combination meter detects the engine start when input engine speed signal at first. Pointers of speed meter
and tachometer sweep and ring illumination gradually turns ON when combination meter detects the engine
start. Then, combination meter starts the normal control.
NOTE:
Water temperature gauge and fuel gauge do not function.
Engine start excitement function can be turned ON/OFF with pressing meter illumination control switch for
more than 1 second.
SKIB2623J
SKIB3738E
Page 1450 of 5621
COMBINATION METERS
DI-17
C
D
E
F
G
H
I
J
L
MA
B
DI
Revision: 2006 January2006 M35/M45
Self-Diagnosis Mode of Combination MeterNKS003U2
SELF-DIAGNOSIS FUNCTION
Odo/trip meter segment and dot matrix LCD segment operation can be checked in self-diagnosis mode.
Meters/gauges can be checked in self-diagnosis mode.
OPERATION PROCEDURE
1. Turn ignition switch ON, and switch the odo/trip meter to “trip A” or “trip B”.
NOTE:
If the diagnosis function is activated with “trip A” displayed, the mileage on “trip A” is reset to “0000.0”.
(The same way for “trip B”.)
2. Turn ignition switch OFF.
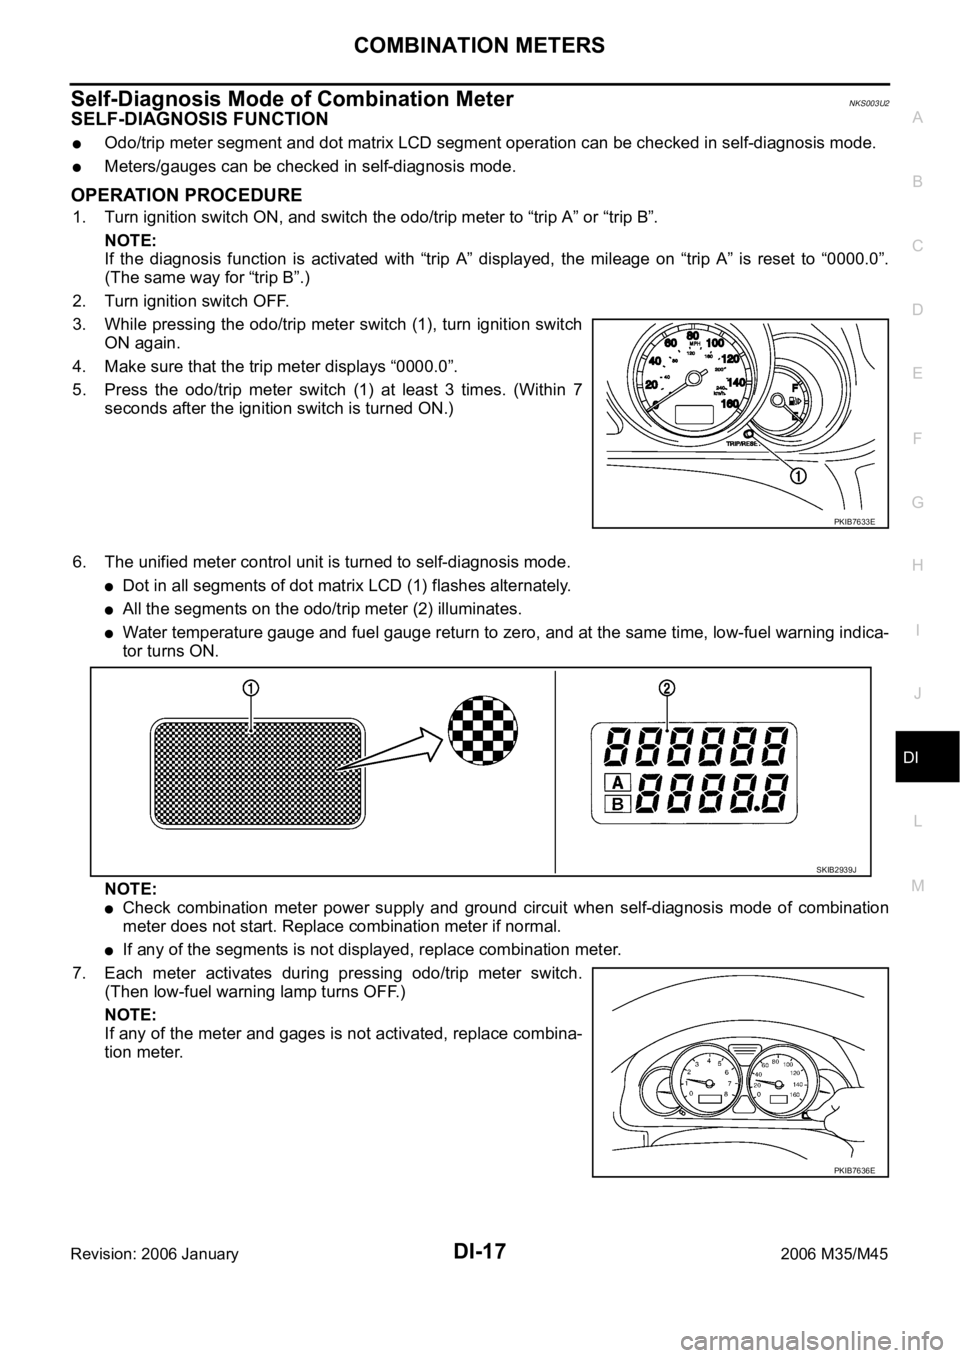
3. While pressing the odo/trip meter switch (1), turn ignition switch
ON again.
4. Make sure that the trip meter displays “0000.0”.
5. Press the odo/trip meter switch (1) at least 3 times. (Within 7
seconds after the ignition switch is turned ON.)
6. The unified meter control unit is turned to self-diagnosis mode.
Dot in all segments of dot matrix LCD (1) flashes alternately.
All the segments on the odo/trip meter (2) illuminates.
Water temperature gauge and fuel gauge return to zero, and at the same time, low-fuel warning indica-
tor turns ON.
NOTE:
Check combination meter power supply and ground circuit when self-diagnosis mode of combination
meter does not start. Replace combination meter if normal.
If any of the segments is not displayed, replace combination meter.
7. Each meter activates during pressing odo/trip meter switch.
(Then low-fuel warning lamp turns OFF.)
NOTE:
If any of the meter and gages is not activated, replace combina-
tion meter.
PKIB7633E
SKIB2939J
PKIB7636E
Page 1465 of 5621
DI-32
UNIFIED METER AND A/C AMP
Revision: 2006 January2006 M35/M45
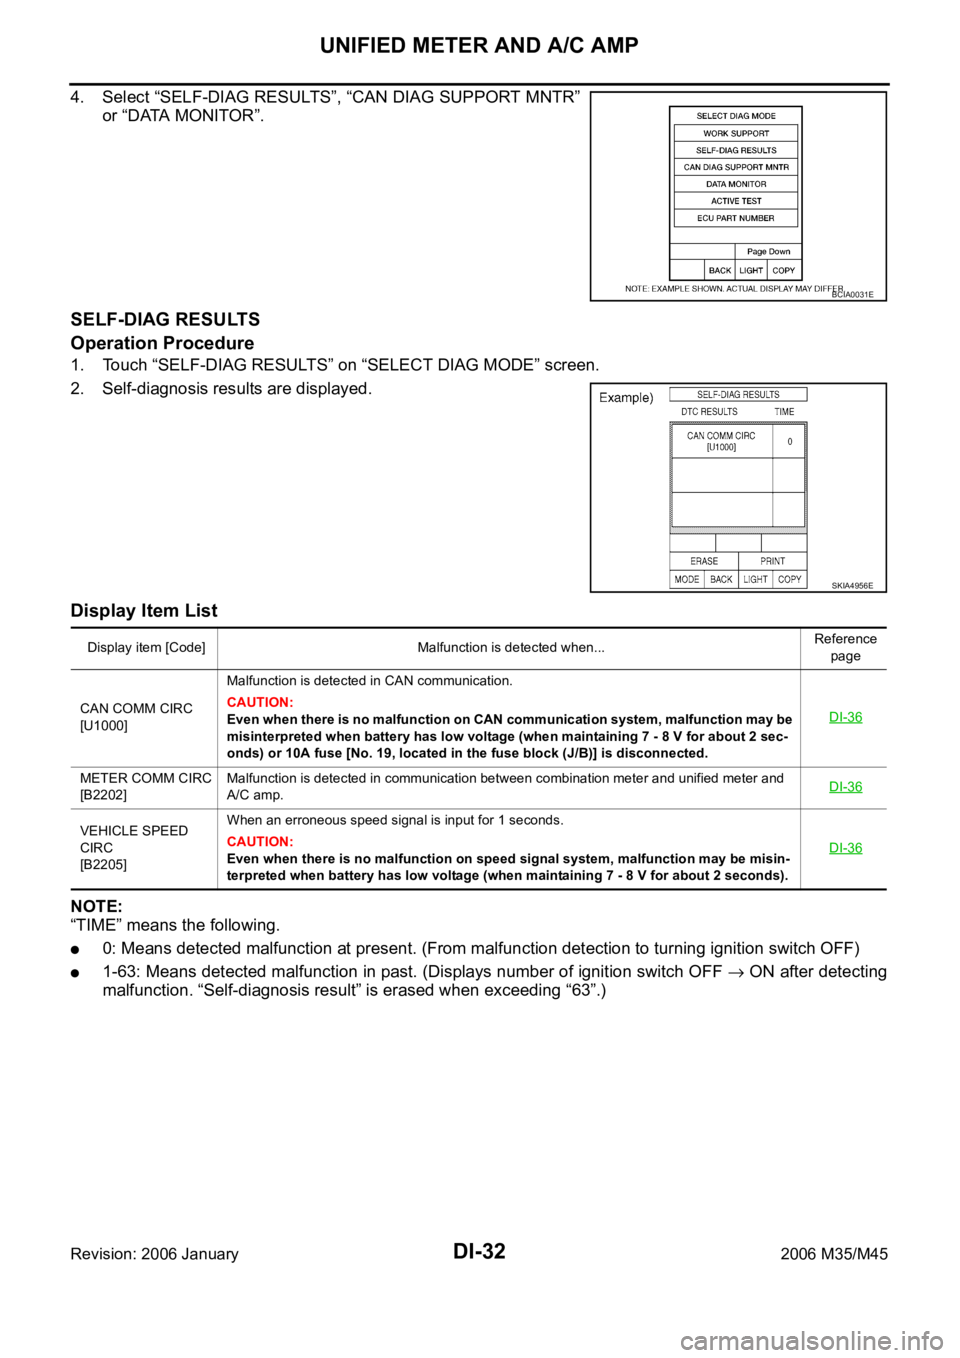
4. Select “SELF-DIAG RESULTS”, “CAN DIAG SUPPORT MNTR”
or “DATA MONITOR”.
SELF-DIAG RESULTS
Operation Procedure
1. Touch “SELF-DIAG RESULTS” on “SELECT DIAG MODE” screen.
2. Self-diagnosis results are displayed.
Display Item List
NOTE:
“TIME” means the following.
0: Means detected malfunction at present. (From malfunction detection to turning ignition switch OFF)
1-63: Means detected malfunction in past. (Displays number of ignition switch OFF ON after detecting
malfunction. “Self-diagnosis result” is erased when exceeding “63”.)
BCIA0031E
SKIA4956E
Display item [Code] Malfunction is detected when...Reference
page
CAN COMM CIRC
[U1000]Malfunction is detected in CAN communication.
CAUTION:
Even when there is no malfunction on CAN communication system, malfunction may be
misinterpreted when battery has low voltage (when maintaining 7 - 8 V for about 2 sec-
onds) or 10A fuse [No. 19, located in the fuse block (J/B)] is disconnected.DI-36
METER COMM CIRC
[B2202]Malfunction is detected in communication between combination meter and unified meter and
A/C amp.DI-36
VEHICLE SPEED
CIRC
[B2205]When an erroneous speed signal is input for 1 seconds.
CAUTION:
Even when there is no malfunction on speed signal system, malfunction may be misin-
terpreted when battery has low voltage (when maintaining 7 - 8 V for about 2 seconds). DI-36
Page 1466 of 5621
UNIFIED METER AND A/C AMP
DI-33
C
D
E
F
G
H
I
J
L
MA
B
DI
Revision: 2006 January2006 M35/M45
DATA MONITOR
Operation Procedure
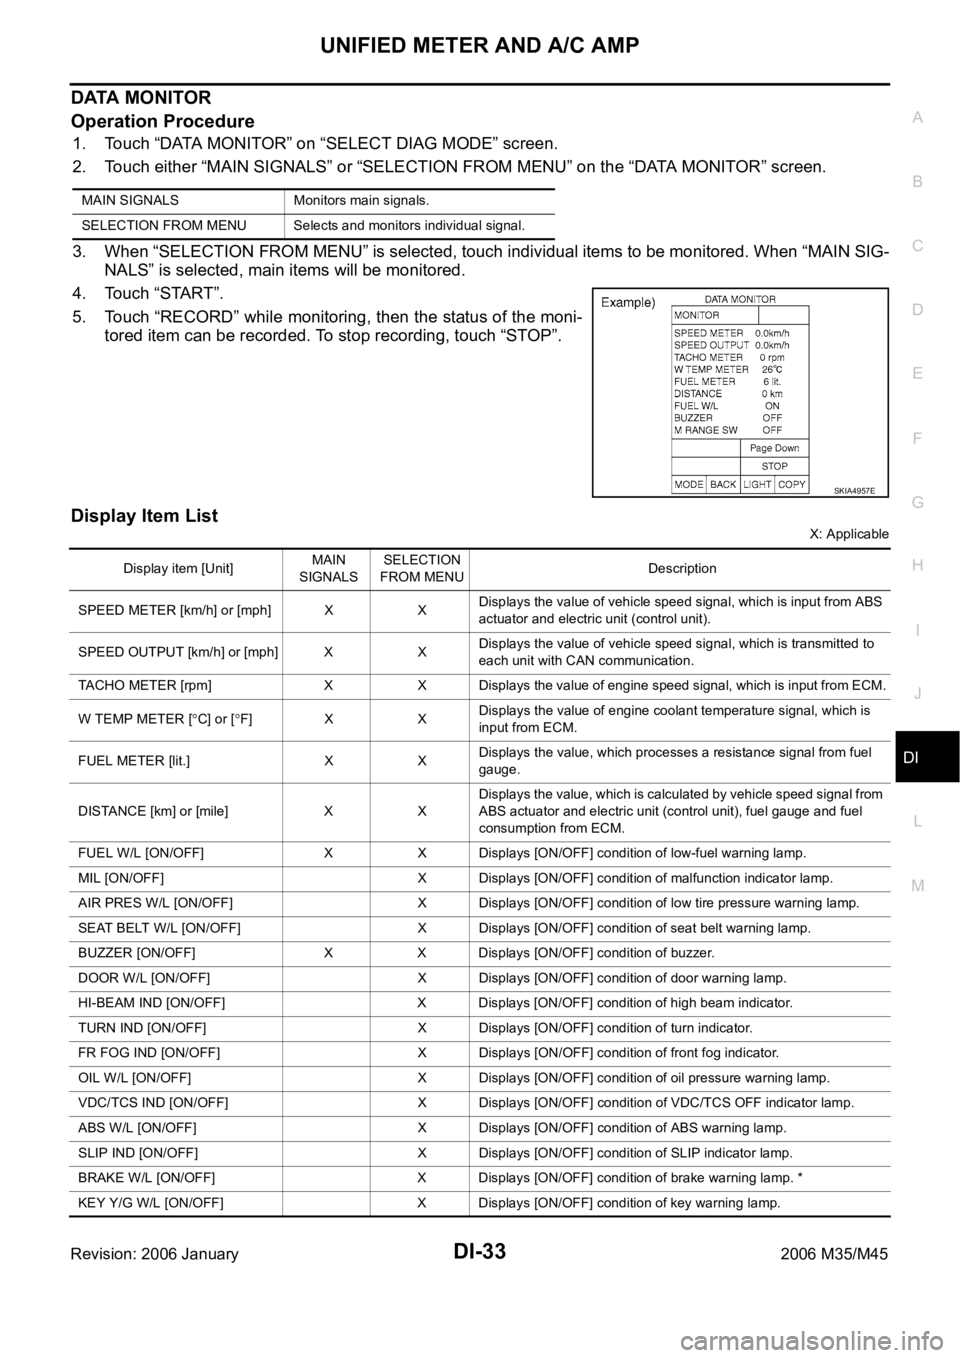
1. Touch “DATA MONITOR” on “SELECT DIAG MODE” screen.
2. Touch either “MAIN SIGNALS” or “SELECTION FROM MENU” on the “DATA MONITOR” screen.
3. When “SELECTION FROM MENU” is selected, touch individual items to be monitored. When “MAIN SIG-
NALS” is selected, main items will be monitored.
4. Touch “START”.
5. Touch “RECORD” while monitoring, then the status of the moni-
tored item can be recorded. To stop recording, touch “STOP”.
Display Item List
X: Applicable MAIN SIGNALS Monitors main signals.
SELECTION FROM MENU Selects and monitors individual signal.
SKIA4957E
Display item [Unit]MAIN
SIGNALSSELECTION
FROM MENUDescription
SPEED METER [km/h] or [mph] X XDisplays the value of vehicle speed signal, which is input from ABS
actuator and electric unit (control unit).
SPEED OUTPUT [km/h] or [mph] X XDisplays the value of vehicle speed signal, which is transmitted to
each unit with CAN communication.
TACHO METER [rpm] X X Displays the value of engine speed signal, which is input from ECM.
W TEMP METER [
C] or [F] X XDisplays the value of engine coolant temperature signal, which is
input from ECM.
FUEL METER [lit.] X XDisplays the value, which processes a resistance signal from fuel
gauge.
DISTANCE [km] or [mile] X XDisplays the value, which is calculated by vehicle speed signal from
ABS actuator and electric unit (control unit), fuel gauge and fuel
consumption from ECM.
FUEL W/L [ON/OFF] X X Displays [ON/OFF] condition of low-fuel warning lamp.
MIL [ON/OFF] X Displays [ON/OFF] condition of malfunction indicator lamp.
AIR PRES W/L [ON/OFF] X Displays [ON/OFF] condition of low tire pressure warning lamp.
SEAT BELT W/L [ON/OFF] X Displays [ON/OFF] condition of seat belt warning lamp.
BUZZER [ON/OFF] X X Displays [ON/OFF] condition of buzzer.
DOOR W/L [ON/OFF] X Displays [ON/OFF] condition of door warning lamp.
HI-BEAM IND [ON/OFF] X Displays [ON/OFF] condition of high beam indicator.
TURN IND [ON/OFF] X Displays [ON/OFF] condition of turn indicator.
FR FOG IND [ON/OFF] X Displays [ON/OFF] condition of front fog indicator.
OIL W/L [ON/OFF] X Displays [ON/OFF] condition of oil pressure warning lamp.
VDC/TCS IND [ON/OFF] X Displays [ON/OFF] condition of VDC/TCS OFF indicator lamp.
ABS W/L [ON/OFF] X Displays [ON/OFF] condition of ABS warning lamp.
SLIP IND [ON/OFF] X Displays [ON/OFF] condition of SLIP indicator lamp.
BRAKE W/L [ON/OFF] X Displays [ON/OFF] condition of brake warning lamp. *
KEY Y/G W/L [ON/OFF] X Displays [ON/OFF] condition of key warning lamp.
Page 1503 of 5621
DI-70
WARNING CHIME
Revision: 2006 January2006 M35/M45
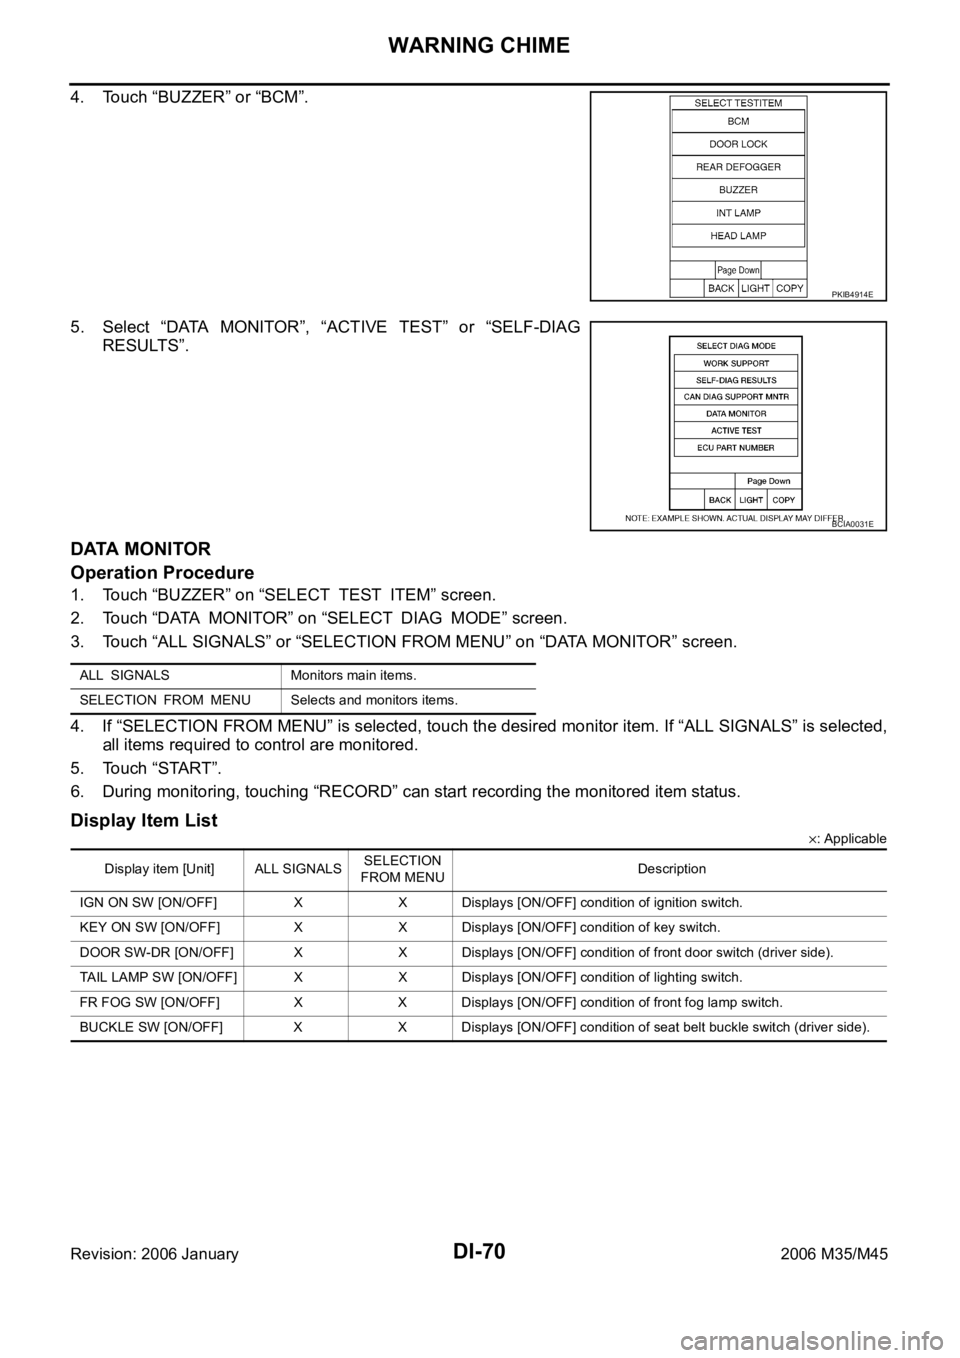
4. Touch “BUZZER” or “BCM”.
5. Select “DATA MONITOR”, “ACTIVE TEST” or “SELF-DIAG
RESULTS”.
DATA MONITOR
Operation Procedure
1. Touch “BUZZER” on “SELECT TEST ITEM” screen.
2. Touch “DATA MONITOR” on “SELECT DIAG MODE” screen.
3. Touch “ALL SIGNALS” or “SELECTION FROM MENU” on “DATA MONITOR” screen.
4. If “SELECTION FROM MENU” is selected, touch the desired monitor item. If “ALL SIGNALS” is selected,
all items required to control are monitored.
5. Touch “START”.
6. During monitoring, touching “RECORD” can start recording the monitored item status.
Display Item List
: Applicable
PKIB4914E
BCIA0031E
ALL SIGNALS Monitors main items.
SELECTION FROM MENU Selects and monitors items.
Display item [Unit] ALL SIGNALSSELECTION
FROM MENUDescription
IGN ON SW [ON/OFF] X X Displays [ON/OFF] condition of ignition switch.
KEY ON SW [ON/OFF] X X Displays [ON/OFF] condition of key switch.
DOOR SW-DR [ON/OFF] X X Displays [ON/OFF] condition of front door switch (driver side).
TAIL LAMP SW [ON/OFF] X X Displays [ON/OFF] condition of lighting switch.
FR FOG SW [ON/OFF] X X Displays [ON/OFF] condition of front fog lamp switch.
BUCKLE SW [ON/OFF] X X Displays [ON/OFF] condition of seat belt buckle switch (driver side).