2006 INFINITI M35 height
[x] Cancel search: heightPage 4585 of 5621
LT-158
ACTIVE AFS
Revision: 2006 January2006 M35/M45
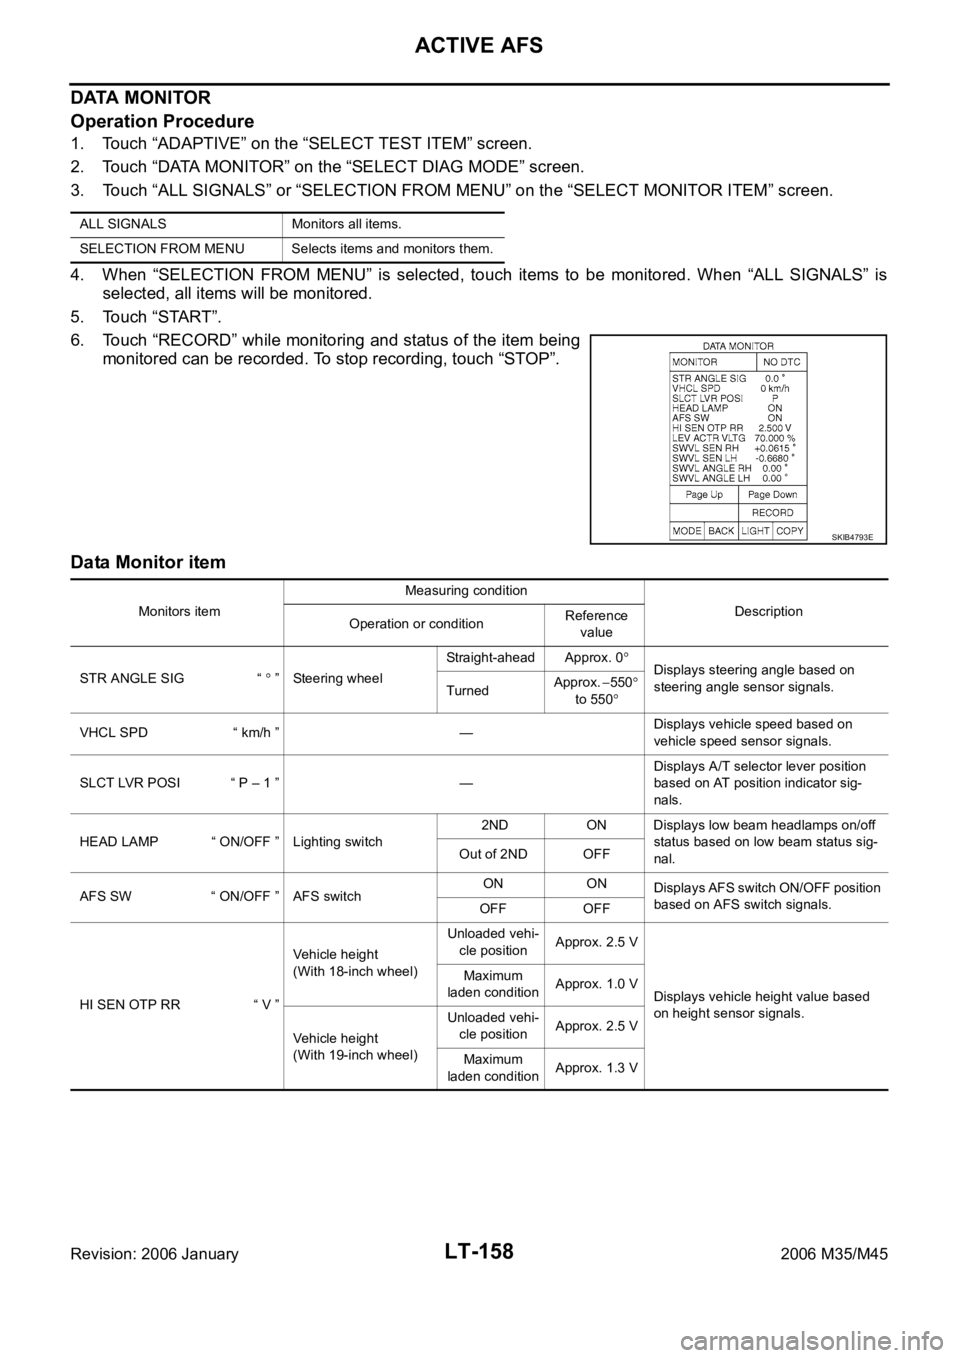
DATA MONITOR
Operation Procedure
1. Touch “ADAPTIVE” on the “SELECT TEST ITEM” screen.
2. Touch “DATA MONITOR” on the “SELECT DIAG MODE” screen.
3. Touch “ALL SIGNALS” or “SELECTION FROM MENU” on the “SELECT MONITOR ITEM” screen.
4. When “SELECTION FROM MENU” is selected, touch items to be monitored. When “ALL SIGNALS” is
selected, all items will be monitored.
5. Touch “START”.
6. Touch “RECORD” while monitoring and status of the item being
monitored can be recorded. To stop recording, touch “STOP”.
Data Monitor item
ALL SIGNALS Monitors all items.
SELECTION FROM MENU Selects items and monitors them.
SKIB4793E
Monitors itemMeasuring condition
Description
Operation or conditionReference
value
STR ANGLE SIG “
” Steering wheelStraight-ahead Approx. 0Displays steering angle based on
steering angle sensor signals.
TurnedApprox. 550
to 550
VHCL SPD “ km/h ” —Displays vehicle speed based on
vehicle speed sensor signals.
SLCT LVR POSI “ P – 1 ” —Displays A/T selector lever position
based on AT position indicator sig-
nals.
HEAD LAMP “ ON/OFF ” Lighting switch 2ND ON Displays low beam headlamps on/off
status based on low beam status sig-
nal. Out of 2ND OFF
AFS SW “ ON/OFF ” AFS switchON ON
Displays AFS switch ON/OFF position
based on AFS switch signals.
OFF OFF
HI SEN OTP RR “ V ”Vehicle height
(With 18-inch wheel)Unloaded vehi-
cle positionApprox. 2.5 V
Displays vehicle height value based
on height sensor signals. Maximum
laden conditionApprox. 1.0 V
Vehicle height
(With 19-inch wheel)Unloaded vehi-
cle positionApprox. 2.5 V
Maximum
laden conditionApprox. 1.3 V
Page 4588 of 5621

ACTIVE AFS
LT-161
C
D
E
F
G
H
I
J
L
MA
B
LT
Revision: 2006 January2006 M35/M45
Symptom ChartNKS003QN
CAUTION:
The low beam headlamps performs small movements when AFS control unit detects the engine start.
This is normal with initialization of swivel actuator by AFS control unit.
SymptomAFS OFF
indicatorCausal system Reference
AFS operates, but cannot judge normal/
abnormal.
(AFS function test)NormalCheck swivel operation.LT-181, "AFS
Operation
Check (Func-
tion Test)"
Check steering angle sensor neutral point (straight-ahead
position).
Auto aiming operates, but cannot judge
normal/abnormal.
(Auto aiming function test)NormalCheck auto aiming operation.LT-183, "Auto
Aiming Opera-
tion Check
(Function
Te s t )"
Check height sensor signal value recognized by AFS con-
trol unit at unloaded vehicle position.
Check height sensor signal and aiming motor drive signal.
Neither AFS operates nor auto aiming
operates.BlinkingCheck AFS control unit self-diagnostic results. LT-154,
"SELF-DIAG
RESULTS"
Check AFS control unit power supply and ground circuit.
NOTE:
Check only when “ADAPTIVE LIGHT” is not displayed on
CONSULT-II “SELECT SYSTEM” screen.LT-151, "Pre-
liminary
Check"
AFS does not operate.
(Auto aiming operation is normal.)Blinking Check AFS control unit self-diagnostic results. LT-154,
"SELF-DIAG
RESULTS"
Illuminated Check AFS switch system circuit.LT-185, "
AFS
Switch Does
Not Operate"
Auto aiming does not operate.
(AFS operation is normal.)NormalCheck AFS control unit self-diagnostic results. LT-154,
"SELF-DIAG
RESULTS"
Check aiming motor system circuit.LT-187, "
Auto
Aiming Does
Not Operate
(Check Aiming
Motor System
Circuit)"
Auto aiming operates in the reverse way.
(Lowering vehicle height angles light
axis up.)Normal Replace AFS control unit.LT-191, "Removal and
Installation of
AFS Control
Unit"
AFS OFF indicator does not illuminate.
(AFS operation and auto aiming opera-
tion are normal.)Not
illuminatedCheck circuit between unified meter and A/C amp. and
combination meter.LT-190, "
AFS
OFF Indicator
Does Not
Operate"AFS OFF indicator blinks.
(AFS operation and auto aiming opera-
tion are normal.)BlinkingCheck receive state of AFS off indicator signal from uni-
fied meter and A/C amp.
AFS cannot be cancelled.
(AFS switch does not operate.)Normal Check AFS switch system circuit.LT-185, "AFS
Switch Does
Not Operate"
Page 4601 of 5621
LT-174
ACTIVE AFS
Revision: 2006 January2006 M35/M45
DTC B2514 HI SEN UNUSUAL RRNKS003QQ
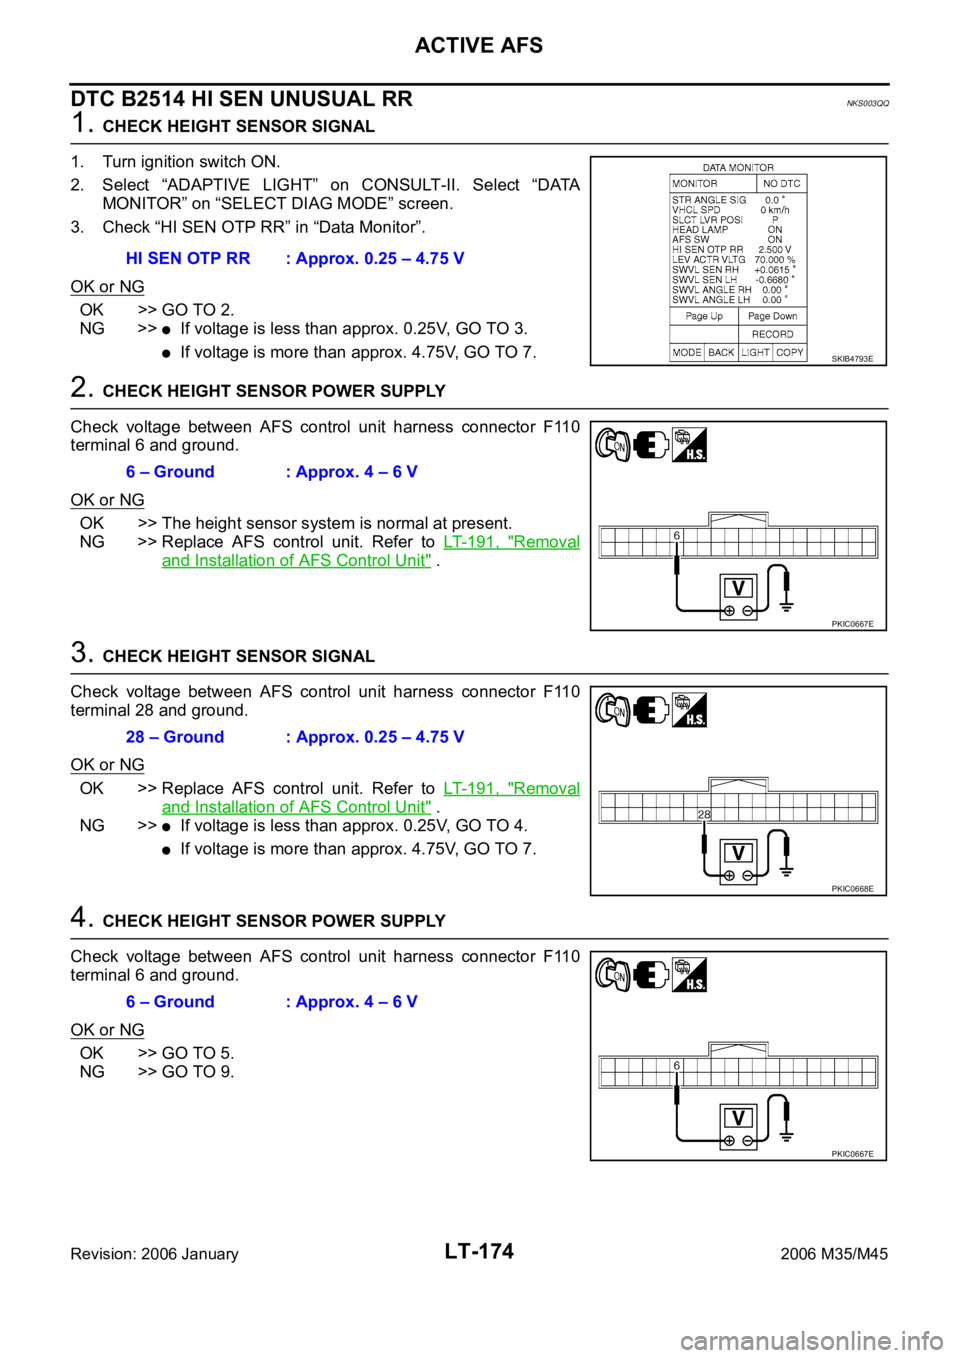
1. CHECK HEIGHT SENSOR SIGNAL
1. Turn ignition switch ON.
2. Select “ADAPTIVE LIGHT” on CONSULT-II. Select “DATA
MONITOR” on “SELECT DIAG MODE” screen.
3. Check “HI SEN OTP RR” in “Data Monitor”.
OK or NG
OK >> GO TO 2.
NG >>
If voltage is less than approx. 0.25V, GO TO 3.
If voltage is more than approx. 4.75V, GO TO 7.
2. CHECK HEIGHT SENSOR POWER SUPPLY
Check voltage between AFS control unit harness connector F110
terminal 6 and ground.
OK or NG
OK >> The height sensor system is normal at present.
NG >> Replace AFS control unit. Refer to LT- 1 9 1 , "
Removal
and Installation of AFS Control Unit" .
3. CHECK HEIGHT SENSOR SIGNAL
Check voltage between AFS control unit harness connector F110
terminal 28 and ground.
OK or NG
OK >> Replace AFS control unit. Refer to LT- 1 9 1 , "Removal
and Installation of AFS Control Unit" .
NG >>
If voltage is less than approx. 0.25V, GO TO 4.
If voltage is more than approx. 4.75V, GO TO 7.
4. CHECK HEIGHT SENSOR POWER SUPPLY
Check voltage between AFS control unit harness connector F110
terminal 6 and ground.
OK or NG
OK >> GO TO 5.
NG >> GO TO 9.HI SEN OTP RR : Approx. 0.25 – 4.75 V
SKIB4793E
6 – Ground : Approx. 4 – 6 V
PKIC0667E
28 – Ground : Approx. 0.25 – 4.75 V
PKIC0668E
6 – Ground : Approx. 4 – 6 V
PKIC0667E
Page 4602 of 5621
ACTIVE AFS
LT-175
C
D
E
F
G
H
I
J
L
MA
B
LT
Revision: 2006 January2006 M35/M45
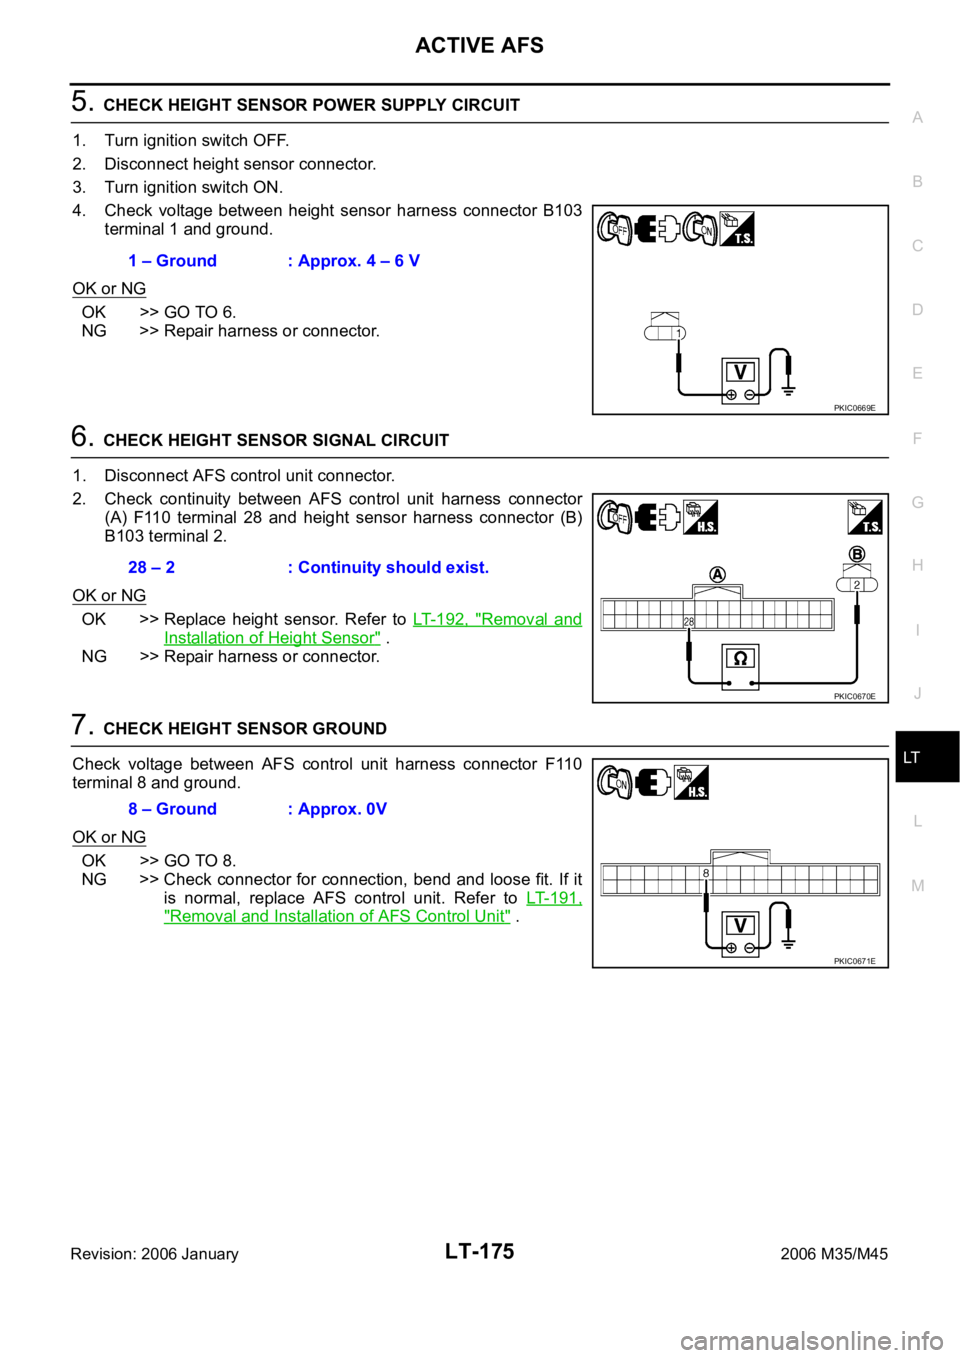
5. CHECK HEIGHT SENSOR POWER SUPPLY CIRCUIT
1. Turn ignition switch OFF.
2. Disconnect height sensor connector.
3. Turn ignition switch ON.
4. Check voltage between height sensor harness connector B103
terminal 1 and ground.
OK or NG
OK >> GO TO 6.
NG >> Repair harness or connector.
6. CHECK HEIGHT SENSOR SIGNAL CIRCUIT
1. Disconnect AFS control unit connector.
2. Check continuity between AFS control unit harness connector
(A) F110 terminal 28 and height sensor harness connector (B)
B103 terminal 2.
OK or NG
OK >> Replace height sensor. Refer to LT- 1 9 2 , "Removal and
Installation of Height Sensor" .
NG >> Repair harness or connector.
7. CHECK HEIGHT SENSOR GROUND
Check voltage between AFS control unit harness connector F110
terminal 8 and ground.
OK or NG
OK >> GO TO 8.
NG >> Check connector for connection, bend and loose fit. If it
is normal, replace AFS control unit. Refer to LT- 1 9 1 ,
"Removal and Installation of AFS Control Unit" . 1 – Ground : Approx. 4 – 6 V
PKIC0669E
28 – 2 : Continuity should exist.
PKIC0670E
8 – Ground : Approx. 0V
PKIC0671E
Page 4603 of 5621
LT-176
ACTIVE AFS
Revision: 2006 January2006 M35/M45
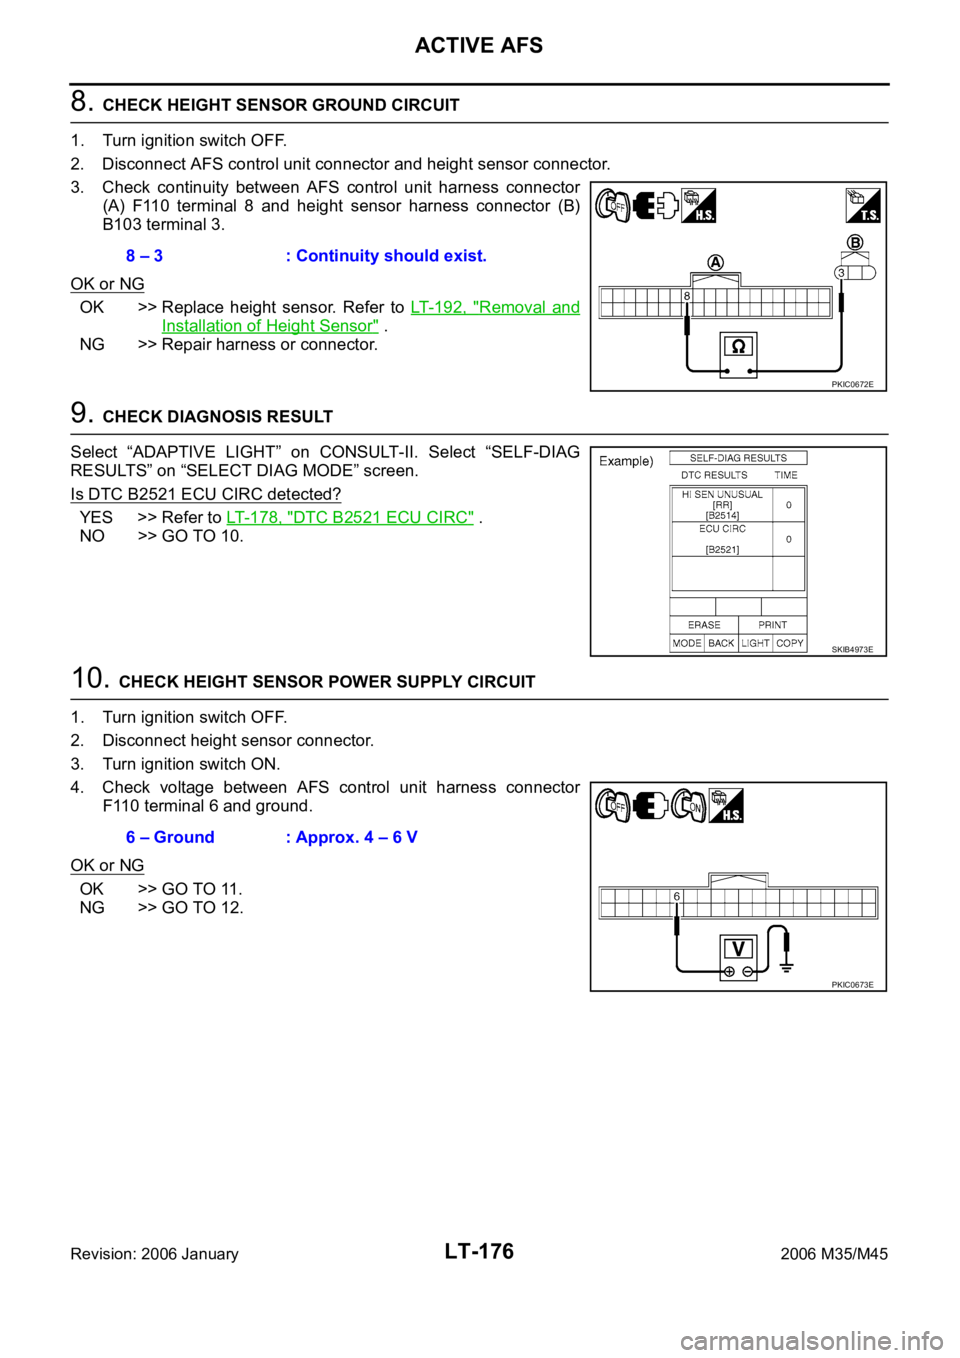
8. CHECK HEIGHT SENSOR GROUND CIRCUIT
1. Turn ignition switch OFF.
2. Disconnect AFS control unit connector and height sensor connector.
3. Check continuity between AFS control unit harness connector
(A) F110 terminal 8 and height sensor harness connector (B)
B103 terminal 3.
OK or NG
OK >> Replace height sensor. Refer to LT- 1 9 2 , "Removal and
Installation of Height Sensor" .
NG >> Repair harness or connector.
9. CHECK DIAGNOSIS RESULT
Select “ADAPTIVE LIGHT” on CONSULT-II. Select “SELF-DIAG
RESULTS” on “SELECT DIAG MODE” screen.
Is DTC B2521 ECU CIRC detected?
YES >> Refer to LT- 1 7 8 , "DTC B2521 ECU CIRC" .
NO >> GO TO 10.
10. CHECK HEIGHT SENSOR POWER SUPPLY CIRCUIT
1. Turn ignition switch OFF.
2. Disconnect height sensor connector.
3. Turn ignition switch ON.
4. Check voltage between AFS control unit harness connector
F110 terminal 6 and ground.
OK or NG
OK >> GO TO 11.
NG >> GO TO 12.8 – 3 : Continuity should exist.
PKIC0672E
SKIB4973E
6 – Ground : Approx. 4 – 6 V
PKIC0673E
Page 4604 of 5621
ACTIVE AFS
LT-177
C
D
E
F
G
H
I
J
L
MA
B
LT
Revision: 2006 January2006 M35/M45
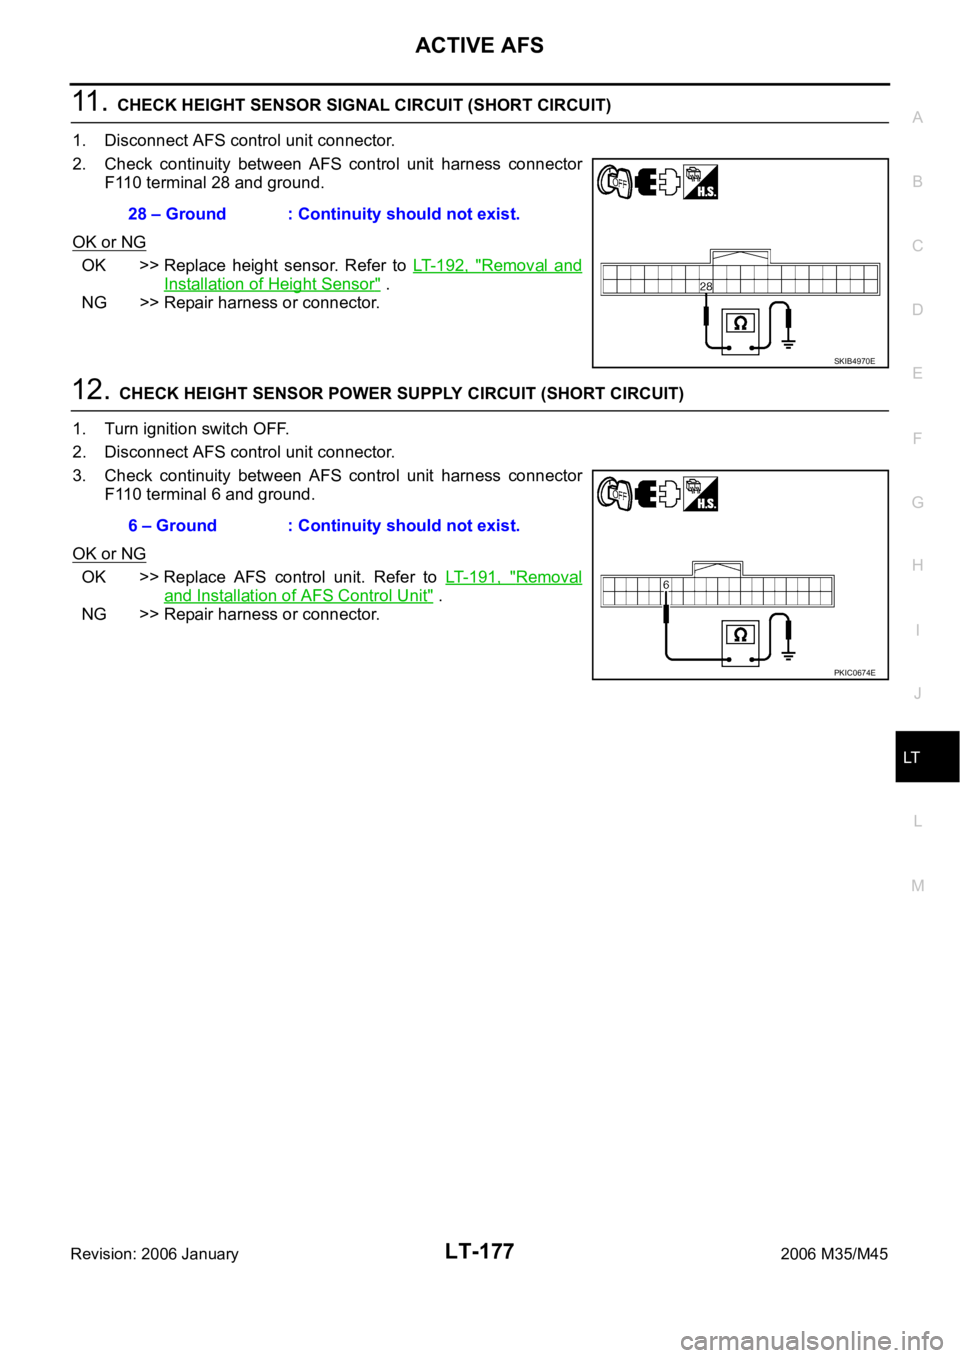
11 . CHECK HEIGHT SENSOR SIGNAL CIRCUIT (SHORT CIRCUIT)
1. Disconnect AFS control unit connector.
2. Check continuity between AFS control unit harness connector
F110 terminal 28 and ground.
OK or NG
OK >> Replace height sensor. Refer to LT- 1 9 2 , "Removal and
Installation of Height Sensor" .
NG >> Repair harness or connector.
12. CHECK HEIGHT SENSOR POWER SUPPLY CIRCUIT (SHORT CIRCUIT)
1. Turn ignition switch OFF.
2. Disconnect AFS control unit connector.
3. Check continuity between AFS control unit harness connector
F110 terminal 6 and ground.
OK or NG
OK >> Replace AFS control unit. Refer to LT- 1 9 1 , "Removal
and Installation of AFS Control Unit" .
NG >> Repair harness or connector.28 – Ground : Continuity should not exist.
SKIB4970E
6 – Ground : Continuity should not exist.
PKIC0674E
Page 4607 of 5621
LT-180
ACTIVE AFS
Revision: 2006 January2006 M35/M45
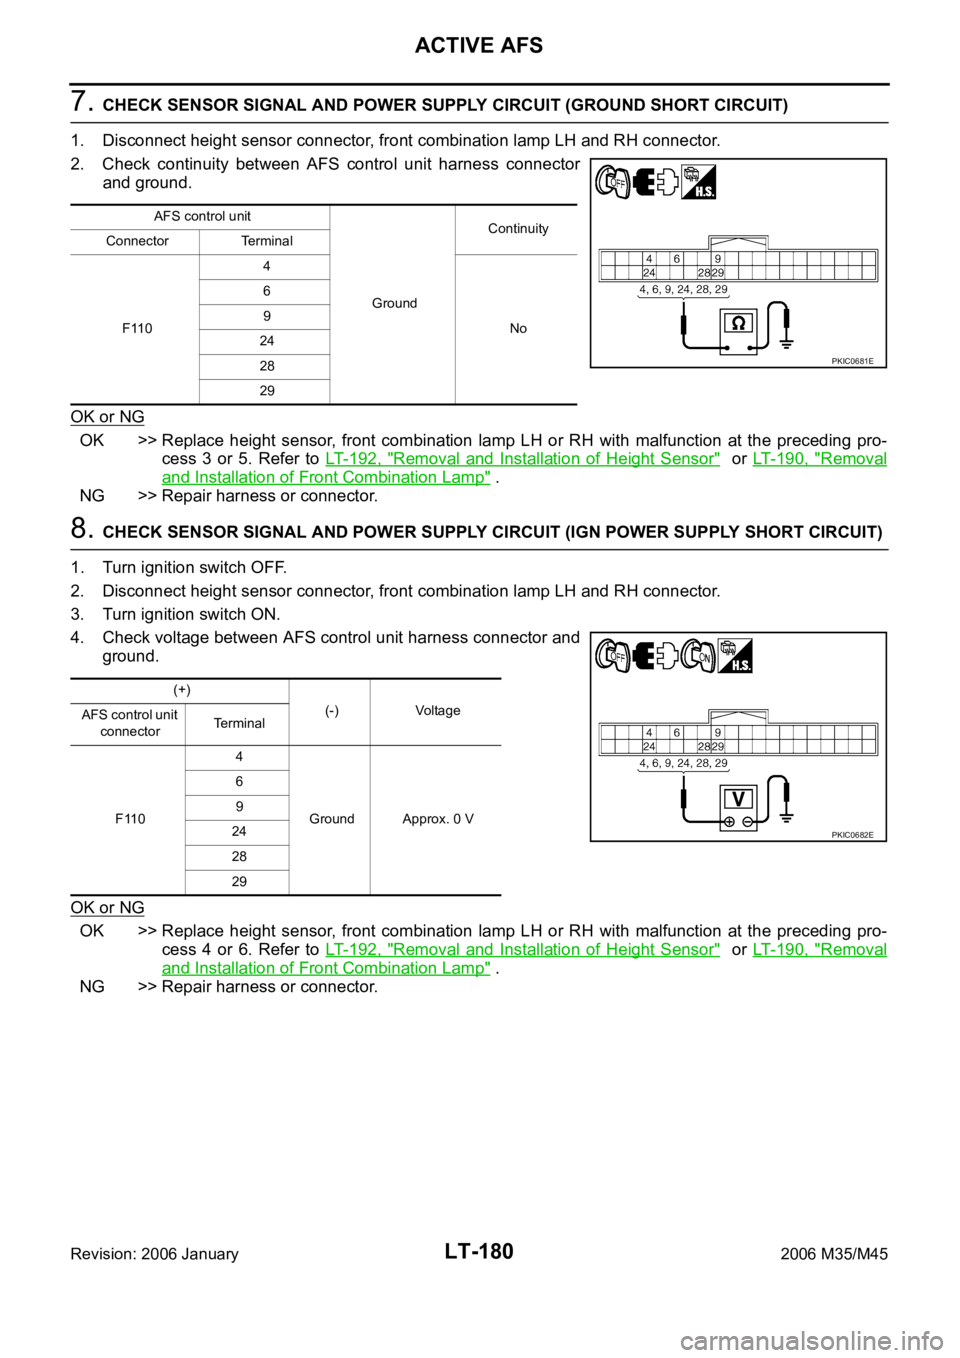
7. CHECK SENSOR SIGNAL AND POWER SUPPLY CIRCUIT (GROUND SHORT CIRCUIT)
1. Disconnect height sensor connector, front combination lamp LH and RH connector.
2. Check continuity between AFS control unit harness connector
and ground.
OK or NG
OK >> Replace height sensor, front combination lamp LH or RH with malfunction at the preceding pro-
cess 3 or 5. Refer to LT- 1 9 2 , "
Removal and Installation of Height Sensor" or LT- 1 9 0 , "Removal
and Installation of Front Combination Lamp" .
NG >> Repair harness or connector.
8. CHECK SENSOR SIGNAL AND POWER SUPPLY CIRCUIT (IGN POWER SUPPLY SHORT CIRCUIT)
1. Turn ignition switch OFF.
2. Disconnect height sensor connector, front combination lamp LH and RH connector.
3. Turn ignition switch ON.
4. Check voltage between AFS control unit harness connector and
ground.
OK or NG
OK >> Replace height sensor, front combination lamp LH or RH with malfunction at the preceding pro-
cess 4 or 6. Refer to LT- 1 9 2 , "
Removal and Installation of Height Sensor" or LT- 1 9 0 , "Removal
and Installation of Front Combination Lamp" .
NG >> Repair harness or connector.
AFS control unit
GroundContinuity
Connector Terminal
F1104
No 6
9
24
28
29
PKIC0681E
(+)
(-) Voltage
AFS control unit
connectorTerminal
F1104
Ground Approx. 0 V 6
9
24
28
29
PKIC0682E
Page 4610 of 5621

ACTIVE AFS
LT-183
C
D
E
F
G
H
I
J
L
MA
B
LT
Revision: 2006 January2006 M35/M45
Auto Aiming Operation Check (Function Test)NKS003QT
1. CHECK AIMING MOTOR
1. Start engine and turn lighting switch to 2ND position.
2. Select “ADAPTIVE LIGHT” on CONSULT-II. Select “ACTIVE
TEST” on “SELECT DIAG MODE” screen.
3. Select “LEVELIZER TEST” on “SELECT TEST ITEM” screen.
4. Touch “ORIGIN” and “PEAK” screen.
5. Make sure of auto aiming operation.
OK or NG
OK >> GO TO 2.
NG >>
When interference or poor fitment is found, perform aiming adjustment. Refer to LT- 7 4 , "Aiming
Adjustment" . If it is normal, replace headlamp. Refer to LT- 1 9 0 , "Removal and Installation of
Front Combination Lamp" .
When the operation range is irregular, perform aiming adjustment. Refer to LT- 7 4 , "Aiming
Adjustment" . If it is normal, GO TO 4.
2. PERFORM STATE LEVELIZER ADJUSTMENT 1
Check “LEV ACTR VLTG” in “Data Monitor” with unloaded vehicle
position. (Remove all loads in driver, passenger and trunk rooms.)
OK or NG
OK >> GO TO 3.
NG >> Perform LEVELIZER ADJUSTMENT. Refer to LT- 1 5 3 ,
"WORK SUPPORT (LEVELIZER ADJUSTMENT)" .
3. PERFORM STATE LEVELIZER ADJUSTMENT 2
Check if “LEV ACTR VLTG” changes approx. 3 seconds after lower-
ing vehicle height as low as approx.
0.5V from the value of “HI SEN
OTP RR” in “Data Monitor” at unloaded vehicle position. (Remove all
loads in driver, passenger and trunk rooms.)
OK or NG
OK >> GO TO 4.
NG >> Perform LEVELIZER ADJUSTMENT. Refer to LT- 1 5 3 ,
"WORK SUPPORT (LEVELIZER ADJUSTMENT)" .
SKIB4796E
TEST ITEM ORIGIN PEAK (Reference value)Light axis range at 10 m (394.7 in) off
(Reference value)
LEVELIZER TEST Light axis angle 0
Light axis angle approx. 2.5Approx. 450 mm (17.7 in)
TEST ITEM Unloaded vehicle position
LEV ACTR VLTG Approx. 70%
SKIB4793E
SKIB4793E