2006 INFINITI M35 stall
[x] Cancel search: stallPage 3500 of 5621
SERVICE INFORMATION FOR ELECTRICAL INCIDENT
GI-37
C
D
E
F
G
H
I
J
K
L
MB
GI
Revision: 2006 January2006 M35/M45
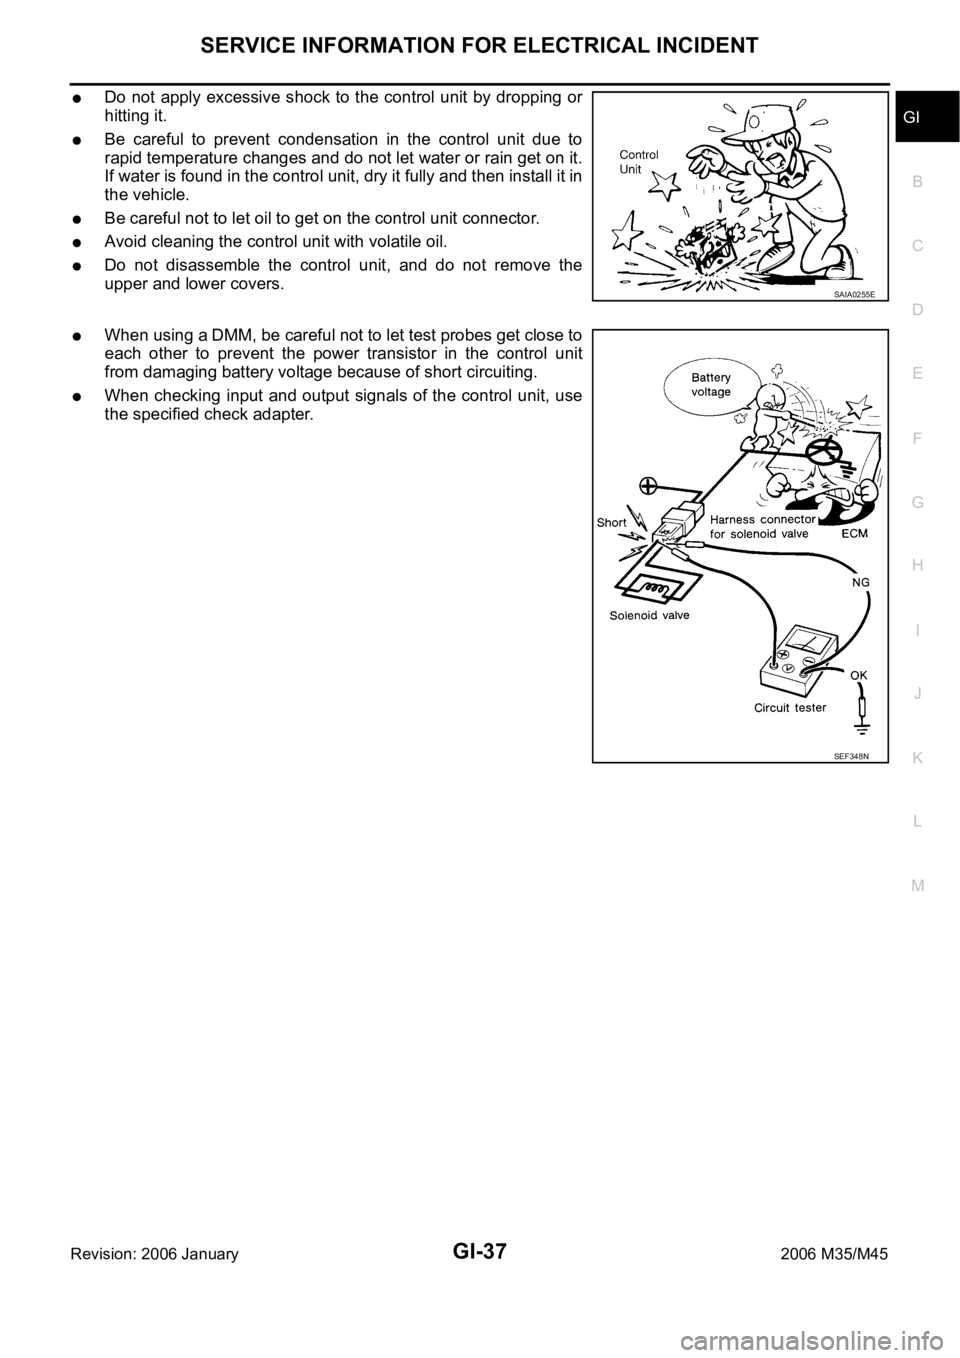
Do not apply excessive shock to the control unit by dropping or
hitting it.
Be careful to prevent condensation in the control unit due to
rapid temperature changes and do not let water or rain get on it.
If water is found in the control unit, dry it fully and then install it in
the vehicle.
Be careful not to let oil to get on the control unit connector.
Avoid cleaning the control unit with volatile oil.
Do not disassemble the control unit, and do not remove the
upper and lower covers.
When using a DMM, be careful not to let test probes get close to
each other to prevent the power transistor in the control unit
from damaging battery voltage because of short circuiting.
When checking input and output signals of the control unit, use
the specified check adapter.
SAIA0255E
SEF348N
Page 3501 of 5621

GI-38
CONSULT-II CHECKING SYSTEM
Revision: 2006 January2006 M35/M45
CONSULT-II CHECKING SYSTEMPFP:00000
DescriptionNAS0007S
CONSULT-II is a hand-held type tester. When it is connected with a diagnostic connector equipped on the
vehicle side, it will communicate with the control unit equipped in the vehicle and then enable various
kinds of diagnostic tests.
Refer to “CONSULT-II Software Operation Manual” for more information.
Function and System Application NAS0007T
x: Applicable
*: NISSAN Anti-Theft System (INFINITI/NISSAN Vehicle Immobilizer System) Diagnostic test
modeFunction
ENGINE
A/T
AIR BAG
METER A/C AMP
BCM
AUTO DRIVE POS.
ABS (Including VDC)
NATS (IVIS/NATS) *
IPDM E/R
ICC
ALL MODE AWD/4WD
INTELLIGENT KEY
LDW
AIR PRESSURE MONITOR
RAS/HICAS
ADAPTIVE LIGHT
PRECRASH SEATBELT
MULTI AV
Work supportThis mode enables a technician to adjust
some devices faster and more accurately by
following the indications on CONSULT-II.x - - - xxx -- x- xxx- x- -
Self-diagnostic
resultsSelf-diagnostic results can be read and
erased quickly.xxxxxxxxxxxxxxxxxx
Trouble diagnos-
tic recordCurrent self-diagnostic results and all trouble
diagnostic records previously stored can be
read.--x---------------
Data monitor Input/Output data in the ECU can be read. x x - x x x x - x xxxxxxxxx
CAN diagnosis
support monitorThe condition of CAN communication line
can be read.xx- xxxx- xxxxxxxxxx
Active testDiagnostic Test Mode in which CONSULT-II
drives some actuators apart from the ECUs
and also shifts some parameters in a speci-
fied range.x- - - xxx -xxxxxxxx- -
DTC & SRT con-
firmationThe results of SRT (System Readiness Test)
and the self-diagnosis status/result can be
confirmed.x- ----------------
DTC work sup-
portThe operating condition to confirm Diagnosis
Trouble Codes can be selected.xx----------------
ECU (ECM/TCM)
part numberECU (ECM/TCM) part number can be read. xx - - xxx -- xxxxxxxxx
ECU discrimi-
nated No.Classification number of a replacement ECU
can be read to prevent an incorrect ECU from
being installed.-- x---------------
Function testThis mode can show results of self-diagnosis
of ECU with either 'OK' or 'NG'. For engines,
more practical tests regarding sensors/
switches and/or actuators are available.xxx---x-----------
Control unit ini-
tializationAll registered ignition key IDs in NATS com-
ponents can be initialized and new IDs can
be registered.-- -----x----------
AV COMM moni-
torThe condition of AV communication can be
Indicated.------------ ---- -x
Page 3502 of 5621
CONSULT-II CHECKING SYSTEM
GI-39
C
D
E
F
G
H
I
J
K
L
MB
GI
Revision: 2006 January2006 M35/M45
Nickel Metal Hydride Battery Replacement NAS0007U
CONSULT-II contains a nickel metal hydride battery. When replacing the battery obey the following:
WAR NING :
Replace the nickel metal hydride battery with Genuine CONSULT-II battery only. Use of another bat-
tery may present a risk of fire or explosion. The battery may present a fire or chemical burn hazard if
mistreated. Do not recharge, disassemble or dispose of in fire.
Keep the battery out of reach of children and discard used battery conforming to the local regulations.
Checking Equipment NAS0007V
When ordering the following equipment, contact your NISSAN/INFINITI distributor.
NOTE:
The CONSULT-II must be used in conjunction with a program card.
CONSULT-II does not require loading (Initialization) procedure.
Be sure the CONSULT-II is turned off before installing or removing a program card.
CAUTION:
If CONSULT-II is used with no connection of CONSULT-II CONVERTER, malfunctions might be
detected in self-diagnosis depending on control unit which carry out CAN communication.
If CONSULT-II CONVERTER is not connected with CONSULT-II, vehicle occur the “FAIL SAFE
MODE” which is “LIGHT UP the HEAD LIGHT” and/or “COOLING FAN ROTAT I N G ” w h e n C O N -
SULT-II is started.
Previous CONSULT-II “I” and “Y” DLC-I and DLC-II cables should NOT be used anymore because
their DDL connector pins can be damaged during cable swapping.
CONSULT-II Start ProcedureNAS0007W
NOTE:
Turning ignition switch off when performing CAN diagnosis could cause CAN memory to be erased.
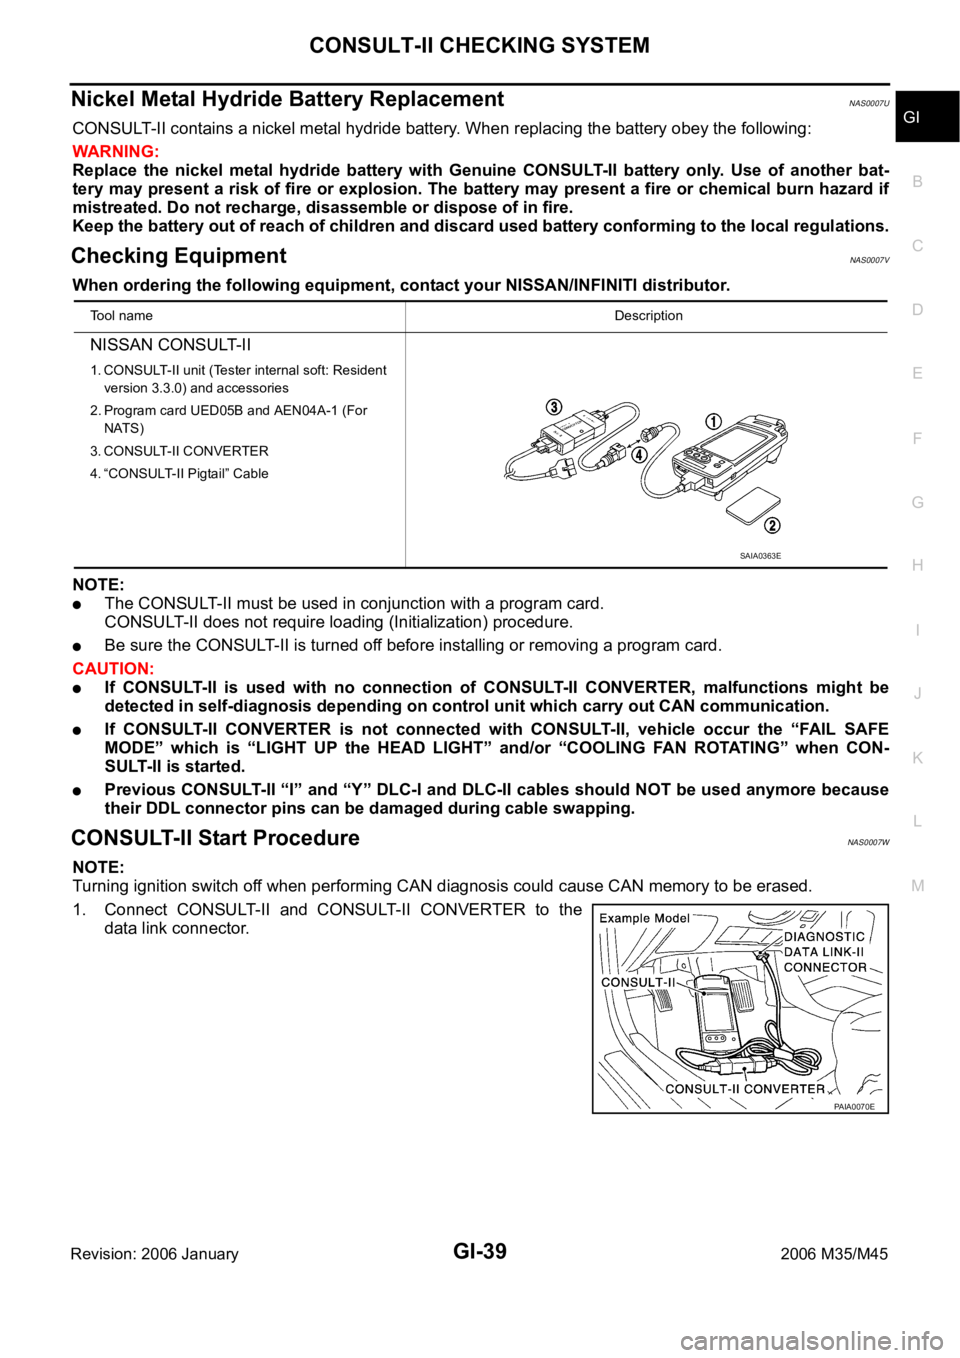
1. Connect CONSULT-II and CONSULT-II CONVERTER to the
data link connector.
Tool nameDescription
NISSAN CONSULT-II
1. CONSULT-II unit (Tester internal soft: Resident
version 3.3.0) and accessories
2. Program card UED05B and AEN04A-1 (For
NATS)
3. CONSULT-II CONVERTER
4. “CONSULT-II Pigtail” Cable
SAIA0363E
PAIA0070E
Page 3508 of 5621
TOW TRUCK TOWING
GI-45
C
D
E
F
G
H
I
J
K
L
MB
GI
Revision: 2006 January2006 M35/M45
AWD MODELS
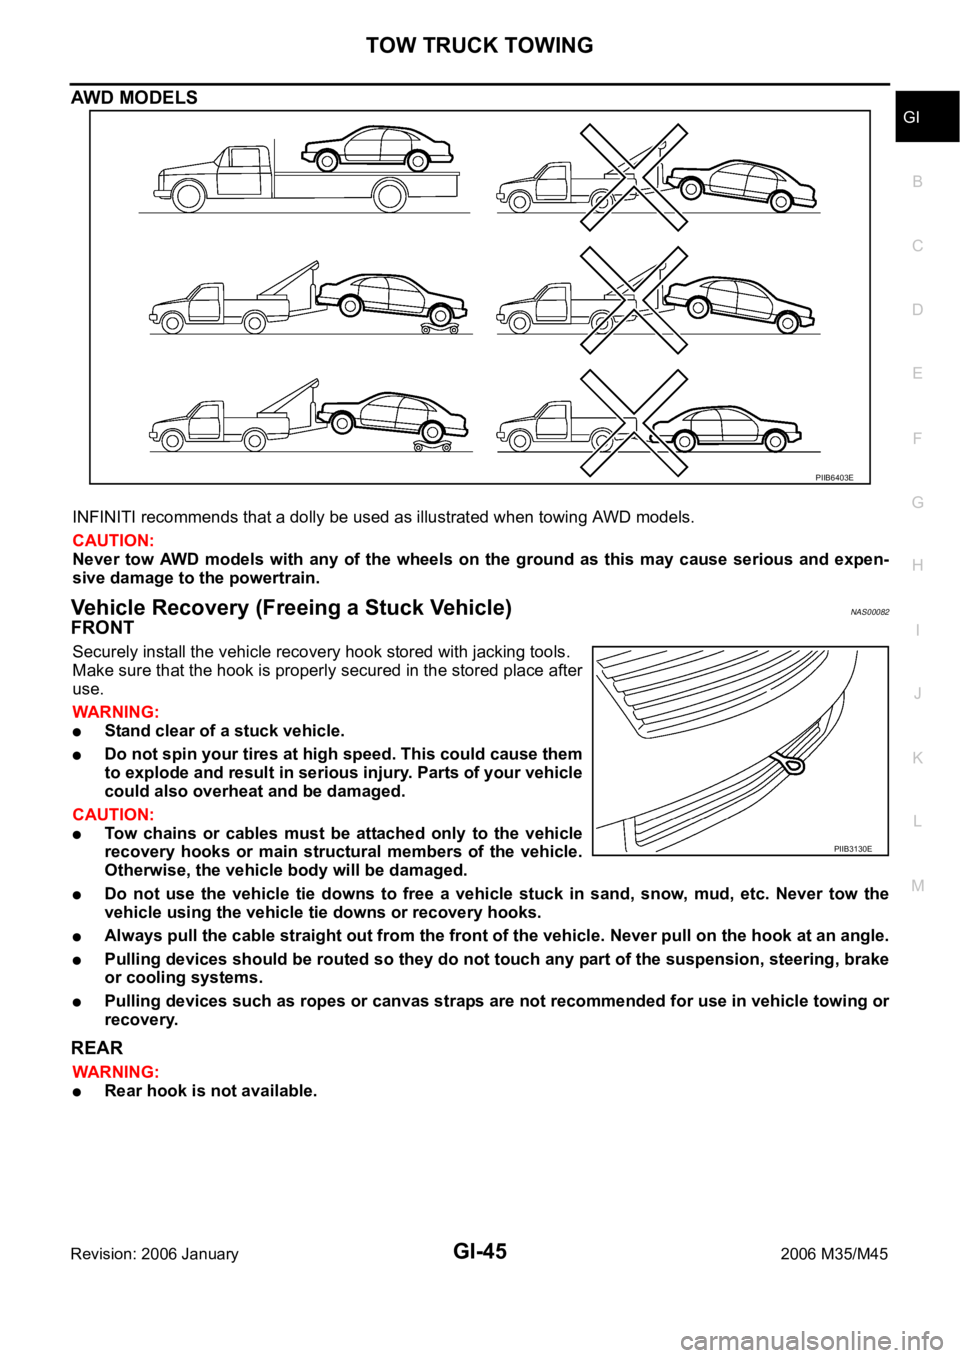
INFINITI recommends that a dolly be used as illustrated when towing AWD models.
CAUTION:
Never tow AWD models with any of the wheels on the ground as this may cause serious and expen-
sive damage to the powertrain.
Vehicle Recovery (Freeing a Stuck Vehicle) NAS00082
FRONT
Securely install the vehicle recovery hook stored with jacking tools.
Make sure that the hook is properly secured in the stored place after
use.
WAR NING :
Stand clear of a stuck vehicle.
Do not spin your tires at high speed. This could cause them
to explode and result in serious injury. Parts of your vehicle
could also overheat and be damaged.
CAUTION:
Tow chains or cables must be attached only to the vehicle
recovery hooks or main structural members of the vehicle.
Otherwise, the vehicle body will be damaged.
Do not use the vehicle tie downs to free a vehicle stuck in sand, snow, mud, etc. Never tow the
vehicle using the vehicle tie downs or recovery hooks.
Always pull the cable straight out from the front of the vehicle. Never pull on the hook at an angle.
Pulling devices should be routed so they do not touch any part of the suspension, steering, brake
or cooling systems.
Pulling devices such as ropes or canvas straps are not recommended for use in vehicle towing or
recovery.
REAR
WAR NING :
Rear hook is not available.
PIIB6403E
PIIB3130E
Page 3520 of 5621
GW-1
GLASSES, WINDOW SYSTEM & MIRRORS
I BODY
CONTENTS
C
D
E
F
G
H
J
K
L
M
SECTION GW
A
B
GW
Revision: 2006 January2006 M35/M45
GLASSES, WINDOW SYSTEM & MIRRORS
PRECAUTIONS .......................................................... 3
Precautions for Supplemental Restraint System
(SRS) “AIR BAG” and “SEAT BELT PRE-TEN-
SIONER” .................................................................. 3
Precautions for Procedures without Cowl Top Cover ..... 3
Handling for Adhesive and Primer ........................... 3
PREPARATION ........................................................... 4
Special Service Tools ............................................... 4
Commercial Service Tools ........................................ 4
SQUEAK AND RATTLE TROUBLE DIAGNOSES ..... 5
Work Flow ................................................................ 5
CUSTOMER INTERVIEW ..................................... 5
DUPLICATE THE NOISE AND TEST DRIVE ....... 6
CHECK RELATED SERVICE BULLETINS ........... 6
LOCATE THE NOISE AND IDENTIFY THE
ROOT CAUSE ...................................................... 6
REPAIR THE CAUSE ........................................... 6
CONFIRM THE REPAIR ....................................... 7
Generic Squeak and Rattle Troubleshooting ........... 7
INSTRUMENT PANEL .......................................... 7
CENTER CONSOLE ............................................. 7
DOORS ................................................................. 7
TRUNK .................................................................. 8
SUNROOF/HEADLINING ..................................... 8
SEATS ................................................................... 8
UNDERHOOD ....................................................... 8
Diagnostic Worksheet .............................................. 9
WINDSHIELD GLASS ...............................................11
Removal and Installation ......................................... 11
REMOVAL ........................................................
.... 11
INSTALLATION ................................................... 12
POWER WINDOW SYSTEM .................................... 13
Component Parts and Harness Connector Location ... 13
System Description ................................................ 13
MANUAL OPERATION ....................................... 14
AUTO OPERATION ............................................ 16
POWER WINDOW SERIAL LINK ....................... 16
POWER WINDOW LOCK ................................... 16
RETAINED POWER OPERATION ...................... 16ANTI-PINCH SYSTEM ........................................ 17
INITIALIZATION .................................................. 17
FAIL-SAFE CONTROL ........................................ 18
POWER WINDOW CONTROL BY THE KEY
CYLINDER SWITCH ........................................... 18
CAN Communication System Description .............. 19
CAN Communication Unit ....................................... 19
Schematic ............................................................... 20
Wiring Diagram — WINDOW — ............................. 21
Terminal and Reference Value for BCM ................. 27
Terminal and Reference Value for Power Window
Main Switch ............................................................ 28
Terminal and Reference Value for (Front and Rear)
Power Window Sub-Switch .................................... 29
CONSULT-II Function (BCM) ................................. 30
WORK SUPPORT ............................................... 31
DATE MONITOR ................................................. 31
Work Flow ............................................................... 32
Trouble Diagnosis Symptom Chart ......................... 32
BCM Power Supply and Ground Circuit Check ...... 34
Power Window Main Switch Power Supply Circuit
Check ..................................................................... 35
Power Window Sub-Switch (Front Passenger Side)
Power Supply and Ground Circuit Check ............... 36
Power Window Sub-Switch (Rear LH or RH) Power
Supply and Ground Circuit Check .......................... 37
Power Window Motor (Front Driver Side) Circuit
Check ..................................................................... 38
Power Window Motor (Front Passenger Side) Cir-
cuit Check ............................................................... 39
Power Window Motor (Rear LH or RH) Circuit Check ... 40
Encoder Circuit Check (Driver Side) ....................... 42
Encoder Circuit Check (Passenger Side) ............... 45
Encoder Circuit Check (Rear LH or RH) ................. 48
Door Switch Check ..............................................
... 52
Front Door Key Cylinder Switch Check .................. 54
Power Window Serial Link Check (Passenger Side) ... 56
Power Window Serial Link Check (Rear LH or RH) ... 58
Power Window Lock Switch Check ........................ 58
Page 3521 of 5621

GW-2Revision: 2006 January2006 M35/M45 SIDE WINDOW GLASS ............................................ 59
Removal and Installation ........................................ 59
REMOVAL ........................................................
... 59
INSTALLATION .................................................... 60
REAR WINDOW GLASS AND MOLDING ................ 61
Removal and Installation ........................................ 61
REMOVAL ........................................................
... 61
INSTALLATION .................................................... 62
FRONT DOOR GLASS AND REGULATOR ............. 63
Removal and Installation ........................................ 63
DOOR GLASS ..................................................... 63
REGULATOR ASSEMBLY .................................. 64
Disassembly and Assembly .................................... 65
REGULATOR ASSEMBLY .................................. 65
Inspection after Installation ..................................... 65
SYSTEM INITIALIZATION ................................... 65
INSPECT THE FUNCTION OF THE ANTI-
PINCH SYSTEM. ................................................. 65
FITTING INSPECTION ........................................ 66
REAR DOOR GLASS AND REGULATOR ............... 67
Removal and Installation ........................................ 67
DOOR GLASS ..................................................... 67
REGULATOR ASSEMBLY .................................. 68
Disassembly and Assembly .................................... 70
REGULATOR ASSEMBLY .................................. 70
Inspection after Installation ..................................... 70
SYSTEM INITIALIZATION ................................... 70
INSPECT THE FUNCTION OF THE ANTI-
PINCH SYSTEM .................................................. 70
FITTING INSPECTION ........................................ 70
INSIDE MIRROR ....................................................... 71
Wiring Diagram –I/MIRR– ....................................... 71
Removal and Installation ........................................ 72
REMOVAL ........................................................
... 72
INSTALLATION .................................................... 72
REAR WINDOW DEFOGGER .................................. 73
Component Parts and Harness Connector Location ... 73
System Description ................................................. 73
CAN Communication System Description .............. 75
CAN Communication Unit ....................................... 75
Schematic ............................................................... 76
Wiring Diagram — DEF — ..................................... 77
Terminal and Reference Value for BCM ................. 81
Terminal and Reference Value for IPDM E/R ......... 81
CONSULT-II Inspection Procedure ......................... 82
DATA MONITOR .................................................. 83
ACTIVE TEST ..................................................... 83
Work Flow ............................................................... 84Trouble Diagnoses Symptom Chart .....................
... 84
BCM Power Supply and Ground Circuit Check ...... 85
Rear Window Defogger Switch Circuit Check ......... 86
Rear Window Defogger Power Supply Circuit
Check ...................................................................... 86
Rear Window Defogger Circuit Check .................... 88
Door Mirror Defogger Power Supply Circuit Check ... 89
Driver Side Door Mirror Defogger Circuit Check ..... 91
Passenger Side Door Mirror Defogger Circuit Check
... 92
Filament Check ....................................................... 94
Filament Repair ....................................................... 94
REPAIR EQUIPMENT ......................................... 94
REPAIRING PROCEDURE ................................. 95
REVERSE INTERLOCK DOOR MIRROR SYSTEM ... 96
Component Parts and Harness Connector Location ... 96
System Description ................................................. 96
OPERATION CONDITIONS ................................ 96
MIRROR UNGLE MEMORY FUNCTION ............ 96
REVERSE INTERLOCK DOOR MIRROR SYS-
TEM OPERATION ............................................... 97
CAN Communication System Description .............. 97
CAN Communication Unit ....................................... 97
Schematic ............................................................... 98
Wiring Diagram —MIRROR— ................................ 99
Terminals and Reference Values for Automatic
Drive Positioner Control Unit .................................104
Terminals and Reference Values for Driver Seat
Control Unit ...........................................................105
CONSULT-II Function (AUTO DRIVE POS.) ........106
CONSULT-II INSPECTION PROCEDURE ........106
DATA MONITOR ................................................107
ACTIVE TEST ....................................................107
Work Flow .............................................................108
Symptom Chart .....................................................108
Check Changeover Switch Circuit ........................109
Check Mirror Switch Circuit Check ....................... 111
Check Mirror Motor Circuit Check .........................113
Check Mirror Sensor Circuit Check .......................116
Check A/T Control Device R Position Circuit ........119
DOOR MIRROR .......................................................120
Automatic Drive Positioner Interlocking Door Mirror .120
Removal and Installation .......................................120
REMOVAL ..........................................................120
INSTALLATION ..................................................120
Disassembly and Assembly ..................................121
DISASSEMBLY ..................................................121
ASSEMBLY ........................................................122
Page 3522 of 5621
PRECAUTIONS
GW-3
C
D
E
F
G
H
J
K
L
MA
B
GW
Revision: 2006 January2006 M35/M45
PRECAUTIONSPFP:00001
Precautions for Supplemental Restraint System (SRS) “AIR BAG” and “SEAT
BELT PRE-TENSIONER”
NIS00216
The Supplemental Restraint System such as “AIR BAG” and “SEAT BELT PRE-TENSIONER”, used along
with a front seat belt, helps to reduce the risk or severity of injury to the driver and front passenger for certain
types of collision. This system includes seat belt switch inputs and dual stage front air bag modules. The SRS
system uses the seat belt switches to determine the front air bag deployment, and may only deploy one front
air bag, depending on the severity of a collision and whether the front occupants are belted or unbelted.
Information necessary to service the system safely is included in the SRS and SB section of this Service Man-
ual.
WAR NING :
To avoid rendering the SRS inoperative, which could increase the risk of personal injury or death
in the event of a collision which would result in air bag inflation, all maintenance must be per-
formed by an authorized NISSAN/INFINITI dealer.
Improper maintenance, including incorrect removal and installation of the SRS, can lead to per-
sonal injury caused by unintentional activation of the system. For removal of Spiral Cable and Air
Bag Module, see the SRS section.
Do not use electrical test equipment on any circuit related to the SRS unless instructed to in this
Service Manual. SRS wiring harnesses can be identified by yellow and/or orange harnesses or
harness connectors.
Precautions for Procedures without Cowl Top CoverNIS00217
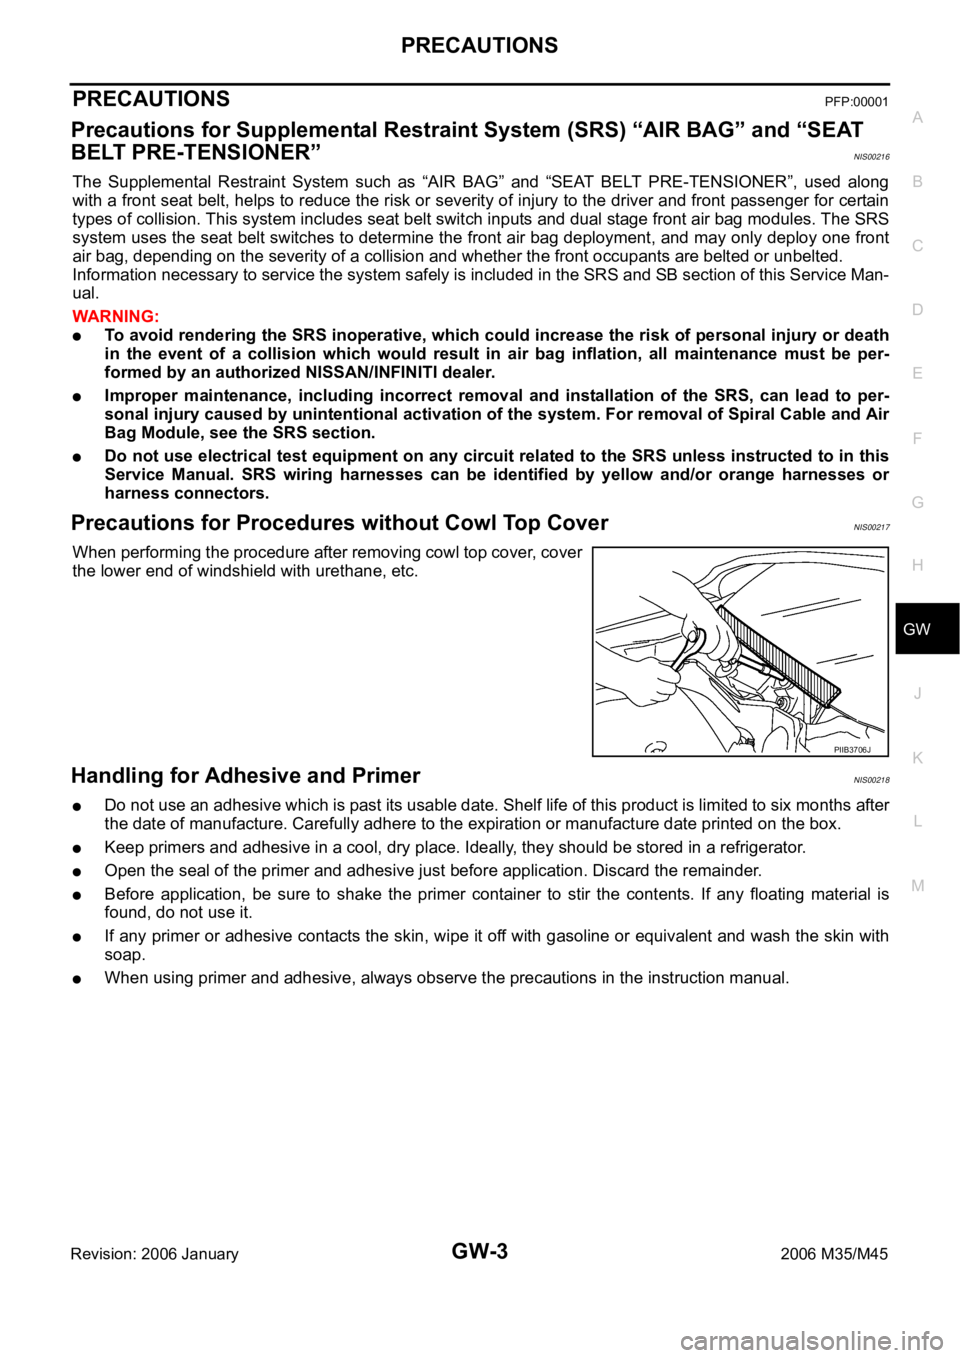
When performing the procedure after removing cowl top cover, cover
the lower end of windshield with urethane, etc.
Handling for Adhesive and PrimerNIS00218
Do not use an adhesive which is past its usable date. Shelf life of this product is limited to six months after
the date of manufacture. Carefully adhere to the expiration or manufacture date printed on the box.
Keep primers and adhesive in a cool, dry place. Ideally, they should be stored in a refrigerator.
Open the seal of the primer and adhesive just before application. Discard the remainder.
Before application, be sure to shake the primer container to stir the contents. If any floating material is
found, do not use it.
If any primer or adhesive contacts the skin, wipe it off with gasoline or equivalent and wash the skin with
soap.
When using primer and adhesive, always observe the precautions in the instruction manual.
PIIB3706J
Page 3526 of 5621
SQUEAK AND RATTLE TROUBLE DIAGNOSES
GW-7
C
D
E
F
G
H
J
K
L
MA
B
GW
Revision: 2006 January2006 M35/M45
INSULATOR (Light foam block)
80845-71L00: 30 mm (1.18 in) thick, 30
50 mm (1.181.97 in)
FELT CLOTHTAPE
Used to insulate where movement does not occur. Ideal for instrument panel applications.
68370-4B000: 15
25 mm (0.590.98 in) pad/68239-13E00: 5 mm (0.20 in) wide tape roll
The following materials, not found in the kit, can also be used to repair squeaks and rattles.
UHMW (TEFLON) TAPE
Insulates where slight movement is present. Ideal for instrument panel applications.
SILICONE GREASE
Used in place of UHMW tape that will be visible or not fit. Will only last a few months.
SILICONE SPRAY
Use when grease cannot be applied.
DUCT TAPE
Use to eliminate movement.
CONFIRM THE REPAIR
Confirm that the cause of a noise is repaired by test driving the vehicle. Operate the vehicle under the same
conditions as when the noise originally occurred. Refer to the notes on the Diagnostic Worksheet.
Generic Squeak and Rattle TroubleshootingNIS0021C
Refer to Table of Contents for specific component removal and installation information.
INSTRUMENT PANEL
Most incidents are caused by contact and movement between:
1. The cluster lid A and instrument panel
2. Acrylic lens and combination meter housing
3. Instrument panel to front pillar garnish
4. Instrument panel to windshield
5. Instrument panel mounting pins
6. Wiring harnesses behind the combination meter
7. A/C defroster duct and duct joint
These incidents can usually be located by tapping or moving the components to duplicate the noise or by
pressing on the components while driving to stop the noise. Most of these incidents can be repaired by apply-
ing felt cloth tape or silicon spray (in hard to reach areas). Urethane pads can be used to insulate wiring har-
ness.
CAUTION:
Do not use silicone spray to isolate a squeak or rattle. If you saturate the area with silicone, you will
not be able to recheck the repair.
CENTER CONSOLE
Components to pay attention to include:
1. Shifter assembly cover to finisher
2. A/C control unit and cluster lid C
3. Wiring harnesses behind audio and A/C control unit
The instrument panel repair and isolation procedures also apply to the center console.
DOORS
Pay attention to the:
1. Finisher and inner panel making a slapping noise
2. Inside handle escutcheon to door finisher
3. Wiring harnesses tapping
4. Door striker out of alignment causing a popping noise on starts and stops
Tapping or moving the components or pressing on them while driving to duplicate the conditions can isolate
many of these incidents. You can usually insulate the areas with felt cloth tape or insulator foam blocks from
the Nissan Squeak and Rattle Kit (J-43980) to repair the noise.