Page 184 of 420
On EX, EX-L and Touring models,
the floor storage area has a Lazy
Susan inside which makes it easier to
f ind items through the small lid.
TheLazySusancanberemoved.
When it is removed, a larger item,
such as the stowable second row
plus-one seat, can be stored.To remove the Lazy Susan, open the
large lid. Attach the hook to the grab
rail on the back of the f ront seat to
keep the lid open. Hold the two
handles on the edge of the Lazy
Susan, and pull it out of the storage
area. Store the removed Lazy Susan
in a saf e place outside the vehicle.
Do not place it on the vehicle f loor or
seat, or in the cargo area. It can f ly
around the interior in a crash.The Lazy Susan can be damaged if it
is kept in a humid place. Always
store the Lazy Susan in a dry place
when it is removed.
Interior Convenience Items
Inst rument s and Cont rols
183
STOWABLE SECOND ROW
PLUS-ONE SEAT
LAZY SUSAN
HANDLE
Page 189 of 420
Turn on the f ront and rear individual
map lights by pushing the lens of
each light. Push the lens again to
turn it of f . You can also operate
these lights with the light control
switch (see page ).
The lights go out about 30 seconds
after all the doors and the tailgate
are closed. They go out immediately
af ter all doors are locked.
With the light control switch in the
Door Activated position, all the
individual map lights come on when
you unlock the door with the remote
transmitter (see page ).
Withanydoororthetailgateleft
open, the lights stay on about 3
minutes, then go out.
ON
All the individual map lights come
onandstayonaslongasthe
switch remains in the ON position.
137
187
When the light control switch is in theposition: On EX, EX-L and Touring modelsIndividual Map L ights
Interior Lights
188
FRONT
Page 199 of 420
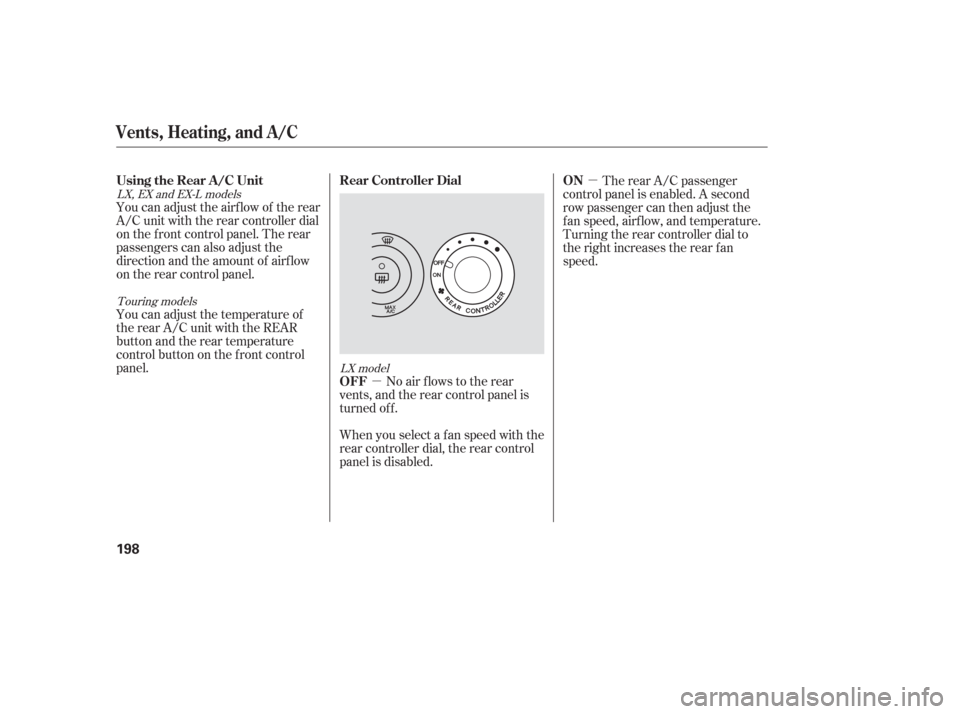
�µ�µ
You can adjust the airflow of the rear
A/C unit with the rear controller dial
on the f ront control panel. The rear
passengers can also adjust the
direction and the amount of airf low
on the rear control panel.
No air flows to the rear
vents, and the rear control panel is
turned off. The rear A/C passenger
control panel is enabled. A second
row passenger can then adjust the
f an speed, airf low, and temperature.
Turning the rear controller dial to
the right increases the rear f an
speed.
When you select a f an speed with the
rear controller dial, the rear control
panel is disabled.
You can adjust the temperature of
the rear A/C unit with the REAR
button and the rear temperature
control button on the f ront control
panel.
LX model
LX, EX and EX-L models
Touring models
Vents, Heating, and A/C
Using the Rear A/C Unit
OFF Rear Controller Dial ON
198
Page 200 of 420
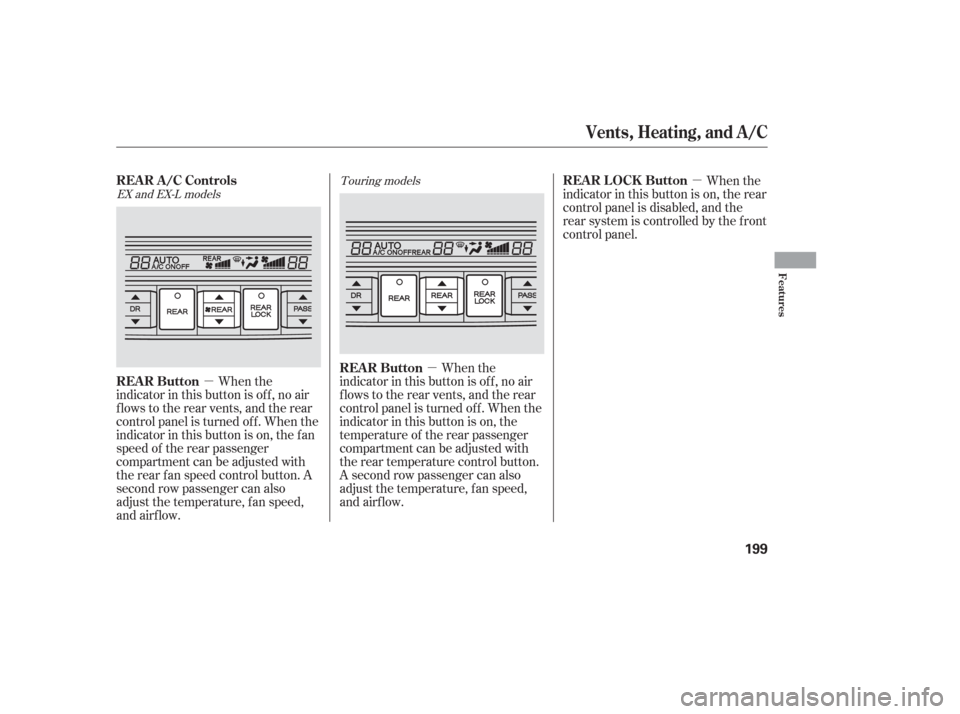
�µ�µ
�µ When the
indicator in this button is of f , no air
flows to the rear vents, and the rear
control panel is turned of f . When the
indicator in this button is on, the
temperature of the rear passenger
compartment can be adjusted with
the rear temperature control button.
A second row passenger can also
adjust the temperature, f an speed,
and airflow. When the
indicator in this button is on, the rear
control panel is disabled, and the
rear system is controlled by the f ront
control panel.
When the
indicator in this button is of f , no air
flows to the rear vents, and the rear
control panel is turned of f . When the
indicator in this button is on, the f an
speed of the rear passenger
compartment can be adjusted with
the rear f an speed control button. A
second row passenger can also
adjust the temperature, f an speed,
and airflow.
EX and EX-L models Touring models
Vents, Heating, and A/C
REAR ButtonREAR LOCK Button
REAR A/C Controls
REAR Button
Features
199
Page 207 of 420

�µ�µ
�µ
The preset f requencies will be lost if
your vehicle’s battery goes dead, is
disconnected, or the radio f use is
removed.
Press the A. SEL button. ‘‘A.SEL’’
f lashes in the display, and the system
goes into scan mode f or several
seconds. It stores the f requencies of
six AM and twelve FM stations in
the preset buttons. To turn of f auto select, press the
A. SEL button. This restores the
presets you originally set.
You will see a ‘‘0’’ displayed af ter
pressing a preset button if auto
select cannot f ind a strong station f or
every preset button. If you do not like the stations auto
select has stored, you can store
other f requencies on the preset
buttons. Use the TUNE, SEEK, or
SCAN functions to find stations, then
store them in the preset buttons as
described.
If you are
traveling far from home and can no
longer receive your preset stations,
you can use the auto select feature to
find stations in the local area.
Press the SOUND (TUNE) knob
repeatedly to display the bass, treble,
balance, and f ader settings.
Eachmodeisshowninthedisplayas
it changes. Turn the SOUND
(TUNE) knob to adjust the setting to
your liking. When the level reaches
the center, you will see ‘‘CENTER’’
in the display. The system will
automatically return the display to
the selected audio mode about 5
seconds af ter you stop adjusting a
mode. Use the TRE/BAS
modes to adjust the tone to your
liking.
These two
modes adjust the strength of the
sound coming f rom each speaker.
BAL adjusts the side-to-side strength,
while FAD adjusts the f ront-to-back
strength.
Adjusting the Sound
AUTO SELECT
Treble/Bass
Balance/Fader
Playing the AM/FM Radio
206
Page 209 of 420
�µ
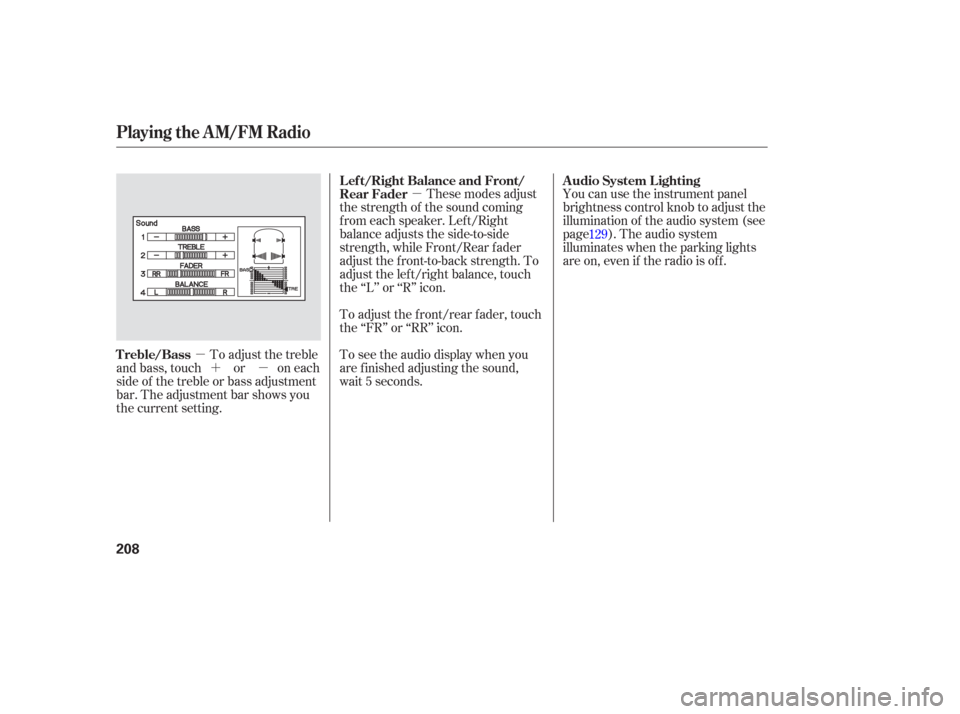
�µ �µ�´ You can use the instrument panel
brightness control knob to adjust the
illumination of the audio system (see
page ). The audio system
illuminates when the parking lights
are on, even if the radio is of f .
These modes adjust
the strength of the sound coming
f rom each speaker. Lef t/Right
balance adjusts the side-to-side
strength, while Front/Rear f ader
adjust the f ront-to-back strength. To
adjust the left/right balance, touch
the ‘‘L’’ or ‘‘R’’ icon.
To adjust the front/rear fader, touch
the ‘‘FR’’ or ‘‘RR’’ icon.
To adjust the treble
and bass, touch or on each
side of the treble or bass adjustment
bar. The adjustment bar shows you
the current setting. To see the audio display when you
are f inished adjusting the sound,
wait 5 seconds. 129
A udio System L ighting
L ef t/Right Balance and Front/
Rear Fader
Treble/Bass
Playing the AM/FM Radio
208
Page 214 of 420

�µ�µ
�µ�´ �µ
�µ
On models with a rear entertainment
system and a navigation system, you
cannot listen to XM Radio and a disc
at the same time. For example, when
XM Radio is playing on the f ront
speakers, you cannot listen to a disc
on the rear speakers, or vice versa.
The scan f unction gives
you a sampling of all channels while
in the channel mode. In the category
mode, only the channels within that
category are scanned. To activate
scan, press the SCAN/RPT button or
touch the SCAN icon on the audio
display. The system plays each
channel in numerical order f or a f ew seconds, then selects the next
channel. When you hear a channel
you want to continue listening to,
press the button or touch the icon
again.
Press either side of
the bar ( or ) to select another
category.
In the category mode, only channels
within that category can be selected.
In the channel mode, all channelscan be selected.
Use the TUNE knob, or the
CATEGORY or SCAN buttons to
tune to a desired channel. You can
also touch the SCAN icon on the
audio display. Press the XM RADIO button.
Either XM1 or XM2 will show in
the display.
To store a channel: Youcanstoreupto12
preset channels using the six preset
buttons or preset icons on the audio
display. Each button stores one
channel f rom the XM1 band and one
channel f rom the XM2 band.
The presets will be lost if your
vehicle’s battery goes dead, is
disconnected, or the radio f use is
removed. Once a channel is stored, press and
release the proper preset button
(icon) to tune to it.Press the XM RADIO button again
or touch the other XM icon (XM1
or XM2) on the audio display.
Store the next six channels using
steps 2 and 3. Repeat steps 2 and 3 to store the
f irst six channels. Pick the preset button (icon) you
want f or that channel. Press and
hold the button (icon) until you
hear a beep.
Turn the tune knob lef t or
right to select channels. In the
category mode, you can only select
channels within that category.
1.
2.3.
4.
5.
Playing the XMSatellite Radio
SCAN CATEGORY
Preset
TUNE
Features
213
Page 220 of 420
 or ON (II) position,
insert a CD into the CD slot. The
drive will pull the CD in the rest of
the way and begin to play it. You
operate the")
�´�µ
�´�µ
�µ
�µ
With the ignition in the
ACCESSORY (I) or ON (II) position,
insert a CD into the CD slot. The
drive will pull the CD in the rest of
the way and begin to play it. You
operate the CD player with the same
controls used f or the radio. The
number of the track playing is shown
in the display. The system will
continuously play a CD until you
change modes.
Each time you press and release the
side of the SKIP bar, the player
skips forward to the beginning of the
next track. Press and release the
side of the SKIP bar to skip
backward to the beginning of the
previous track.
To move rapidly within a track, press
and hold the or side of the
SKIP bar. You will see CUE or REW
in the display.
To continuously replay
a track, press and release the RPT
button. You will see RPT in the
display. Press the RPT button again
to turn it off.
This f eature plays the
tracks in random order. To activate
random play, press and release the
RDM button. You will see RDM in
the display. This continues until you
press the RDM button again. Press the eject button ( ) to
remove the CD. If you eject the CD,
but do not remove it f rom the slot,
the system will automatically reload
the CD af ter 15 seconds and put it in
pause mode. To begin playing, press
the CD button.
Press the AM or FM button to
switch to the radio while a CD is
playing. Press the CD button to play
the CD.
If you turn the system of f while a CD
is playing, either with the PWR/VOL
knob or by turning off the ignition,
the CD will stay in the drive. When
youturnthesystembackon,theCD
will begin playing where it lef t of f .
LX model
CD Player
To Change Tracks (SK IP)
REPEAT
RANDOMTo Stop Playing a CD
Playing a CD, CD Player
Features
219
Do not use CDs with adhesive labels.
The label can curl up and cause the CD
to jam in the unit.

.")