Page 249 of 420
Num Input
A numerical command can be issued
to a DVD by inputting a two digit
number, and a button number can be
selected on the screen.Select and enter the second digit
number the same way. The cursor
will automatically move to the ‘‘ENT’’
icon when you press the ENT button.
Press the ENT button to enter the
number command. To go back to the
DVD screen, press the RETURN
button.
Select the f irst digit number using
the , , , or
button, and enter it by pressing
the ENT button. If you want to
change the number, select ‘‘DEL,’’
and press the ENT button, then
select and enter the new number.
Select the ‘‘Num Input’’ f rom the play
mode setup menu. The screen will
change as shown above. If you select
the ‘‘Move Key’’ using the ,
, , or button, and
press the ENT button, the Num
Input display on the screen will changefromtheleftsidetoright
side or right to lef t.
Rear Entertainment System
248
Page 253 of 420
�Ý�Û
Select the ‘‘Aspect Ratio’’ by pressing
the or button, then press
the ENT button.
The selectable setting menu is
displayed, and the current setting is
highlighted in blue.
Select the desired setting by
pressing the or button, then
press the ENT button.The selected setting will be
highlighted in blue f or one second,
and the screen returns to the play
mode in the selected setting.
Rear Entertainment System
252
Page 256 of 420
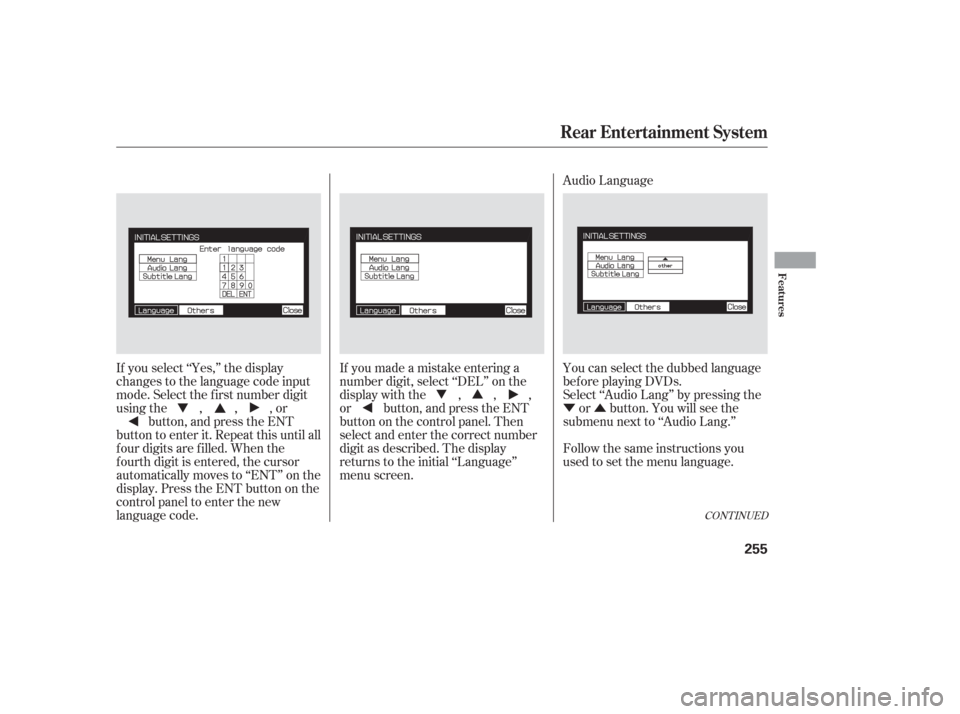
�Ý�Û Audio Language
If you select ‘‘Yes,’’ the display
changes to the language code input
mode. Select the f irst number digit
usingthe,,,or button, and press the ENT
button to enter it. Repeat this until all
f our digits are f illed. When the
f ourth digit is entered, the cursor
automatically moves to ‘‘ENT’’ on the
display. Press the ENT button on the
control panel to enter the new
language code. If you made a mistake entering a
number digit, select ‘‘DEL’’ on the
display with the , , ,
or button, and press the ENT
buttononthecontrolpanel.Then
select and enter the correct number
digit as described. The display
returns to the initial ‘‘Language’’
menu screen.
You can select the dubbed language
bef ore playing DVDs.
Select ‘‘Audio Lang’’ by pressing the
or button. You will see the
submenu next to ‘‘Audio Lang.’’
Follow the same instructions you
used to set the menu language.
CONT INUED
Rear Entertainment System
Features
255
Page 269 of 420

The security system automatically
sets 15 seconds after you lock the
doors, hood, and the tailgate. For the
system to activate, you must lock the
doorsandthetailgatefromthe
outside with the key, the lock tab,
the door lock switch, or the remote
transmitter. The security system
indicator in the instrument panel
starts blinking immediately to show
you the system is setting itself .Once the security system is set,
opening any door, the tailgate, or the
hood without using the key or the
remote transmitter, will cause it to
alarm. It also alarms if the radio is
removed f rom the dashboard or the
wiring is cut.The security system will not set if
the hood, tailgate, or any door is not
f ully closed. If the system will not set,
check the Door and Tailgate Open
Monitor on the instrument panel
(see page ), to see if the doors
and the tailgate are f ully closed.
Since it is not part of the monitor
display, manually check the hood.
Do not attempt to alter this system
or add other devices to it.
The security system helps to protect
your vehicle and valuables f rom thef t.
The horn sounds and a combination
of headlights, parking lights, side
marker lights and taillights f lashes if
someone attempts to break into your
vehicleorremovetheradio.This
alarm continues f or 2 minutes, then
the alarm stops. To reset an
alarming system before the 2
minutes have elapsed, unlock either
f ront door with the key or the
remote transmitter.
67
On EX, EX-L and Touring models
Security System
268
SECURITY SYSTEM
INDICATOR
Page 273 of 420

�µ
The HomeLinkUniversal
Transceiver built into your vehicle
canbeprogrammedtooperateupto
three remote controlled devices
around your home, such as garage
doors, lighting, or home security
systems.
If you are training HomeLink to
operate a garage door or gate, you
should unplug the motor f or that
device during training. Repeatedly
pressing the remote control button
could burn out the motor. Always ref er to the opening
instructions and saf ety inf ormation
that came with your garage door
opener or other equipment you
intend to operate with HomeLink. If
you do not have this inf ormation,
contact the manuf acturer of the
equipment.
If you are training the second or
third buttons, go directly to step 1.
HomeLink stores the code in a
permanent memory. There should
be no need to retrain HomeLink if
your vehicle’s battery goes dead or is
disconnected. If your garage door
opener was manuf actured bef ore
April 1982, you may not be able to
program HomeLink to operate it.
They do not have the saf ety f eature that causes the motor to stop and
reverse if an obstacle is detected
during closing, increasing the risk of
injury.
For quick and accurate training,
make sure the remote control
transmitter for the device (garage
door, automatic gate, security
system, etc.) has a fresh battery.
If you just
received your vehicle and have not
trained any of the buttons in
HomeLink bef ore, you should erase
any previously learned codes bef ore
training the first button.
Todothis,pressandholdthetwo
outside buttons on the HomeLink
Transceiver for about 20 seconds
until the red indicator f lashes.
Release the buttons, then proceed to
step 1.
On EX, EX-L and Touring models
General Inf ormation T raining HomeL ink
Important Saf ety Precautions Bef ore you begin
HomeL ink Universal Transceiver
272
Page 290 of 420
Combine several short trips into
one.
The air conditioning puts an extra
load on the engine which makes it
usemorefuel.Usethefresh-air
ventilation when possible.
Always maintain your vehicle
according to the maintenance
messages. See
(page ).
an underinf lated tire
causes more ‘‘rolling resistance,’’
which uses more f uel.
The build-up of snow or mud on
your vehicle’s underside adds
weight and rolling resistance.
Frequent cleaning helps your f uel
mileage and reduces the chance of
corrosion.
Drive moderately. Rapid
acceleration, abrupt cornering,
and hard braking use more f uel.
Always drive in the highest gear
possible. Try to maintain a constant speed.
Everytimeyouslowdownand
speed up, your vehicle uses extra
f uel. Use cruise control when
appropriate.
329For example,
Fuel Economy
Improving Fuel Economy
Owner’s
Maintenance Checks
Bef ore Driving
289
Page 293 of 420
�Î�Î�Î�Î
�Î�Î
�Î
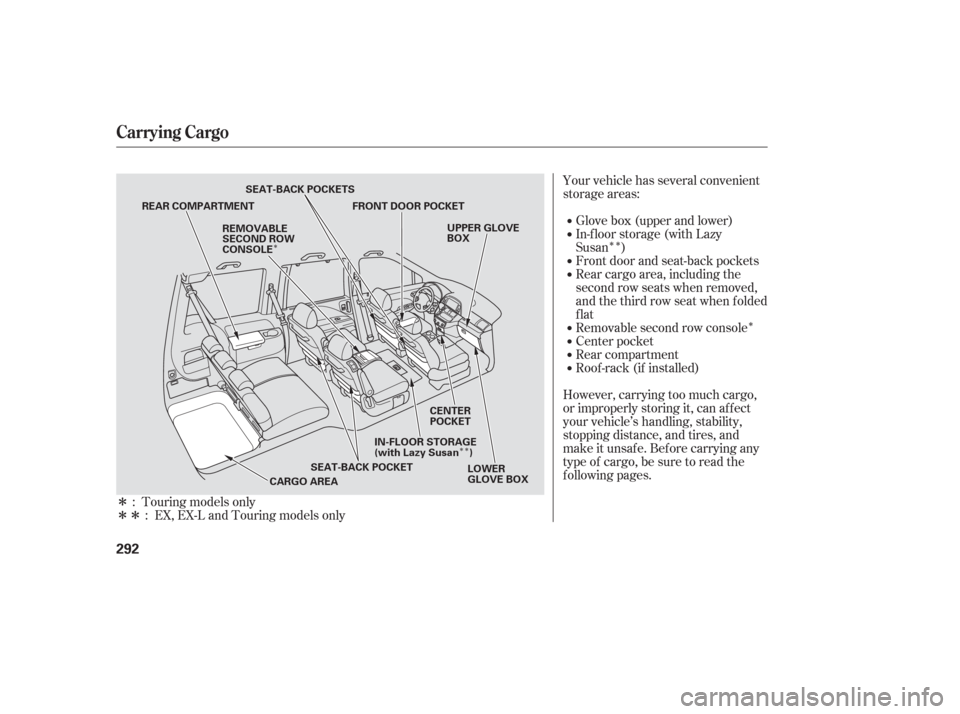
�Î�ÎYour vehicle has several convenient
storage areas:
In-f loor storage (with Lazy
Susan ) Glove box (upper and lower)
However, carrying too much cargo,
or improperly storing it, can af f ect
your vehicle’s handling, stability,
stopping distance, and tires, and
make it unsaf e. Bef ore carrying any
type of cargo, be sure to read the
f ollowing pages. Roof -rack (if installed) Rear compartment
Center pocket
Removable second row console Rear cargo area, including the
second row seats when removed,
andthethirdrowseatwhenfolded
flat Front door and seat-back pockets
: :
Touring models only
EX, EX-L and Touring models only
Carrying Cargo
292
REAR COMPARTMENT FRONT DOOR POCKET
SEAT-BACK POCKET
CARGO AREA LOWER
GLOVE BOX
UPPER GLOVE
BOX
REMOVABLE
SECOND ROW
CONSOLE
CENTER
POCKET
SEAT-BACK POCKETS
IN-FLOOR STORAGE
(with Lazy Susan )
Page 310 of 420
Your vehicle is equipped with a tire
pressure monitoring system (TPMS)
that turns on every time you start the
engine and monitors the pressure in
your tires while driving.
You will see the above display on the
multi-inf ormation display when you
turn the ignition switch to ON (II)
andpresstheINFObuttononthe
steering wheel six times.To see the inf lation pressures of all
f our tires, press the SEL/RESET
buttononthesteeringwheel.The
display changes as shown above.
Each tire has its own pressure
sensor. If the air pressure of a tire
becomes signif icantly low, the
sensor in that tire immediately sends
a signal that causes the low tire
pressure indicator in the instrument
panel to come on. If this happens,
you will see which tire is losing the
pressure in the multi-information
display along with a ‘‘CHECK TIRE
PRESSURE’’ message.
CONT INUED
On U.S. Touring model only
Tire Pressure Monitoring System (TPMS)
Driving
309


that turns on every time you start the
engine and monitors the pressure in
your tires while driving.
You will see the above displ")