Page 140 of 420
 and
customized vehicle control settings
(see page ). When you open the
driver’s door af ter unlocking it with")
Each remote transmitter activates
the driver’s seat position memory
system (see page ) and
customized vehicle control settings
(see page ). When you open the
driver’s door af ter unlocking it with
the remote transmitter, the driver’s
seat moves to the positions stored in
memory. You will hear two beeps
when the movement is completed.The driver’s seat position memory
activation (Driver 1, Driver 2) is
shownonthebackof each
transmitter. Make sure you store
your seat position in the memory
that is activated by the transmitter
you normally carry.
Avoid dropping or throwing the
transmitter.
Protect the transmitter from
extreme temperature.
Do not immerse the transmitter in
any liquid.
If you lose a transmitter, the
replacement needs to be
reprogrammed by your dealer.
Most of the customized settings will
return to the default settings.
To turn it back on, repeat this
procedure. The LED will come on
for 1 second to indicate the feature
has been turned on. You can turn of f driver’s seat
position memory activation with the
remote transmitter. Press and hold
the LOCK and UNLOCK buttons at
thesametime.TheLEDinthe
remote transmitter will blink twice.
Then release the buttons, and press
the LOCK or UNLOCK button.
91 165
On Touring models only
Recalling a Memorized Seat
Position
Remote Transmitter Care
Remote Transmitter
Inst rument s and Cont rols
139
With Driver
2
With Driver 1
Page 144 of 420

The tailgate can be opened and
closed with the remote transmitter
or the switch on the dashboard when
both f ront doors are unlocked.The tailgate can also be closed by
pressing the button on the tailgate. If
you press the button again while the
tailgate is closing, you will hear three
beeps, and the tailgate will stop
moving, reverse direction, and stop
at the f ully opened position.
Press and hold the tailgate button on
the remote transmitter or the
dashboard switch f or about 1 second
to open or close the tailgate. Each
time you press the button on the
remote transmitter or the dashboard
switch, you will hear a beep, and
some f ront and rear lights will f lash.
To open or close the tailgate
manually, see page .
If you push the same button or
switch again while the tailgate is
opening or closing, you will hear
three beeps, and the tailgate will stop
moving, reverse direction, and stop
at the f ully opened or closed position.
142
CONT INUED
On Touring models only
Power Tailgate
Tailgate
Inst rument s and Cont rols
143
DASHBOARD SWITCH
TAILGATE
BUTTON TAILGATE SWITCH
Page 152 of 420

If the battery is disconnected or goes
dead, close the sliding door
completely by hand. If it still does
not operate properly af ter the
battery is reconnected, have your
vehicle checked by a dealer. If there is a problem in the power
sliding door system, you will see a
‘‘CHECK LEFT SLIDING DOOR’’ or
‘‘CHECK RIGHT SLIDING DOOR’’
message in the multi-inf ormation
display (see page ). If this
message stays on, turn the MAIN
switch to OFF, and have the system
inspected by your dealer.
If the power sliding door indicator
comesonandstayson,thereisa
problem in the system. Turn the
MAIN switch to OFF, and have the
system inspected by a dealer.
Each sliding door has a pinch sensor
on the f ront edge. Do not damage
this sensor, or the power sliding door
may not operate properly. 88
On Touring model
On EX, EX-L and Touring models On EX and EX-L models
Sliding Doors
Power Sliding Door Problems
Pinch Sensor
Inst rument s and Cont rols
151
PINCH SENSOR
POWER SLIDING DOOR INDICATOR
U.S. indicator shown
Page 153 of 420
There are bucket seats with
armrests for two front passengers,
bucket seats with armrests for two
passengers in the second row, and a
bench seat f or three passengers in
the third row.
For greater cargo capacity, the seats
in the second row can be removed,
andthebenchseatinthethirdrow
can be f olded into the f loor.
The EX and EX-L models have a
stowable second row plus-one seat
that can be installed between the
second row bucket seats when
needed. The plus-one seat can also
be used as a second row center
console, or stored in the f loor
storage area. For more inf ormation,
see page .160
Passenger Seating
Convert ible Second Row Bucket
Seat s
Seats
152
Page 154 of 420
�µ
The f ront passenger’s seat, and the
seats in the second and third rows
adjust manually.
Make all seat adjustments bef ore
you start driving. The EX, EX-L and Touring models
have a power adjustable driver’s seat.
The LX model has manual driver’s
seat adjustments.To adjust the bucket seats in the
second row, pull up the bar on the
front of the seat bottom.
The third row seats do not adjust
f orward and backward.
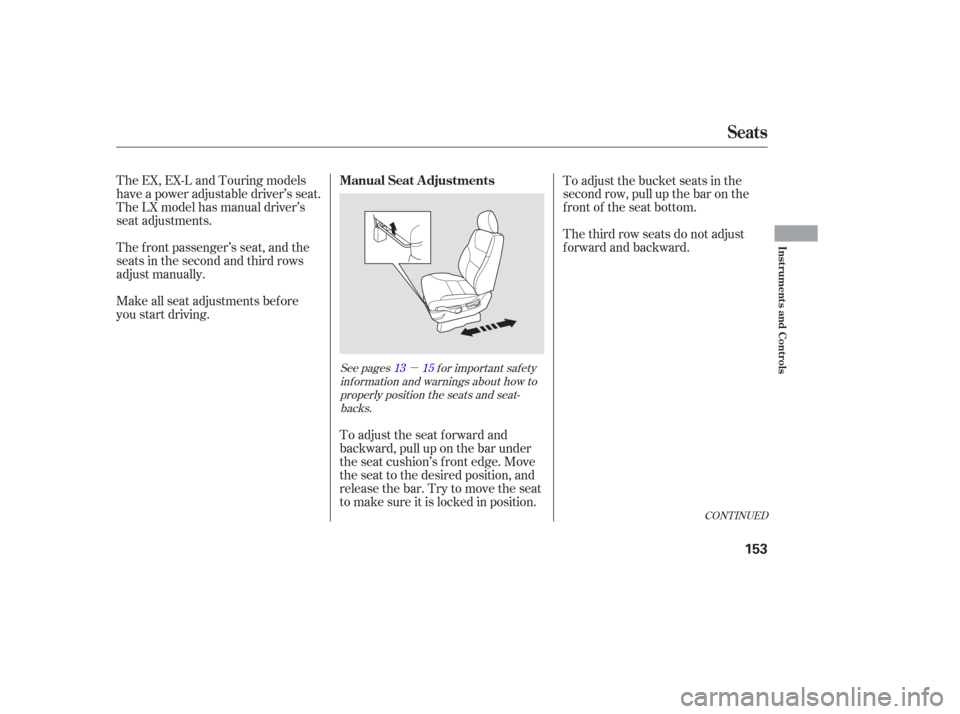
To adjust the seat forward and
backward, pull up on the bar under
the seat cushion’s f ront edge. Move
the seat to the desired position, and
releasethebar.Trytomovetheseat
to make sure it is locked in position.
See pages f or important saf ety inf ormation and warnings about how toproperly position the seats and seat-backs. 13 15
CONT INUED
Manual Seat Adjustments
Seats
Inst rument s and Cont rols
153
Page 155 of 420
To change the seat-back angle of the
bucket seats in the second row, pull
forwardontheleverontheoutside
of the seat-back. To change the seat-back angle of the
f ront seat, pull up on the lever on the
outside of the seat bottom.The lef t and right halves of the third
seat-back can be adjusted separately.
To adjust the angle, pull the
adjustment strap on the outside of
each seat-back, move the seat-back
to the desired position, and release
the adjustment strap. Let the seat-
back latch in the new position.The height of your driver’s seat is
adjustable. Pull up the lever on the
outside of the seat cushion to raise
the seat bottom or push the lever
down to lower the seat cushion.
Make all adjustments bef ore you
start driving.
On LX model
Driver’s Seat Manual Height
Adjustment
Seats
154
ADJUSTMENT STRAP
Page 157 of 420

See page f or important saf etyinf ormation and a warning about how toproperly position the head restraints. 15
On EX, EX-L and Touring models On EX-L and Touring models
Your vehicle is equipped with head
restraints in all seating positions to
help protect you and your
passengers f rom whiplash and other
injuries.
An armrest is located on each of the
frontseatsandoneachsideof the
second row seats. Pivot it down to
use it. When you remove the bucket
seats in the second row, pivot the
armrests up out of the way.
To change the lumbar support, move
the lever on the right side of the
seat-back forward or backward.
Keep moving the lever f orward or
backward until you f ind a suitable
position. They are most ef f ective when you
adjust them so the back of the
occupant’s head rests against the
center of the restraint.
Theangleof thearmrestoneach
f ront seat is adjustable. Pivot the
armrest down, and pull it up to the
desired angle. Head Restraints
Armrests
Driver’s L umbar Support
Seats
156
Page 158 of 420
To get into or out of the third row
seat, walk between the second row
seats.When the seat on the passenger’s
side is moved to the center, walk
through the passenger’s side to get
into or out of the third row seat.
All head restraints adjust f or height.
You need both hands to adjust the
restraint. Do not attempt to adjust it
while driving. To raise it, pull upward.
To lower the restraint, push the
release button sideways, and push
the restraint down.
On Touring models, you need to
remove the second row console
before you can make this seat
adjustment (see page ). 180
CONT INUED
T hird Seat A ccess
Seats
Inst rument s and Cont rols
157
RELEASE
BUTTON