Page 237 of 420
, press the RR
CTRL knob. The system’s icon
shows in the upper display. Your
passengers can then operate the rea")
Press the REAR PWR button. To
turn on the rear controls (ceiling
panel/remote control), press the RR
CTRL knob. The system’s icon
shows in the upper display. Your
passengers can then operate the rear
system with the control panel in the
ceiling. The rear control panel can be
used as a remote control when it is
detached f rom the ceiling unit. Press
the RR CTRL knob again to turn the
rear controls of f . You will see the
RearControlsOff iconintheupper
display.
The rear system selects the source it
waslastsetto.Ifthatsourcehas
been removed (the DVD has been
ejected f rom the player, f or example),
you will see ‘‘DVD EJECT’’ in the
display. You must select another
source.Whenyouturnonthesystem,the
rear speakers are automatically
turned of f if the rear system selects
a dif f erent entertainment source
than the front system. You will see
the Rear Speakers Of f icon in the
upper display. The sound f or the rear
system is sent to the wireless
headphones.
If youwanttoturntherearspeakers
on again, press and hold the REAR
PWR button until the Rear Speakers
Of f icon goes of f .
The rear speakers are
connected to the f ront system, so
they will always play the source that
the f ront system is set to.
Your vehicle is equipped with a rear
entertainment system that includes a
DVD player f or the enjoyment of the
rear passengers.
With this system, the rear
passengers can enjoy a dif f erent
entertainment source (radio, CD
changer, DVD player, or optional
tape player) than the f ront seat
occupants. The audio is broadcast
through the supplied wireless
headphones.
The ignition switch must be in the
ACCESSORY (I) or ON (II) position
to operate the rear entertainment
system.
Available on EX-L and Touring modelsTo Turn On the System
Rear Speakers
Rear Entertainment System
236
NOTE:
Page 250 of 420
�Ý�Û
When you select ‘‘PERSONAL
SURROUND’’ by pressing the or button, the personal
surround setup menu is displayed
above the ‘‘PERSONAL
SURROUND’’ icon.
Selecting one of the sound ef f ects,
Cinema,Music,orVoice,fromthe
personal surround menu allows you
to change the sound in your
headphones to match the disc you are playing.
Select ‘‘Cinema,’’ ‘‘Music,’’ or ‘‘Voice’’
by pressing the or button, and
enter your selection by pressing the
ENT button. The ‘‘PERSONAL
SURROUND’’ logo is displayed in
the upper right corner of the screen.
If you select ‘‘Of f ,’’ the logo
disappears, and there will be no
special sound ef f ect.
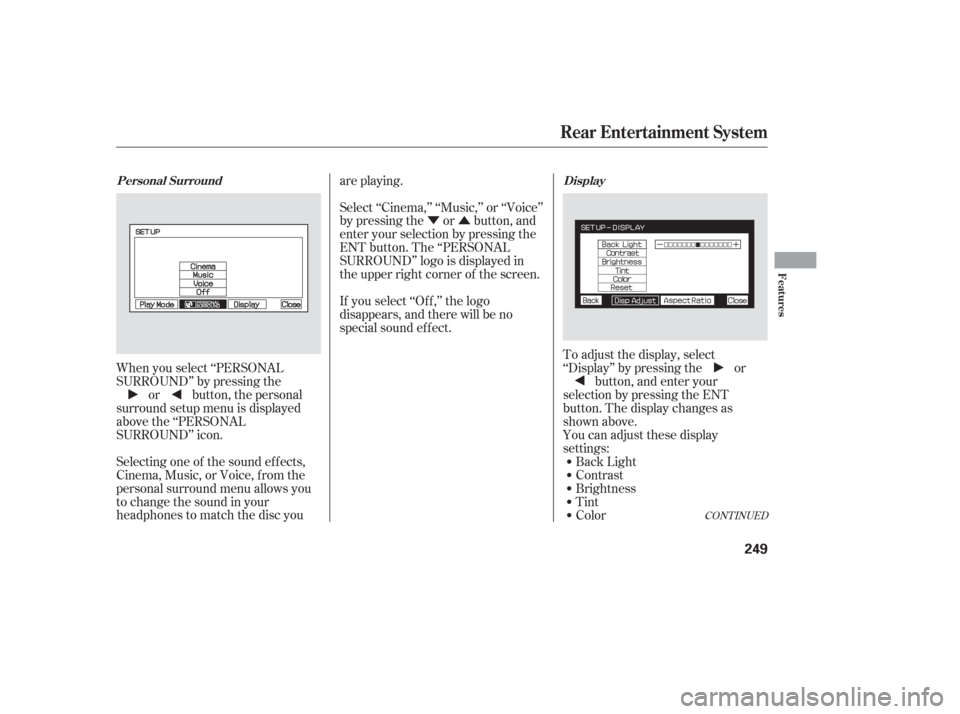
You can adjust these display
settings:Back Light
Contrast
Brightness
Tint
Color
To adjust the display, select
‘‘Display’’ by pressing the or
button, and enter your
selection by pressing the ENT
button. The display changes as
shown above.
CONT INUED
Personal Surround Display
Rear Entertainment System
Features
249
Page 266 of 420

Each headphone uses one AAA
battery. The battery is under the
cover on the lef t earpiece. To
remove the cover, insert a coin in the
slot and twist it slightly to pry the
cover away f rom the earpiece. Pull
the cover outward, and pivot it out of
the way.
Some state and local government
agencies prohibit the use of
headphones by the driver of a motor
vehicle. Always obey applicable laws
and regulations. The audio f or the rear entertainment
system is sent to the wireless
headphones that come with the
system. When using the headphones,
make sure you wear them correctly:
L (lef t) and R (right) are marked on
the sides of the frame. The antennas
are in the f ront of the earpieces. If
you wear the headphones backwards,
the antennas will be aimed away
from the system, affecting the sound
quality and range.
To use the headphones, pivot the
earpieces outward. This turns them
on. To adjust the volume, turn the
dial on the bottom of the right
earpiece. When you remove the
headphones, the earpieces
automatically pivot inward, and the
headphones turn of f . When not in
use, store the headphones in the
pocket of either f ront seat.
CONT INUED
Replacing Bat t eriesWireless Headphones
Rear Entertainment System
Features
265
VOLUME
DIAL
TAB
Page 267 of 420
Auxiliary input jacks and headphone
connectors f or the rear
entertainment system are under the
third seat armrest on the driver’s
side. To access these connectors,
open the cover by pulling up on the
lever.The system will accept auxiliary
inputs f rom standard video games
and video equipment.
Some video game power supplies
may cause poor picture quality.
V=Videojack
L = Lef t audio jack
R = Right audio jack
Remove the battery. Install the new
battery in the earpice as shown in
the diagram next to the battery slot.
Slide the cover back into place on the
earpiece, then press down on the
back edge to lock it in place. Auxiliary Input Jacks
Rear Entertainment System
266
COVER
BATTERY ARMREST
LEVER
AUXILIARY INPUT JACKS
Page 268 of 420
There are three headphone
connectors f or the third seat
passengers. Each connector has its
own volume control.
Rear Entertainment System
Features
267
VOLUME DIALS
HEADPHONE CONNECTORS
Page 291 of 420

Your dealer has Honda accessories
that allow you to personalize your
vehicle. These accessories have
been designed and approved f or your
vehicle, and are covered by warranty.When properly installed, cellular
phones, alarms, two-way radios, and
low-powered audio systems should
not interf ere with your vehicle’s
computer controlled systems, such
as your airbags and anti-lock brakes.Bef ore installing any accessory:
Make sure the accessory does not
obscure any lights, or interf ere
with proper vehicle operation or
perf ormance.
Modif ying your vehicle, or installing
some non-Honda accessories, can
make it unsaf e. Bef ore you make any
modif ications or add any accessories,
be sure to read the f ollowing
inf ormation.
Although non-Honda accessories
may f it on your vehicle, they may not
meet f actory specif ications, and
could adversely af f ect your vehicle’s
handling and stability (see page ). Be sure electronic accessories do
not overload electrical circuits
(see page ) or interf ere with
the proper operation of your
vehicle.
Bef ore installing any electronic
accessory, have the installer
contact your dealer. If possible,
have your dealer inspect the f inal
installation.
Do not install accessories on the
side pillars or across the rear
windows as these may interf ere
with proper operation of the side
curtain airbags.
291 382
A ccessories
A ccessories and Modif ications
290
Improper accessories or
modifications can affect your
vehicle’s handling, stability, and
performance, and cause a
crash in which you can be hurt
or killed.
Follow all instructions in this
owner’s manual regarding
accessories and modifications.
Page 405 of 420

Honda dealership personnel are
trained prof essionals. They should
be able to answer all your questions.
If you encounter a problem that your
dealership does not solve to your
satisf action, please discuss it with
the dealership’s management. The
service manager or general manager
can help. Almost all problems are
solved in this way.
If you are dissatisf ied with the
decision made by the dealership’s
management, contact your Honda
Customer Service Office.U.S. Owners:
Canadian Owners:
In Puerto Rico and the U.S. Virgin
Islands:
When you call or write, please give
us this inf ormation:
Vehicle Identif ication Number
(see page )
Name and address of the dealer
who services your vehicle
Date of purchase
Mileage on your vehicle
Your name, address, and tele-
phone number
A detailed description of the
problem
Name of the dealer who sold the
vehicle to you 390
Customer Service Inf ormation
404
CUSTOMER RELATIONS
RELATIONS AVEC LA CLIENTÉLE American Honda Motor Co., Inc.
Automobile Customer Service
Mail Stop 500-2N-7A
1919 Torrance Boulevard
Torrance, California 90501-2746
Tel: (800) 999-1009
Honda Canada Inc.
715 Milner Avenue
Toronto, ON
M1B 2K8
Tel: 1-888-9-HONDA-9
Fax: Toll-free 1-877-939-0909
Toronto (416) 287-4776 Bella International
P.O. Box 190816
San Juan, PR 00919-0816
Tel: (787) 620-7028
Page 409 of 420

�$
�%
��
�.
�\"
��
�#
�) This manual covers maintenance and recommended
procedures f or repair to engine and chassis components.
It is written f or the journeyman mechanic, bu")
�µ�µ
�µ
�(
��
��
�%
�)
�$
�%
��
�.
�"
��
�#
�) This manual covers maintenance and recommended
procedures f or repair to engine and chassis components.
It is written f or the journeyman mechanic, but is simple
enough f or most mechanically-inclined owners to under-
stand.
This manual complements the service manual by
providing in-depth troubleshooting inf ormation f or each
electrical circuit in your vehicle.
This manual describes the procedures involved in the
replacement of damaged body parts.
Authorized Manuals
Service Manual:
Electrical T roubleshooting Manual:
Body Repair Manual:
408
NOTE: Dealers and Companies please provide dealer or company name,
and also the name of the person to whose attention the shipment should
be sent. For purchases outside U.S.A. please write to the address shown
below for a quotation.
P.O. BOX 07280·DETROIT, MICHIGAN 48207·1-800-782-4356
Customer Name Attention
Apartment Number
State & Zip Code
City
Daytime Telephone Number
Check or money order enclosed payable to Helm Inc U.S. funds only.
Do not send cash
Master
Card VISA
Check here if your billing address is different
from the shipping address shown above.
Account Number Expiration: Mo. Yr.
CUSTOMER SIGNATURE DATE
Street Address No P.O. Box Number
()
These Publications cannot be returned for credit without receiving advance authorization within 14
days of delivery. On returns, a restocking fee may be applied against the original order.