Page 60 of 420

This section gives inf ormation about
the controls and displays that
contribute to the daily operation of
your vehicle. All the essential
controls are within easy reach............................
Control Locations .60............................
Instrument Panel .61
..........
Instrument Panel Indicators .63
.............................................
Gauges .71
.............
Multi-Inf ormation Display .74
Controls Near the Steering
.........................................
Wheel .124
Windshield Wipers and .....................................
Washers .125
Rear Window Wiper and .......................................
Washer .126
.........
Turn Signal and Headlights .126
......
Instrument Panel Brightness .129
...............
Hazard Warning Button .130
...............
Rear Window Def ogger .130
........
Steering Wheel Adjustment .131
.............................
Keys and Locks .132
......................
Immobilizer System .133
..............................
Ignition Switch .134
.....................
Remote Transmitter .135
....................................
Door Locks .141
....................
Power Door Locks .141
............
Childproof Door Locks .142
..........................................
Tailgate .142
..........................
Power Tailgate .143
.................................
Sliding Doors .146
...............................................
Seats .152..................................
Seat Heaters .164
Driver’s Seat Position Memory ........................................
System .165
............................
Power Windows .167
.......................................
Moonroof .170
...........................................
Mirrors .171
...............................
Parking Brake .172
.
Adjustable Driver’s Foot Pedals .173
.........
Interior Convenience Items .174
..........
Retractable Center Tray .175
.....................
Beverage Holders .175
................
Integrated Sunshade .177
....................
Sunglasses Holder .178
................
Conversation Mirror .178
...................................
Sun Visor .179
............................
Vanity Mirror .179
...................
Rear Compartment .179
Removable Second Row
..................................
Console .180
...............
In-Floor Storage Area .181
......................
Lower Glove Box .184
......................
Upper Glove Box .184
...........................
Center Pocket .185
........
Accessory Power Sockets . 186
.......................
AC Power Outlet .186
...............................
Interior Lights .187
Instruments and Controls
Inst rument s and Cont rols
59
Page 153 of 420
There are bucket seats with
armrests for two front passengers,
bucket seats with armrests for two
passengers in the second row, and a
bench seat f or three passengers in
the third row.
For greater cargo capacity, the seats
in the second row can be removed,
andthebenchseatinthethirdrow
can be f olded into the f loor.
The EX and EX-L models have a
stowable second row plus-one seat
that can be installed between the
second row bucket seats when
needed. The plus-one seat can also
be used as a second row center
console, or stored in the f loor
storage area. For more inf ormation,
see page .160
Passenger Seating
Convert ible Second Row Bucket
Seat s
Seats
152
Page 158 of 420
To get into or out of the third row
seat, walk between the second row
seats.When the seat on the passenger’s
side is moved to the center, walk
through the passenger’s side to get
into or out of the third row seat.
All head restraints adjust f or height.
You need both hands to adjust the
restraint. Do not attempt to adjust it
while driving. To raise it, pull upward.
To lower the restraint, push the
release button sideways, and push
the restraint down.
On Touring models, you need to
remove the second row console
before you can make this seat
adjustment (see page ). 180
CONT INUED
T hird Seat A ccess
Seats
Inst rument s and Cont rols
157
RELEASE
BUTTON
Page 160 of 420

Both seats can be removed to give
more cargo capacity.
Make sure the seat is securely
locked in place bef ore driving. A seat
thatisnotlockedinplacecouldfly
around and cause injury in a sudden
stop or crash.
Reversethisproceduretomovethe
seat back to the outside.
When the passenger’s side bucket
seat is in the outside position, and
theplus-oneseatorthesecondrow
console is not used, install the f loor
mat and the cover over the center
f loor anchors between the bucket
seats. Make sure to f asten the
buttons on the mat to the floor.
Install the cover over the outer floor
anchor and install the floor mat over
the cover. Insert the tabs on the f loor
mat into the slit on the f loor. Fasten
the buttons on the floor mat to the
f loor. To remove a seat:
Pull up the seat-back angle
adjustment lever, and fold the seat-
back f orward.
Unlock the seat f rom the f loor by
pulling the lock release lever under
the seat cushion’s f ront edge and
lifting the rear of the seat.
CONT INUED
Seats
Removing the Bucket Seats in the
Second Row
Inst rument s and Cont rols
159
LOCK RELEASE LEVER
SLIT
COVER
TABS
FLOOR MAT
Page 162 of 420
CONT INUED
To remove the seat, lower the head
restraint all the way down. Remove
the seat cushion by pulling the strap
on the seat cushion, and f old the
seat-back forward.
To install the stowable plus-one seat,
hook the f ront of the seat to the f loor,
then push down the back until it
locks. Make sure both the f ront and
back of the seat are securely latched.
Pull up the seat-back, and adjust the
seat-back angle to the desired
position while pulling the seat-back
angle adjustment strap on the
outside of the seat bottom. Install the seat cushion on the seat
bottom plate. To install the cushion,
hook the f ront of the cushion f irst,
then push down the rear until the
cushion is securely positioned.
To use the plus-one seat as a center
console, remove its seat cushion by
pulling up the seat cushion strap.
Then pivot the seat-back forward
until it is f lat. Store the seat cushion
in the f loor storage area.
Seats
Inst rument s and Cont rols
161
ANGLE ADJUSTMENT STRAP
Page 175 of 420
�Î�Î
Interior Convenience Items
174
BEVERAGE HOLDERVANITY
MIRROR
CENTER
POCKET
ACCESSORY
POWER
SOCKET
REAR
COMPARTMENT
COAT HOOK
SUN VISOR
ACCESSORY
POWER
SOCKET
: Touring model only SUNGLASSES
HOLDER WITH
CONVERSATION
MIRROR
LOWER
GLOVE BOX
UPPER GLOVE
BOX
REMOVABLE SECOND
ROW CONSOLE RETRACTABLE
CENTER TRAY
BEVERAGE
HOLDER
BEVERAGE
HOLDER
IN-FLOOR
STORAGE
Page 181 of 420
There is a removable console
between the second row bucket
seats.To remove the console, pull up the
tab at the f ront edge to unlock the
rear of the console f rom the f loor.To reinstall the console, hook the
f ront of it to the f loor, then push
down the back until it locks. Make
sure the console is securely locked in
place. A console that is not locked in
place could f ly around and cause
injury in a sudden stop or crash.
If you remove the second seat center
console, store it in a saf e place
outside the vehicle.
Unhook the f ront of the console
f rom the f loor by pulling it back
slightly, then pivoting it upward.
To open the console, push the tab,
and slide the lid to the rear.
On Touring models only
Removable Second Row Console
Interior Convenience Items
180
TAB
TAB
Page 293 of 420
�Î�Î�Î�Î
�Î�Î
�Î
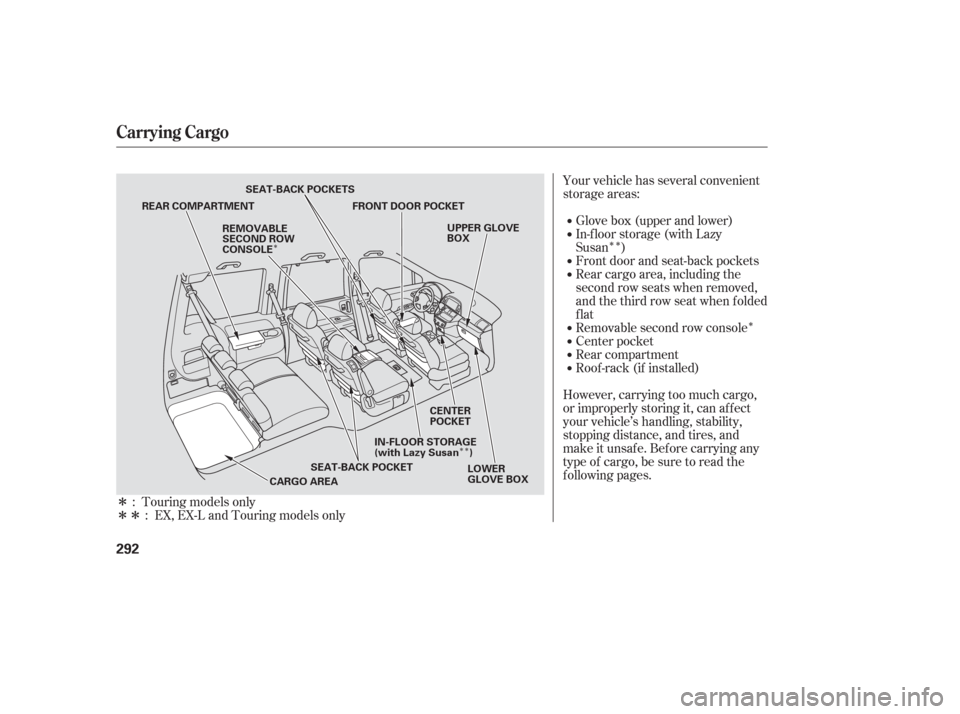
�Î�ÎYour vehicle has several convenient
storage areas:
In-f loor storage (with Lazy
Susan ) Glove box (upper and lower)
However, carrying too much cargo,
or improperly storing it, can af f ect
your vehicle’s handling, stability,
stopping distance, and tires, and
make it unsaf e. Bef ore carrying any
type of cargo, be sure to read the
f ollowing pages. Roof -rack (if installed) Rear compartment
Center pocket
Removable second row console Rear cargo area, including the
second row seats when removed,
andthethirdrowseatwhenfolded
flat Front door and seat-back pockets
: :
Touring models only
EX, EX-L and Touring models only
Carrying Cargo
292
REAR COMPARTMENT FRONT DOOR POCKET
SEAT-BACK POCKET
CARGO AREA LOWER
GLOVE BOX
UPPER GLOVE
BOX
REMOVABLE
SECOND ROW
CONSOLE
CENTER
POCKET
SEAT-BACK POCKETS
IN-FLOOR STORAGE
(with Lazy Susan )