2006 GREAT WALL HOVER oil level
[x] Cancel search: oil levelPage 174 of 425

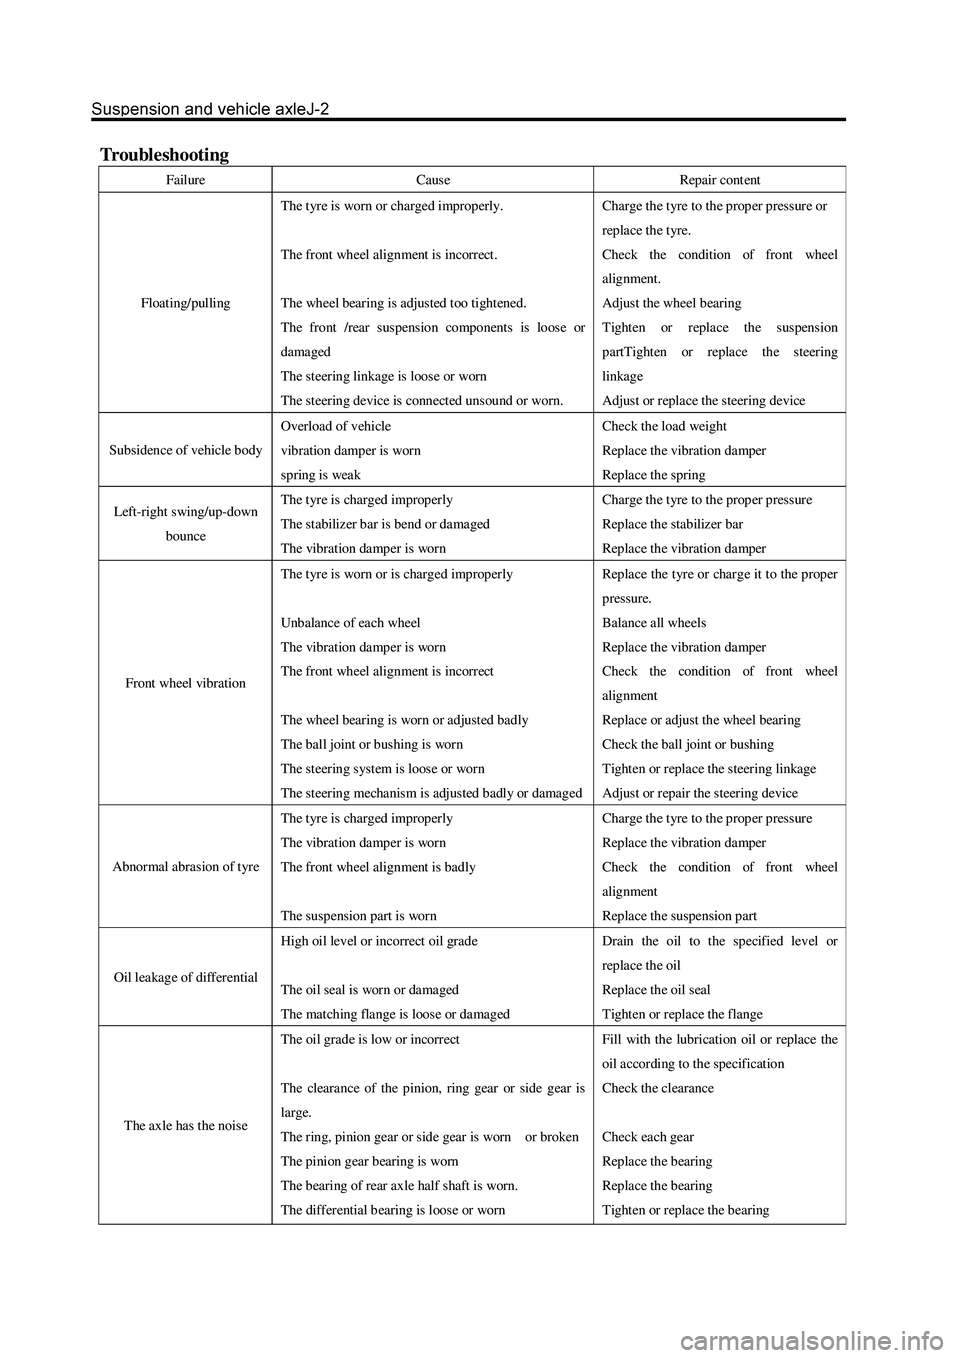
Troubleshooting
Failure Cause Repair cont ent
Floating/pulling The t yre is worn or charged improperly.
The front wheel alignment is incorrect.
The wheel bearing is adjusted too tightened.
The front /rear suspension components is loose or
damaged
The steering linkage is loose or worn
The steering device is connect ed unsound or worn. Charge the t yre to the prop er pressur e or
repla ce the t yre.
Check the condition of front wheel
alignment.
Adjust the wheel bearing
Tighten or replace the suspension
partTighten or replace the steering
linkage
Adjust or replace the steering device
Subsidence of vehicle body Overload of vehicle
vibration damper is worn
spring is weak Check the load weight
Replace the vibration damper
Replace the spring
Left-right swing/up-down
bounce The t yre is charged improperly
The stabilizer bar is bend or damaged
The vibration damper is worn Charge the t yre to the prop er pressur e
Replace the stabilizer bar
Replace the vibration damper
Front wheel vibration The t yre is worn or is charged improperly
Unbalance of each wheel
The vibration damper is worn
The front wheel alignment is incorrect
The wheel bearing is worn or adjusted badly
The ball joint or bushing is worn
The steering system is loose or worn
The steering mechanism is adjusted badly or damaged Repla ce the t yr e or char ge it to the prop er
pressure.
Balance all wheels
Replace the vibration damper
Check the condition of front wheel
alignment
Replace or adjust the wheel bearing
Check the ball joint or bushing
Tighten or replace the steering linkage
Adjust or repair the steering device
Abnormal abrasion of tyre The t yre is charged improperly
The vibration damper is worn
The front wheel alignment is badly
The suspension part is worn Charge the t yre to the prop er pressur e
Replace the vibration damper
Check the condition of front wheel
alignment
Replace the suspension part
Oil leakage of differential High oil level or incorrect oil grade
The oil seal is worn or damaged
The matching flange is loose or damaged Drain the oil to the specified level or
repla ce the oil
Replace the oil seal
Tighten or replace the flange
The axle has the nois e The oil grade is low or incorrect
The clearance of the pinion, ring gear or side gear is
large.
The ring, pinion gear or side gear is worn or broken
The pinion gear bearing is worn
The b earing of rear axle half shaft is worn.
The differential b earing is loos e or worn Fill with the lubrication oil or replace the
oil according to the specification
Check the clearance
Check each gear
Replace the bearing
Replace the bearing
Tighten or replace the bearing
Page 233 of 425

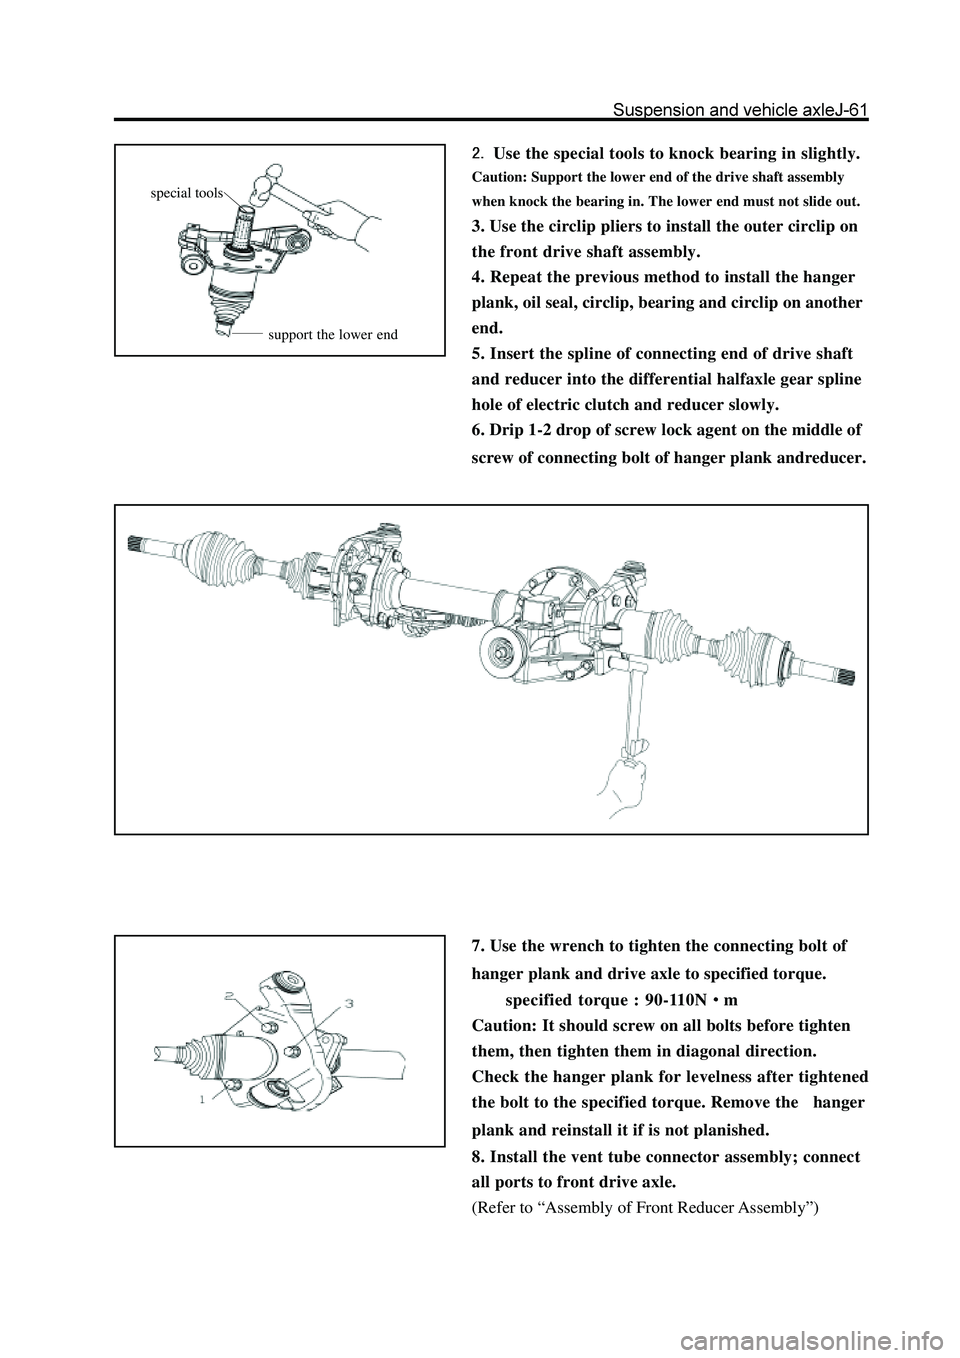
Use the special tools to knock bearing in slightly.
Caution: Support the lower end of the drive shaft assembly
when knock the bearing in. The lower end must not slide out.
3. Use the circlip pliers to install the outer circlip on
the front drive shaft assembly.
4. Repeat the previous method to install the hanger
plank, oil seal, circlip, bearing and circlip on another
end.
5. Insert the spline of connecting end of drive shaft
and reducer into the differential halfaxle gear spline
hole of electric clutch and reducer slowly.
6. Drip 1-2 drop of screw lock agent on the middle of
screw of connecting bolt of hanger plank andreducer.
7. Use the wrench to tighten the connecting bolt of
hanger plank and drive axle to specified torque.
specified torque : 90-110N
m
Caution: It should screw on all bolts before tighten
them, then tighten them in diagonal direction.
Check the hanger plank for levelness after tightened
the bolt to the specified torque. Remove the hanger
plank and reinstall it if is not planished.
8. Install the vent tube connector assembly; connect
all ports to front drive axle.
(Refer to “Assembly of Front Reducer Assembly”)
special tools
support the lower end
Page 236 of 425

5. Remove the drive gear flange and dustproof cover
assembly
a. Use the hand hammer and chisel to loose the riveted part on
nut.
b. Use the special tools to clamp the drive gear flangeandremove
the drive gear nut.
c. Use the cooper bar to knock down the drive gear flange and
dustproof cover assembly.
6. Remove the drive gear oil seal
Use the special tools to remove the oil seal; do not
damage the inner wall of reducer housing.
7. Install the new drive gear oil seal
a. Use the special tools to knock into the new oil seal.
b. The top of the oil seal is level to the top of reducer housing.
Caution: Coat the oil seal lip with the lithium base grease and
the oil seal should be in correct position.
special
rotate the wrench in clockwise.
specialspecial
Page 246 of 425

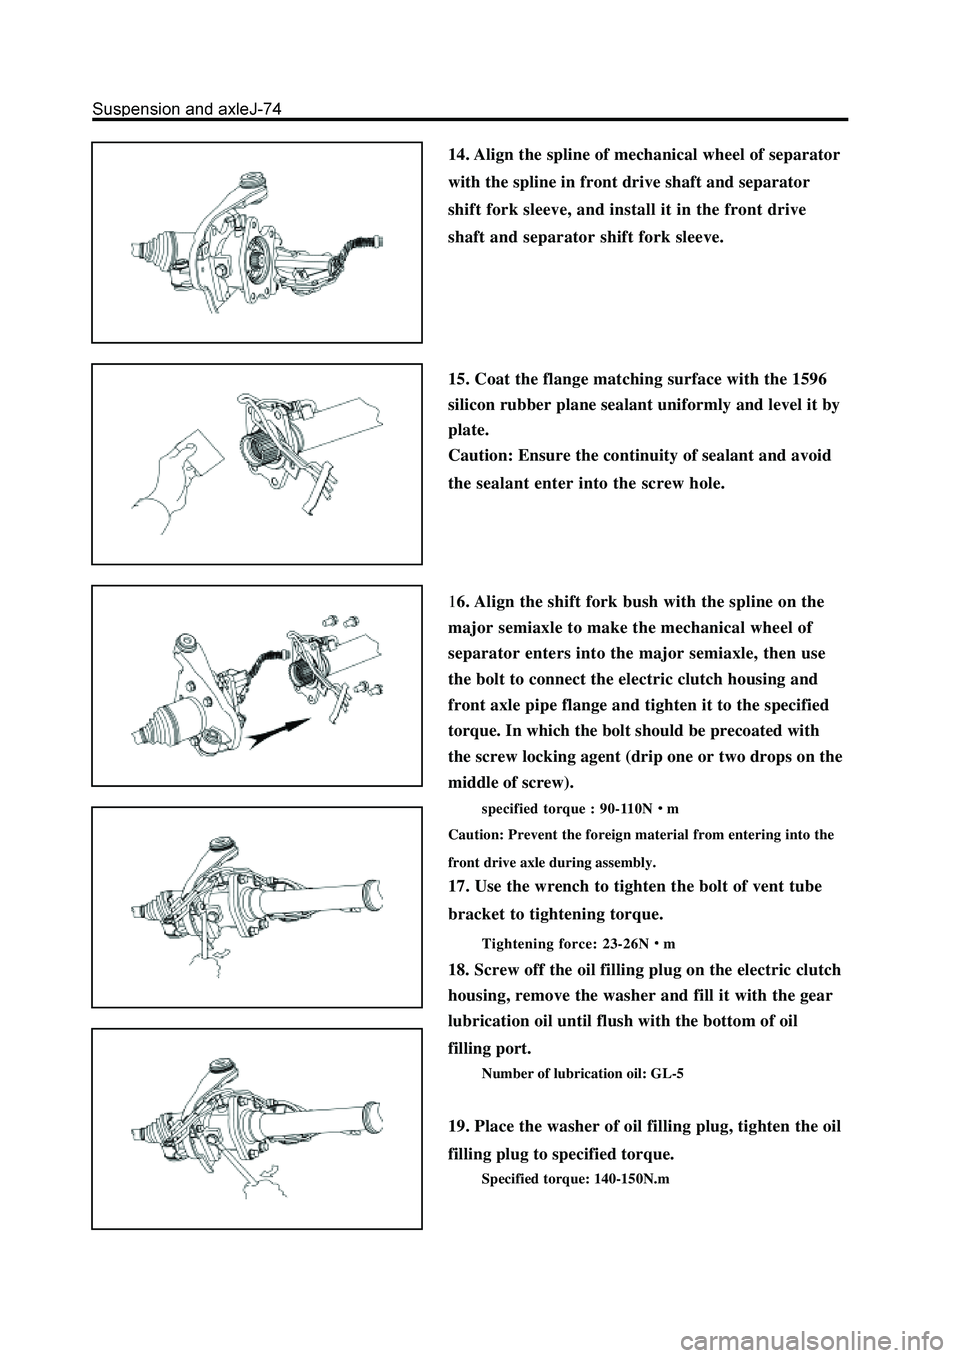
14. Align the spline of mechanical wheel of separator
with the spline in front drive shaft and separator
shift fork sleeve, and install it in the front drive
shaft and separator shift fork sleeve.
15. Coat the flange matching surface with the 1596
silicon rubber plane sealant uniformly and level it by
plate.
Caution: Ensure the continuity of sealant and avoid
the sealant enter into the screw hole.
16. Align the shift fork bush with the spline on the
major semiaxle to make the mechanical wheel of
separator enters into the major semiaxle, then use
the bolt to connect the electric clutch housing and
front axle pipe flange and tighten it to the specified
torque. In which the bolt should be precoated with
the screw locking agent (drip one or two drops on the
middle of screw).
specified torque : 90-110Nm
Caution: Prevent the foreign material from entering into the
front drive axle during assembly.
17. Use the wrench to tighten the bolt of vent tube
bracket to tightening torque.
Tightening force: 23-26Nm
18. Screw off the oil filling plug on the electric clutch
housing, remove the washer and fill it with the gear
lubrication oil until flush with the bottom of oil
filling port.
Number of lubrication oil: GL-5
19. Place the washer of oil filling plug, tighten the oil
filling plug to specified torque.
Specified torque: 140-150N.m
Page 263 of 425

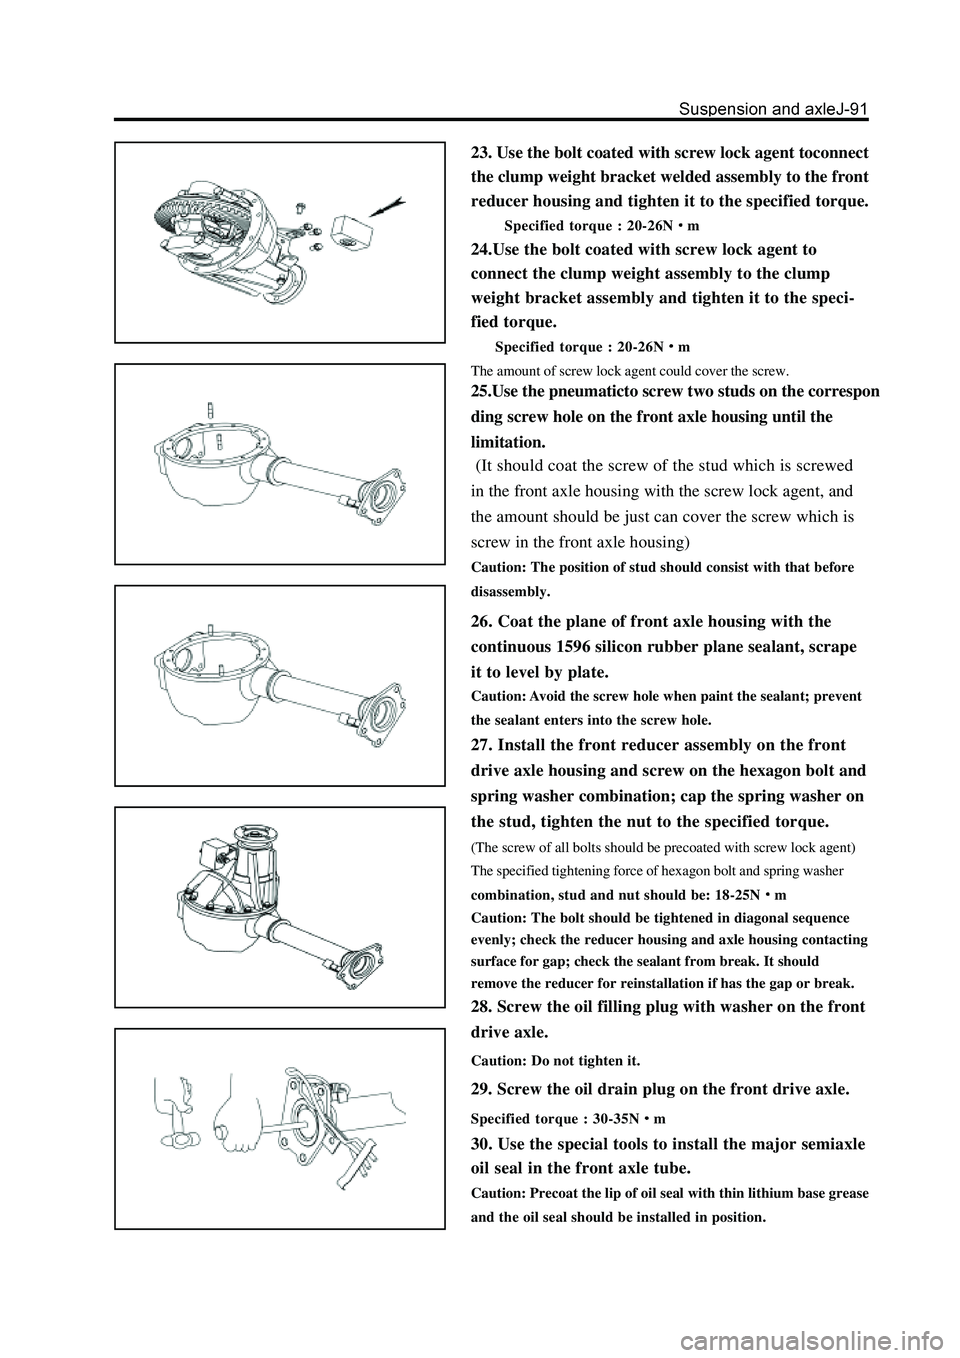
23. Use the bolt coated with screw lock agent toconnect
the clump weight bracket welded assembly to the front
reducer housing and tighten it to the specified torque.
Specified torque : 20-26Nm
24.Use the bolt coated with screw lock agent to
connect the clump weight assembly to the clump
weight bracket assembly and tighten it to the speci-
fied torque.
Specified torque : 20-26Nm
The amount of screw lock agent could cover the screw.
25.Use the pneumaticto screw two studs on the correspon
ding screw hole on the front axle housing until the
limitation.
26. Coat the plane of front axle housing with the
continuous 1596 silicon rubber plane sealant, scrape
it to level by plate.
Caution: Avoid the screw hole when paint the sealant; prevent
the sealant enters into the screw hole.
27. Install the front reducer assembly on the front
drive axle housing and screw on the hexagon bolt and
spring washer combination; cap the spring washer on
the stud, tighten the nut to the specified torque.
(The screw of all bolts should be precoated with screw lock agent)
The specified tightening force of hexagon bolt and spring washer
combination, stud and nut should be: 18-25N
m
Caution: The bolt should be tightened in diagonal sequence
evenly; check the reducer housing and axle housing contacting
surface for gap; check the sealant from break. It should
remove the reducer for reinstallation if has the gap or break.
28. Screw the oil filling plug with washer on the front
drive axle.
Caution: Do not tighten it.
29. Screw the oil drain plug on the front drive axle.
Specified torque : 30-35Nm
30. Use the special tools to install the major semiaxle
oil seal in the front axle tube.
Caution: Precoat the lip of oil seal with thin lithium base grease
and the oil seal should be installed in position.
(It should coat the screw of the stud which is screwed
in the front axle housing with the screw lock agent, and
the amount should be just can cover the screw which is
screw in the front axle housing)
Caution: The position of stud should consist with that before
disassembly.
Page 265 of 425

electric clutch detector
37. Detect the electric clutch assembly .
a. Measure the clearance between the shift fork and shift fork
sleeve.
Range of clearance : 0.2-0.4mm
It should replace the electric clutch assembly and shift fork
sleeve when the clearance is not in the range.
b. Connect the electric clutch assembly to the electric clutch
detector and power the electric clutch detector with220V
power supply to test the electric clutch (Before the test,
adjustthe test controller status to make the motor starting time
is 3s ,the time form found the actuator is not in position to
restartingis 2.5s and the time of controller to redrive the
electric clutch is2s) The motor starts for 3s when the gear
switch is shifted form 2WD to 4WD, the lamp flashes at the
same time, the clutch is in 4WD status, the indicator lamp is
light always. If does not reach the 4WD status in the first
time, then the controller restarts it for 2s after 2.5s delay, the
lamp flashes at the same time; if it is still not in position, then
the indicator lamp flashes twice continuously, the indicator
lamp is extinguished for 1s, the motor is stopped. That means
the electric clutch is unqualified and should be replaced by the
qualified product. The motor starts for 3s normally when the
clutch is shifted form 4WD to 2WD, the lamp flashes at the
same time, when the clutch is in 2WD status, the indicator
lamp is extinguished always. If does not reach the 2WD status
in the first time, then the controller restarts it for 2s after 2.5s
delay, the lamp flashes at the same time; if it is still not in
2WD status, then the indicator lamp flashes twice
continuously, the indicator lamp is extinguished for 1s, the
motor is stopped.
That means the electric clutch is unqualified and should be
replaced by the qualified product.
38. Cover the shift fork sleeve on the major
semiaxle spline.
39. Install the separator housing on the front axle
tube flange and use the bolt to tighten it to the
specified torque
(The bolt should be precoated
with the screw lock agent and the amount should be
just can cover the complete screw)
specified torque : 90-110Nm
Caution: Before installation, remove the foreign material on
two matching surfaces of separator housing and front axle
tube flange; and precoat the 1596 silicon rubber plane sealant
on the front axle tube flange. Caution: Prevent the sealant
from entering into the screw hole.
40. Press in the plastic vent tube on the electric
clutch housing and front axle tube.
41. Install two location pins in the location pin hole
of electric clutch housing respectively.
42. Coat the connecting surface of electric clutch
housing and electric clutch with 1596 silicon rubber
sealant uniformly; level it by plate.
Caution: The connecting surface should be cleaned
and must not have the oil and other foreign
matters. The sealant must not enter into the elec-
tric clutch housing and screw hole.
Page 266 of 425

44.Insert the clip into the vent tube bracket.
45. Clamp the vent tube clip on the front drive axle
vent tube connecting tube assembly.
46. Connect the front drive axle vent tube connecting
tube assembly to three ports, the front axle tube,
electric clutch and electric clutch housing. 43. Install the electric clutch assembly on the electric
clutch housing.
a. Make the shift fork cross on the shift fork sleeve.
b. Align the location pin hole of electric clutch with two
location pins, and tighten it by bolt; tighten the bolt to the
specified torque. (Precoat the medium screw of bolt with one
or two drop of screw lock agent)
Specified torque : 23-26N
m
47. Screw off the oil filling plug of front drive axle
housing, then fill the axle housing with the hypoid
gear oil; then tighten the oil filling plug to the speci-
fied torque.
Gear oil number: GL-5
Filling amount: The oil level is flush with the lower edge of oil filling
port.
specified torque : 140-150N
m
48. Fill the electric clutch housing with the gear oil ;
then tighten the oil filling plug to the specified
torque.
Gear oil number: GL-5
Filling amount: The oil level is flush with the lower edge of oil filling
port.
Specified torque: 140-150N
m
Page 272 of 425

4. Install the new oil seal
a. Coat the lip of oil seal with the HP-R grease.
b. Use the special tools to knock in the new oil seal.
Insertion depth of oil seal: 1.0mm
5. Install the flange and dustproof cover assembly
6. Rivet the drive bevel gear nut.
7. Connect the drive shaft flange to the reducer
flange Align the assembly mark ; then connect them
by bolt.
Tightening force: 785Nm
8. Check the oil level of reducerReplace the hyperbolic
gear oil if necessary.
Oil number : GL-5 hyperbolic gear
Viscosity : SAE80W/90
Amount: Filled with oil until the oil flows out form oil filling
port.
Removal of reducer
1.Remove the oil drain plug; drain the oil from the
reducer
2. Remove the rear axle
(Refer to Step 2 in “Disassembly of Rear Axle”)
3. Disconnect the drive shaft from the reducer
(Refer to step 1 in “Replace the Oil Seal on Car”)
4Remove the assembly of reducer.
special tools
insertion depth: 1mm
assembly mark
assembly mark