2006 GREAT WALL HOVER wheel alignment
[x] Cancel search: wheel alignmentPage 16 of 425

Overview of the entire car-7
Suspension
The front suspension is the torsion bar spring, double-cylinder inflatable hydraulic damper, transverse stabilizer rod, double
cross-arm independent suspension. The distance between the center of front shaft of lower arm fixing nut and level ground is
295mm±1mm.
The rear suspension is the four-connecting rod, coil spring, double-cylinder inflatable hydraulic damper, transverse stabilizer
rod, no indep endent suspension.
Carriage
Peripheral trapezoidal structure; welded by two box section longitudinal beams and several box or tube section cross beams.
Steering system
Pinion-and-rack power steering-gear, hydraulic assists steering. Breakaway front steering trapezoidal structure. Diameter of
quadriradistus steering disc φ380mm, adjustable angle, power-absorbing steering pipe. For main technical parameters of
steering s ystem refer to Table 5.
Table 5 Main technical parameter of steering system
Serial No. Item Parameter Serial No. Item Parameter
1 wheel camber 0°±30′ 6 Rotary round of
steering disc n 3.64
2 kingpin inclination 12°30′±30′ 7 Angle drive ratio of
steering system i0ω 18.2
3 kingpin castor 3°30′±30′ 8 Force drive ratio of
steering s ystem i0p 198.0
4 toe (mm) 0~2 9 Normal efficiency of
steering gear η+ ≥75%
5 Steering angle of
internal and external
wheel (°) 32/28 10 Revers e efficiency of
steering gear η- ≥60%
1.Adjustment of .4-Wheel Alignment
Test and adjust the front wheel alignment value and adjust the toe on the 4-Wheel Alignment meter.
a. Adjustment of kingpin castor: The standard value is 3°30′±30′(adjust the difference of left and right kingpin
castor to within 30′);
b. Adjustment of toe: The toe with standard value of 0~2mm is adjusted by rotating the steering cross rod. When adjust
the toe, it should rotate the cross brace in left and right side evenly. Tighten the lock nut after adjustment, the torque is
55 - 65N·m.
c. Centering and fix of steering wheel: according to the display of the alignment gauge, turn the front wheel to right
ahead, after removing the steering wheel without changing the position of steering lever, mount the steering wheel
with center aligned, the radials of the steering wheel shall be in the bilateral symmetry position, and the symbol of
Great wall on the steering wheel shall be in the confrontation position of the driver, tighten the nut, with a tightening
torque of 25 - 35N·m.
Left wheel left steering: 32, right wheel left steering:28;
Left wheel right steering:
28, right wheel right steering: 32;
b. Under the light condition of the car, the height between the center of front axis fixed bolt of the lower suspension arm to the
ground is 295
1mm, if the dimension is not within this scope, reach it through adjusting the torsion bar adjustment arm
bolt;
c. The reference dimension of the height of the car is : the left and right deviation is less than 10mm;
3. Checking the free gap of steering wheel:
Turn the orientation of the car to front, stop the engine, exert a force of about 4.9N on the steering wheel along the circumferential
direction to make the it turning to the left, there is resistance force, stop turning when the resistance force is growing; then turn
the steering wheel to the right, stop turning when the resistance force is felt to be growing; the radian value that the external edge
of steering wheel runs is the free gap of the steering wheel, its standard value shall be less than or equal to 20
, and the corner
from the central position to the left or right shall be no larger than 10.
Page 36 of 425

Clutch-6
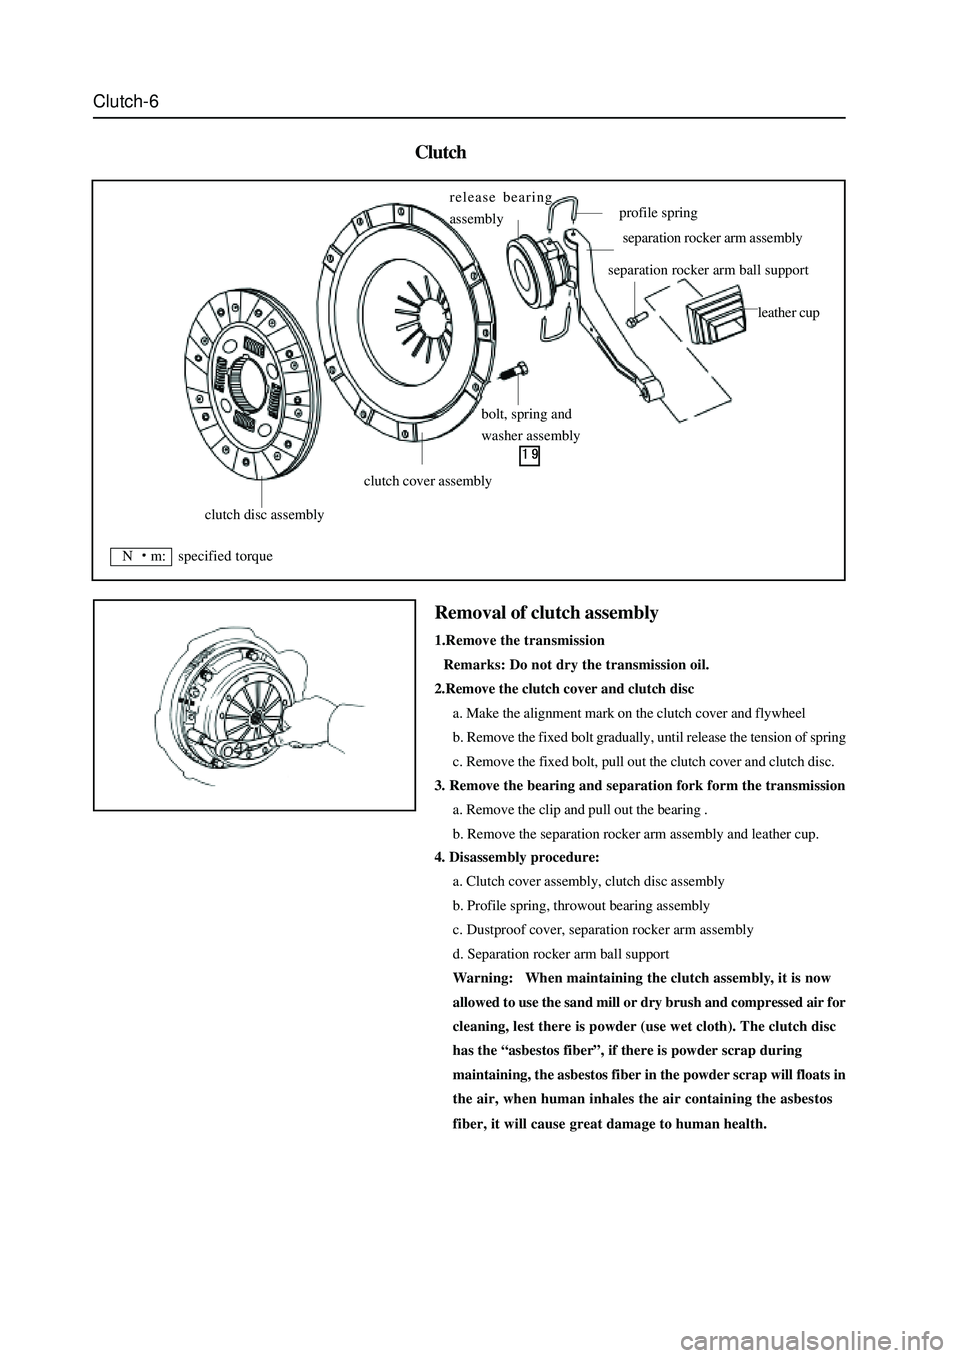
Clutch
4. Disassembly procedure:
a. Clutch cover assembly, clutch disc assembly
b. Profile spring, throwout bearing assembly
c. Dustproof cover, separation rocker arm assembly
d. Separation rocker arm ball support
Warning: When maintaining the clutch assembly, it is now
allowed to use the sand mill or dry brush and compressed air for
cleaning, lest there is powder (use wet cloth). The clutch disc
has the “asbestos fiber”, if there is powder scrap during
maintaining, the asbestos fiber in the powder scrap will floats in
the air, when human inhales the air containing the asbestos
fiber, it will cause great damage to human health.
Removal of clutch assembly
1.Remove the transmission
Remarks: Do not dry the transmission oil.
2.Remove the clutch cover and clutch disc
a. Make the alignment mark on the clutch cover and flywheel
b. Remove the fixed bolt gradually, until release the tension of spring
c. Remove the fixed bolt, pull out the clutch cover and clutch disc.
3. Remove the bearing and separation fork form the transmission
a. Remove the clip and pull out the bearing .
b. Remove the separation rocker arm assembly and leather cup.
clutch disc assembly
clutch cover assembly
bolt, spring and
washer assembly release bearing
assembly
profile spring
separation rocker arm assembly
separation rocker arm ball support
leather cup
N m: specified torque
Page 39 of 425

Clutch-9
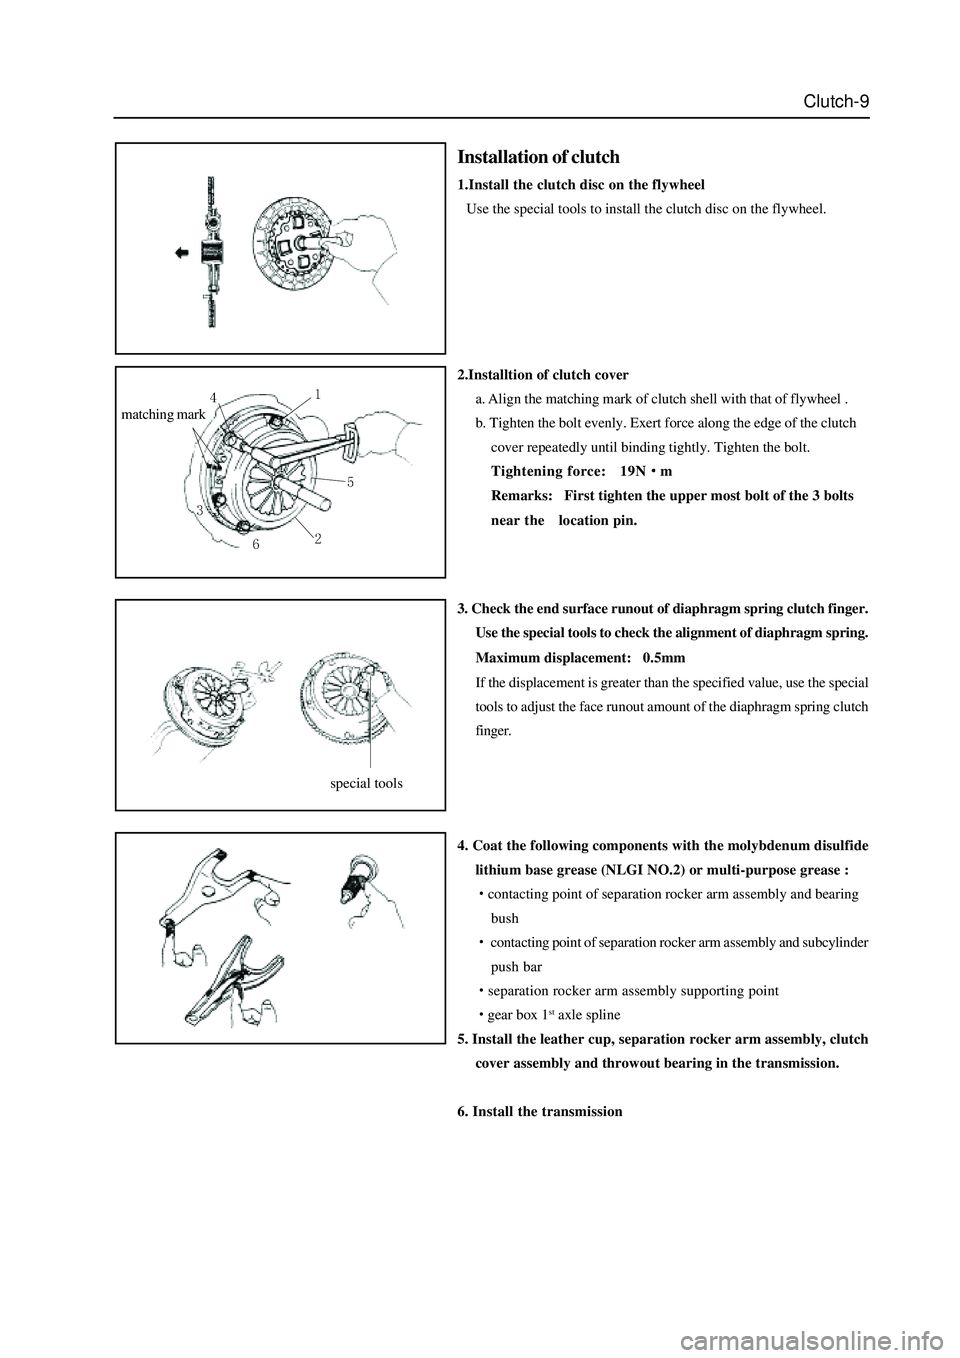
2.Installtion of clutch cover
a. Align the matching mark of clutch shell with that of flywheel .
b. Tighten the bolt evenly. Exert force along the edge of the clutch
cover repeatedly until binding tightly. Tighten the bolt.
Tightening force: 19N
m
Remarks: First tighten the upper most bolt of the 3 bolts
near thelocation pin.
3. Check the end surface runout of diaphragm spring clutch finger.
Use the special tools to check the alignment of diaphragm spring.
Maximum displacement: 0.5mm
If the displacement is greater than the specified value, use the special
tools to adjust the face runout amount of the diaphragm spring clutch
finger.
4. Coat the following components with the molybdenum disulfide
lithium base grease (NLGI NO.2) or multi-purpose grease :
contacting point of separation rocker arm assembly and bearing
bush
contacting point of separation rocker arm assembly and subcylinder
push bar
separation rocker arm assembly supporting point
gear box 1st axle spline
5. Install the leather cup, separation rocker arm assembly, clutch
cover assembly and throwout bearing in the transmission.
6. Install the transmission
matching mark
Installation of clutch
1.Install the clutch disc on the flywheel
Use the special tools to install the clutch disc on the flywheel.
special tools
Page 174 of 425

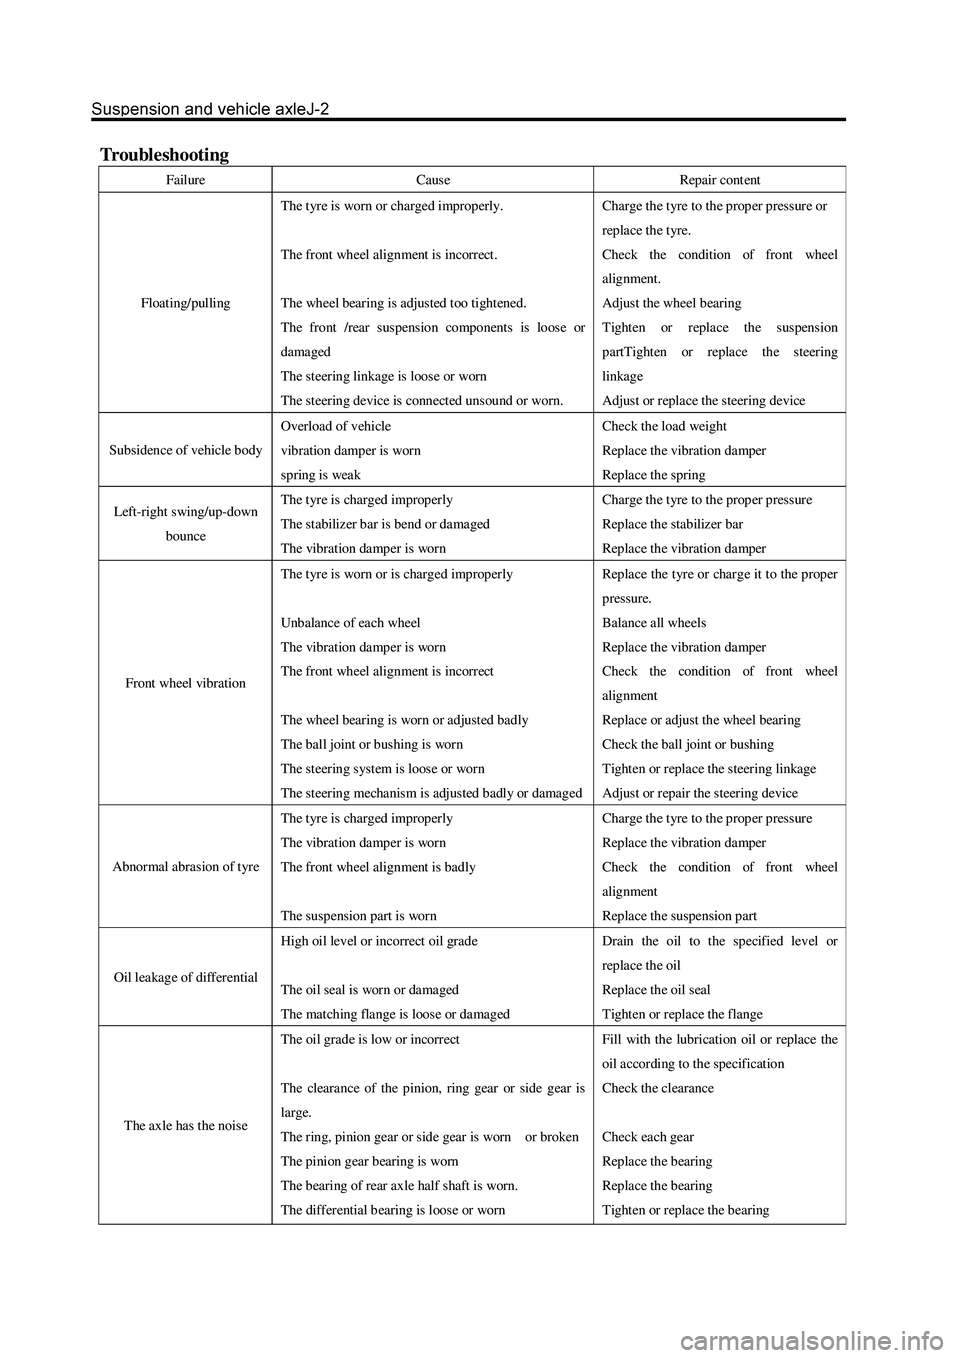
Troubleshooting
Failure Cause Repair cont ent
Floating/pulling The t yre is worn or charged improperly.
The front wheel alignment is incorrect.
The wheel bearing is adjusted too tightened.
The front /rear suspension components is loose or
damaged
The steering linkage is loose or worn
The steering device is connect ed unsound or worn. Charge the t yre to the prop er pressur e or
repla ce the t yre.
Check the condition of front wheel
alignment.
Adjust the wheel bearing
Tighten or replace the suspension
partTighten or replace the steering
linkage
Adjust or replace the steering device
Subsidence of vehicle body Overload of vehicle
vibration damper is worn
spring is weak Check the load weight
Replace the vibration damper
Replace the spring
Left-right swing/up-down
bounce The t yre is charged improperly
The stabilizer bar is bend or damaged
The vibration damper is worn Charge the t yre to the prop er pressur e
Replace the stabilizer bar
Replace the vibration damper
Front wheel vibration The t yre is worn or is charged improperly
Unbalance of each wheel
The vibration damper is worn
The front wheel alignment is incorrect
The wheel bearing is worn or adjusted badly
The ball joint or bushing is worn
The steering system is loose or worn
The steering mechanism is adjusted badly or damaged Repla ce the t yr e or char ge it to the prop er
pressure.
Balance all wheels
Replace the vibration damper
Check the condition of front wheel
alignment
Replace or adjust the wheel bearing
Check the ball joint or bushing
Tighten or replace the steering linkage
Adjust or repair the steering device
Abnormal abrasion of tyre The t yre is charged improperly
The vibration damper is worn
The front wheel alignment is badly
The suspension part is worn Charge the t yre to the prop er pressur e
Replace the vibration damper
Check the condition of front wheel
alignment
Replace the suspension part
Oil leakage of differential High oil level or incorrect oil grade
The oil seal is worn or damaged
The matching flange is loose or damaged Drain the oil to the specified level or
repla ce the oil
Replace the oil seal
Tighten or replace the flange
The axle has the nois e The oil grade is low or incorrect
The clearance of the pinion, ring gear or side gear is
large.
The ring, pinion gear or side gear is worn or broken
The pinion gear bearing is worn
The b earing of rear axle half shaft is worn.
The differential b earing is loos e or worn Fill with the lubrication oil or replace the
oil according to the specification
Check the clearance
Check each gear
Replace the bearing
Replace the bearing
Tighten or replace the bearing
Page 175 of 425

Front wheel alignment
1. Process the following inspection and eliminate
all problems
a. Check the wear condition of tyre and proper inflation.
Tyre inflation pressure: 230kPa
b. Check the wheel bearing of front wheel for loose.
c. Check the front suspension for loose.
d. Check the steering drive device for loose.
e. Process the standard elastic test; check thefrontvibration damper
for normal operation.
3. Install the 4-Wheel alignment instrument
Processed according to the detailed description of equipment
manufacturer.
4. Adjust the wheel angle
Remove the cover of spacing bolt of steering knuckle; check the internal
wheel’s steering angle A.
Internal wheel’s steering angle:
32
Caution: The wheel should not touch the brake hose of car body
when the steering wheel is rotated to limit.
2. Adjust the height of car
A:Adjust the height of car to the standard value for theconvenience of
processing the front wheel alignmentinspection.
B: Front fixed bolt of lower suspension arm
The standard no-load height is: the center of front fixed boltof lower
suspension arm is 295
1mm away form theground.
Page 191 of 425

d. Tighten the adjusting bolt to make the extension length of the bolt
equal to the length before remove.
2. For new torsion bar spring
a. Remove the wheel.
b. Coat thin grease on the spline of the torsion bar spring.
c. Install the torsion bar spring on the torsion bar base.
d. Lower the lower arm to the lower limitation position; install the
adjusting arm in the torsion bar spring with the angle that the
adjusting bolt just can be screwed on the upper adjusting block.
e. Tighten the adjusting bolt to the specified torque.
Nut tightening limitation: A is about 30-35mm; if A>
35mm, then it is adjusted through height of adjusting arm.
f. Install the wheel; remove the bracket; bounce the vehicle for
several times to make the suspension enters into the stable
status.
g. Rotate the adjusting bolt and adjust the ground clearance of
chassis (Refer to 4-Wheel Alignment).
Page 195 of 425

5. Install the torsion bar spring
(Refer to “Torsion Bar Spring”)
6. Tighten the nut of front shaft of lower arm to
specified torque
a. Install the wheel, remove the bracket and bounce the vehicle for
several times to make the vibration damper enters into the
stable status.
b. Align the assembly mark and tighten the nut to specified torque.
Tightening force: 240
20Nm
7. Check the wheel alignment parameter
(Refer to 4-Wheel Alignment)
Page 199 of 425

Connect the copper gasket seal and tighten the hollowbolttospecified
torque.
Tightening force: 50
5Nm
6. Discharge the air in front brake system
(refer to relevant chapter)
Remarks: It must discharge the air in the rear brake system if
disassemble the right upper arm.
7. Check the brake fluid for leakage
8. Tighten the upper arm front shaft nut to the specified
torque
Install the wheel, remove the bracket and bounce the vehicle for
several times to make the vibration damper enters into the stable
status.
9. Check the wheel alignment parameter
(Refer to 4-Wheel Alignment)