Page 1793 of 2893
����
20-116Seats
Component Location Index
REAR SEAT
FRONT SEAT
(Driver’s)
FRONT SEAT
(Passenger’s) Removal/Installation, page 20-131
Seat-back")
����
�(�#�'���������������
�����������������������)����
20-116Seats
Component Location Index
REAR SEAT
FRONT SEAT
(Driver’s)
FRONT SEAT
(Passenger’s) Removal/Installation, page 20-131
Seat-back Latch Replacement, page 20-135
Seat-back Release Lever/Cable
Removal/Installation, page 20-136
Armrest Beverage Holder Replacement, page 20-137
Armrest Replacement, page 20-138
Seat-back Cover Replacement, page 20-139
Seat Side Bolster Cover Replacement, page 20-143
Seat Cushion Cover Replacement, page 20-143
Armrest Cover Replacement, page 20-144
Active Head Restraint Inspection, page 20-117
Removal/Installation, page 20-118
Seat Frame Replacement, page 20-122
Seat-back Cover Replacement, page 20-123
Seat Cushion Cover Replacement, page 20-127
Active Head Restraint Inspection, page 20-117
Removal/Installation, page 20-118
Seat Frame Replacement, page 20-120
Seat-back Cover Replacement, page 20-123
Seat Cushion Cover Replacement, page 20-127
08/08/21 15:03:05 61SNR030_200_0118
ProCarManuals.com
DYNOMITE -2009-
Page 1795 of 2893
����
S
pecial Tools Required
20-118 Seats
Front Seat Removal/Installation
A
A
7/16
-20 UNF
32 N·m
(3.3 kgf·m, 24 lbf·ft)
A
B
KTC trim t")
���
����
����
�(�#�'���������������
���������������
� �����)����
S
pecial Tools Required
20-118 Seats
Front Seat Removal/Installation
A
A
7/16
-20 UNF
32 N·m
(3.3 kgf·m, 24 lbf·ft)
A
B
KTC trim tool set SOJATP2014
SRS components are located in this area. Review the
S
RS component locations (see page 24-11) and the
precautions and procedures (see page 24-13) before
doing repairs or service.
NOTE: Put on gloves to protect your hands.
When prying with a flat-tip screwdriver, wrap it with protective tape to prevent damage.
Take care not to scratch the body or tear the seat covers.
Use the appropriate tool from the KTC trim tool set to avoid damage when removing components.
1. Do the battery terminal disconnection procedure (see page 22-68), and wait at least 3 minutes before
beginning work.
2. Tilt the steering wheel all the way up, and push it all the way in. Adjust the seat-back recline to a
middle position.
3. Slide the front seat forward fully. Carefully pry up on the bottom edge of the anchor cover (A) to
release the hooks, and remove the cover. 4.
Remove the lower anchor bolt (A).
5. Remove the seat track outer end covers (A) and the seat track center end covers (B) from the back of
both seat tracks.
08/08/21 15:03:07 61SNR030_200_0120
ProCarManuals.com
DYNOMITE -2009-
Page 1797 of 2893
�
��
Passenger’s Seat
20-12020-120 Seats
Front Seat Removal/Installation
(cont’d)
Front Seat Frame Replacement
Fastener Locations
:Bolt,4
10x")
���
���
�(�#�'���������������
����������������� �����)�
��
Passenger’s Seat
20-12020-120 Seats
Front Seat Removal/Installation
(cont’d)
Front Seat Frame Replacement
Fastener Locations
:Bolt,4
10x1.25mm
34 N·m
(3.5 kgf·m, 25 lbf·ft) A
A
B
C
Fastener Locations
:Clip,4
A
9. With the help of an assistant, carefully remove thefront seat through the front door opening.
10. Install the seat in the reverse order of removal, and note these items:
Apply medium strength liquid thread lock to the seat mounting bolts before reinstallation.
Tighten the seat mounting bolts to the specified torque in the sequence shown. Slide the seat (A)
all the way back and tighten and , then slide
it forward and tighten and . The driver’s seat
is shown; the passenger’s seat is similar.
Tighten the bolts by hand first, then tighten them to specification with a torque wrench.
Make sure each connector is plugged in properly.
Check for any DTCs that may have been set during repairs, and clear them.
Do the battery terminal reconnection procedure (see page 22-68). Calibrate the ODS unit after any of these actions
(see page 24-27):
Front passenger’s seat replacement (including any seat components)
Replacement of the front seat weight sensors
After a vehicle collision
NOTE: Put on gloves to protect your hands.
Apply oil to the pivot portions of the slide locks.
Apply multipurpose grease to the sliding portions of the seat tracks.
If the side airbag has deployed, replace the seat frame and related pieces with new ones (see page
24-185).
1. Remove the front seat (see page 20-118).
2. Remove these items: Front seat-back cover (see page 20-123)
Front seat cushion cover (see page 20-127)
ODS unit (see page 24-209)
Front seat belt buckle (see page 24-6)
3. Remove the clips, then remove the recline inner covers (A) and module holder (B) from the seat
frame (C).
08/08/21 15:03:55 61SNR030_200_0122
ProCarManuals.com
DYNOMITE -2009-
Page 1798 of 2893
�
��
Passenger’s Seat
20-12020-120 Seats
Front Seat Removal/Installation
(cont’d)
Front Seat Frame Replacement
Fastener Locations
:Bolt,4
10x")
���
���
�(�#�'���������������
����������������� �����)�
��
Passenger’s Seat
20-12020-120 Seats
Front Seat Removal/Installation
(cont’d)
Front Seat Frame Replacement
Fastener Locations
:Bolt,4
10x1.25mm
34 N·m
(3.5 kgf·m, 25 lbf·ft) A
A
B
C
Fastener Locations
:Clip,4
A
9. With the help of an assistant, carefully remove thefront seat through the front door opening.
10. Install the seat in the reverse order of removal, and note these items:
Apply medium strength liquid thread lock to the seat mounting bolts before reinstallation.
Tighten the seat mounting bolts to the specified torque in the sequence shown. Slide the seat (A)
all the way back and tighten and , then slide
it forward and tighten and . The driver’s seat
is shown; the passenger’s seat is similar.
Tighten the bolts by hand first, then tighten them to specification with a torque wrench.
Make sure each connector is plugged in properly.
Check for any DTCs that may have been set during repairs, and clear them.
Do the battery terminal reconnection procedure (see page 22-68). Calibrate the ODS unit after any of these actions
(see page 24-27):
Front passenger’s seat replacement (including any seat components)
Replacement of the front seat weight sensors
After a vehicle collision
NOTE: Put on gloves to protect your hands.
Apply oil to the pivot portions of the slide locks.
Apply multipurpose grease to the sliding portions of the seat tracks.
If the side airbag has deployed, replace the seat frame and related pieces with new ones (see page
24-185).
1. Remove the front seat (see page 20-118).
2. Remove these items: Front seat-back cover (see page 20-123)
Front seat cushion cover (see page 20-127)
ODS unit (see page 24-209)
Front seat belt buckle (see page 24-6)
3. Remove the clips, then remove the recline inner covers (A) and module holder (B) from the seat
frame (C).
08/08/21 15:03:55 61SNR030_200_0122
ProCarManuals.com
DYNOMITE -2009-
Page 1800 of 2893
����
Driver’s Seat
20-122 Seats
Front Seat Frame Replacement (cont’d)
A
B
C
D
Fastener Locations
:Clip,3
A
E
Check the operation of the driver’")
����
�(�#�'���������������
����������������� �����)����
Driver’s Seat
20-122 Seats
Front Seat Frame Replacement (cont’d)
A
B
C
D
Fastener Locations
:Clip,3
A
E
Check the operation of the driver’s seat position sensor
after any of these actions (see page 24-29):
Driver’s seat position sensor replacement
Cover plate (front side of driver’s seat slide rail) replacement
NOTE: Put on gloves to protect your hands.
Apply oil to the pivot portions of the slide lock.
Apply multipurpose grease to the sliding portions and pivot portions of the seat tracks.
If the side airbag has deployed, replace the seat frame and related pieces with new ones (see page
24-185).
1. Remove the front seat (see page 20-118).
2. Remove these items: Front seat-back cover/pad (see page 20-123)
Front seat cushion cover/pad (see page 20-127)
Driver’s seat position sensor (see page 24-211)
Front seat belt buckle (see page 24-6) 3. Remove the clips, then remove the recline inner
covers (A), the outer upper rail cover (B), the inner
upper rail cover (C) and the module holder (D) from
the seat frame (E).
4. Install the new seat frame in the reverse order of removal, and note these items:
Make sure the driver’s seat position sensor connector is plugged in properly.
If the clips are damaged or stress-whitened, replace them with new ones.
Push the clips into place securely.
Make sure the seat wiring harnesses are routed properly and not pinched.
08/08/21 15:03:56 61SNR030_200_0124
ProCarManuals.com
DYNOMITE -2009-
Page 1802 of 2893
����
��������
�
��
20-124Seats
Front Seat-back Cover Replacement (cont’d)
Fastener Locations
:Clip,2
A
C
B
A A
D
C
A BA
E BC A
B C
D
A B
A
A A
A
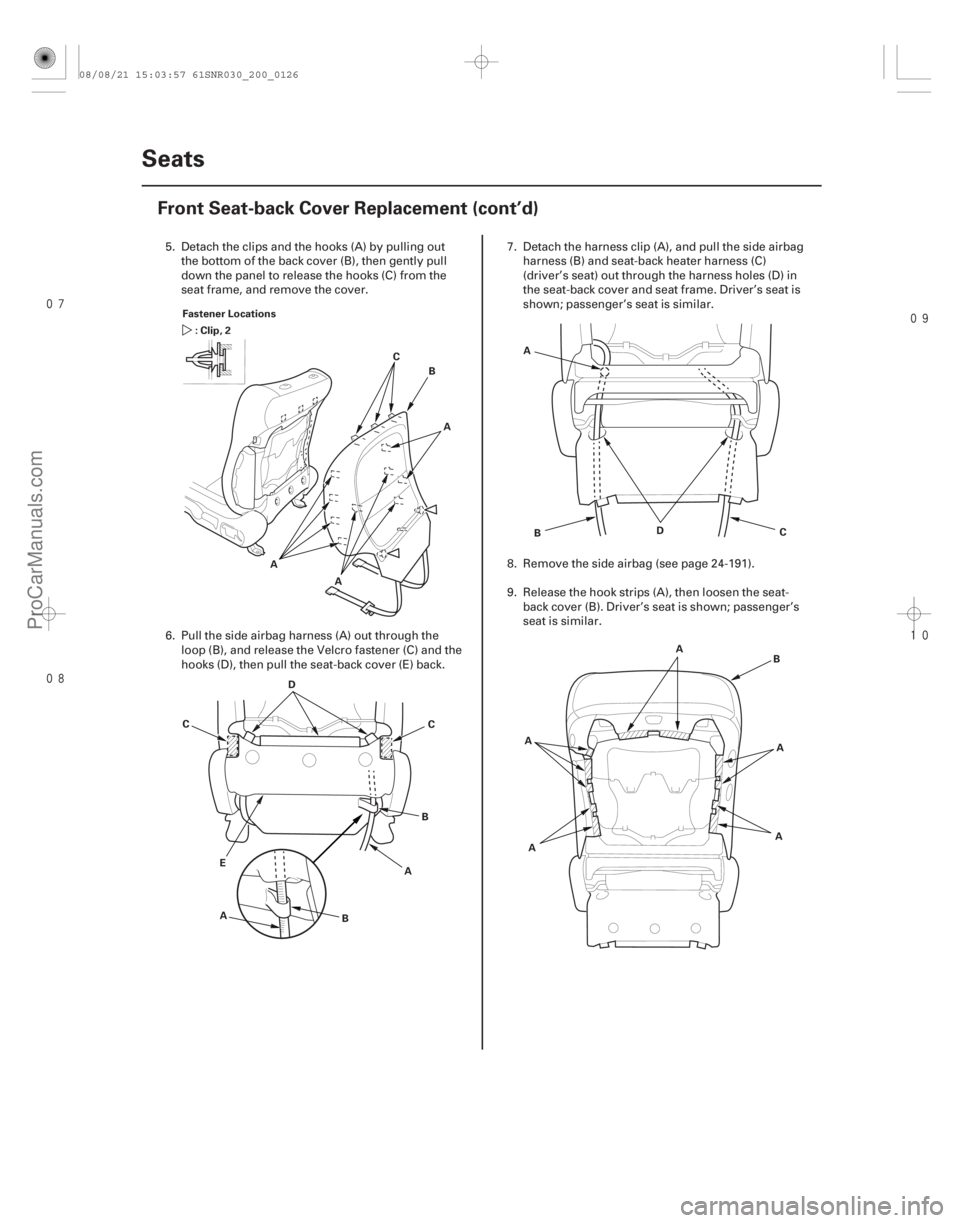
5. Detach the clips and the hooks (A) by pu lling out
the bottom of the back cover (B), then gently pull
down the panel to release the hooks (C) from the
seat frame, and remove the cover.
6. Pull the side airbag harness (A) out through the loop (B), and release the Velcro fastener (C) and the
hooks (D), then pull the seat-back cover (E) back. 7. Detach the harness clip (A), and pull the side airbag
harness (B) and seat-back heater harness (C)
(driver’s seat) out through the harness holes (D) in
the seat-back cover and seat frame. Driver’s seat is
shown; passenger’s seat is similar.
8. Remove the side airbag (see page 24-191).
9. Release the hook strips (A), then loosen the seat- back cover (B). Driver’s seat is shown; passenger’s
seat is similar.
08/08/21 15:03:57 61SNR030_200_0126
ProCarManuals.com
DYNOMITE -2009-
Page 1804 of 2893
�
��
�
���
��
�
��
20-126Seats
Front Seat-back Cover Replacement (cont’d)
A
B
A AA
A
A
A
B C
D
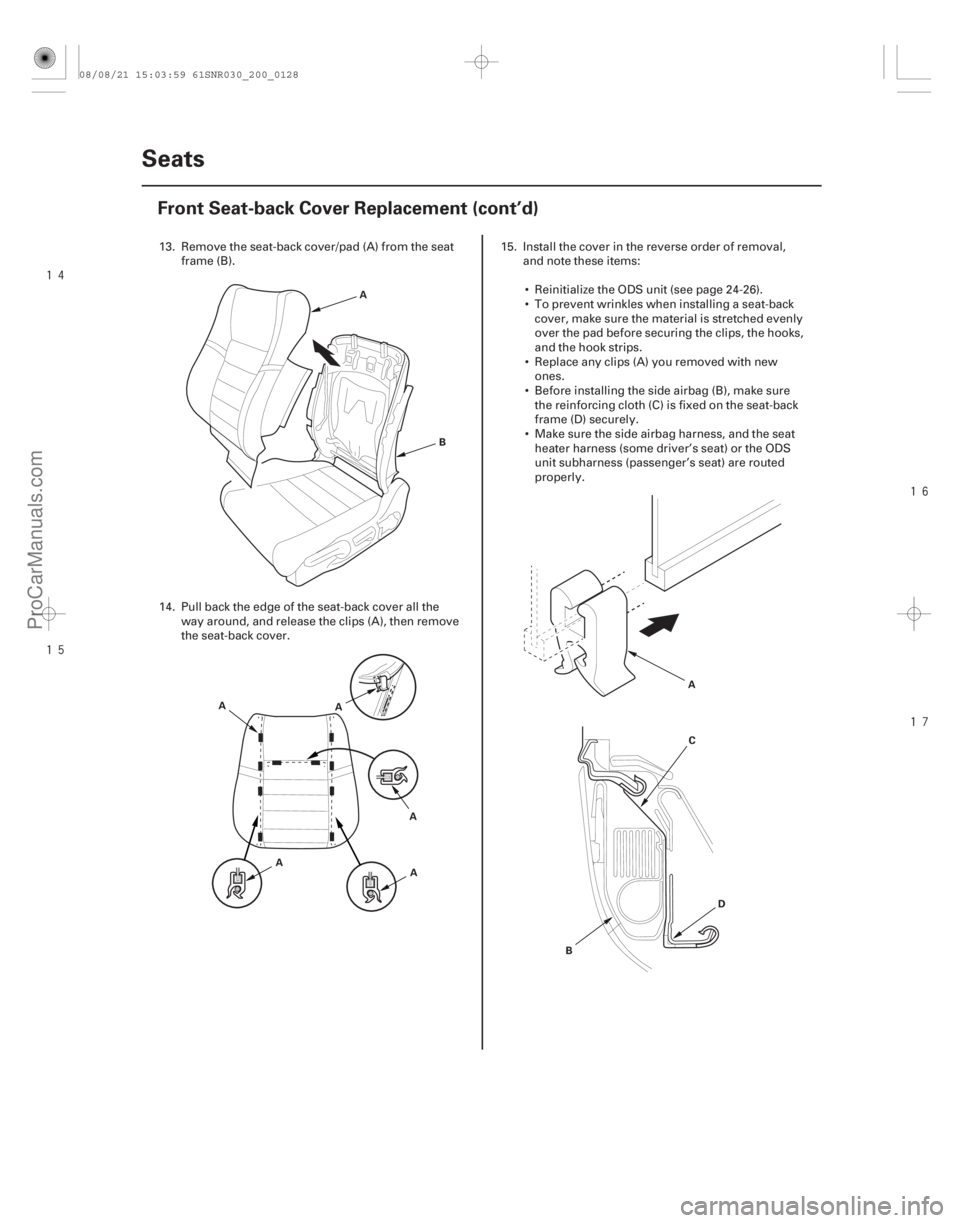
13. Remove the seat-back cover/pad (A) from the seatframe (B).
14. Pull back the edge of the seat-back cover all the way around, and release the clips (A), then remove
the seat-back cover. 15. Install the cover in the reverse order of removal,
and note these items:
Reinitialize the ODS unit (see page 24-26).
To prevent wrinkles when installing a seat-back cover, make sure the material is stretched evenly
over the pad before securing the clips, the hooks,
and the hook strips.
Replace any clips (A) you removed with new ones.
Before installing the side airbag (B), make sure the reinforcing cloth (C) is fixed on the seat-back
frame (D) securely.
Make sure the side airbag harness, and the seat heater harness (some driver’s seat) or the ODS
unit subharness (passenger’s seat) are routed
properly.
08/08/21 15:03:59 61SNR030_200_0128
ProCarManuals.com
DYNOMITE -2009-
Page 1806 of 2893
����
��������
����
Passenger’s seat Driver’s seat
20-128Seats
Front Seat Cushion Cover Replacement (cont’d)
Fastener Location
: Clip, 1
A B
B
A
B
C
C
E
F
DC
H I
J D A
B
D
E
C
D
C
F
G
H
I
J C
E
H
AB
B
A
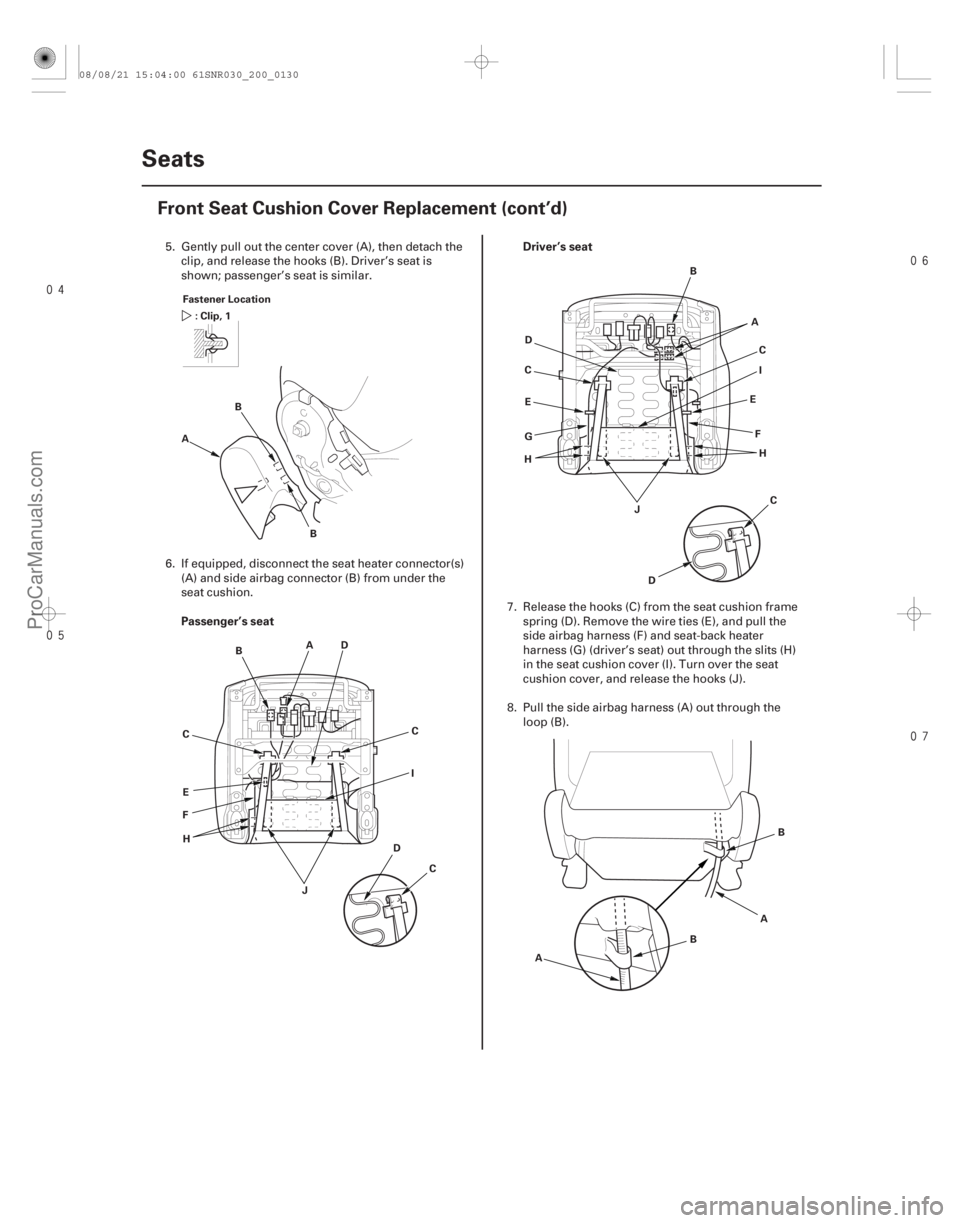
5. Gently pull out the center cover (A), then detach the clip, and release the hooks (B). Driver’s seat is
shown; passenger’s seat is similar.
6. If equipped, disconnect the seat heater connector(s) (A) and side airbag connector (B) from under the
seat cushion. 7. Release the hooks (C) from the seat cushion framespring (D). Remove the wire ties (E), and pull the
side airbag harness (F) and seat-back heater
harness (G) (driver’s seat) out through the slits (H)
in the seat cushion cover (I). Turn over the seat
cushion cover, and release the hooks (J).
8. Pull the side airbag harness (A) out through the loop (B).
08/08/21 15:04:00 61SNR030_200_0130
ProCarManuals.com
DYNOMITE -2009-