Page 1173 of 2893
���
��������
����
�(�#�'�������
���
�����
�
���
�������
� �����)����
14-257
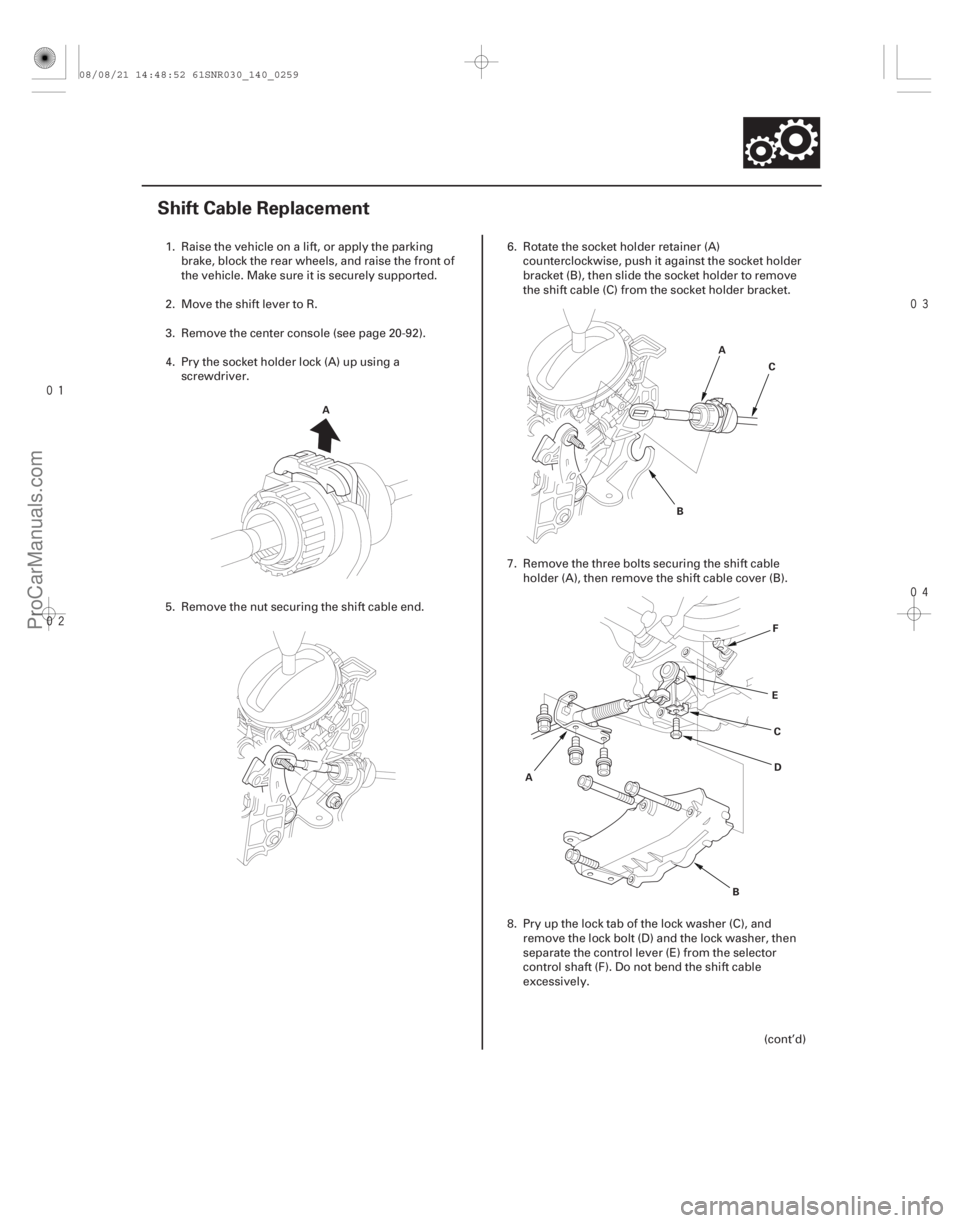
Shift Cable Replacement
A A
B C
A BC
D
E
F
1. Raise the vehicle on a lift, or apply the parking
brake, block the rear wheels, and raise the front of
the vehicle. Make sure it is securely supported.
2. Move the shift lever to R.
3. Remove the center console (see page 20-92).
4. Pry the socket holder lock (A) up using a screwdriver.
5. Remove the nut securing the shift cable end. 6. Rotate the socket holder retainer (A)
counterclockwise, push it against the socket holder
bracket (B), then slide the socket holder to remove
the shift cable (C) from the socket holder bracket.
7. Remove the three bolts securing the shift cable holder (A), then remove the shift cable cover (B).
8. Pry up the lock tab of the lock washer (C), and remove the lock bolt (D) and the lock washer, then
separate the control lever (E) from the selector
control shaft (F). Do not bend the shift cable
excessively.
(cont’d)
08/08/21 14:48:52 61SNR030_140_0259
ProCarManuals.com
DYNOMITE -2009-
Page 1181 of 2893
���
����
����
�(�#�'�������
���
�����
�����������
�
�������)����
�µ
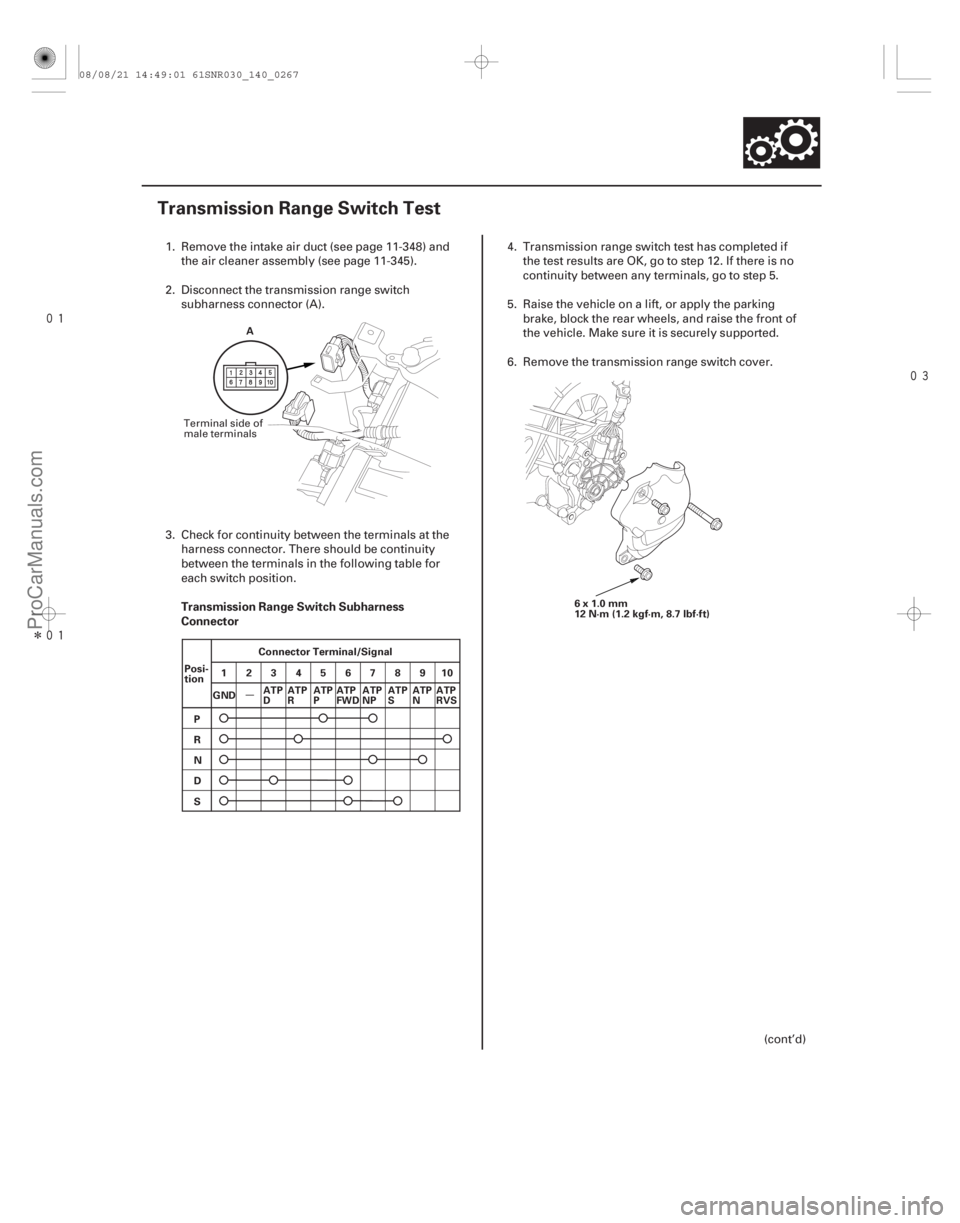
Transmission Range Switch Subharness
Connector
14-265
Transmission Range Switch Test
A Connector Terminal/Signal
25
134
687910
P
R
N
D
S
Posi-
tion
6x1.0mm
12 N·m (1.2 kgf·m, 8.7 lbf·ft)
ATP
NP
ATP
FWD
GND
ATP
RVS
ATP
D ATP
R ATP
P ATP
SATP
N
1. Remove the intake air duct (see page 11-348) and
the air cleaner assembly (see page 11-345).
2. Disconnect the transmission range switch subharness connector (A).
3. Check for continuity between the terminals at the harness connector. There should be continuity
between the terminals in the following table for
each switch position. 4. Transmission range switch test has completed if
the test results are OK, go to step 12. If there is no
continuity between any terminals, go to step 5.
5. Raise the vehicle on a lift, or apply the parking brake, block the rear wheels, and raise the front of
the vehicle. Make sure it is securely supported.
6. Remove the transmission range switch cover.
(cont’d)
Terminal side of
male terminals
08/08/21 14:49:01 61SNR030_140_0267
ProCarManuals.com
DYNOMITE -2009-
Page 1183 of 2893
���
��������
����
�(�#�'�������
���
�����
�����������
�
� �����)����
14-267
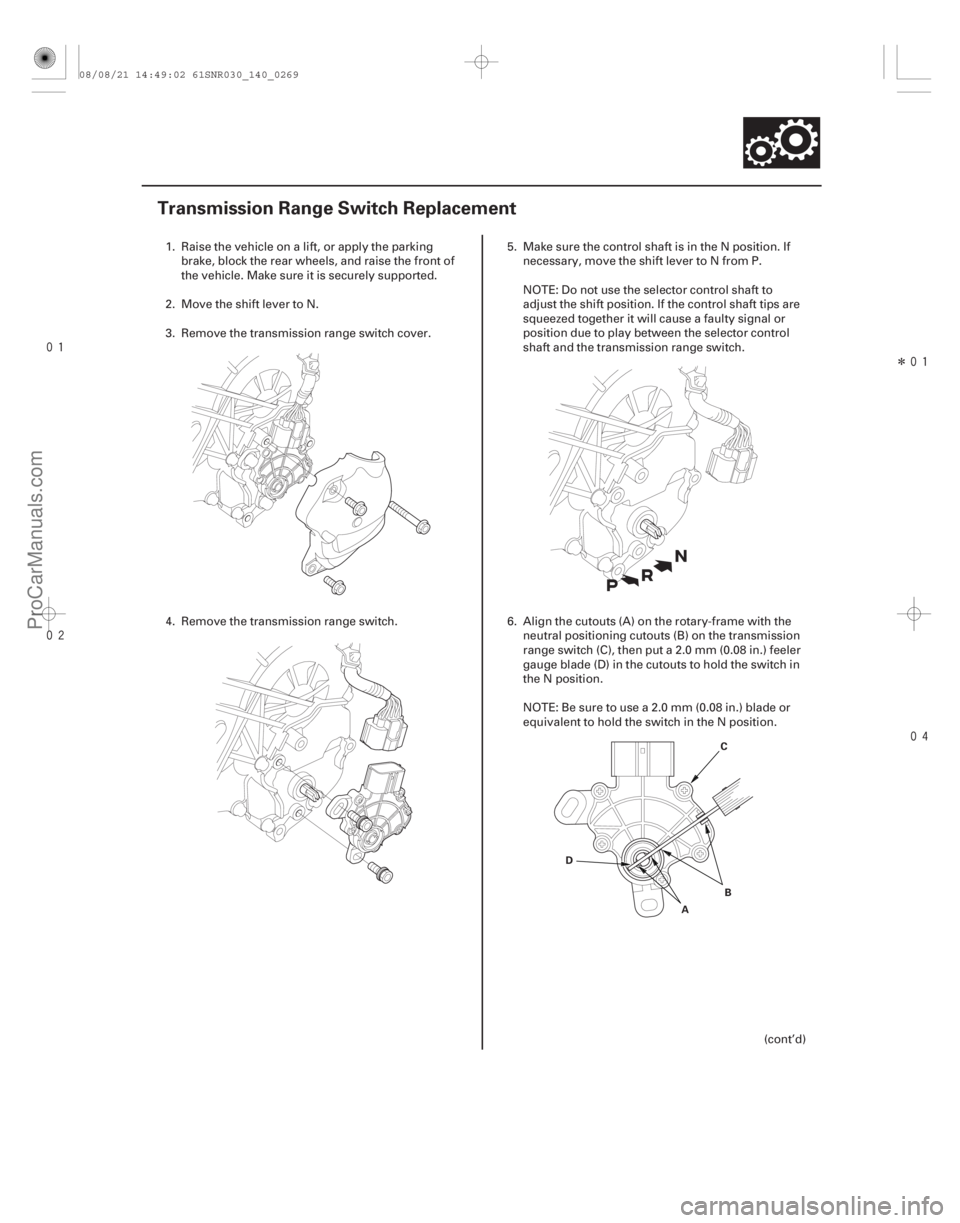
Transmission Range Switch Replacement
A B
C
D
1. Raise the vehicle on a lift, or apply the parking brake, block the rear wheels, and raise the front of
the vehicle. Make sure it is securely supported.
2. Move the shift lever to N.
3. Remove the transmission range switch cover.
4. Remove the transmission range switch. 5. Make sure the control shaft is in the N position. If
necessary, move the shift lever to N from P.
NOTE: Do not use the selector control shaft to
adjust the shift position. If the control shaft tips are
squeezed together it will cause a faulty signal or
position due to play between the selector control
shaft and the transmission range switch.
6. Align the cutouts (A) on the rotary-frame with the neutral positioning cutouts (B) on the transmission
range switch (C), then put a 2.0 mm (0.08 in.) feeler
gauge blade (D) in the cutouts to hold the switch in
the N position.
NOTE: Be sure to use a 2.0 mm (0.08 in.) blade or
equivalent to hold the switch in the N position.
(cont’d)
08/08/21 14:49:02 61SNR030_140_0269
ProCarManuals.com
DYNOMITE -2009-
Page 1196 of 2893
����
�(�#�'�������
���
���������������������������)����
�Ó
�Ú
�Ø �µ
14-279
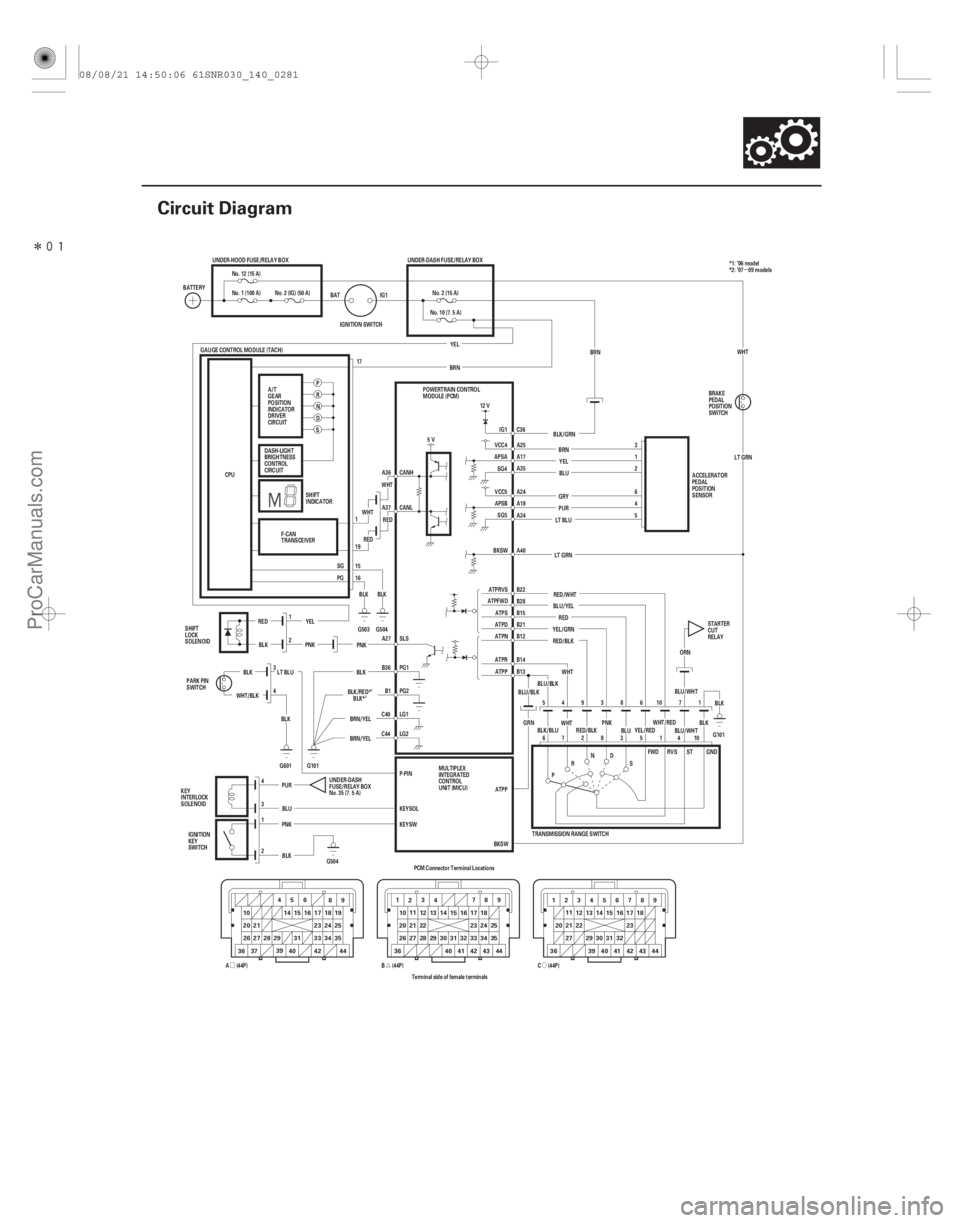
Circuit Diagram
22
36 444342 27 28
3033 34 35
32 25
20 21 22 16 1817
13 14 15
12
11 789
31
3123
31
456
1514
2120 25
24
34
33
292827
42 44
40
37
36 31
123456 9
87
11 12 151413 17 1816
32
29
30
42 43 44
40
39
36
18
17
16 19
3598
10 2120
27
2
26 29 40
4
23 24
41 23
41
39
10
26
G601
4 3
DN
R
P ST
S RVS
FWD
BKSW LT GRN
LT GRNWHT
No. 12 (15 A)
YEL
BRN
PG SG 16
15
BLK A40
BKSW
WHT/BLK BLK LT BLU
BLK
C(44P)
B(44P)
A(44P)
Terminal side of female terminals
G503
BLK A36
A37
WHT
RED
RED
WHT
1
19 CANH
CANL
17
P
R
N
D
S
GAUGE CONTROL MODULE (TACH)
2 1 3 4 1
3827
65 41017
6
549 38 10
KEYSW KEYSOL
G504
BLU
PNK
PUR
BLK P-PIN
ATPPBLU/BLK 5 4 6 2 1
3
GRY PUR
LT BLU
A24
VCC5
APSB A18
A34
SG5
SG4
A35
A17
APSA VCC4 A25
BLUYEL
BRN
PG1
PG2
LG1
LG2
C40 B1
C44 B36
BRN/YEL
BRN/YEL
G101 PNK
BLK
B13 BLK/GRN
BRN
C36
IG1
12 V
No. 2 (15 A)
UNDER-DASH FUSE/RELAY BOX
No. 10 (7. 5 A)
BLU/WHT
RED/BLK
WHT ORN
SLS
A27
RED
BLK BAT
IG1
IGNITION SWITCH
5V
BLK
BLU/WHT
TRANSMISSION RANGE SWITCH
B22
ATPRVS
ATPFWD
ATPP
ATPR ATPN ATPD
ATPS
YEL/RED
B28
G101
B12
B21
BLU
PNK
RED/BLK
WHT
BLK/BLU
B14 B15
WHT/RED
BLU/BLK YEL/GRN
RED
BLU/YEL
1
2 YEL
PNK
UNDER-HOOD FUSE/RELAY BOX
No. 2 (IG) (50 A)
No. 1 (100 A)
BATTERY
STARTER
CUT
RELAY
SHIFT
LOCK
SOLENOID BRAKE
PEDAL
POSITION
SWITCH
ACCELERATOR
PEDAL
POSITION
SENSOR
KEY
INTERLOCK
SOLENOID IGNITION
KEY
SWITCH UNDER-DASH
FUSE/RELAY BOX
No.35(7.5A)
F-CAN
TRANSCEIVER
CPU A/T
GEAR
POSITION
INDICATOR
DRIVER
CIRCUIT
PARK PIN
SWITCH DASH-LIGHT
BRIGHTNESS
CONTROL
CIRCUIT
POWERTRAIN CONTROL
MODULE (PCM)
MULTIPLEX
INTEGRATED
CONTROL
UNIT (MICU)
SHIFT
INDICATOR
RED/WHT
GRN
G504
BLK/RED* BLK* *1: ’06 model
*2: ’07 09 models
BLK PCM Connector Terminal Locations GND
1
2
08/08/21 14:50:06 61SNR030_140_0281
ProCarManuals.com
DYNOMITE -2009-
Page 1197 of 2893
����
���
����
�(�#�'�������
���
�������������������
�������)�
��
�µ
�µ �µ
�µ
�µ
�µ
YES
NO
YES
NO
YES
NO
14-280A/T Interlock System
Shift Lock System Circuit Troubleshooting
A
SHIFT LOCK SOLENOID CONNECTOR
IG1 (YEL)
SHIFT LOCK SOLENOID CONNECTOR IG1 (YEL) SLS (PNK)
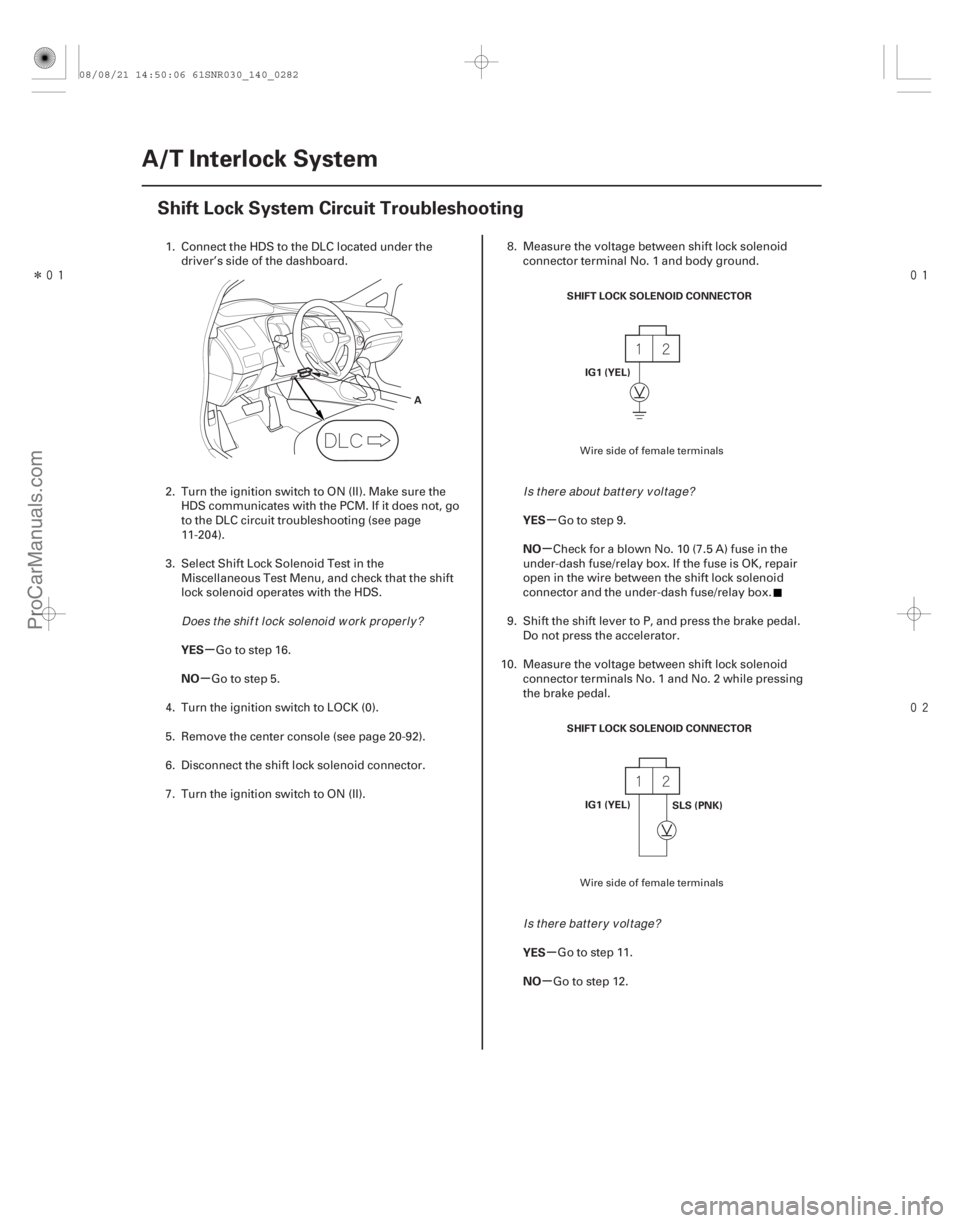
1. Connect the HDS to the DLC located under the
driver’s side of the dashboard.
2. Turn the ignition switch to ON (II). Make sure the HDS communicates with the PCM. If it does not, go
to the DLC circuit troubleshooting (see page
11-204).
3. Select Shift Lock Solenoid Test in the Miscellaneous Test Menu, and check that the shift
lock solenoid operates with the HDS.
Go to step 16.
Go to step 5.
4. Turn the ignition switch to LOCK (0).
5. Remove the center console (see page 20-92).
6. Disconnect the shift lock solenoid connector.
7. Turn the ignition switch to ON (II). 8. Measure the voltage between shift lock solenoid
connector terminal No. 1 and body ground.
Go to step 9.
CheckforablownNo.10(7.5A)fuseinthe
under-dash fuse/relay box. If the fuse is OK, repair
open in the wire between the shift lock solenoid
connector and the under-dash fuse/relay box.
9. Shift the shift lever to P, and press the brake pedal. Do not press the accelerator.
10. Measure the voltage between shift lock solenoid connector terminals No. 1 and No. 2 while pressing
the brake pedal.
Go to step 11.
Go to step 12.
Wire side of female terminals
Wire side of female terminals
Does t he shi f t l ock sol enoi d w or k pr oper l y ? Is t her e about bat t er y v ol t age?
Is there battery voltage?
08/08/21 14:50:06 61SNR030_140_0282
ProCarManuals.com
DYNOMITE -2009-
Page 1198 of 2893
��������
�µ
�µ �µ
�µ
YES
NO
YES
NO
14-281
SHIFT LOCK SOLENOID CONNECTOR
IG1 (YEL) SLS (PNK)
SLS (PNK)
PCM CONNECTOR A (44P)
SHIFT LOCK
SOLENOID
CONNECTOR
SLS (PNK)
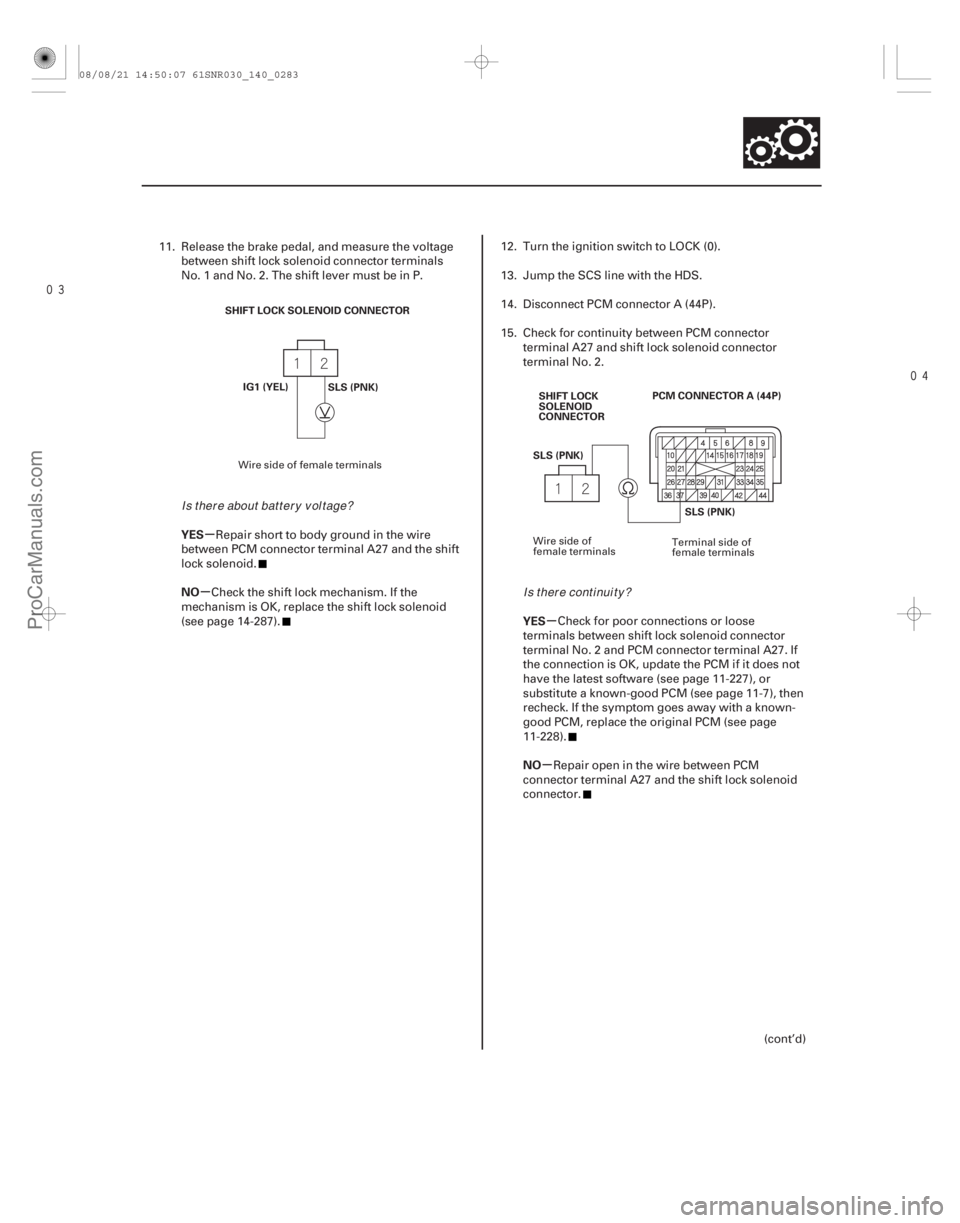
11. Release the brake pedal, and measure the voltage between shift lock solenoid connector terminals
No. 1 and No. 2. The shift lever must be in P.
Repair short to body ground in the wire
between PCM connector terminal A27 and the shift
lock solenoid.
Check the shift lock mechanism. If the
mechanism is OK, replace the shift lock solenoid
(see page 14-287). 12. Turn the ignition switch to LOCK (0).
13. Jump the SCS line with the HDS.
14. Disconnect PCM connector A (44P).
15. Check for continuity between PCM connector
terminal A27 and shift lock solenoid connector
terminal No. 2.
Check for poor connections or loose
terminals between shift lock solenoid connector
terminal No. 2 and PCM connector terminal A27. If
the connection is OK, update the PCM if it does not
have the latest software (see page 11-227), or
substitute a known-good PCM (see page 11-7), then
recheck. If the symptom goes away with a known-
good PCM, replace the original PCM (see page
11-228).
Repair open in the wire between PCM
connector terminal A27 and the shift lock solenoid
connector.
(cont’d)
Wire side of female terminals Wire side of
female terminalsTerminal side of
female terminals
Is t her e about bat t er y v ol t age?
Is there continuity?
08/08/21 14:50:07 61SNR030_140_0283
ProCarManuals.com
DYNOMITE -2009-
Page 1199 of 2893
�����
�µ
�µ
�µ
�µ
�µ
�µ
YES
NO
YES
NO
YES
NO
14-282A/T Interlock System
Shift Lock System Circuit Troubleshooting (cont’d)
BKSW (LT GRN)
PCM CONNECTOR A (44P)
16. Monitor the Brake Switch in the Data List with the
HDS, and press the brake pedal.
Go to step 21.
If the brake lights come on, go to step 17. If
the brake lights do not work, repair the faulty brake
light circuit.
17. Turn the ignition switch to LOCK (0).
18. Jump the SCS line with the HDS.
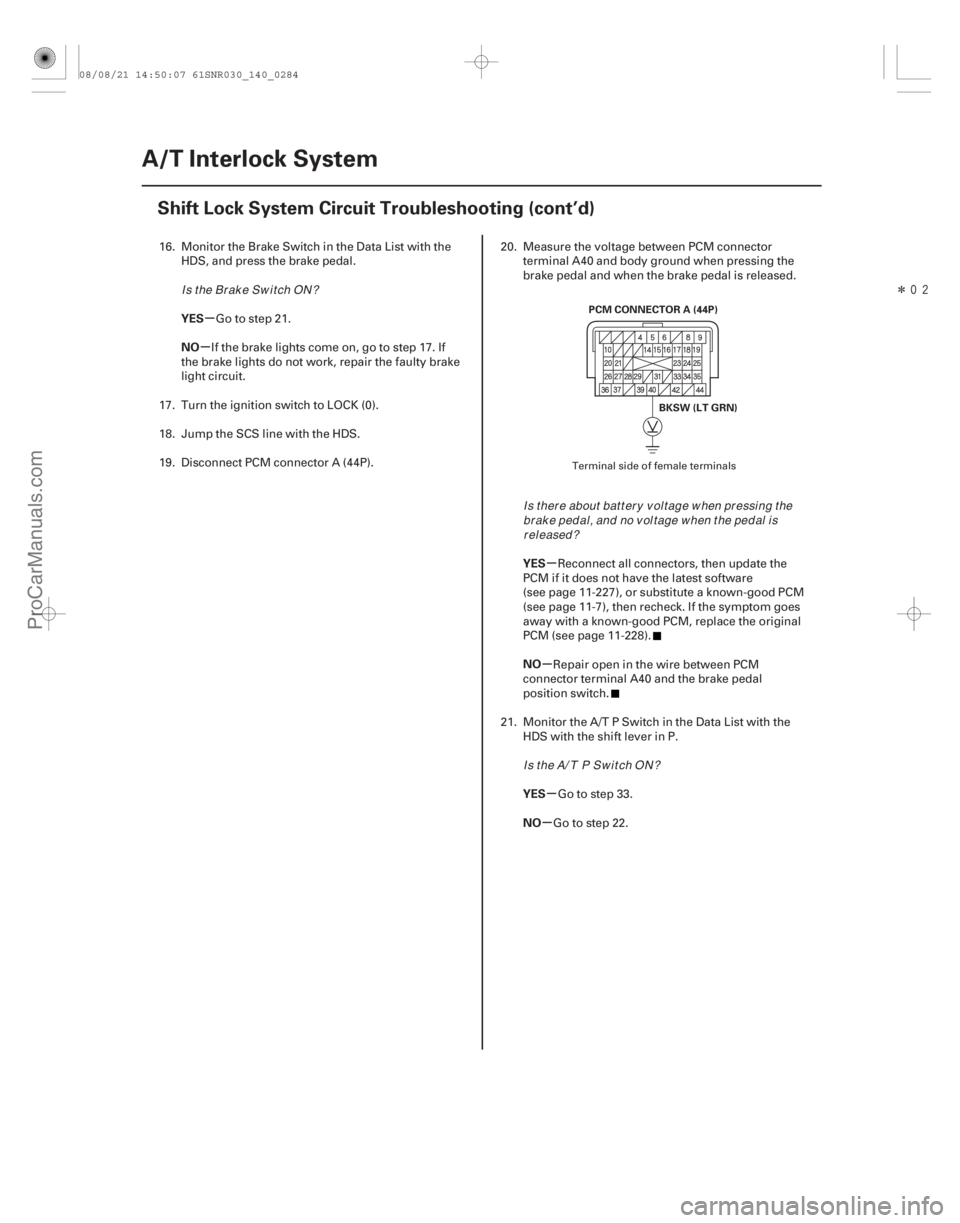
19. Disconnect PCM connector A (44P). 20. Measure the voltage between PCM connector
terminal A40 and body ground when pressing the
brake pedal and when the brake pedal is released.
Reconnect all connectors, then update the
PCM if it does not have the latest software
(see page 11-227), or substitute a known- good PCM
(see page 11-7), then recheck. If the symptom goes
away with a known-good PCM, replace the original
PCM (see page 11-228).
Repair open in the wire between PCM
connector terminal A40 and the brake pedal
position switch.
21. Monitor the A/T P Switch in the Data List with the HDS with the shift lever in P.
Go to step 33.
Go to step 22.
Terminal side of female terminals
Is the Brake Switch ON?
Is there about battery voltage when pressing thebr ak e ped al , and no v ol t age w hen t he ped al i sreleased?
Is the A/ T P Switch ON?
08/08/21 14:50:07 61SNR030_140_0284
ProCarManuals.com
DYNOMITE -2009-
Page 1314 of 2893
���������
����
16-21
E
D A E
D
A
C B B
A
E
12x1.25mm
59 N·m
(6.0 kgf·m,
43 lbf·ft)
C
12x1.25mm
59 N·m
(6.0 kgf·m,
43 lbf·ft)
D
12x1.25mm
59 N·m
(6.0 kgf·m,
43 lbf·ft)
A
B
5. Clean the areas where the driveshaft contacts the
differential thoroughly with solvent or brake
cleaner, and dry with compressed air.
NOTE: Do not wash the rubber parts with solvent.
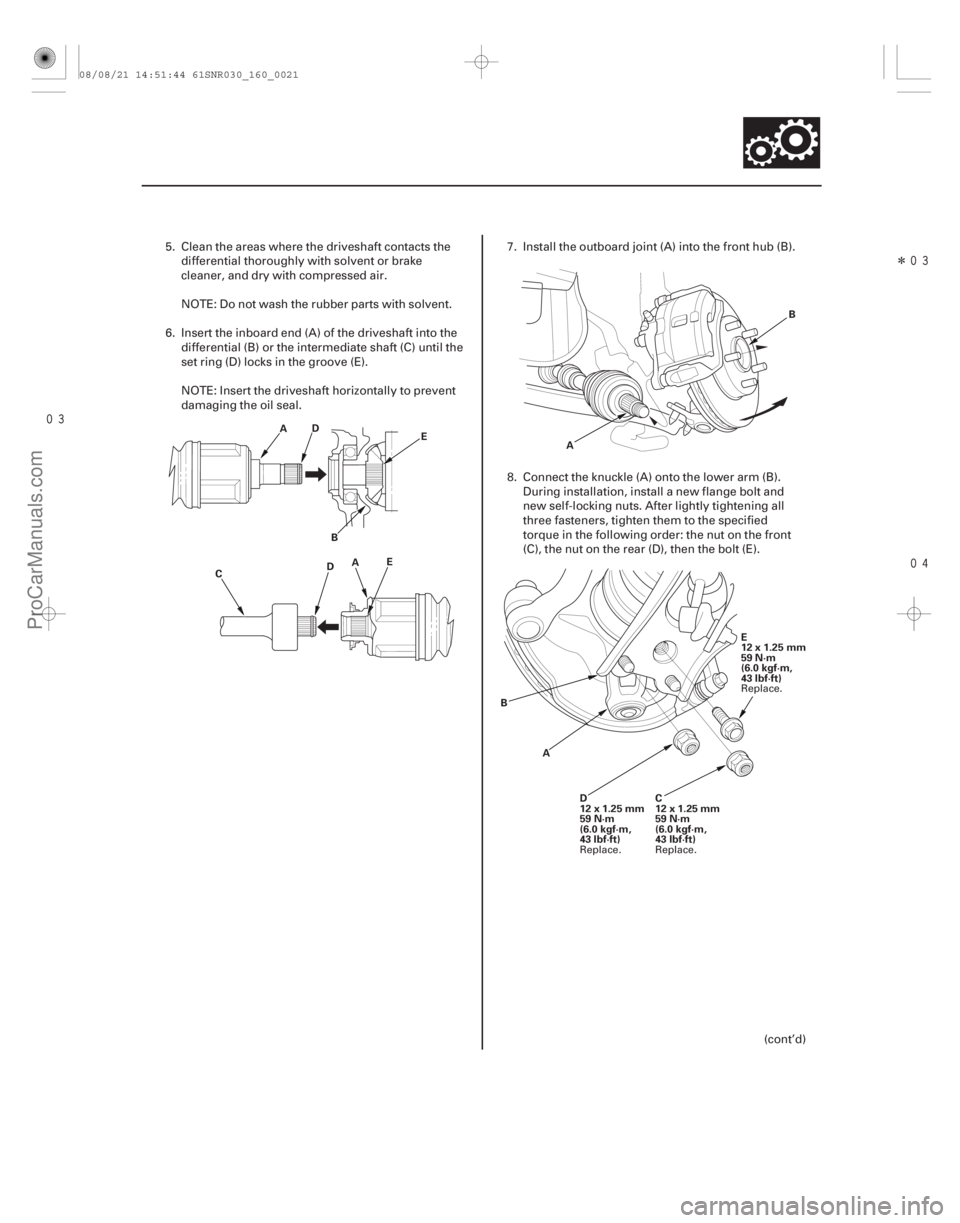
6. Insert the inboard end (A) of the driveshaft into the differential (B) or the intermediate shaft (C) until the
set ring (D) locks in the groove (E).
NOTE: Insert the driveshaft horizontally to prevent
damaging the oil seal. 7. Install the outboard joint (A) into the front hub (B).
8. Connect the knuckle (A) onto the lower arm (B).
During installation, install a new flange bolt and
new self-locking nuts. After lightly tightening all
three fasteners, tighten them to the specified
torque in the following order: the nut on the front
(C), the nut on the rear (D), then the bolt (E).
(cont’d)
Replace.
Replace.
Replace.
08/08/21 14:51:44 61SNR030_160_0021
ProCarManuals.com
DYNOMITE -2009-