Page 2130 of 5135
A79033
±
ENGINE MECHANICAL ENGINE(1AZ±FSE)
14±183
AVENSIS REPAIR MANUAL (RM1018E)
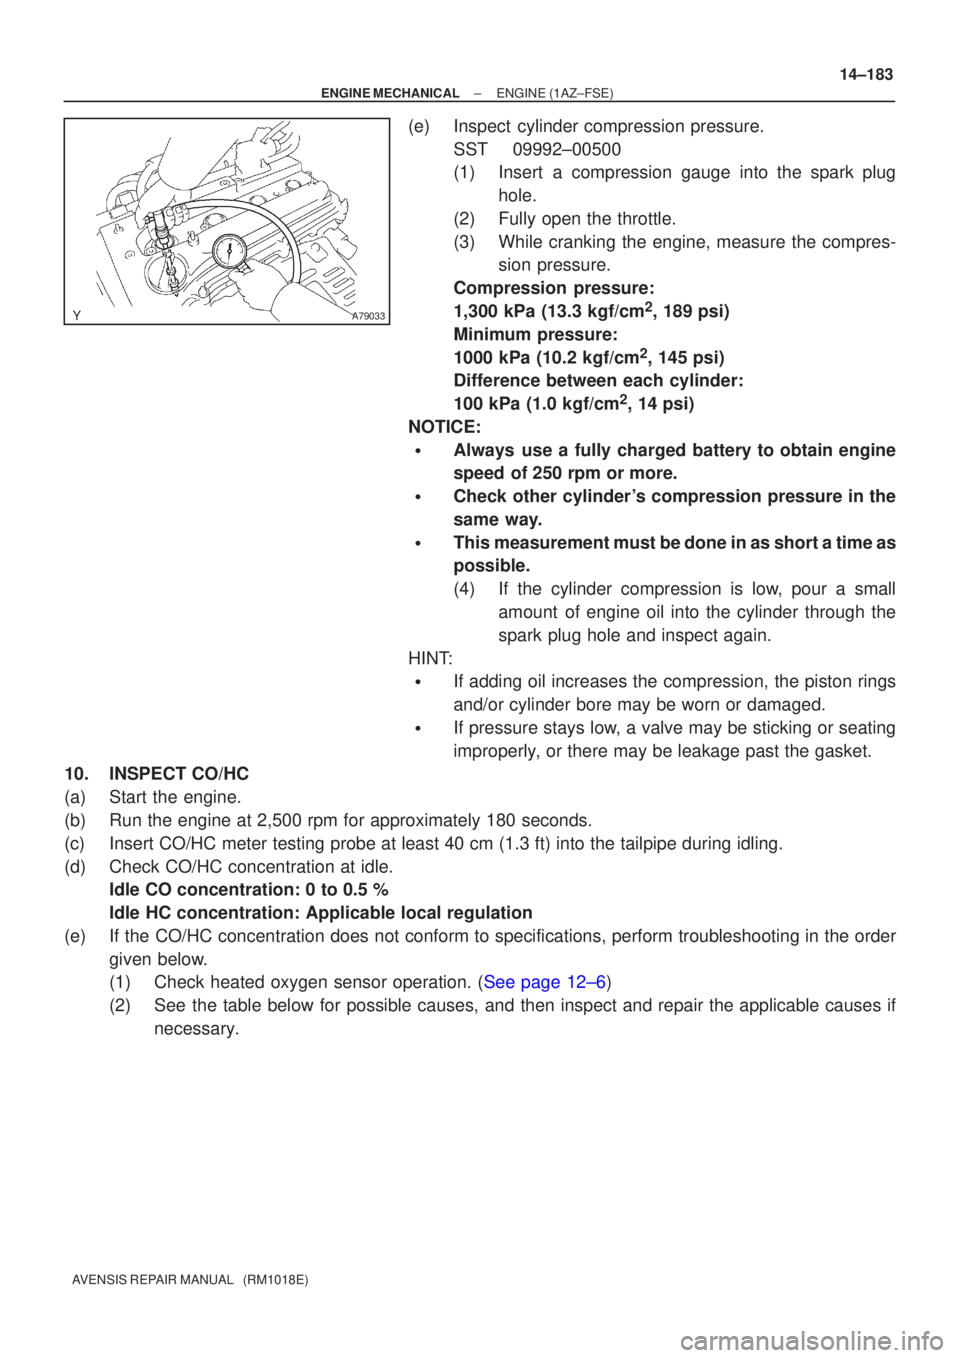
(e)Inspect cylinder compression pressure.
SST09992±00500
(1)Insert a compression gauge into the spark plughole.
(2)Fully open the throttle.
(3)While cranking the engine, measure the compres- sion pressure.
Compression pressure:
1,300 kPa (13.3 kgf/cm
2, 189 psi)
Minimum pressure:
1000 kPa (10.2 kgf/cm
2, 145 psi)
Difference between each cylinder:
100 kPa (1.0 kgf/cm
2, 14 psi)
NOTICE:
�Always use a fully charged battery to obtain engine
speed of 250 rpm or more.
�Check other cylinder's compression pressure in the
same way.
�This measurement must be done in as short a time as
possible.
(4)If the cylinder compression is low, pour a small amount of engine oil into the cylinder through the
spark plug hole and inspect again.
HINT:
�If adding oil increases the compression, the piston rings
and/or cylinder bore may be worn or damaged.
�If pressure stays low, a valve may be sticking or seating
improperly, or there may be leakage past the gasket.
10.INSPECT CO/HC
(a)Start the engine.
(b)Run the engine at 2,500 rpm for approximately 180 seconds.
(c)Insert CO/HC meter testing probe at least 40 cm (1.3 ft) into the tail\
pipe during idling.
(d)Check CO/HC concentration at idle. Idle CO concentration: 0 to 0.5 %
Idle HC concentration: Applicable local regulation
(e)If the CO/HC concentration does not conform to specifications, perform troubleshooting in the order given below.
(1)Check heated oxygen sensor operation. (See page 12±6)
(2) See the table below for possible causes, and then inspect and repair the applicable causes ifnecessary.
Page 2132 of 5135
141BI±01
A77421
Cut Position
A77422SST
14±180
±
ENGINE MECHANICAL ENGINE REAR OIL SEAL(1AZ±FE)
AVENSIS REPAIR MANUAL (RM1018E)
ENGINE REAR OIL SEAL(1AZ±FE)
REPLACEMENT
1.REMOVE MANUAL TRANSAXLE ASSY (M/T TRANSAXLE) (See page 41±24)
2.REMOVE AUTOMATIC TRANSAXLE ASSY (A/T TRANSAXLE) (See page 40±25)
3.REMOVE CLUTCH COVER ASSY (M/T TRANSAXLE) (See page 42±26)
4.REMOVE DRIVE PLATE AND RING GEAR OR FLYWHEEL (See page 14±121) SST09213±54015 (91651±60855), 09330±00021
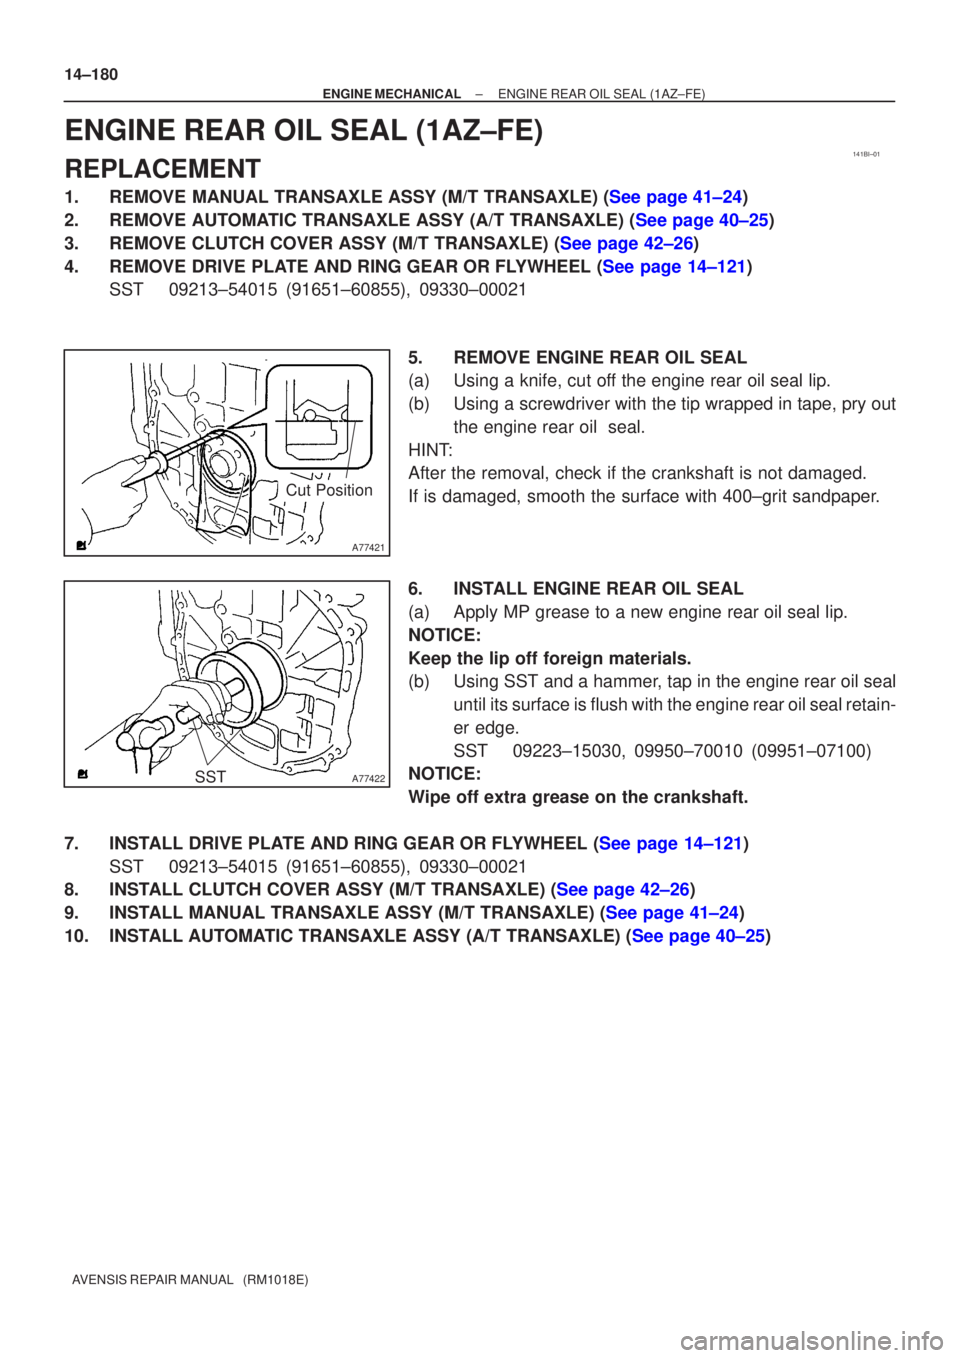
5.REMOVE ENGINE REAR OIL SEAL
(a)Using a knife, cut off the engine rear oil seal lip.
(b)Using a screwdriver with the tip wrapped in tape, pry outthe engine rear oil seal.
HINT:
After the removal, check if the crankshaft is not damaged.
If is damaged, smooth the surface with 400±grit sandpaper.
6.INSTALL ENGINE REAR OIL SEAL
(a)Apply MP grease to a new engine rear oil seal lip.
NOTICE:
Keep the lip off foreign materials.
(b)Using SST and a hammer, tap in the engine rear oil seal until its surface is flush with the engine rear oil seal retain-
er edge.
SST09223±15030, 09950±70010 (09951±07100)
NOTICE:
Wipe off extra grease on the crankshaft.
7.INSTALL DRIVE PLATE AND RING GEAR OR FLYWHEEL (See page 14±121) SST09213±54015 (91651±60855), 09330±00021
8.INSTALL CLUTCH COVER ASSY (M/T TRANSAXLE) (See page 42±26)
9.INSTALL MANUAL TRANSAXLE ASSY (M/T TRANSAXLE) (See page 41±24)
10.INSTALL AUTOMATIC TRANSAXLE ASSY (A/T TRANSAXLE) (See page 40±25)
Page 2133 of 5135
141BH±01
A77281
A13697
SST
SST
A77381
SST
14±178
±
ENGINE MECHANICAL TIMING GEAR CASE OR TIMING CHAIN CASE OIL
SEAL(1AZ±FE)
AVENSIS REPAIR MANUAL (RM1018E)
TIMING GEAR CASE OR TIMING CHAIN CASE OIL
SEAL(1AZ±FE)
REPLACEMENT
1.REMOVE FRONT WHEEL RH
2.REMOVE RADIATOR SUPPORT OPENING COVER
3.REMOVE ENGINE ROOM COVER SIDE
4.REMOVE ENGINE UNDER COVER RH 5.REMOVE ENGINE COVER SUB±ASSY NO.1
(a)Remove the 2 nuts and the engine cover No. 1.
6.REMOVE FAN AND GENERATOR V BELT (See page 14±105) SST 09249±63010
7. REMOVE CRANKSHAFT PULLEY
(a) Using SST, loosen the pulley bolt.SST 09213±54015 (91651±60855), 09330±00021,
(b) Using SST, remove the crankshaft pulley. SST 09950±50013 (09951±05010, 09952±05010, 09953±05020, 09954±05021)
Page 2134 of 5135
A77418
Cut Position
A77419
SST
A77420
SST
SST
±
ENGINE MECHANICAL TIMING GEAR CASE OR TIMING CHAIN CASE OIL
SEAL(1AZ±FE)14±179
AVENSIS REPAIR MANUAL (RM1018E)
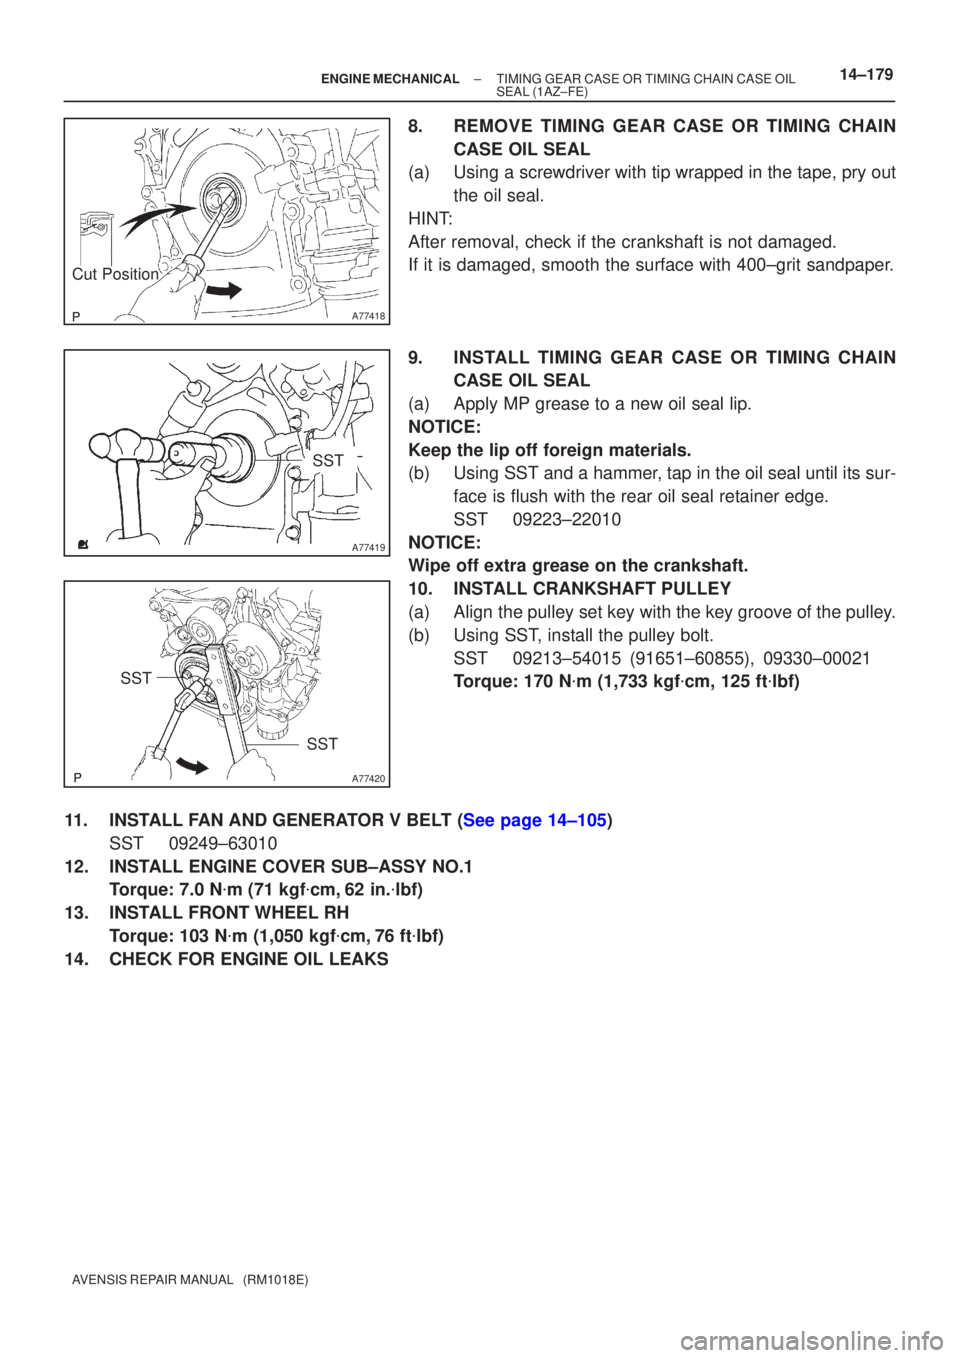
8.REMOVE TIMING GEAR CASE OR TIMING CHAIN
CASE OIL SEAL
(a)Using a screwdriver with tip wrapped in the tape, pry out
the oil seal.
HINT:
After removal, check if the crankshaft is not damaged.
If it is damaged, smooth the surface with 400±grit sandpaper.
9.INSTALL TIMING GEAR CASE OR TIMING CHAIN CASE OIL SEAL
(a)Apply MP grease to a new oil seal lip.
NOTICE:
Keep the lip off foreign materials.
(b)Using SST and a hammer, tap in the oil seal until its sur- face is flush with the rear oil seal retainer edge.
SST09223±22010
NOTICE:
Wipe off extra grease on the crankshaft.
10.INSTALL CRANKSHAFT PULLEY
(a)Align the pulley set key with the key groove of the pulley.
(b)Using SST, install the pulley bolt. SST09213±54015 (91651±60855), 09330±00021
Torque: 170 N �m (1,733 kgf �cm, 125 ft �lbf)
11.INSTALL FAN AND GENERATOR V BELT (See page 14±105) SST 09249±63010
12. INSTALL ENGINE COVER SUB±ASSY NO.1 Torque: 7.0 N �m (71 kgf �cm, 62 in. �lbf)
13. INSTALL FRONT WHEEL RH Torque: 103 N �m (1,050 kgf �cm, 76 ft �lbf)
14. CHECK FOR ENGINE OIL LEAKS
Page 2135 of 5135
141BK±01
A77281
A77283
A77284
± ENGINE MECHANICALCAMSHAFT (1AZ±FE)
14±171
AVENSIS REPAIR MANUAL (RM1018E)
REPLACEMENT
1. REMOVE RADIATOR SUPPORT OPENING COVER
2. REMOVE ENGINE ROOM COVER SIDE
3. REMOVE ENGINE UNDER COVER RH
4. REMOVE ENGINE COVER SUB±ASSY NO.1
(a) Remove the 2 nuts and the engine cover No. 1.
5. REMOVE IGNITION COIL ASSY
(a) Remove 4 bolts and the ignition coils.
6. REMOVE CYLINDER HEAD COVER SUB±ASSY
(a) Disconnect the 2 PCV hoses from the cylinder head cov-
er.
(b) Remove the 8 bolts and 2 nuts, and then remove the cylin-
der head cover and gasket.
7. SET NO. 1 CYLINDER TO TDC/COMPRESSION
(a) Turn the crankshaft pulley, and align its timing notch with
timing mark 0 of the timing chain cover.
Page 2137 of 5135
A52473
A77309
15973
481062
A56228
A77413
Advance
Side Port
± ENGINE MECHANICALCAMSHAFT (1AZ±FE)
14±173
AVENSIS REPAIR MANUAL (RM1018E)
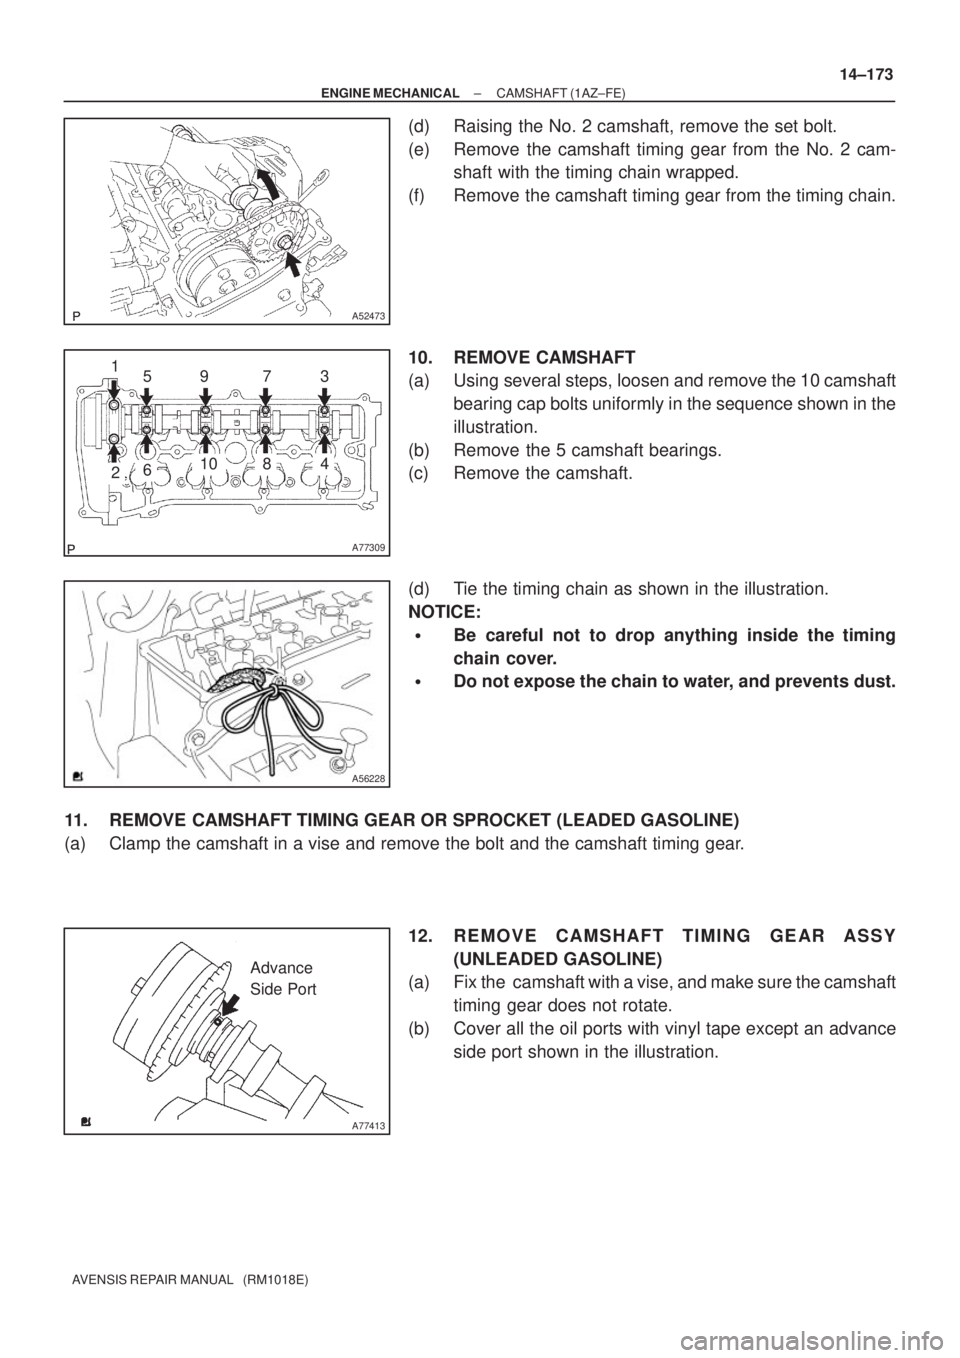
(d) Raising the No. 2 camshaft, remove the set bolt.
(e) Remove the camshaft timing gear from the No. 2 cam-
shaft with the timing chain wrapped.
(f) Remove the camshaft timing gear from the timing chain.
10. REMOVE CAMSHAFT
(a) Using several steps, loosen and remove the 10 camshaft
bearing cap bolts uniformly in the sequence shown in the
illustration.
(b) Remove the 5 camshaft bearings.
(c) Remove the camshaft.
(d) Tie the timing chain as shown in the illustration.
NOTICE:
�Be careful not to drop anything inside the timing
chain cover.
�Do not expose the chain to water, and prevents dust.
11. REMOVE CAMSHAFT TIMING GEAR OR SPROCKET (LEADED GASOLINE)
(a) Clamp the camshaft in a vise and remove the bolt and the camshaft timing gear.
12. REMOVE CAMSHAFT TIMING GEAR ASSY
(UNLEADED GASOLINE)
(a) Fix the camshaft with a vise, and make sure the camshaft
timing gear does not rotate.
(b) Cover all the oil ports with vinyl tape except an advance
side port shown in the illustration.
Page 2138 of 5135
A31032
A32639
A77414
Straight
Pin
Key
Groove 14±174
± ENGINE MECHANICALCAMSHAFT (1AZ±FE)
AVENSIS REPAIR MANUAL (RM1018E)
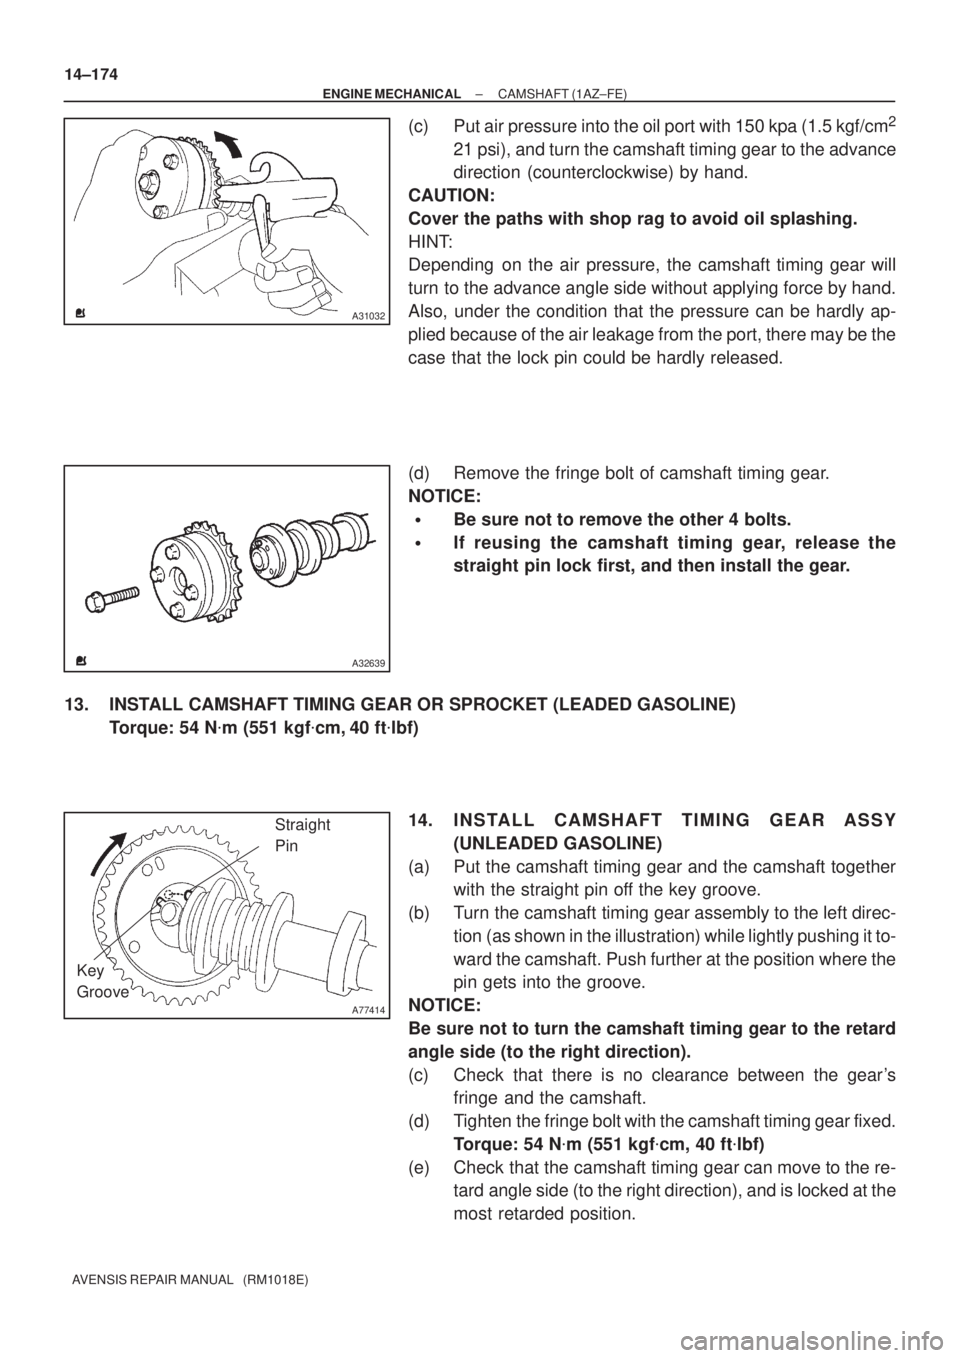
(c) Put air pressure into the oil port with 150 kpa (1.5 kgf/cm2
21 psi), and turn the camshaft timing gear to the advance
direction (counterclockwise) by hand.
CAUTION:
Cover the paths with shop rag to avoid oil splashing.
HINT:
Depending on the air pressure, the camshaft timing gear will
turn to the advance angle side without applying force by hand.
Also, under the condition that the pressure can be hardly ap-
plied because of the air leakage from the port, there may be the
case that the lock pin could be hardly released.
(d) Remove the fringe bolt of camshaft timing gear.
NOTICE:
�Be sure not to remove the other 4 bolts.
�If reusing the camshaft timing gear, release the
straight pin lock first, and then install the gear.
13. INSTALL CAMSHAFT TIMING GEAR OR SPROCKET (LEADED GASOLINE)
Torque: 54 N�m (551 kgf�cm, 40 ft�lbf)
14. INSTALL CAMSHAFT TIMING GEAR ASSY
(UNLEADED GASOLINE)
(a) Put the camshaft timing gear and the camshaft together
with the straight pin off the key groove.
(b) Turn the camshaft timing gear assembly to the left direc-
tion (as shown in the illustration) while lightly pushing it to-
ward the camshaft. Push further at the position where the
pin gets into the groove.
NOTICE:
Be sure not to turn the camshaft timing gear to the retard
angle side (to the right direction).
(c) Check that there is no clearance between the gear's
fringe and the camshaft.
(d) Tighten the fringe bolt with the camshaft timing gear fixed.
Torque: 54 N�m (551 kgf�cm, 40 ft�lbf)
(e) Check that the camshaft timing gear can move to the re-
tard angle side (to the right direction), and is locked at the
most retarded position.
Page 2141 of 5135
A77396
HookPin
Turn
Disconnect
A77397
Push
Turn
Plunger
A77399
Seal Packing
A77400NutNut
A
BC A
AAAB
± ENGINE MECHANICALCAMSHAFT (1AZ±FE)
14±177
AVENSIS REPAIR MANUAL (RM1018E)
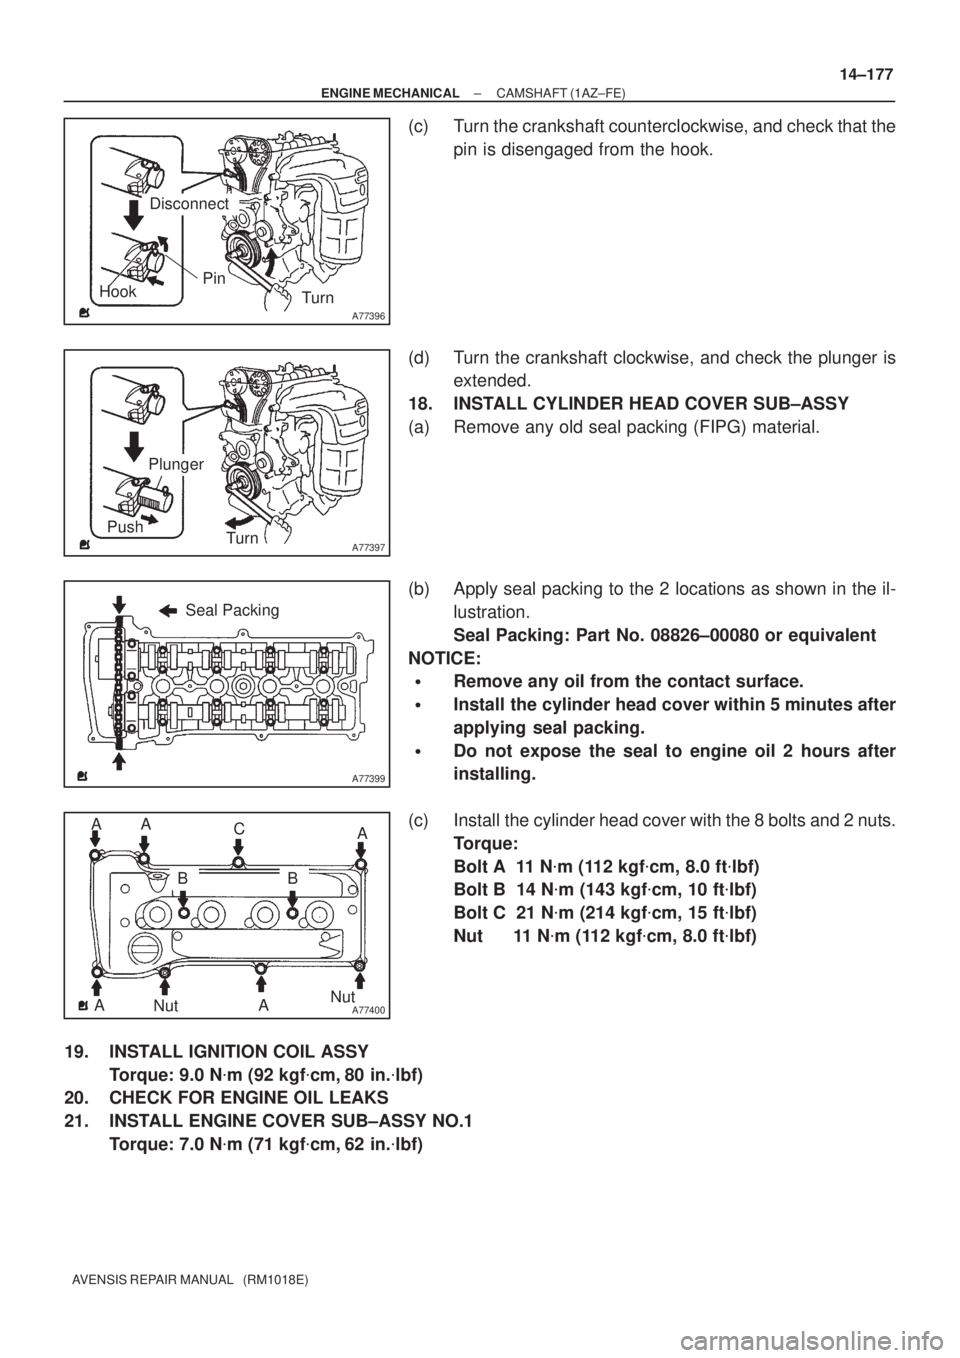
(c) Turn the crankshaft counterclockwise, and check that the
pin is disengaged from the hook.
(d) Turn the crankshaft clockwise, and check the plunger is
extended.
18. INSTALL CYLINDER HEAD COVER SUB±ASSY
(a) Remove any old seal packing (FIPG) material.
(b) Apply seal packing to the 2 locations as shown in the il-
lustration.
Seal Packing: Part No. 08826±00080 or equivalent
NOTICE:
�Remove any oil from the contact surface.
�Install the cylinder head cover within 5 minutes after
applying seal packing.
�Do not expose the seal to engine oil 2 hours after
installing.
(c) Install the cylinder head cover with the 8 bolts and 2 nuts.
Torque:
Bolt A 11 N�m (112 kgf�cm, 8.0 ft�lbf)
Bolt B 14 N�m (143 kgf�cm, 10 ft�lbf)
Bolt C 21 N�m (214 kgf�cm, 15 ft�lbf)
Nut 11 N�m (112 kgf�cm, 8.0 ft�lbf)
19. INSTALL IGNITION COIL ASSY
Torque: 9.0 N�m (92 kgf�cm, 80 in.�lbf)
20. CHECK FOR ENGINE OIL LEAKS
21. INSTALL ENGINE COVER SUB±ASSY NO.1
Torque: 7.0 N�m (71 kgf�cm, 62 in.�lbf)