Page 1245 of 5135
I37732
1 23 4
5 67 8
F/P
P1
I37734
12 F17
I37734
12F17
±
DIAGNOSTICS COMBUSTION TYPE POWER HEATER SYSTEM
05±1177
AVENSIS REPAIR MANUAL (RM1018E)
1CHECK WIRE HARNESS(POWER HEATER ECU ± BODY GROUND)
(a)Check for short circuit in harness and connector between
terminal F/P of power heater ECU and body ground
(See page 01±32).
NG REPAIR OR REPLACE WIRE HARNESS
OK
2 CHECK WIRE HARNESS(POWER HEATER ECU ± POWER HEATER FUEL PUMP)
(a) Check for an open or short circuit in harness and connec- tor betwen terminal 1 of power heater ECU and power
heater fuel pump (See page 01±32).
NG REPAIR OR REPLACE WIRE HARNESS
OK
3 CHECK WIRE HARNESS(POWER HEATER FUEL PUMP ± BODY GROUND)
(a) Check for an open circuit in harness and connector be- tween terminal 2 of power heater fuel pump and body
ground
(See page 01±32).
NG REPAIR OR REPLACE WIRE HARNESS
OK
Page 1246 of 5135
I36139
F17
05±1178
± DIAGNOSTICSCOMBUSTION TYPE POWER HEATER SYSTEM
AVENSIS REPAIR MANUAL (RM1018E)
4 INSPECT POWER HEATER FUEL PUMP
(a) Connect the positive (+) lead from the battery to terminal
1 and negative (±) to terminal 2 with the power heater
turned on and check the pressure of the hose by hand.
Standard: The pressure is applied to the hose.
NG REPAIR OR REPLACE POWER HEATER FUEL
PUMP
OK
PROCEED TO NEXT CIRCUIT INSPECTION SHOWN IN PROBLEM SYMPTOMS TABLE
Page 1247 of 5135
I36132
Center J/BP5
Power Heater SWPower Heater ECU
CB1
CK12
R±W G±Y G±Y
IE612
P13
SW
W±B
R±W36IG IN
2 E
Driver Side J/B
B±L
DN
DH5 1 IG1 Relay HTR
DC
DA9 6
DH1W±B
AM1
I13
Ignition SW
1 IG1 AM1 3G±R
Engine Room R/B No.3
ALT
ED11
B±L W
33
21
B
FL MAIN
Battery
IJ IKA
J15
J/C 53
12
G±Y
± DIAGNOSTICSCOMBUSTION TYPE POWER HEATER SYSTEM
05±1173
AVENSIS REPAIR MANUAL (RM1018E)
POWER HEATER SWITCH CIRCUIT
CIRCUIT DESCRIPTION
When the power heter switch is turned on, the power heater ECU sends the drive signal to the fuel pump,
causing the combustion type power heater to operate.
WIRING DIAGRAM
05C81±01
Page 1475 of 5135
± DIAGNOSTICSAUDIO SYSTEM
05±1419
AVENSIS REPAIR MANUAL (RM1018E)
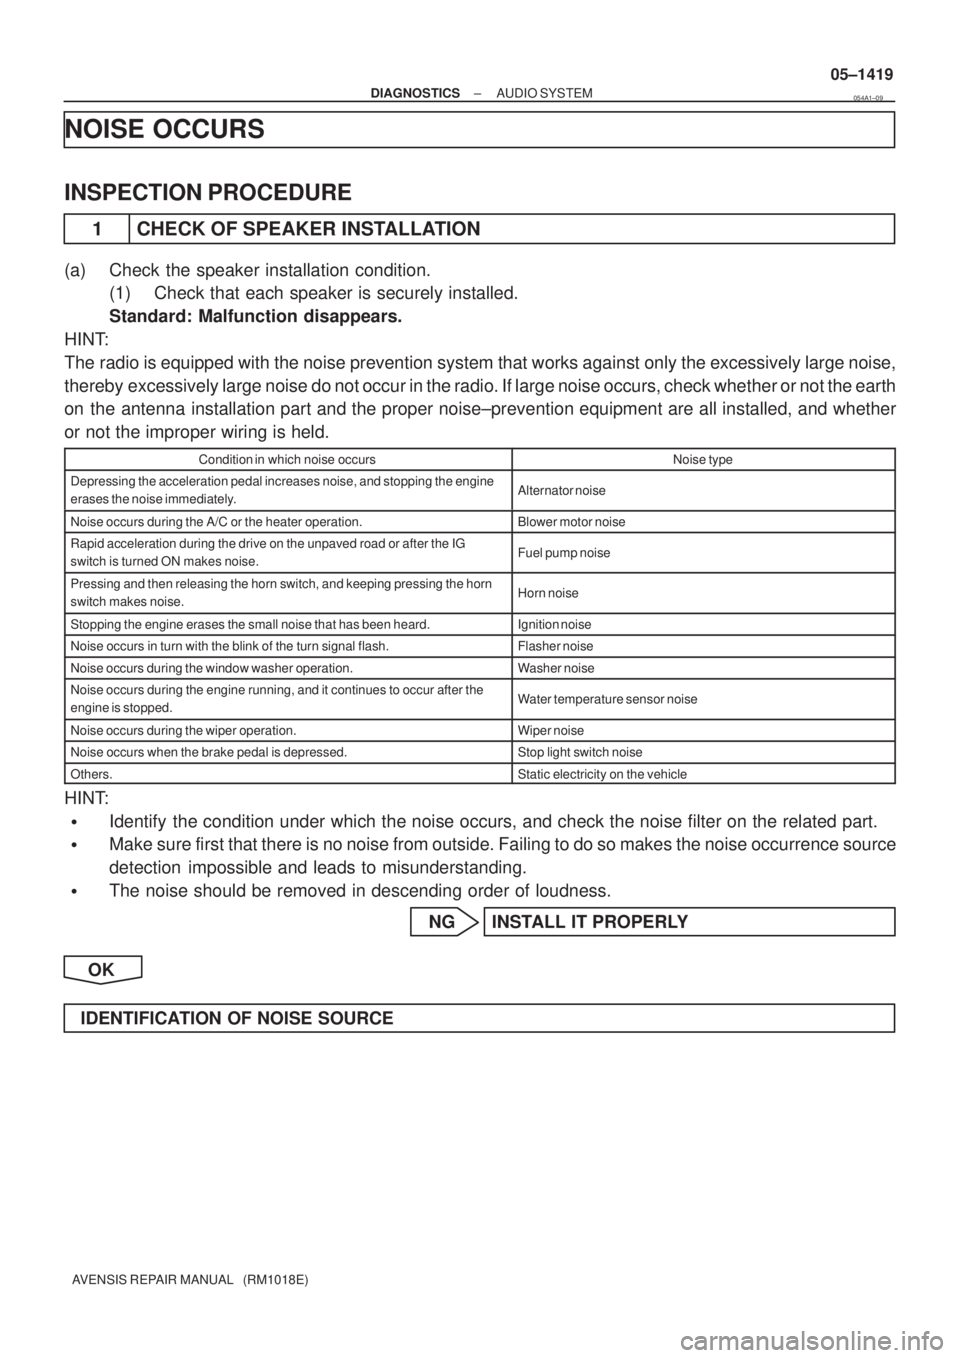
NOISE OCCURS
INSPECTION PROCEDURE
1 CHECK OF SPEAKER INSTALLATION
(a) Check the speaker installation condition.
(1) Check that each speaker is securely installed.
Standard: Malfunction disappears.
HINT:
The radio is equipped with the noise prevention system that works against only the excessively large noise,
thereby excessively large noise do not occur in the radio. If large noise occurs, check whether or not the earth
on the antenna installation part and the proper noise±prevention equipment are all installed, and whether
or not the improper wiring is held.
Condition in which noise occursNoise type
Depressing the acceleration pedal increases noise, and stopping the engine
erases the noise immediately.Alternator noise
Noise occurs during the A/C or the heater operation.Blower motor noise
Rapid acceleration during the drive on the unpaved road or after the IG
switch is turned ON makes noise.Fuel pump noise
Pressing and then releasing the horn switch, and keeping pressing the horn
switch makes noise.Horn noise
Stopping the engine erases the small noise that has been heard.Ignition noise
Noise occurs in turn with the blink of the turn signal flash.Flasher noise
Noise occurs during the window washer operation.Washer noise
Noise occurs during the engine running, and it continues to occur after the
engine is stopped.Water temperature sensor noise
Noise occurs during the wiper operation.Wiper noise
Noise occurs when the brake pedal is depressed.Stop light switch noise
Others.Static electricity on the vehicle
HINT:
�Identify the condition under which the noise occurs, and check the noise filter on the related part.
�Make sure first that there is no noise from outside. Failing to do so makes the noise occurrence source
detection impossible and leads to misunderstanding.
�The noise should be removed in descending order of loudness.
NG INSTALL IT PROPERLY
OK
IDENTIFICATION OF NOISE SOURCE
054A1±09
Page 1832 of 5135
100FL±01
A77917
A77918
(a)
(b)
A77919
10±34
±
ENGINE CONTROL SYSTEM KNOCK SENSOR(1AZ±FE)
AVENSIS REPAIR MANUAL (RM1018E)
REPLACEMENT
1.DISCHARGE FUEL SYSTEM PRESSURE (See page 11±15)
2.REMOVE ENGINE ROOM COVER SIDE (See page 10±26)
3.REMOVE RADIATOR SUPPORT OPENING COVER (See page 10±26)
4.ENGINE COOLANT (See page 16±19)
5.REMOVE ENGINE COVER SUB±ASSY NO.1 (See page 10±26)
6.REMOVE AIR CLEANER CAP SUB±ASSY (See page 10±26)
7.SEPARATE ACCELERATOR CONTROL CABLE ASSY (See page 10±26)
8.REMOVE THROTTLE BODY ASSY (See page 10±26)
9.DISCONNECT FUEL TUBE SUB±ASSY (See page 11±26) SST 09268±21010
10.REMOVE FUEL DELIVERY PIPE SUB±ASSY (See page 11±26)
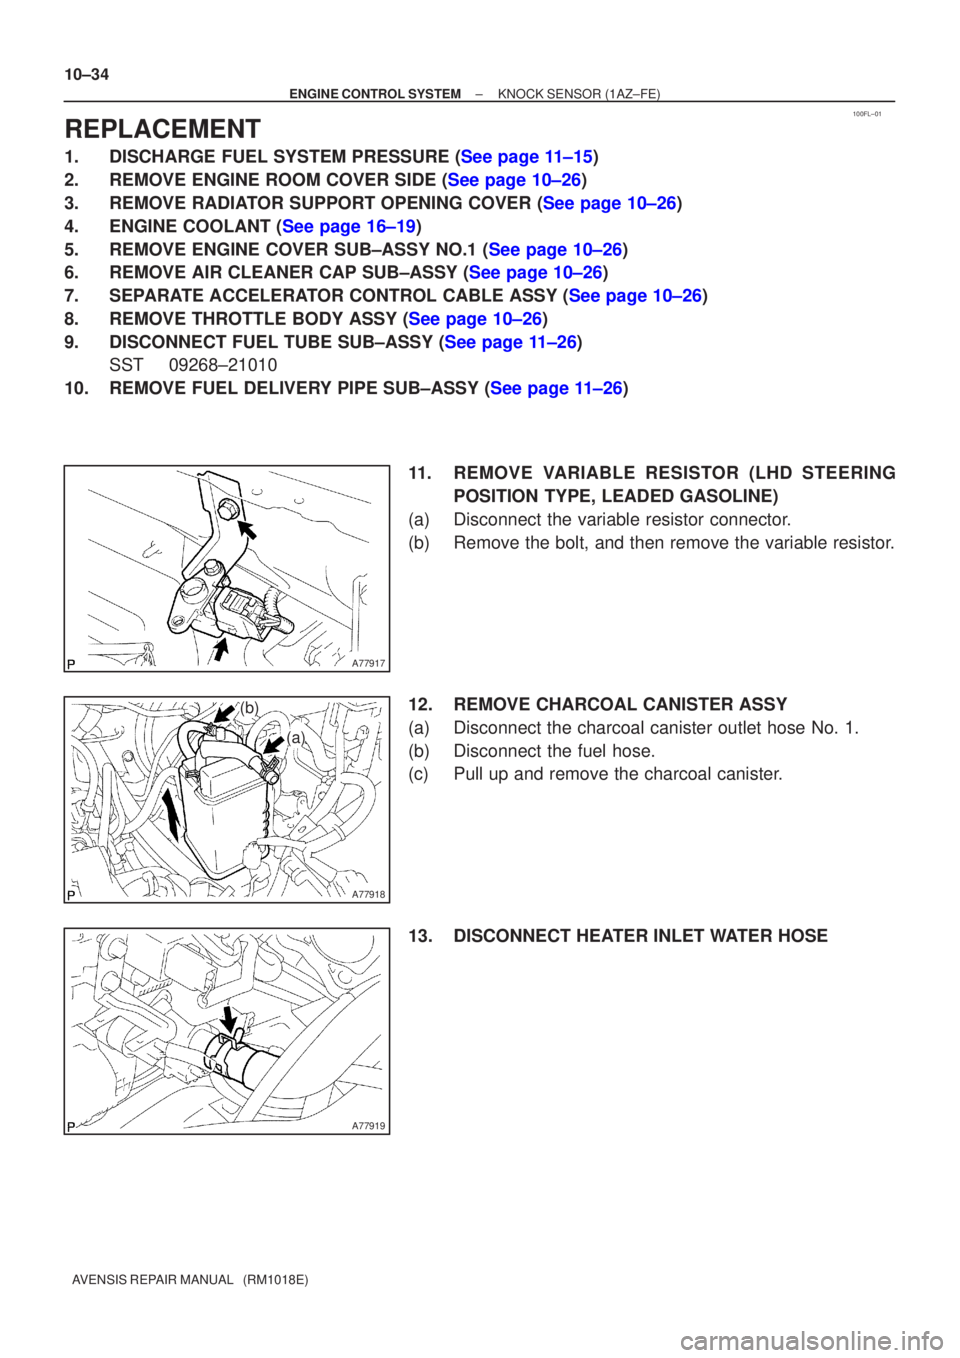
11. REMOVE VARIABLE RESISTOR (LHD STEERINGPOSITION TYPE, LEADED GASOLINE)
(a) Disconnect the variable resistor connector.
(b) Remove the bolt, and then remove the variable resistor.
12. REMOVE CHARCOAL CANISTER ASSY
(a) Disconnect the charcoal canister outlet hose No. 1.
(b) Disconnect the fuel hose.
(c) Pull up and remove the charcoal canister.
13. DISCONNECT HEATER INLET WATER HOSE
Page 1834 of 5135
10±36
±
ENGINE CONTROL SYSTEM KNOCK SENSOR(1AZ±FE)
AVENSIS REPAIR MANUAL (RM1018E)
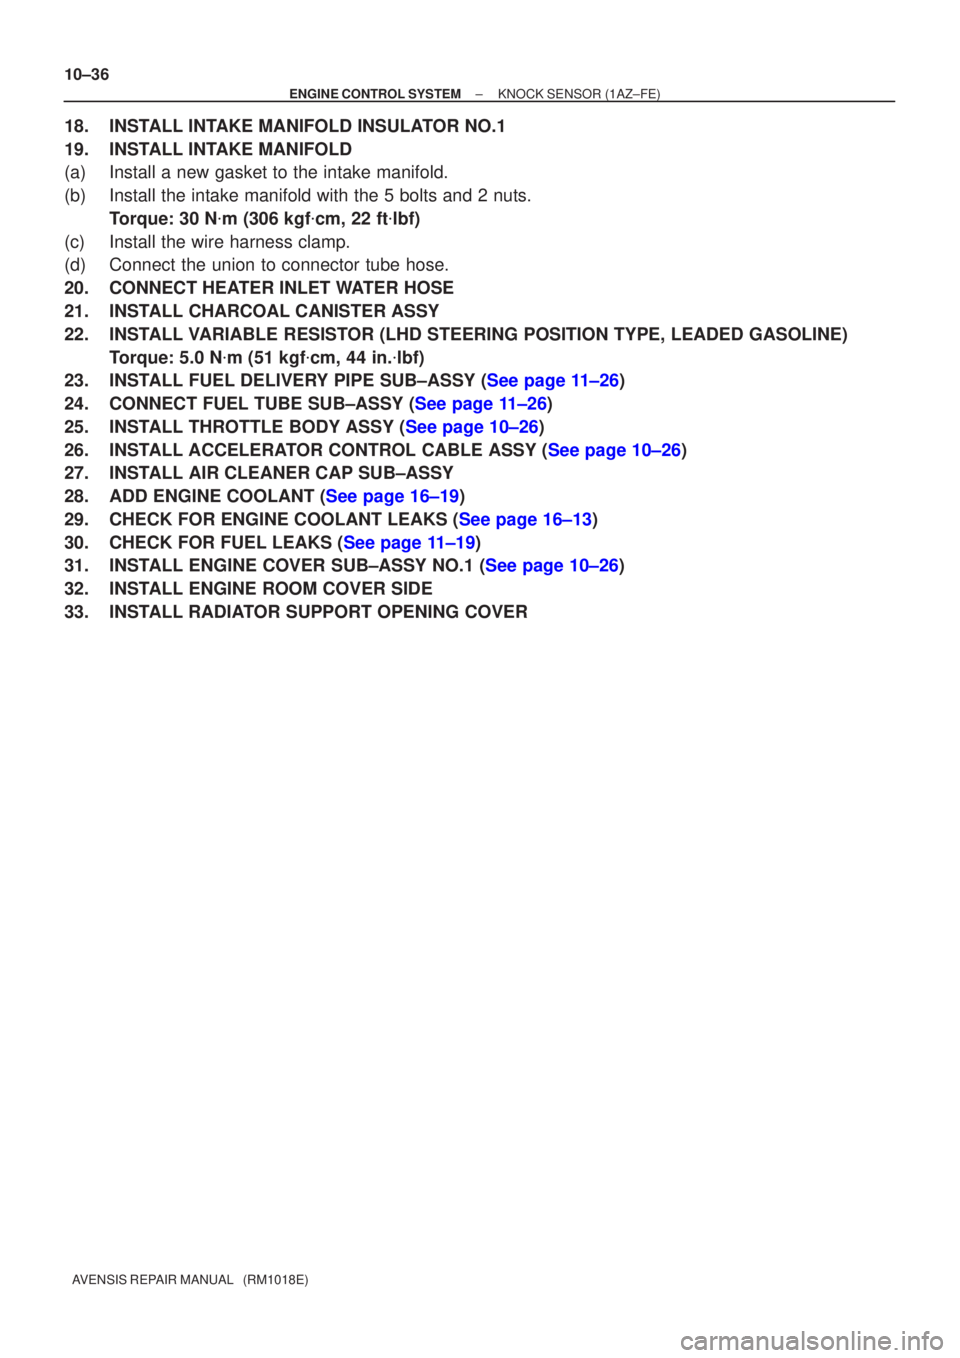
18.INSTALL INTAKE MANIFOLD INSULATOR NO.1
19.INSTALL INTAKE MANIFOLD
(a)Install a new gasket to the intake manifold.
(b)Install the intake manifold with the 5 bolts and 2 nuts. Torque: 30 N �m (306 kgf �cm, 22 ft �lbf)
(c)Install the wire harness clamp.
(d)Connect the union to connector tube hose.
20.CONNECT HEATER INLET WATER HOSE
21.INSTALL CHARCOAL CANISTER ASSY
22.INSTALL VARIABLE RESISTOR (LHD STEERING POSITION TYPE, LEADED GASOLINE) Torque: 5.0 N �m (51 kgf �cm, 44 in. �lbf)
23.INSTALL FUEL DELIVERY PIPE SUB±ASSY (See page 11±26)
24.CONNECT FUEL TUBE SUB±ASSY (See page 11±26)
25.INSTALL THROTTLE BODY ASSY (See page 10±26)
26.INSTALL ACCELERATOR CONTROL CABLE ASSY (See page 10±26)
27. INSTALL AIR CLEANER CAP SUB±ASSY
28.ADD ENGINE COOLANT (See page 16±19)
29.CHECK FOR ENGINE COOLANT LEAKS (See page 16±13)
30.CHECK FOR FUEL LEAKS (See page 11±19)
31.INSTALL ENGINE COVER SUB±ASSY NO.1 (See page 10±26)
32. INSTALL ENGINE ROOM COVER SIDE
33. INSTALL RADIATOR SUPPORT OPENING COVER
Page 1838 of 5135
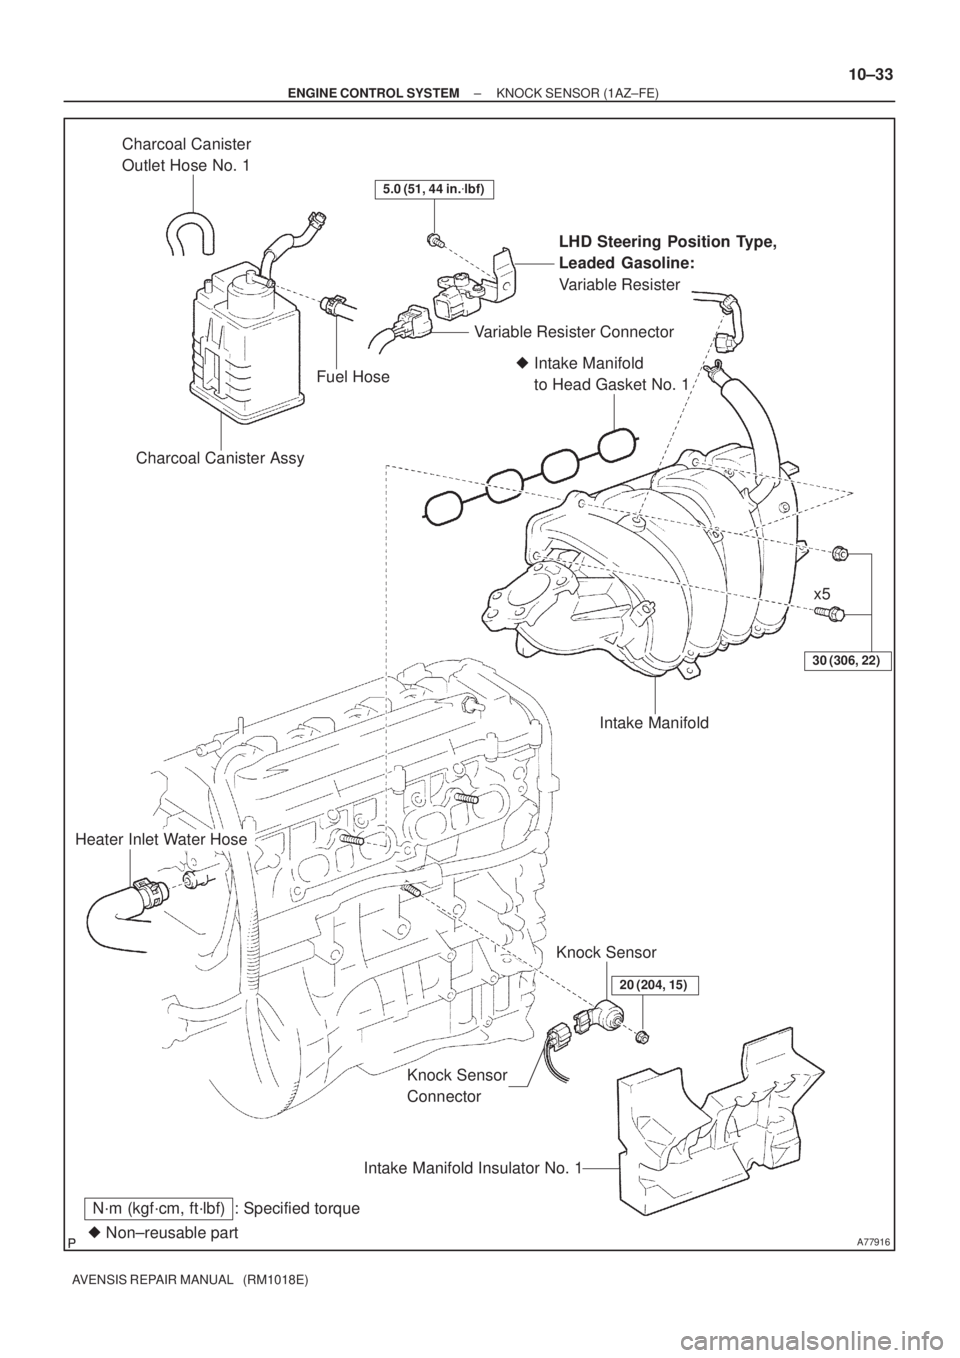
A77916� Non±reusable part
N´m (kgf´cm, ft´lbf) : Specified torque
30 (306, 22)
Heater Inlet Water Hose
Knock Sensor
ConnectorKnock Sensor
20 (204, 15)
Intake Manifold Insulator No. 1
� Intake Manifold
to Head Gasket No. 1
Intake Manifold
LHD Steering Position Type,
Leaded Gasoline:
Variable Resister
5.0 (51, 44 in.�lbf)
Charcoal Canister Assy
Variable Resister Connector
Charcoal Canister
Outlet Hose No. 1
Fuel Hose
x5
± ENGINE CONTROL SYSTEMKNOCK SENSOR (1AZ±FE)
10±33
AVENSIS REPAIR MANUAL (RM1018E)
Page 1839 of 5135
110UX±01
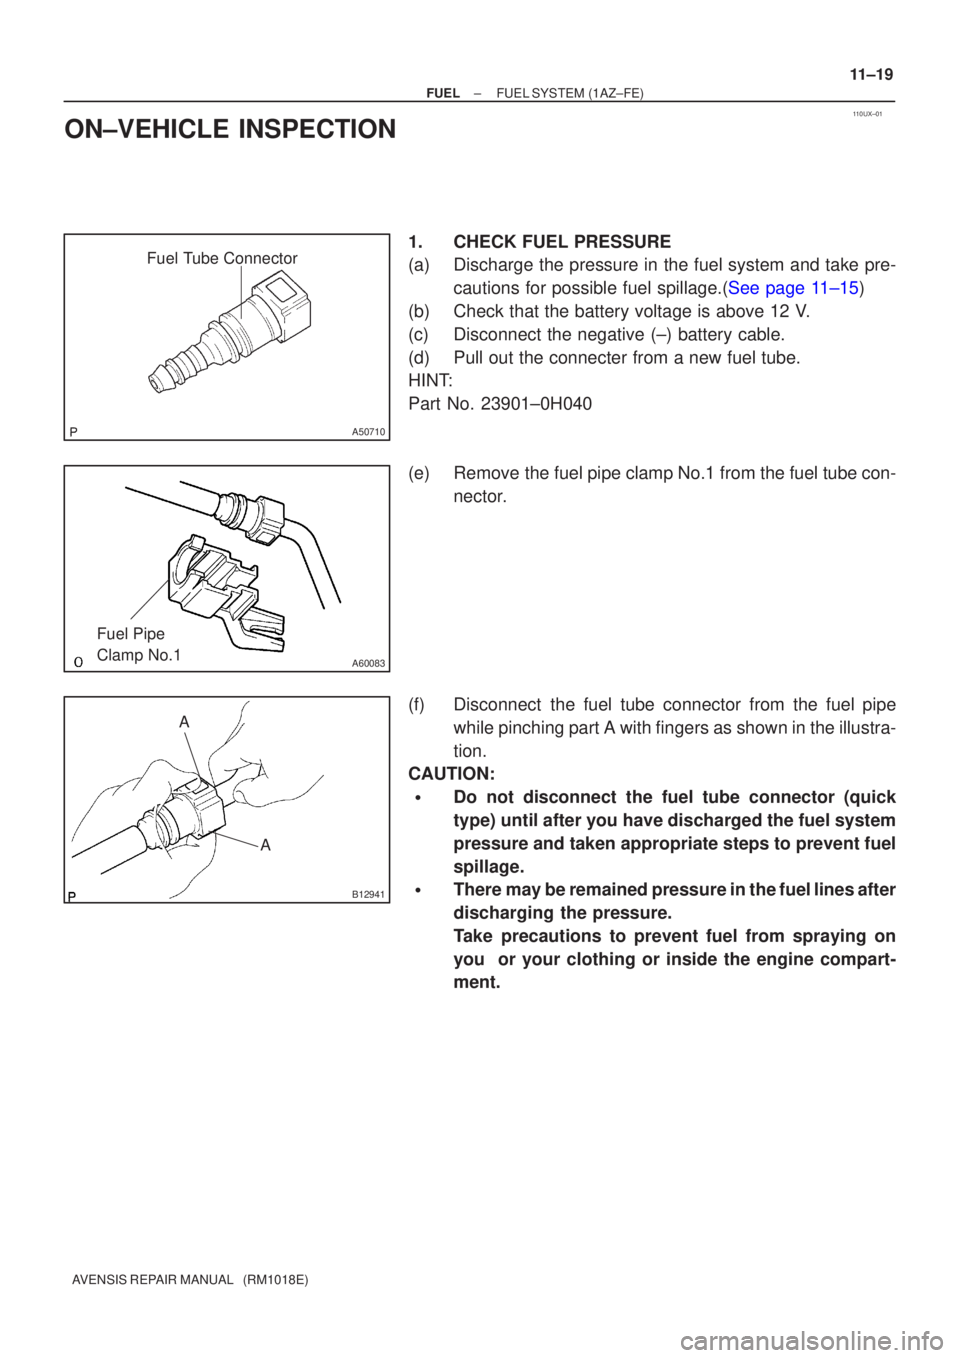
Fuel Tube Connector
A50710
A60083
Fuel Pipe
Clamp No.1
AA
B12941
±
FUEL FUEL SYSTEM(1AZ±FE)
11±19
AVENSIS REPAIR MANUAL (RM1018E)
ON±VEHICLE INSPECTION
1.CHECK FUEL PRESSURE
(a)Discharge the pressure in the fuel system and take pre-
cautions for possible fuel spillage.(See page 11±15)
(b) Check that the battery voltage is above 12 V.
(c) Disconnect the negative (±) battery cable.
(d) Pull out the connecter from a new fuel tube.
HINT:
Part No. 23901±0H040
(e) Remove the fuel pipe clamp No.1 from the fuel tube con- nector.
(f) Disconnect the fuel tube connector from the fuel pipe while pinching part A with fingers as shown in the illustra-
tion.
CAUTION:
�Do not disconnect the fuel tube connector (quick
type) until after you have discharged the fuel system
pressure and taken appropriate steps to prevent fuel
spillage.
�There may be remained pressure in the fuel lines after
discharging the pressure.
Take precautions to prevent fuel from spraying on
you or your clothing or inside the engine compart-
ment.