Page 2218 of 5135
A77314
A/T:
Clip
Transmission
Control Cable Assy
N´m (kgf´cm, ft´lbf)
: Specified torque
M/T:
Transmission Control
Cable Assy
5.0 (51, 44 in.�lbf)
12 (120, 9.0)
M/T:
Clutch Release
Cylinder Assy
12 (122, 8.9)
Clip
5.0 (51, 44 in.�lbf)
9.0 (92, 80 in.�lbf)
14±196
± ENGINE MECHANICALPARTIAL ENGINE ASSY (1AZ±FSE)
AVENSIS REPAIR MANUAL (RM1018E)
Page 2235 of 5135
A79419
N´m (kgf´cm, ft´lbf)
: Specified torque
� Non±reusable part
29 (296, 21)
80 (816, 59)
133 (1,348, 97)
43 (440, 32)
30 (302, 22)
43 (440, 32)
� Gasket
74 (755, 55)
49 (500, 36)
� Gasket � Cotter Pin V (Cooler Compressor
to Crankshaft pulley)
Belt No. 1Glove Compartment Door Assy
Steering Intermediate
Shaft Assy No. 2
Column Hole Cover Silencer Sheet
Front Stabilizer Link Assy LHClip
Tie Rod End Sub±assy LH
Front Axle Hub LH Nut
Front Suspension Member
Brace Rear LH
Compression
Spring
Floor Panel Brace Front Exhaust Pipe Assy Front
Compression Spring w/ A/C:
Compressor And Magnetic ClutchFront Drive Shaft Assy LHClip Transmission Control
Cable Assy
Clip
Clutch Accumulator Assy
Clutch Release Cylinder Assy
Transmission Control Cable Assy
35 (357, 26)
142 (1,448, 105)
Clip
± ENGINE MECHANICALPARTIAL ENGINE ASSY (1CD±FTV)
14±279
AVENSIS REPAIR MANUAL (RM1018E)
Page 2323 of 5135
A79178
A78277
±
ENGINE MECHANICAL PARTIAL ENGINE ASSY(1CD±FTV)
14±287
AVENSIS REPAIR MANUAL (RM1018E)
24.SEPARATE TRANSMISSION CONTROL CABLE ASSY
(a)Remove the 2 clips and 2 washers, separate the control cable assy.
25.REMOVE INJECTOR DRIVER
(a)Remove the 2 nuts which is used to secure the injector driver.
(b)Disconnect the injector driver connector and the harness clamp.
(c)Remove the injector driver.
26.DISCONNECT ENGINE WIRE
(a)Remove the glove compartment door.
(b)Disconnect the engine wire from the ECM and the junc-
tion block.
(c)Pull out the engine wire.
(d)Disconnect the engine wire from engine room junction block.
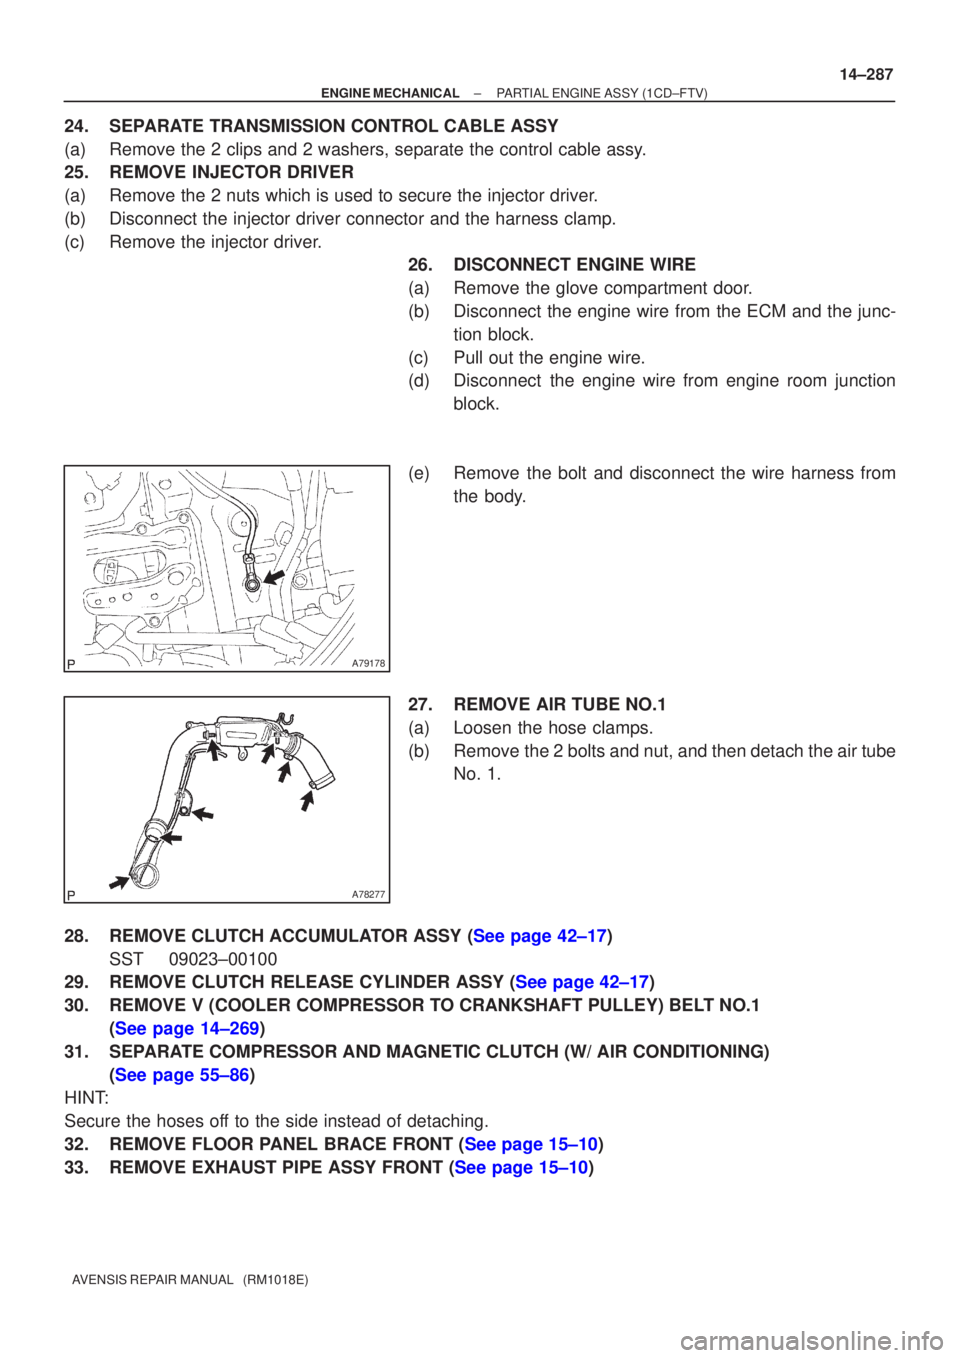
(e)Remove the bolt and disconnect the wire harness from the body.
27.REMOVE AIR TUBE NO.1
(a)Loosen the hose clamps.
(b)Remove the 2 bolts and nut, and then detach the air tube No. 1.
28.REMOVE CLUTCH ACCUMULATOR ASSY (See page 42±17) SST 09023±00100
29.REMOVE CLUTCH RELEASE CYLINDER ASSY (See page 42±17)
30. REMOVE V (COOLER COMPRESSOR TO CRANKSHAFT PULLEY) BELT NO.1
(See page 14±269)
31. SEPARATE COMPRESSOR AND MAGNETIC CLUTCH (W/ AIR CONDITIONING) (See page 55±86)
HINT:
Secure the hoses off to the side instead of detaching.
32.REMOVE FLOOR PANEL BRACE FRONT (See page 15±10)
33.REMOVE EXHAUST PIPE ASSY FRONT (See page 15±10)
Page 2342 of 5135
16±20
±
COOLING ENGINE COOLANT(1AZ±FE)
AVENSIS REPAIR MANUAL (RM1018E)
2.ADD ENGINE COOLANT
(a)Tighten the radiator drain plug, and pour coolant into radiator until it \
overflows. Capacity:
Transmission typeSteeringCoolant Capacity
[liters (US gts, lmp. gts)]
M/TLHD6.0 (6.3, 5.3)
M/TRHD6.1 (6.4, 5.4)
A/TLHD6.3 (6.7, 5.5)
A/TRHD6.4 (6.8, 5.6)
NOTICE:
�Do not use an alcohol type coolant or plain water alone.
�The coolant should be mixed with plain water (preferably demineralized wat\
er or distilled wa-
ter).
HINT:
�Use of improper coolants may damage engine cooling system.
�Use ºToyota Long Life Coolantº or equivalent and mix it with plain water ac\
cording to the manufactur-
er's directions.
�Using of coolant with includes more than 50 % (freezing protection down to ±\
35 �C (±31 �F)) or 60 %
(freezing protection down to ±50 �C (±58 �F)) of ethylene±glycol is recommended but not more than
70 %.
�Press the radiator inlet and outlet hose several times with hard.
�If the coolant level gets lower, pour coolant.
(b)Reinstall the radiator cap.
(c)Pour engine coolant into the reservoir tank until it reaches full line.
(d)Warm up the engine until the thermostat valve begins to open.
HINT:
Press the radiator inlet and outlet hose several times with hard during \
the warming up.
(e)Stop the engine and wait until the coolant temp. Gets cold. Then remove the radiator cap to check the coolant level.
HINT:
�If the level gets lower, perform the procedures above again.
�If the level does not gets lower, adjust the reservoir tank coolant level.
3.CHECK FOR ENGINE COOLANT LEAKS (See page 16±13)
Page 2353 of 5135
160MH±01
A64364
Radiator CapCylinder Block
Drain Cock Plug
Drain Pipe
Radiator
Drain Cock Plug
± COOLINGENGINE COOLANT (1ZZ±FE/3ZZ±FE)
16±7
AVENSIS REPAIR MANUAL (RM1018E)
ENGINE COOLANT (1ZZ±FE/3ZZ±FE)
REPLACEMENT
1. DRAIN ENGINE COOLANT
CAUTION:
To avoid the danger of being burned, do not remove the ra-
diator cap while the engine and radiator are still hot.
Thermal expansion will cause hot engine coolant and
steam to blow out from the radiator.
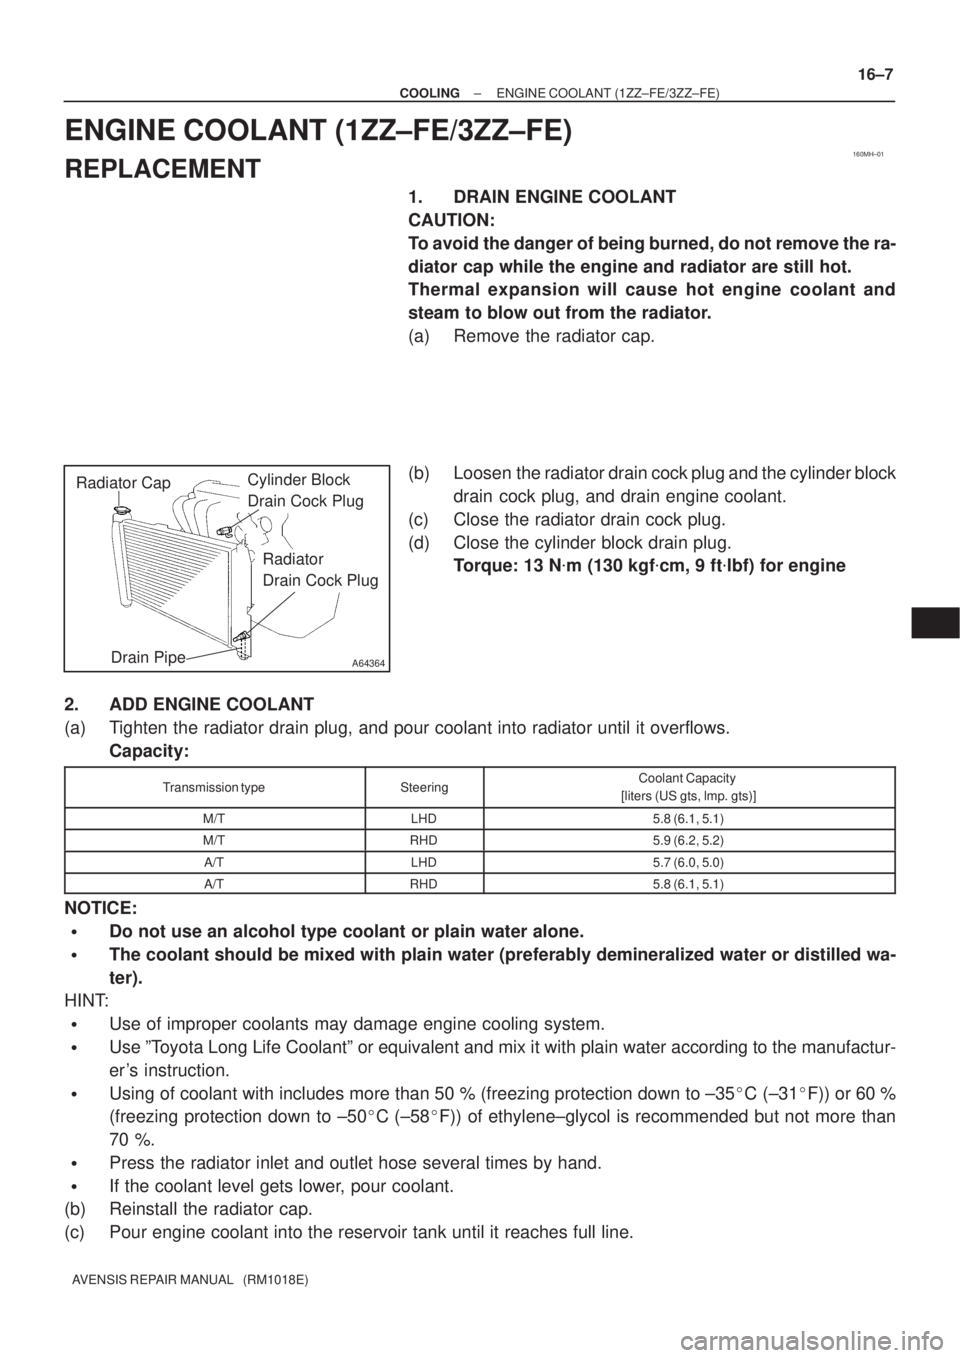
(a) Remove the radiator cap.
(b) Loosen the radiator drain cock plug and the cylinder block
drain cock plug, and drain engine coolant.
(c) Close the radiator drain cock plug.
(d) Close the cylinder block drain plug.
Torque: 13 N�m (130 kgf�cm, 9 ft�lbf) for engine
2. ADD ENGINE COOLANT
(a) Tighten the radiator drain plug, and pour coolant into radiator until it overflows.
Capacity:
Transmission typeSteeringCoolant Capacity
[liters (US gts, lmp. gts)]
M/TLHD5.8 (6.1, 5.1)
M/TRHD5.9 (6.2, 5.2)
A/TLHD5.7 (6.0, 5.0)
A/TRHD5.8 (6.1, 5.1)
NOTICE:
�Do not use an alcohol type coolant or plain water alone.
�The coolant should be mixed with plain water (preferably demineralized water or distilled wa-
ter).
HINT:
�Use of improper coolants may damage engine cooling system.
�Use ºToyota Long Life Coolantº or equivalent and mix it with plain water according to the manufactur-
er's instruction.
�Using of coolant with includes more than 50 % (freezing protection down to ±35�C (±31�F)) or 60 %
(freezing protection down to ±50�C (±58�F)) of ethylene±glycol is recommended but not more than
70 %.
�Press the radiator inlet and outlet hose several times by hand.
�If the coolant level gets lower, pour coolant.
(b) Reinstall the radiator cap.
(c) Pour engine coolant into the reservoir tank until it reaches full line.
Page 2386 of 5135
16±32
±
COOLING ENGINE COOLANT(1AZ±FSE)
AVENSIS REPAIR MANUAL (RM1018E)
2.ADD ENGINE COOLANT
(a)Tighten the radiator drain plug, and pour coolant into radiator until it \
overflows. Capacity:
Transmission typeSteeringCoolant Capacity
[liters (US gts, lmp. gts)]
M/TLHD6.0 (6.3, 5.3)
M/TRHD6.1 (6.4, 5.4)
A/TLHD6.3 (6.7, 5.5)
A/TRHD6.4 (6.8, 5.6)
NOTICE:
�Do not use an alcohol type coolant or plain water alone.
�The coolant should be mixed with plain water (preferably demineralized wat\
er or distilled wa-
ter).
HINT:
�Use of improper coolants may damage engine cooling system.
�Use ºToyota Long Life Coolantº or equivalent and mix it with plain water ac\
cording to the manufactur-
er's directions.
�Using of coolant with includes more than 50 % (freezing protection down to ±\
35 �C (±31 �F)) or 60 %
(freezing protection down to ±50 �C (±58 �F)) of ethylene±glycol is recommended but not more than
70 %.
�Press the radiator inlet and outlet hose several times with hard.
�If the coolant level gets lower, pour coolant.
(b)Reinstall the radiator cap.
(c)Pour engine coolant into the reservoir tank until it reaches full line.
(d)Warm up the engine until the thermostat valve begins to open.
HINT:
Press the radiator inlet and outlet hose several times with hard during \
the warming up.
(e)Stop the engine and wait until the coolant temp. Gets cold. Then remove the radiator cap to check the coolant level.
HINT:
�If the level gets lower, perform the procedures above again.
�If the level does not gets lower, adjust the reservoir tank coolant level.
3.CHECK FOR ENGINE COOLANT LEAKS(See page 16±25)
Page 2513 of 5135
C95317
C86742
C87504
C95318
± FRONT SUSPENSIONFRONT SUSPENSION ARM SUB±ASSY LOWER NO.1
LH (ATM)26±17
AVENSIS REPAIR MANUAL (RM1018E)
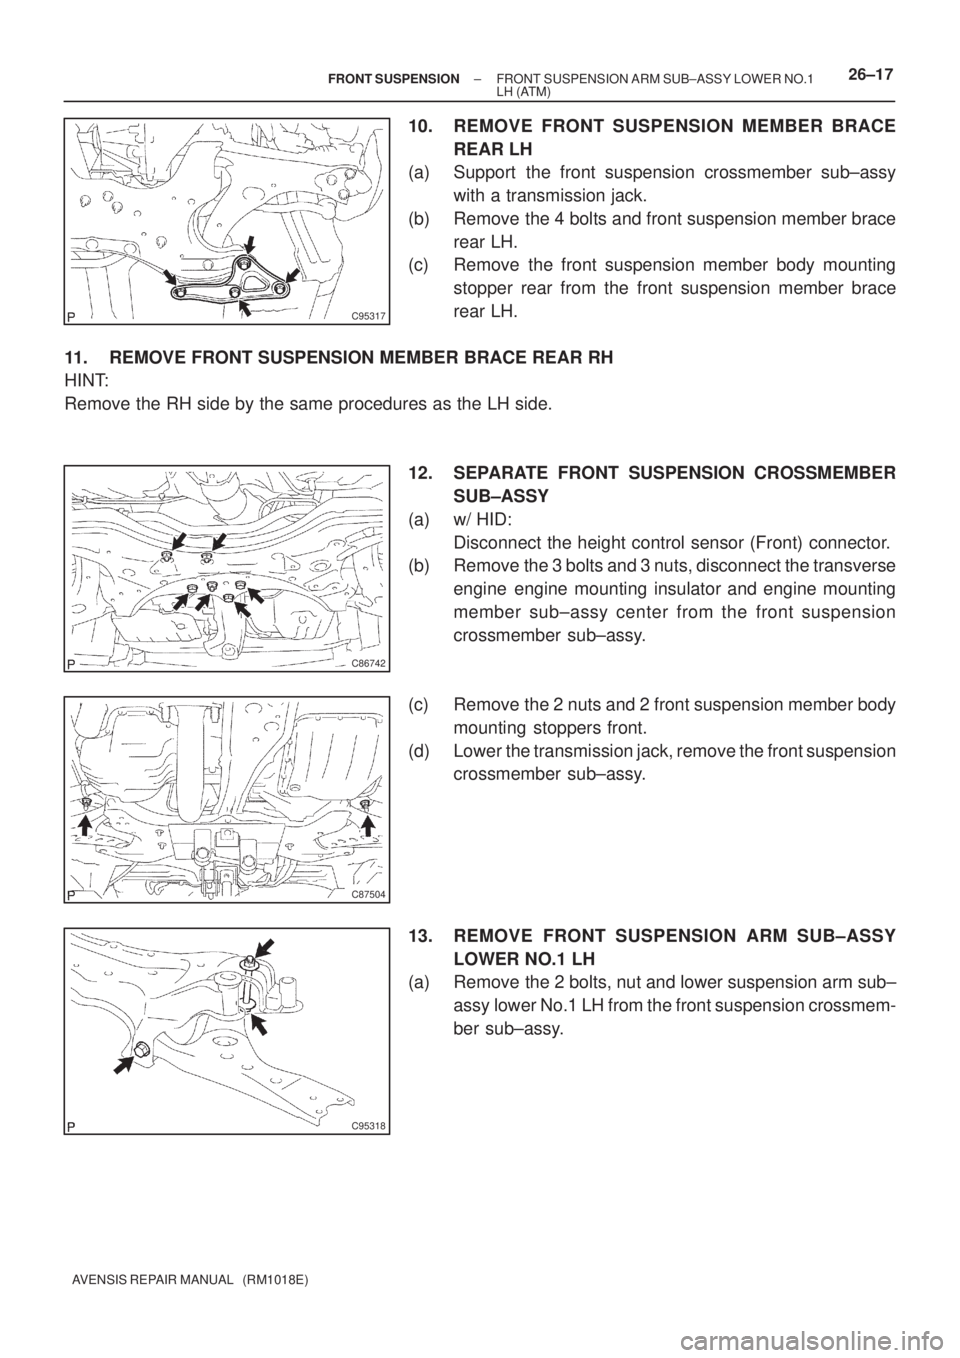
10. REMOVE FRONT SUSPENSION MEMBER BRACE
REAR LH
(a) Support the front suspension crossmember sub±assy
with a transmission jack.
(b) Remove the 4 bolts and front suspension member brace
rear LH.
(c) Remove the front suspension member body mounting
stopper rear from the front suspension member brace
rear LH.
11. REMOVE FRONT SUSPENSION MEMBER BRACE REAR RH
HINT:
Remove the RH side by the same procedures as the LH side.
12. SEPARATE FRONT SUSPENSION CROSSMEMBER
SUB±ASSY
(a) w/ HID:
Disconnect the height control sensor (Front) connector.
(b) Remove the 3 bolts and 3 nuts, disconnect the transverse
engine engine mounting insulator and engine mounting
member sub±assy center from the front suspension
crossmember sub±assy.
(c) Remove the 2 nuts and 2 front suspension member body
mounting stoppers front.
(d) Lower the transmission jack, remove the front suspension
crossmember sub±assy.
13. REMOVE FRONT SUSPENSION ARM SUB±ASSY
LOWER NO.1 LH
(a) Remove the 2 bolts, nut and lower suspension arm sub±
assy lower No.1 LH from the front suspension crossmem-
ber sub±assy.
Page 2514 of 5135
C95318
C87504
C86742
AA
AAB
B
C95317
AA
A
B
26±18
±
FRONT SUSPENSION FRONT SUSPENSION ARM SUB±ASSY LOWER NO.1
LH(ATM)
AVENSIS REPAIR MANUAL (RM1018E)
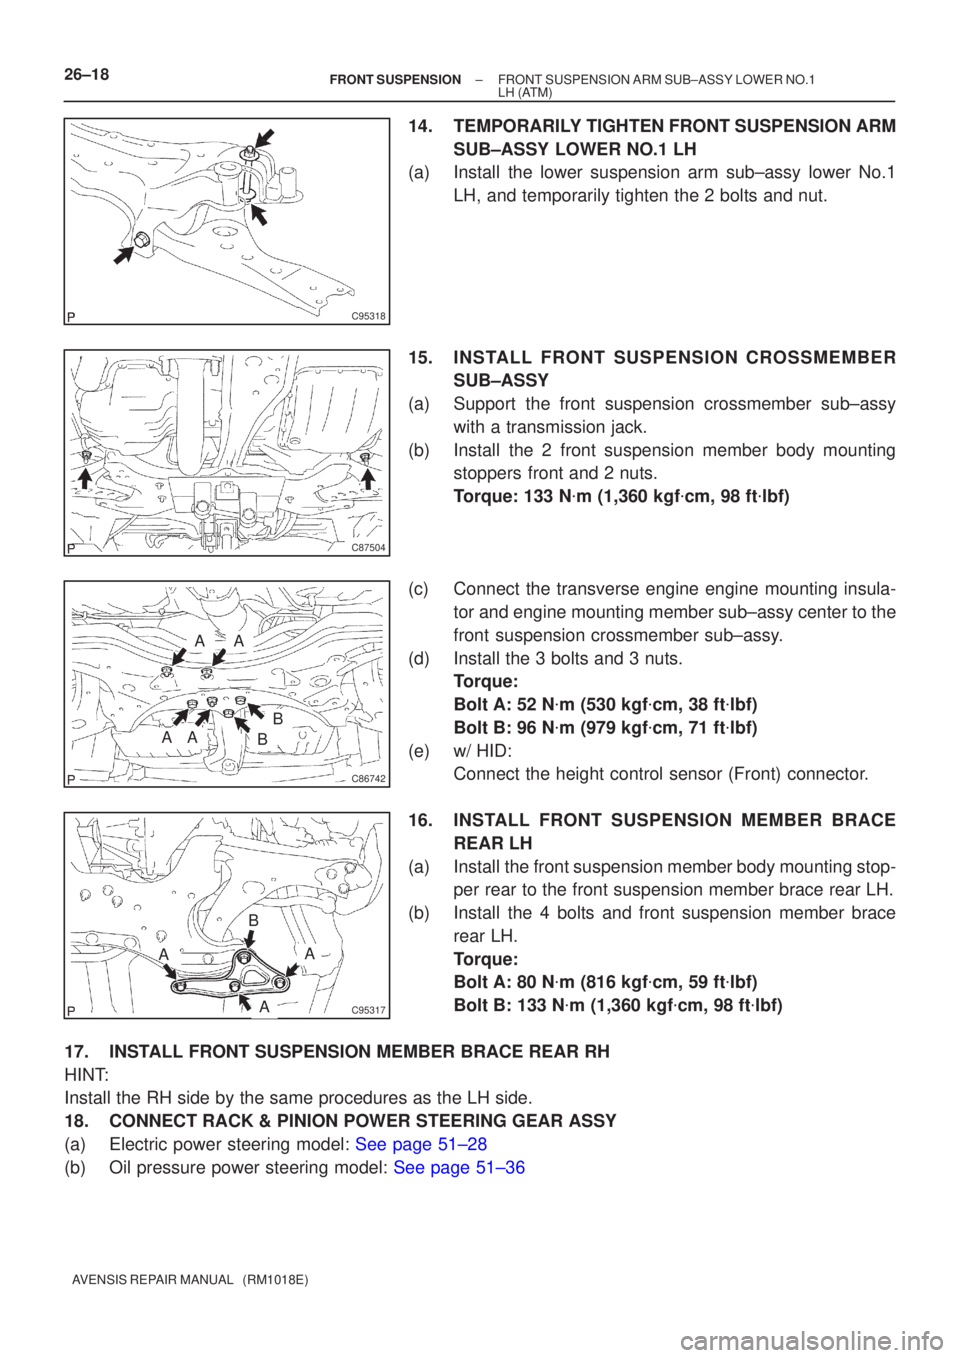
14.TEMPORARILY TIGHTEN FRONT SUSPENSION ARM SUB±ASSY LOWER NO.1 LH
(a)Install the lower suspension arm sub±assy lower No.1
LH, and temporarily tighten the 2 bolts and nut.
15.INSTALL FRONT SUSPENSION CROSSMEMBER SUB±ASSY
(a)Support the front suspension crossmember sub±assy with a transmission jack.
(b)Install the 2 front suspension member body mounting stoppers front and 2 nuts.
Torque: 133 N �m (1,360 kgf �cm, 98 ft �lbf)
(c)Connect the transverse engine engine mounting insula- tor and engine mounting member sub±assy center to the
front suspension crossmember sub±assy.
(d)Install the 3 bolts and 3 nuts. Torque:
Bolt A: 52 N �m (530 kgf �cm, 38 ft �lbf)
Bolt B: 96 N �m (979 kgf �cm, 71 ft �lbf)
(e)w/ HID: Connect the height control sensor (Front) connector.
16.INSTALL FRONT SUSPENSION ME MBER BRACE
REAR LH
(a)Install the front suspension member body mounting stop- per rear to the front suspension member brace rear LH.
(b)Install the 4 bolts and front suspension member brace rear LH.
Torque:
Bolt A: 80 N �m (816 kgf �cm, 59 ft �lbf)
Bolt B: 133 N �m (1,360 kgf �cm, 98 ft �lbf)
17.INSTALL FRONT SUSPENSION MEMBER BRACE REAR RH
HINT:
Install the RH side by the same procedures as the LH side.
18.CONNECT RACK & PINION POWER STEERING GEAR ASSY
(a)Electric power steering model: See page 51±28
(b)Oil pressure power steering model: See page 51±36