Page 4018 of 4555
LT-22
HEADLAMP - XENON TYPE -
3. Remove front turn signal lamps. Refer to LT- 9 4 , "Removal and
Installation of Front Turn Signal Lamp" .
4. Disconnect connector of headlamp and clearance lamp.
5. Remove front grille. Refer to EI-19, "
FRONT GRILLE" in
“EXTERIOR & INTERIOR (EI)” section.
6. Remove headlamp mounting bolts.
7. Pull headlamp forward the vehicle.
INSTALLATION
Installation is the reverse order of removal.
Disassembly and AssemblyEKS00N54
DISASSEMBLY
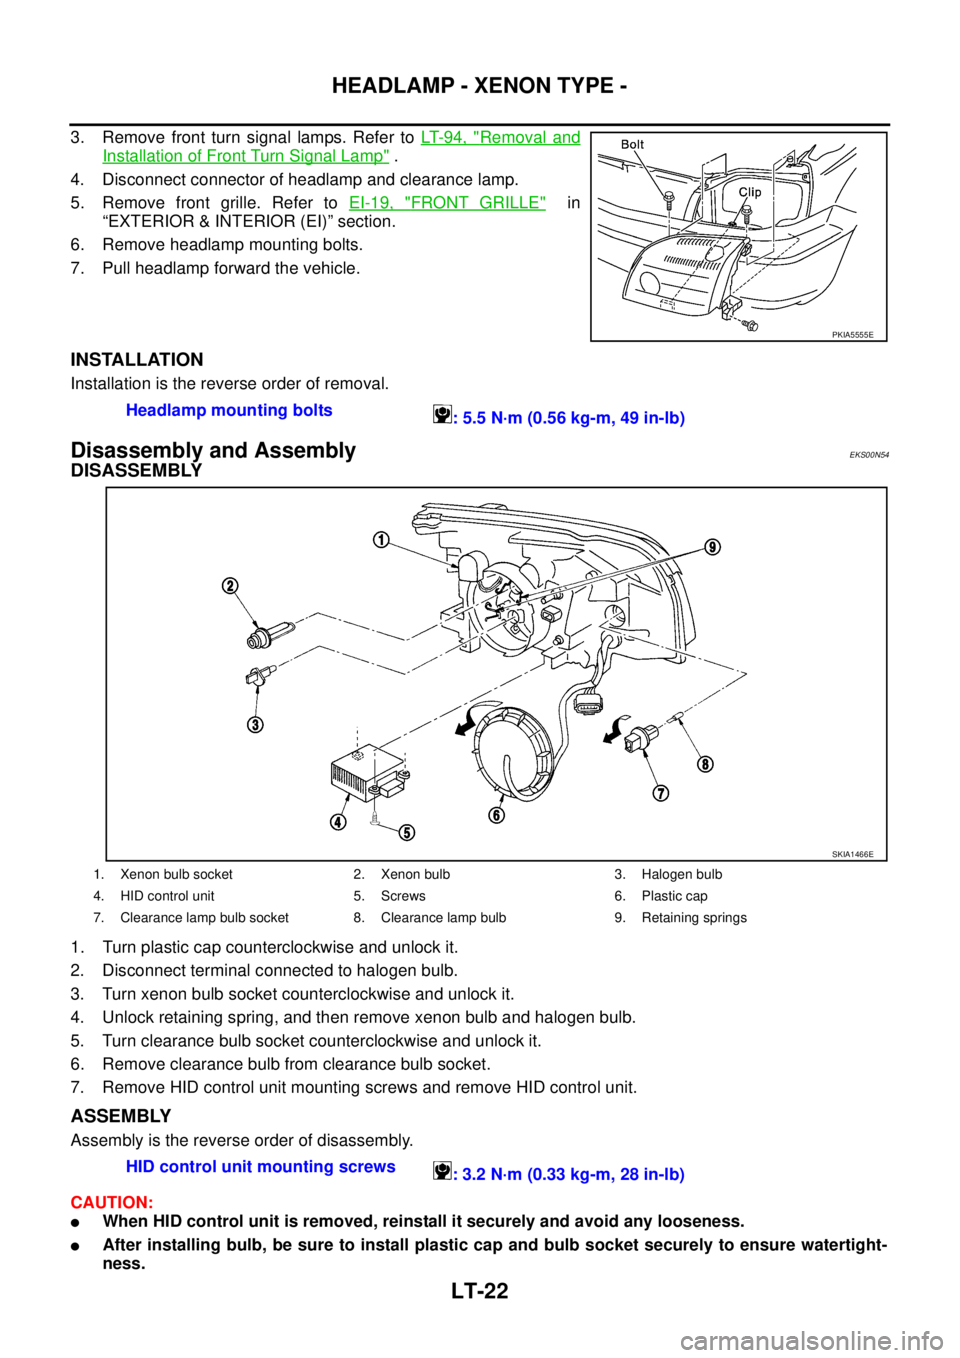
1. Turn plastic cap counterclockwise and unlock it.
2. Disconnect terminal connected to halogen bulb.
3. Turn xenon bulb socket counterclockwise and unlock it.
4. Unlock retaining spring, and then remove xenon bulb and halogen bulb.
5. Turn clearance bulb socket counterclockwise and unlock it.
6. Remove clearance bulb from clearance bulb socket.
7. Remove HID control unit mounting screws and remove HID control unit.
ASSEMBLY
Assembly is the reverse order of disassembly.
CAUTION:
�When HID control unit is removed, reinstall it securely and avoid any looseness.
�After installing bulb, be sure to install plastic cap and bulb socket securely to ensure watertight-
ness.
PKIA5555E
Headlamp mounting bolts
: 5.5 N·m (0.56 kg-m, 49 in-lb)
1. Xenon bulb socket 2. Xenon bulb 3. Halogen bulb
4. HID control unit 5. Screws 6. Plastic cap
7. Clearance lamp bulb socket 8. Clearance lamp bulb 9. Retaining springs
SKIA1466E
HID control unit mounting screws
: 3.2 N·m (0.33 kg-m, 28 in-lb)
Page 4033 of 4555
HEADLAMP - CONVENTIONAL TYPE -
LT-37
C
D
E
F
G
H
I
J
L
MA
B
LT
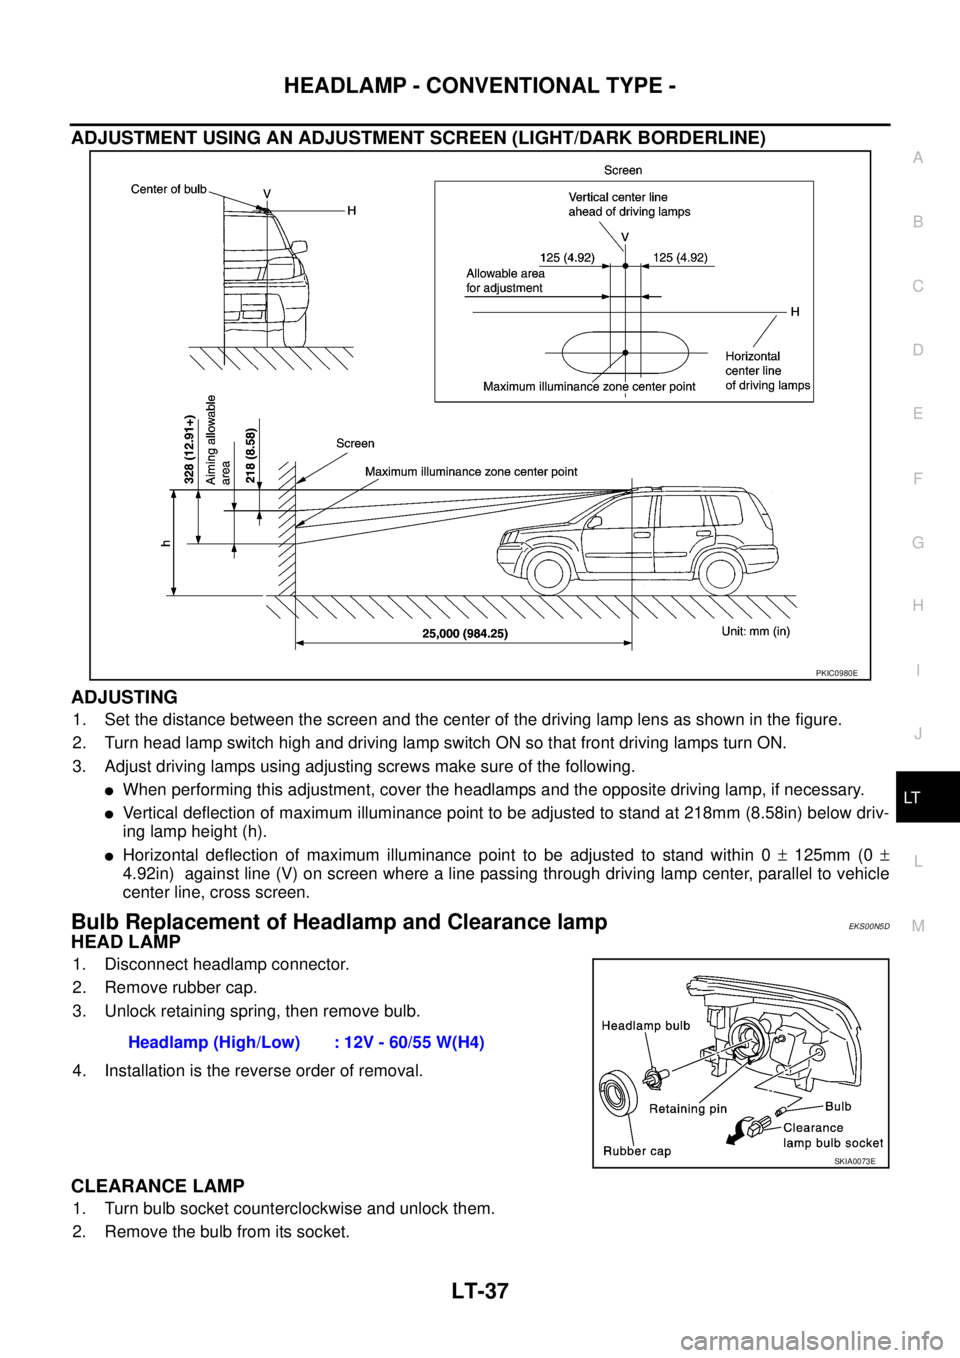
ADJUSTMENT USING AN ADJUSTMENT SCREEN (LIGHT/DARK BORDERLINE)
ADJUSTING
1. Set the distance between the screen and the center of the driving lamp lens as shown in the figure.
2. Turn head lamp switch high and driving lamp switch ON so that front driving lamps turn ON.
3. Adjust driving lamps using adjusting screws make sure of the following.
�When performing this adjustment, cover the headlamps and the opposite driving lamp, if necessary.
�Vertical deflection of maximum illuminance point to be adjusted to stand at 218mm (8.58in) below driv-
ing lamp height (h).
�Horizontal deflection of maximum illuminance point to be adjusted to stand within 0 ± 125mm (0 ±
4.92in) against line (V) on screen where a line passing through driving lamp center, parallel to vehicle
center line, cross screen.
Bulb Replacement of Headlamp and Clearance lampEKS00N5D
HEAD LAMP
1. Disconnect headlamp connector.
2. Remove rubber cap.
3. Unlock retaining spring, then remove bulb.
4. Installation is the reverse order of removal.
CLEARANCE LAMP
1. Turn bulb socket counterclockwise and unlock them.
2. Remove the bulb from its socket.
PKIC0980E
Headlamp (High/Low) : 12V - 60/55 W(H4)
SKIA0073E
Page 4034 of 4555
LT-38
HEADLAMP - CONVENTIONAL TYPE -
3. Installation is the reverse of order removal.
CAUTION:
�Never touch the glass of bulb directly by hand. Keep grease and other oily matters away from it.
Never touch bulb by hand while it is lit or right after being turned off. Burning may result.
�When replacing bulb, prepare new bulb first of all. Never leave bulb out of headlamp housing for a
long period, because dust, moisture or smoke will cause performance lowering (fouling, cloud,
etc.) of headlamp reflector and lens.
�When bulb is installed, be sure to lock rubber cap to ensure watertightness.
Bulb Replacement of Driving LampEKS00N5E
1. Remove the driving lamp. Refer to LT- 3 9 , "Removal and Installa-
tion of Driving Lamp" in “HEADLAMP”.
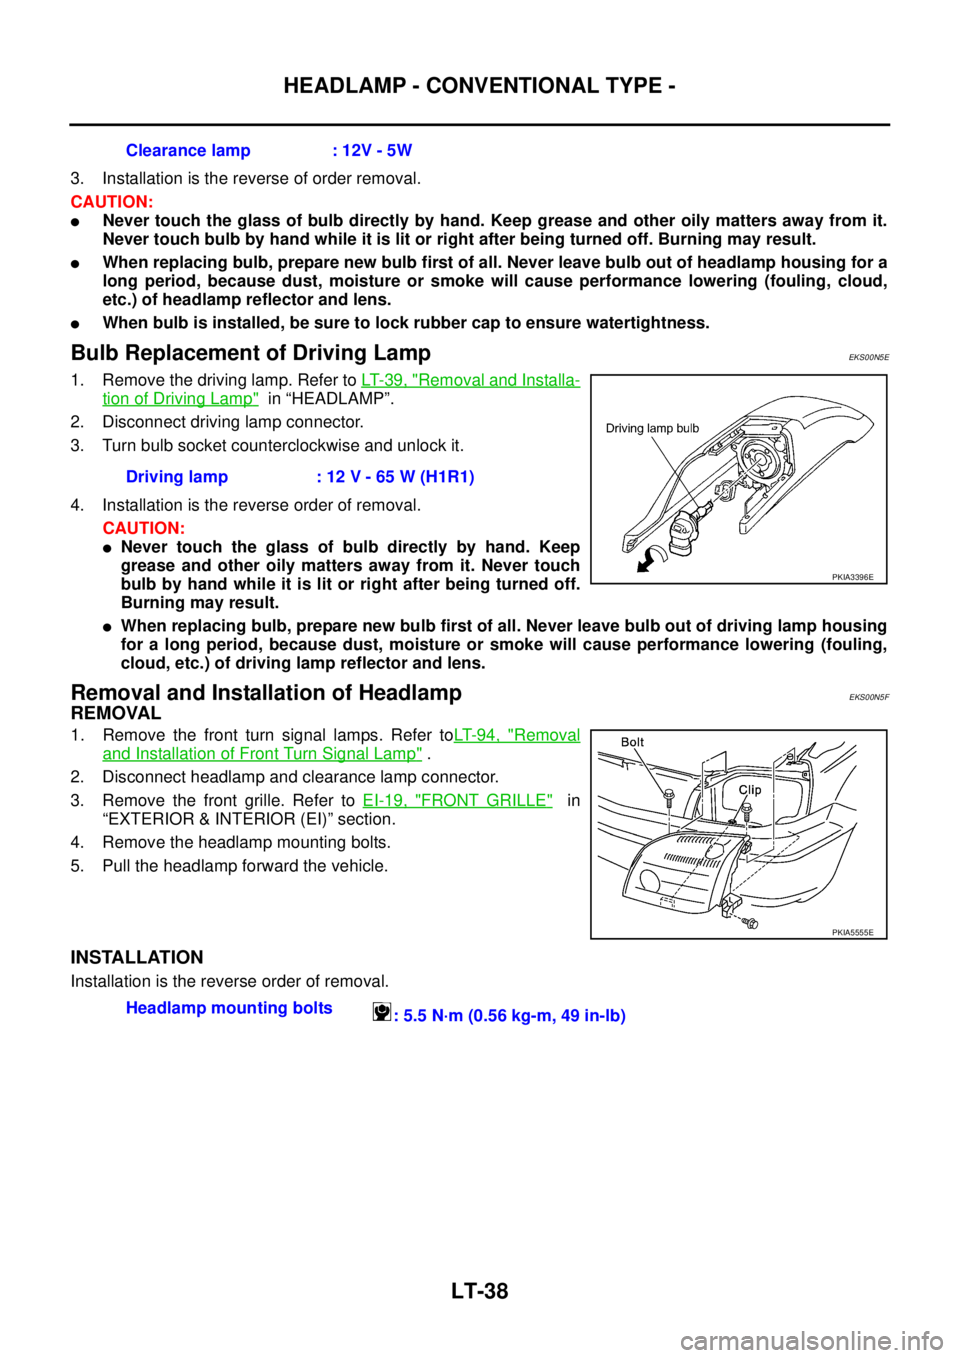
2. Disconnect driving lamp connector.
3. Turn bulb socket counterclockwise and unlock it.
4. Installation is the reverse order of removal.
CAUTION:
�Never touch the glass of bulb directly by hand. Keep
grease and other oily matters away from it. Never touch
bulb by hand while it is lit or right after being turned off.
Burning may result.
�When replacing bulb, prepare new bulb first of all. Never leave bulb out of driving lamp housing
for a long period, because dust, moisture or smoke will cause performance lowering (fouling,
cloud, etc.) of driving lamp reflector and lens.
Removal and Installation of HeadlampEKS00N5F
REMOVAL
1. Remove the front turn signal lamps. Refer toLT- 9 4 , "Removal
and Installation of Front Turn Signal Lamp" .
2. Disconnect headlamp and clearance lamp connector.
3. Remove the front grille. Refer to EI-19, "
FRONT GRILLE" in
“EXTERIOR & INTERIOR (EI)” section.
4. Remove the headlamp mounting bolts.
5. Pull the headlamp forward the vehicle.
INSTALLATION
Installation is the reverse order of removal.Clearance lamp : 12V - 5W
Driving lamp : 12 V - 65 W (H1R1)
PKIA3396E
PKIA5555E
Headlamp mounting bolts
: 5.5 N·m (0.56 kg-m, 49 in-lb)
Page 4090 of 4555
LT-94
TURN SIGNAL AND HAZARD WARNING LAMPS
Bulb ReplacementEKS0034D
FRONT TURN SIGNAL LAMP
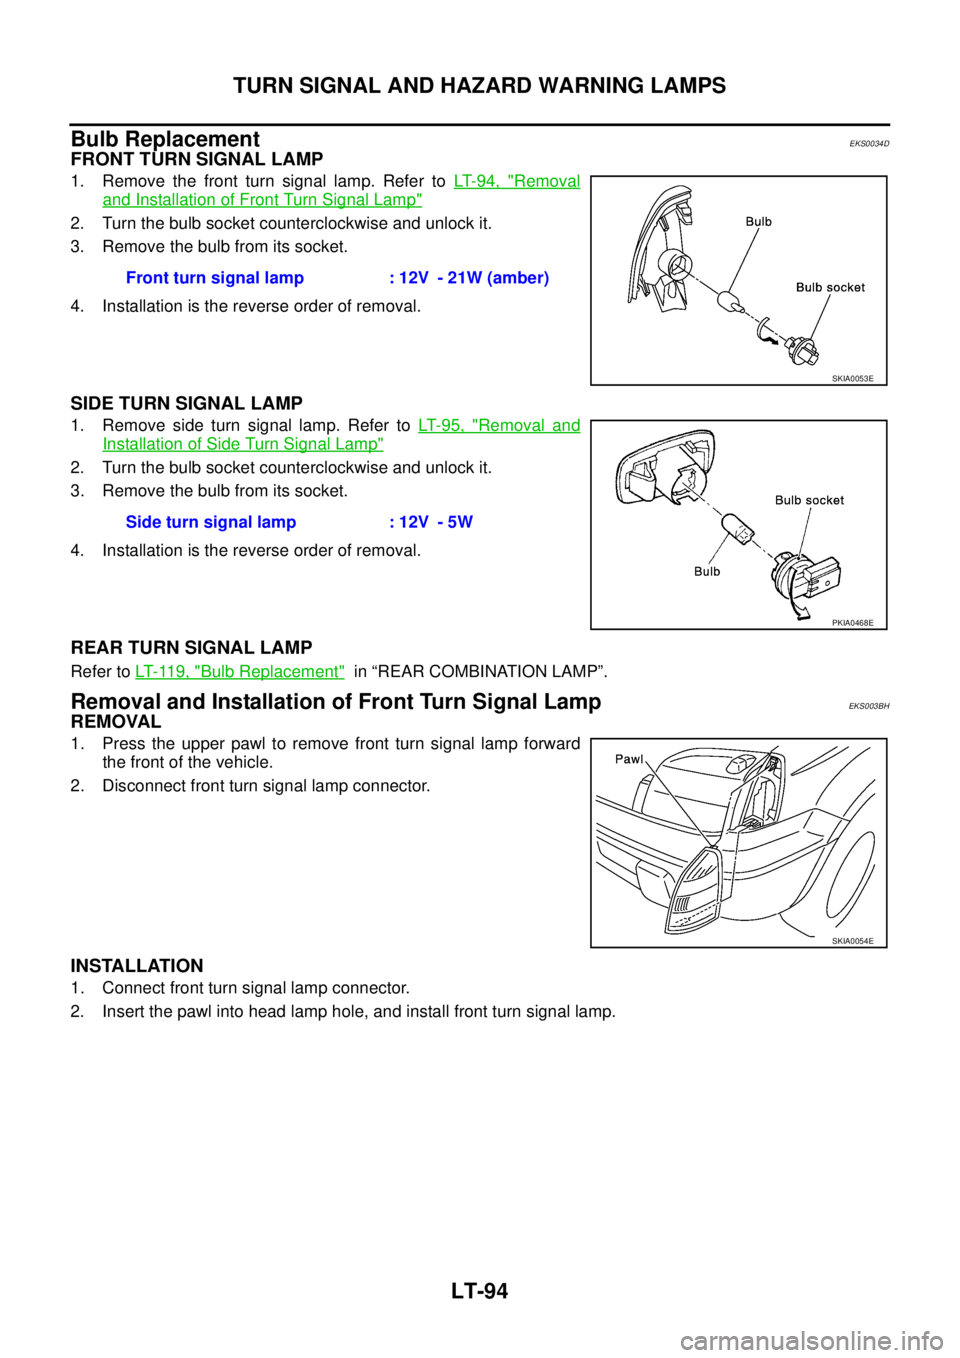
1. Remove the front turn signal lamp. Refer to LT- 9 4 , "Removal
and Installation of Front Turn Signal Lamp"
2. Turn the bulb socket counterclockwise and unlock it.
3. Remove the bulb from its socket.
4. Installation is the reverse order of removal.
SIDE TURN SIGNAL LAMP
1. Remove side turn signal lamp. Refer to LT- 9 5 , "Removal and
Installation of Side Turn Signal Lamp"
2. Turn the bulb socket counterclockwise and unlock it.
3. Remove the bulb from its socket.
4. Installation is the reverse order of removal.
REAR TURN SIGNAL LAMP
Refer to LT- 11 9 , "Bulb Replacement" in “REAR COMBINATION LAMP”.
Removal and Installation of Front Turn Signal LampEKS003BH
REMOVAL
1. Press the upper pawl to remove front turn signal lamp forward
the front of the vehicle.
2. Disconnect front turn signal lamp connector.
INSTALLATION
1. Connect front turn signal lamp connector.
2. Insert the pawl into head lamp hole, and install front turn signal lamp.Front turn signal lamp : 12V - 21W (amber)
SKIA0053E
Side turn signal lamp : 12V - 5W
PKIA0468E
SKIA0054E
Page 4095 of 4555
STOP LAMP
LT-99
C
D
E
F
G
H
I
J
L
MA
B
LT
Bulb ReplacementEKS0034K
STOP LAMP
Refer to LT- 11 9 , "Bulb Replacement" in “REAR COMBINATION LAMP”.
HIGH-MOUNTED STOP LAMP
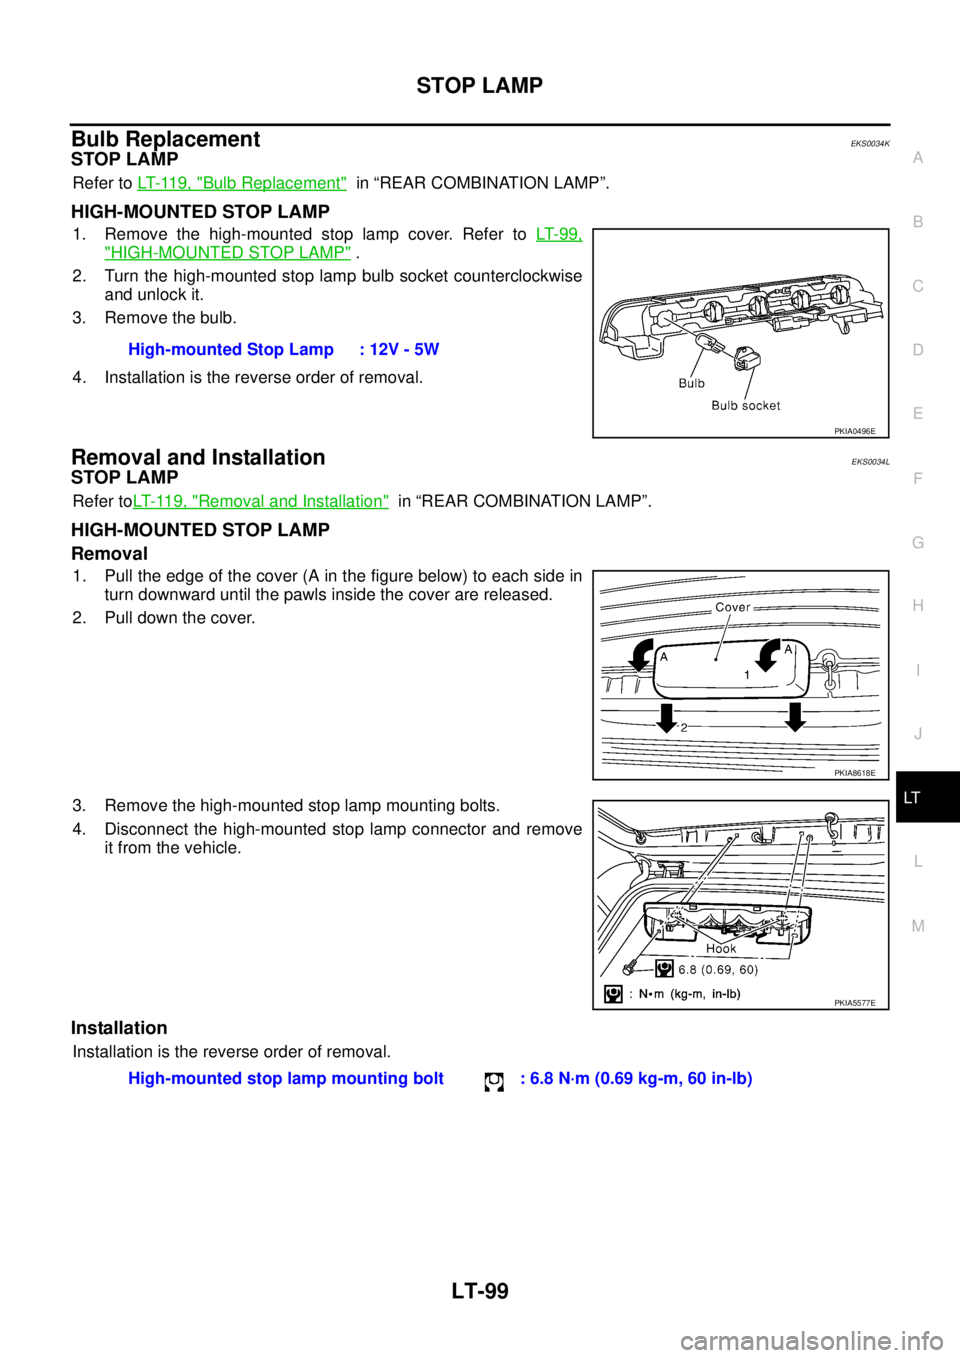
1. Remove the high-mounted stop lamp cover. Refer to LT- 9 9 ,
"HIGH-MOUNTED STOP LAMP" .
2. Turn the high-mounted stop lamp bulb socket counterclockwise
and unlock it.
3. Remove the bulb.
4. Installation is the reverse order of removal.
Removal and InstallationEKS0034L
STOP LAMP
Refer toLT- 11 9 , "Removal and Installation" in “REAR COMBINATION LAMP”.
HIGH-MOUNTED STOP LAMP
Removal
1. Pull the edge of the cover (A in the figure below) to each side in
turn downward until the pawls inside the cover are released.
2. Pull down the cover.
3. Remove the high-mounted stop lamp mounting bolts.
4. Disconnect the high-mounted stop lamp connector and remove
it from the vehicle.
Installation
Installation is the reverse order of removal.High-mounted Stop Lamp : 12V - 5W
PKIA0496E
PKIA8618E
PKIA5577E
High-mounted stop lamp mounting bolt : 6.8 N·m (0.69 kg-m, 60 in-lb)
Page 4107 of 4555
FRONT FOG LAMP
LT-111
C
D
E
F
G
H
I
J
L
MA
B
LT
Bulb Replacement EKS003DI
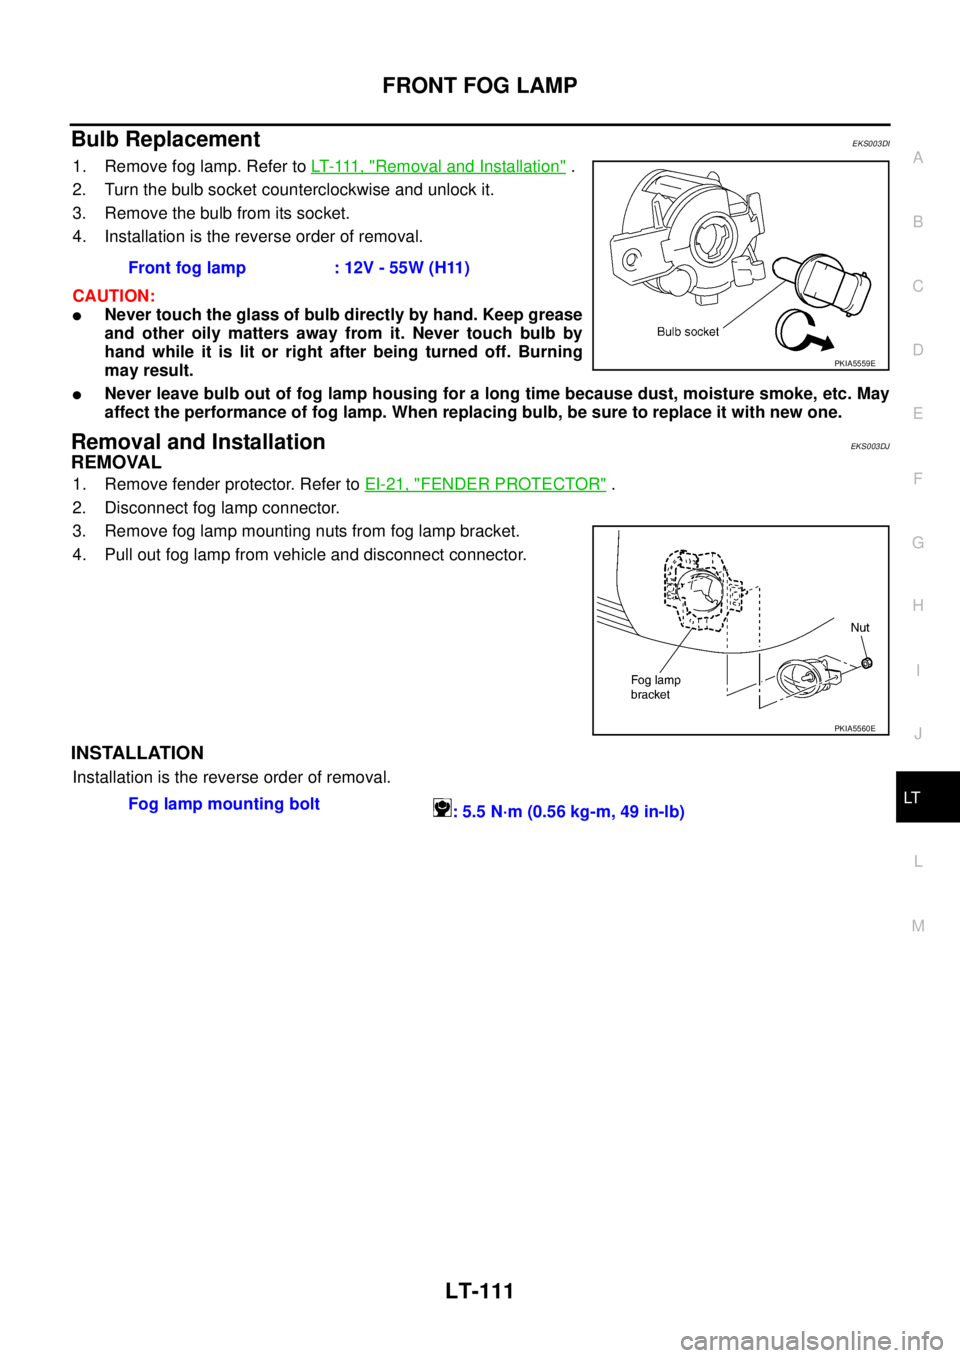
1. Remove fog lamp. Refer to LT- 111 , "Removal and Installation" .
2. Turn the bulb socket counterclockwise and unlock it.
3. Remove the bulb from its socket.
4. Installation is the reverse order of removal.
CAUTION:
�Never touch the glass of bulb directly by hand. Keep grease
and other oily matters away from it. Never touch bulb by
hand while it is lit or right after being turned off. Burning
may result.
�Never leave bulb out of fog lamp housing for a long time because dust, moisture smoke, etc. May
affect the performance of fog lamp. When replacing bulb, be sure to replace it with new one.
Removal and Installation EKS003DJ
REMOVAL
1. Remove fender protector. Refer to EI-21, "FENDER PROTECTOR" .
2. Disconnect fog lamp connector.
3. Remove fog lamp mounting nuts from fog lamp bracket.
4. Pull out fog lamp from vehicle and disconnect connector.
INSTALLATION
Installation is the reverse order of removal.Front fog lamp : 12V - 55W (H11)
PKIA5559E
PKIA5560E
Fog lamp mounting bolt
: 5.5 N·m (0.56 kg-m, 49 in-lb)
Page 4111 of 4555
REAR FOG LAMP
LT-115
C
D
E
F
G
H
I
J
L
MA
B
LT
Bulb ReplacementEKS0015L
1. Remove rear fog lamp. Refer to LT- 11 5 , "Removal and Installa-
tion" .
2. Turn bulb socket counterclockwise and unlock it.
3. Remove bulb.
4. Installation is the reverse order of removal.
Removal and InstallationEKS0015M
REMOVAL
1. Remove rear fog lamp mounting screws.
2. Take out rear fog lamp from bumper, then disconnect connector.
INSTALLATION
Installation is the reverse order of removal.Rear fog lamp : 12V - 21W
SKIA0052E
SKIA0090E
Rear fog lamp mounting screws
: 1.4 N·m (0.14 kg-m, 12 in-lb)
Page 4115 of 4555
REAR COMBINATION LAMP
LT-119
C
D
E
F
G
H
I
J
L
MA
B
LT
Bulb ReplacementEKS00164
1. Remove rear combination lamp mounting bolts.
2. Pull rear combination lamp toward rear of vehicle. Disengage
locating pins.
3. Turn bulb socket counterclockwise and unlock it.
4. Remove bulb.
5. Installation is the reverse order of removal.
Removal and InstallationEKS00165
REMOVAL
1. Remove luggage-side lower finisher. Refer to EI-35, "BODY
SIDE TRIM" in “EI EXTERIOR & INTERIOR” section.
2. Disconnect rear combination lamp connector.
3. Remove rear combination lamp mounting bolts.
4. Pull rear combination lamp rearward the vehicle. Disengage
locating pins.
5. Pull harness grommet and remove harness.
INSTALLATION
Installation is the reverse order of removal.Stop/tail lamp : 12V - 21/5W
Rear turn signal lamp : 12V - 21W
Back-up lamp : 12V - 21W
PKIC0923E
PKIA8620E
Rear combination lamp mounting bolts
: 5.4 N·m (0.55 kg-m, 48 in-lb)