Page 2189 of 4555

TRANSAXLE ASSEMBLY
MT-33
D
E
F
G
H
I
J
K
L
MA
B
MT
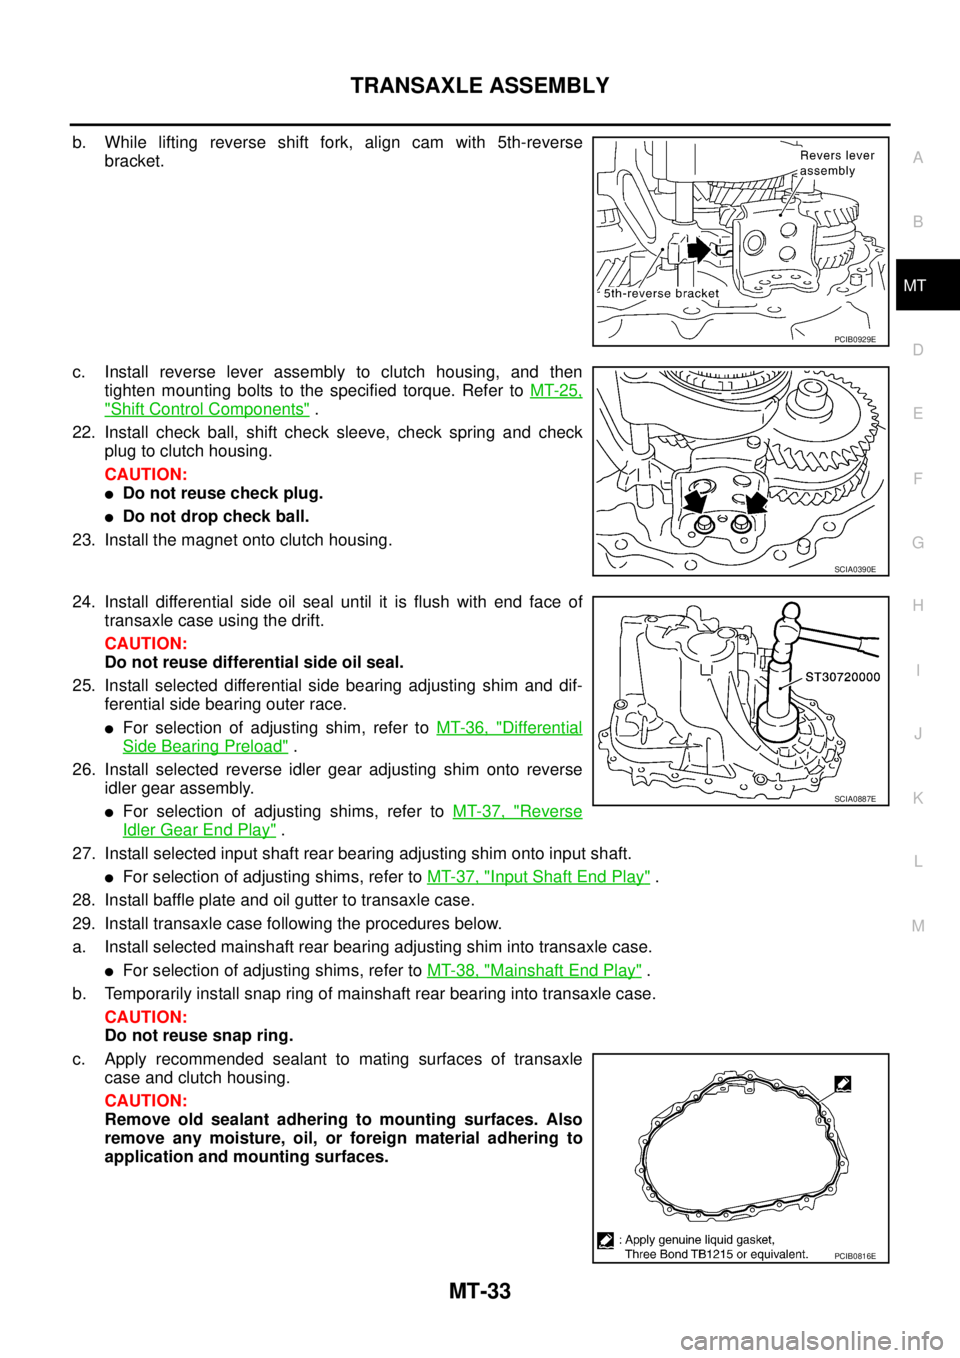
b. While lifting reverse shift fork, align cam with 5th-reverse
bracket.
c. Install reverse lever assembly to clutch housing, and then
tighten mounting bolts to the specified torque. Refer to MT-25,
"Shift Control Components" .
22. Install check ball, shift check sleeve, check spring and check
plug to clutch housing.
CAUTION:
�Do not reuse check plug.
�Do not drop check ball.
23. Install the magnet onto clutch housing.
24. Install differential side oil seal until it is flush with end face of
transaxle case using the drift.
CAUTION:
Do not reuse differential side oil seal.
25. Install selected differential side bearing adjusting shim and dif-
ferential side bearing outer race.
�For selection of adjusting shim, refer to MT-36, "Differential
Side Bearing Preload" .
26. Install selected reverse idler gear adjusting shim onto reverse
idler gear assembly.
�For selection of adjusting shims, refer to MT-37, "Reverse
Idler Gear End Play" .
27. Install selected input shaft rear bearing adjusting shim onto input shaft.
�For selection of adjusting shims, refer to MT-37, "Input Shaft End Play" .
28. Install baffle plate and oil gutter to transaxle case.
29. Install transaxle case following the procedures below.
a. Install selected mainshaft rear bearing adjusting shim into transaxle case.
�For selection of adjusting shims, refer to MT-38, "Mainshaft End Play" .
b. Temporarily install snap ring of mainshaft rear bearing into transaxle case.
CAUTION:
Do not reuse snap ring.
c. Apply recommended sealant to mating surfaces of transaxle
case and clutch housing.
CAUTION:
Remove old sealant adhering to mounting surfaces. Also
remove any moisture, oil, or foreign material adhering to
application and mounting surfaces.
PCIB0929E
SCIA0390E
SCIA0887E
PCIB0816E
Page 2192 of 4555

MT-36
TRANSAXLE ASSEMBLY
ADJUSTMENT
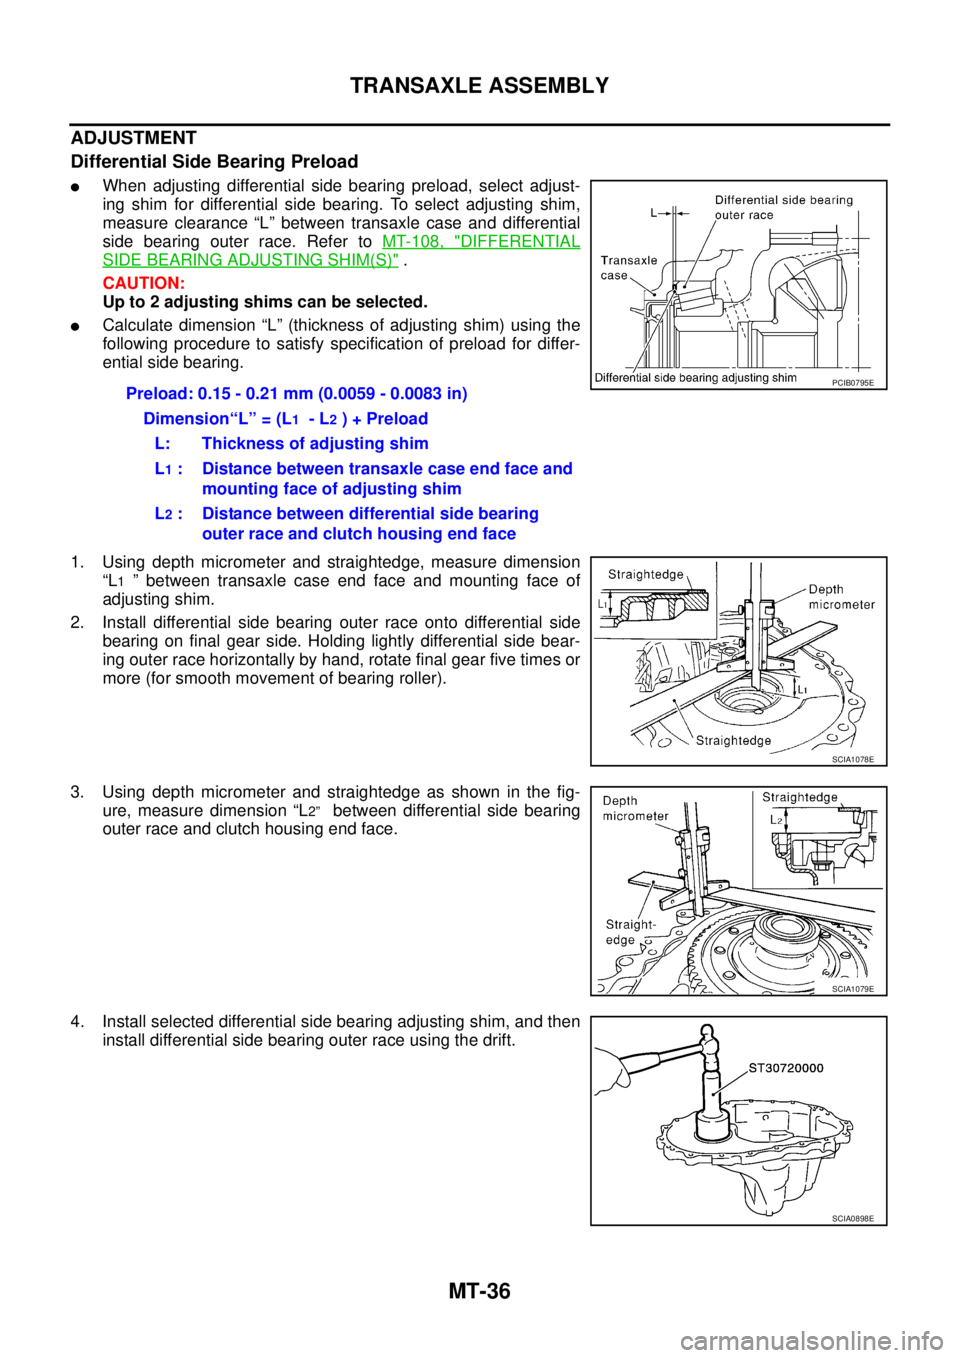
Differential Side Bearing Preload
�When adjusting differential side bearing preload, select adjust-
ing shim for differential side bearing. To select adjusting shim,
measure clearance “L” between transaxle case and differential
side bearing outer race. Refer to MT-108, "
DIFFERENTIAL
SIDE BEARING ADJUSTING SHIM(S)" .
CAUTION:
Up to 2 adjusting shims can be selected.
�Calculate dimension “L” (thickness of adjusting shim) using the
following procedure to satisfy specification of preload for differ-
ential side bearing.
1. Using depth micrometer and straightedge, measure dimension
“L
1 ” between transaxle case end face and mounting face of
adjusting shim.
2. Install differential side bearing outer race onto differential side
bearing on final gear side. Holding lightly differential side bear-
ing outer race horizontally by hand, rotate final gear five times or
more (for smooth movement of bearing roller).
3. Using depth micrometer and straightedge as shown in the fig-
ure, measure dimension “L
2” between differential side bearing
outer race and clutch housing end face.
4. Install selected differential side bearing adjusting shim, and then
install differential side bearing outer race using the drift.Preload: 0.15 - 0.21 mm (0.0059 - 0.0083 in)
Dimension“L” = (L
1 - L2 ) + Preload
L: Thickness of adjusting shim
L
1 : Distance between transaxle case end face and
mounting face of adjusting shim
L
2 : Distance between differential side bearing
outer race and clutch housing end face
PCIB0795E
SCIA1078E
SCIA1079E
SCIA0898E
Page 2196 of 4555
MT-40
TRANSAXLE ASSEMBLY
Disassembly and Assembly (RS6F51A)ECS008C1
COMPONENTS
Case and Housing Components
1. Clutch housing 2. Differential side oil seal 3. Ball pin
4. Washer 5. Input shaft oil seal 6. Oil channel
7. Magnet 8. Gasket 9. Filler plug
10. O-ring 11. Plug 12. Air breather tube
13. Back-up lamp switch 14. Oil gutter 15. Baffle plate
16. Transaxle case 17. Plug 18. Welch plug
19. Bore plug 20. Drain plug 21. Differential side oil seal
22. Park/Neutral position (PNP) switch
PCIB1457E
Page 2200 of 4555
MT-44
TRANSAXLE ASSEMBLY
Final Drive Components
DISASSEMBLY
1. Remove plug (for 2WD models) or filler plug (for 4WD models) from clutch housing.
2. Remove drain plug and plug from transaxle case.
3. Remove park/neutral position switch and back-up lamp switch
from transaxle case.
4. Remove shift check and stopper bolt from transaxle case, and
then remove control assembly from transaxle case.
1. Differential side bearing outer race
(clutch housing side)2. Differential side bearing (clutch
housing side)3. Speedometer drive gear (for 2WD
models)
4. Differential case 5. Final gear 6. Differential side bearing (transaxle
case side)
7. Differential side bearing outer race
(transaxle case side)8. Differential side bearing adjusting
shim9. Pinion mate shaft
10. Side gear 11. Side gear thrust washer 12. Pinion mate gear
13. Pinion mate thrust washer 14. Retaining pin
PCIB0869E
SCIA0389E
Page 2201 of 4555
TRANSAXLE ASSEMBLY
MT-45
D
E
F
G
H
I
J
K
L
MA
B
MT
5. Remove check plugs (4 pieces), check springs (4 pieces), check
balls (4 pieces) and shift check sleeve (2 pieces).
6. Remove transaxle case mounting bolts.
7. Remove bore plug from transaxle case.
CAUTION:
Be careful not to damage transaxle case.
8. While spreading the snap ring of mainshaft rear bearing located
at bore plug hole, remove transaxle case from clutch housing.
9. Remove oil gutter, baffle plate from transaxle case.
10. Remove snap ring, mainshaft rear bearing adjusting shim from
transaxle case.
11. Remove input shaft rear bearing adjusting shim and reverse
idler gear adjusting shim.
12. Remove differential side bearing outer race from transaxle case
using the puller, and then remove differential side bearing
adjusting shim from transaxle case.
13. Remove welch plug from transaxle case.
SCIA0959E
SCIA0983E
SCIA0897E
SCIA0402E
Page 2202 of 4555
MT-46
TRANSAXLE ASSEMBLY
14. Remove differential side oil seal from transaxle case.
CAUTION:
Be careful not to damage transaxle case.
15. Remove magnet from clutch housing.
16. With shift lever in 5th position, remove mounting bolts from
reverse lever assembly. Lift reverse lever assembly to remove.
CAUTION:
Be careful not to lose shifter cap.
17. Pull out reverse fork rod then remove reverse shift fork.
18. Remove retaining pin of reverse bracket using a pin punch.
19. Pull out reverse bracket and reverse bracket fork rod.
20. Remove check ball (2 pieces) and interlock pin from clutch
housing.
21. Shift 3rd-4th fork rod to 3rd position. Remove retaining pin of 5th
- 6th shift fork using a pin punch.
22. Remove stopper rings for 5th-6th bracket.
23. Pull out 5th-6th fork rod and remove 5th-6th shift fork and 5th-
6th bracket.
24. Remove check balls (2 pieces) and interlock pin.
SCIA0397E
SCIA0960E
SCIA0961E
SCIA0962E
SCIA0963E
Page 2203 of 4555

TRANSAXLE ASSEMBLY
MT-47
D
E
F
G
H
I
J
K
L
MA
B
MT
25. Remove retaining pin of 3rd-4th bracket using a pin punch.
26. Remove stopper rings for 3rd-4th shift fork.
27. Pull out 3rd-4th fork rod and remove 3rd-4th shift fork and 3rd-
4th bracket.
28. Remove shift check sleeve from clutch housing.
29. Remove retaining pin of 1st-2nd shift fork using a pin punch.
30. Pull out 1st-2nd fork rod with 1st-2nd bracket.
31. Remove 1st-2nd shift fork.
32. Remove retaining pin of 1st-2nd bracket using a pin punch and
separate fork rod and 1st-2nd bracket.
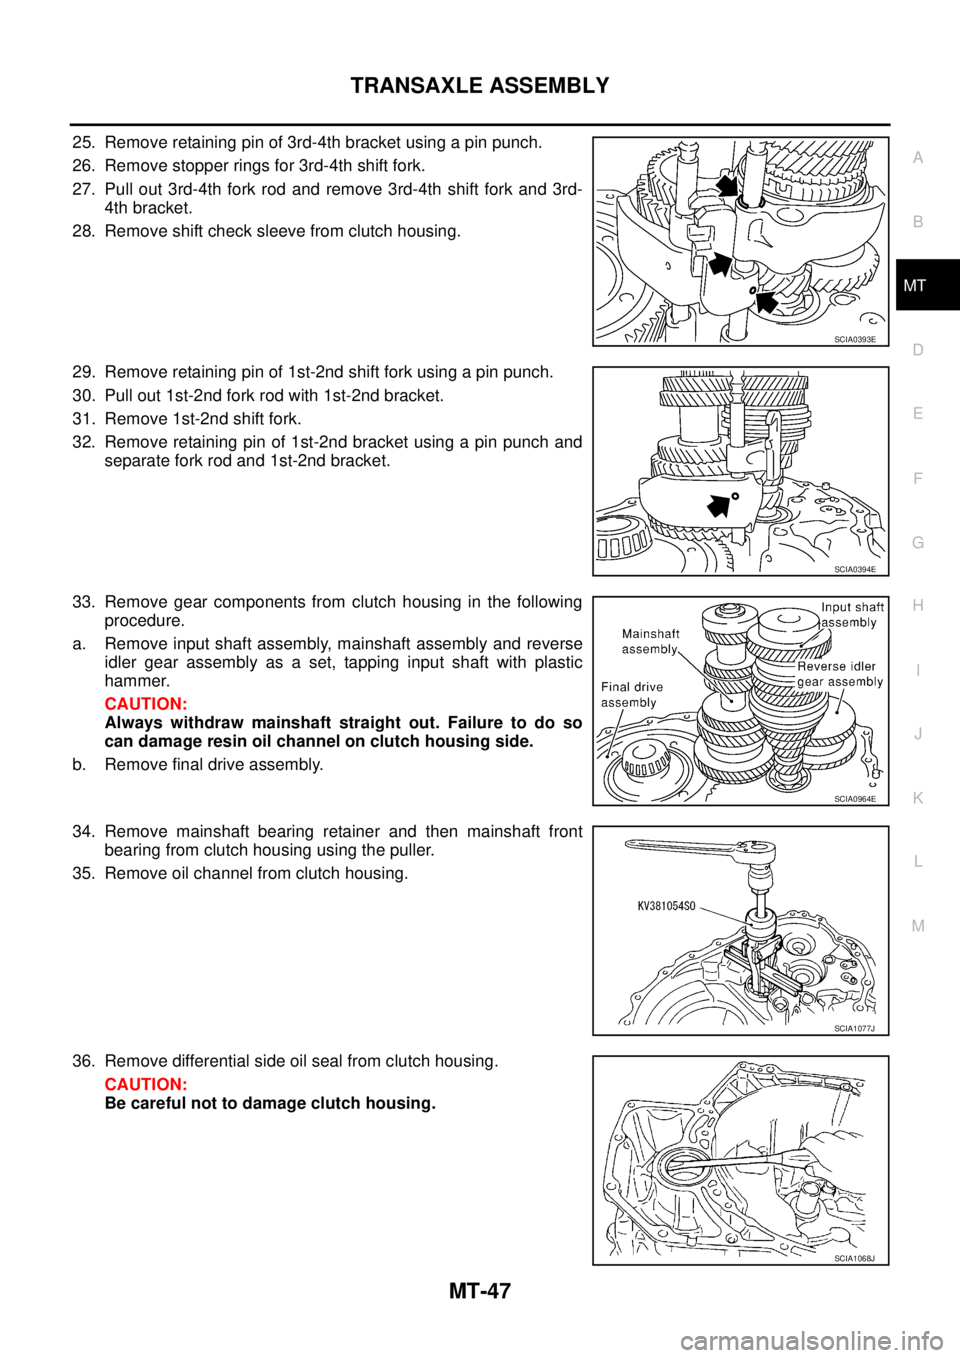
33. Remove gear components from clutch housing in the following
procedure.
a. Remove input shaft assembly, mainshaft assembly and reverse
idler gear assembly as a set, tapping input shaft with plastic
hammer.
CAUTION:
Always withdraw mainshaft straight out. Failure to do so
can damage resin oil channel on clutch housing side.
b. Remove final drive assembly.
34. Remove mainshaft bearing retainer and then mainshaft front
bearing from clutch housing using the puller.
35. Remove oil channel from clutch housing.
36. Remove differential side oil seal from clutch housing.
CAUTION:
Be careful not to damage clutch housing.
SCIA0393E
SCIA0394E
SCIA0964E
SCIA1077J
SCIA1068J
Page 2204 of 4555
MT-48
TRANSAXLE ASSEMBLY
37. Remove differential side bearing outer race from clutch housing
using the puller.
38. Remove input shaft oil seal from clutch housing.
CAUTION:
Be careful not to damage clutch housing.
ASSEMBLY
1. Install input shaft oil seal to clutch housing using the drift.
CAUTION:
Do not reuse input shaft oil seal.
2. Install differential side oil seal until it become flush with end face
of clutch housing using the drift.
CAUTION:
�Do not reuse differential side oil seal.
�Apply multi-purpose grease onto oil seal lip. (For 4WD
models)
SCIA1069J
SCIA0398E
Dimension A: 1.8 - 2.8 mm (0.071 - 0.110 in)
PCIB0873E
SCIA1070J