Page 3418 of 4555
AV-76
NAVIGATION SYSTEM
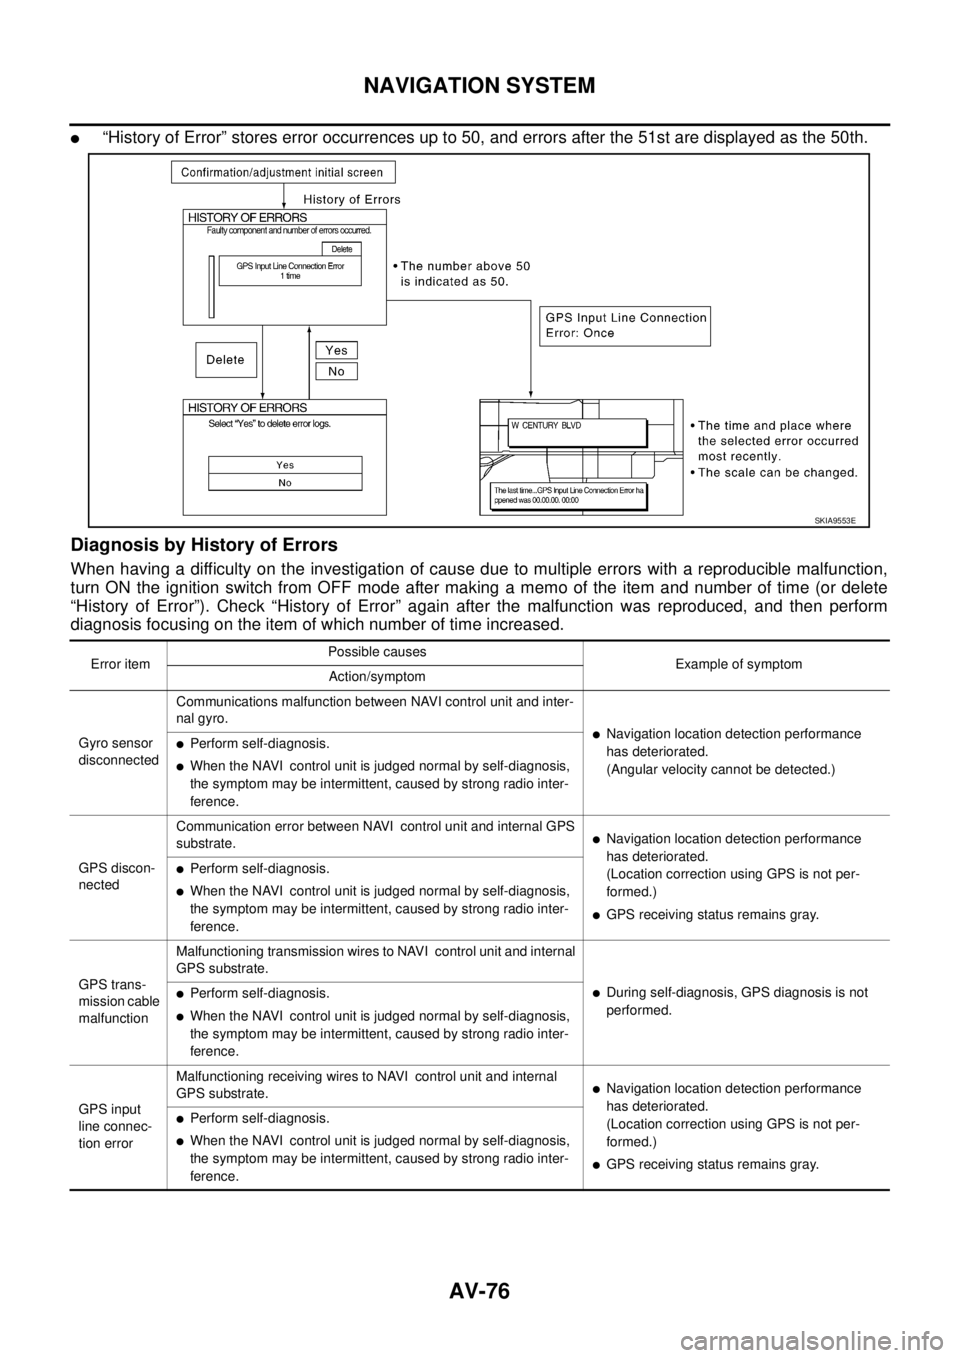
�“History of Error” stores error occurrences up to 50, and errors after the 51st are displayed as the 50th.
Diagnosis by History of Errors
When having a difficulty on the investigation of cause due to multiple errors with a reproducible malfunction,
turn ON the ignition switch from OFF mode after making a memo of the item and number of time (or delete
“History of Error”). Check “History of Error” again after the malfunction was reproduced, and then perform
diagnosis focusing on the item of which number of time increased.
SKIA9553E
Error itemPossible causes
Example of symptom
Action/symptom
Gyro sensor
disconnectedCommunications malfunction between NAVI control unit and inter-
nal gyro.
�Navigation location detection performance
has deteriorated.
(Angular velocity cannot be detected.)�Perform self-diagnosis.
�When the NAVI control unit is judged normal by self-diagnosis,
the symptom may be intermittent, caused by strong radio inter-
ference.
GPS discon-
nectedCommunication error between NAVI control unit and internal GPS
substrate.
�Navigation location detection performance
has deteriorated.
(Location correction using GPS is not per-
formed.)
�GPS receiving status remains gray.
�Perform self-diagnosis.
�When the NAVI control unit is judged normal by self-diagnosis,
the symptom may be intermittent, caused by strong radio inter-
ference.
GPS trans-
mission cable
malfunctionMalfunctioning transmission wires to NAVI control unit and internal
GPS substrate.
�During self-diagnosis, GPS diagnosis is not
performed.�Perform self-diagnosis.
�When the NAVI control unit is judged normal by self-diagnosis,
the symptom may be intermittent, caused by strong radio inter-
ference.
GPS input
line connec-
tion errorMalfunctioning receiving wires to NAVI control unit and internal
GPS substrate.
�Navigation location detection performance
has deteriorated.
(Location correction using GPS is not per-
formed.)
�GPS receiving status remains gray.
�Perform self-diagnosis.
�When the NAVI control unit is judged normal by self-diagnosis,
the symptom may be intermittent, caused by strong radio inter-
ference.
Page 3422 of 4555
AV-80
NAVIGATION SYSTEM
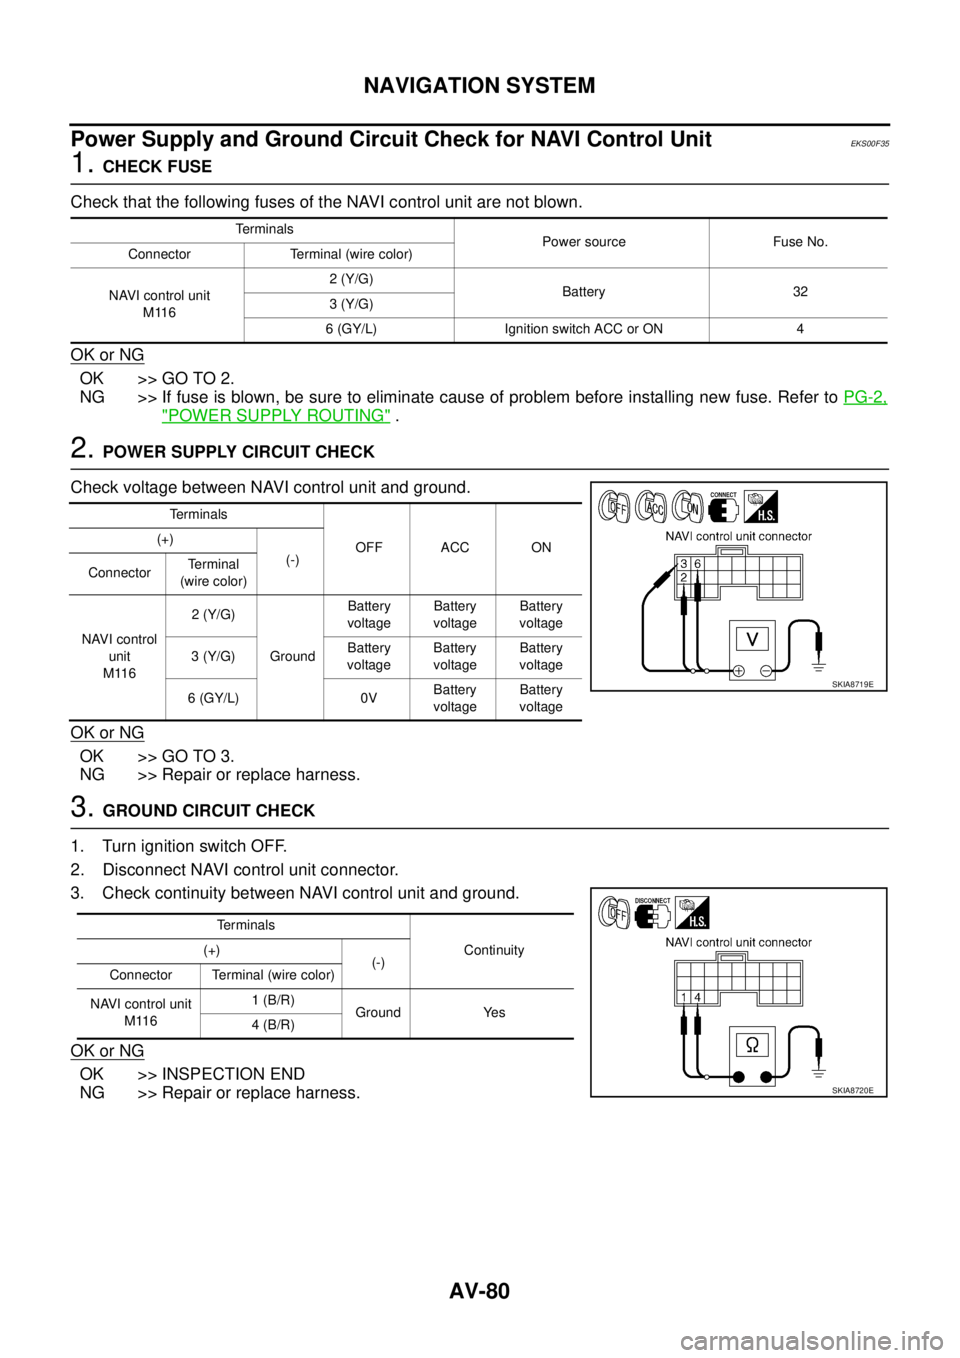
Power Supply and Ground Circuit Check for NAVI Control UnitEKS00F35
1. CHECK FUSE
Check that the following fuses of the NAVI control unit are not blown.
OK or NG
OK >> GO TO 2.
NG >> If fuse is blown, be sure to eliminate cause of problem before installing new fuse. Refer to PG-2,
"POWER SUPPLY ROUTING" .
2. POWER SUPPLY CIRCUIT CHECK
Check voltage between NAVI control unit and ground.
OK or NG
OK >> GO TO 3.
NG >> Repair or replace harness.
3. GROUND CIRCUIT CHECK
1. Turn ignition switch OFF.
2. Disconnect NAVI control unit connector.
3. Check continuity between NAVI control unit and ground.
OK or NG
OK >> INSPECTION END
NG >> Repair or replace harness.
Te r m i n a l s
Power source Fuse No.
Connector Terminal (wire color)
NAVI control unit
M1162 (Y/G)
Battery 32
3 (Y/G)
6 (GY/L) Ignition switch ACC or ON 4
Terminals
OFF ACC ON (+)
(-)
ConnectorTerminal
(wire color)
NAVI control
unit
M1162 (Y/G)
GroundBattery
voltageBattery
voltageBattery
voltage
3 (Y/G)Battery
voltageBattery
voltageBattery
voltage
6 (GY/L) 0VBattery
voltageBattery
voltage
SKIA8719E
Te r m i n a l s
Continuity (+)
(-)
Connector Terminal (wire color)
NAVI control unit
M1161 (B/R)
Ground Yes
4 (B/R)
SKIA8720E
Page 3423 of 4555

NAVIGATION SYSTEM
AV-81
C
D
E
F
G
H
I
J
L
MA
B
AV
Power Supply and Ground Circuit Check for DisplayEKS00F36
1. CHECK FUSE
Check that the following fuses of the display are not blown.
OK or NG
OK >> GO TO 2.
NG >> If fuse is blown, be sure to eliminate cause of problem before installing new fuse. Refer to PG-2,
"POWER SUPPLY ROUTING" .
2. POWER SUPPLY CIRCUIT CHECK
Check voltage between display and ground.
OK or NG
OK >> GO TO 3.
NG >> Repair or replace harness.
3. GROUND CIRCUIT CHECK
1. Turn ignition switch OFF.
2. Disconnect display connector.
3. Check continuity between display and ground.
OK or NG
OK >> INSPECTION END
NG >> Repair or replace harness.
UnitTerminals
Power source Fuse No.
Connector Terminal (wire color)
Display M11221 (Y/G)
Battery 32
23 (Y/G)
19 (GY/L) Ignition switch ACC or ON 4
UnitTerminals
OFF ACC ON (+)
(-)
ConnectorTerminal
(wire color)
Display M11221 (Y/G)
GroundBattery
voltageBattery
voltageBattery
voltage
23 (Y/G)Battery
voltageBattery
voltageBattery
voltage
19 (GY/L) 0VBattery
voltageBattery
voltage
SKIA9491E
UnitTe r m i n a l s
Continuity (+)
(-)
Connector Terminal (wire color)
Display M11222 (B/R)
Ground Yes
24 (B/R)
SKIA9492E
Page 3424 of 4555
AV-82
NAVIGATION SYSTEM
Power Supply and Ground Circuit Check for NAVI SwitchEKS00F37
1. CHECK FUSE
Check 10A fuse [No.4, located in fuse block (J/B)].
OK or NG
OK >> GO TO 2.
NG >> If fuse is blown, be sure to eliminate cause of problem before installing new fuse. Refer to PG-2,
"POWER SUPPLY ROUTING" .
2. POWER SUPPLY CIRCUIT CHECK
Check voltage between NAVI switch and ground.
OK or NG
OK >> GO TO 3.
NG >> Repair or replace harness.
3. GROUND CIRCUIT CHECK
1. Turn ignition switch OFF.
2. Disconnect NAVI switch connector.
3. Check continuity between NAVI switch harness connector M113
terminal 7 (B/R) and ground.
OK or NG
OK >> INSPECTION END
NG >> Repair or replace harness.
UnitTerminals
OFF ACC ON (+)
(-)
ConnectorTe r m i n a l
(wire color)
NAVI
switchM113 1 (GY/L) Ground 0VBattery
voltageBattery
voltage
SKIA8724E
Continuity should exist.
SKIA8725E
Page 3425 of 4555
NAVIGATION SYSTEM
AV-83
C
D
E
F
G
H
I
J
L
MA
B
AV
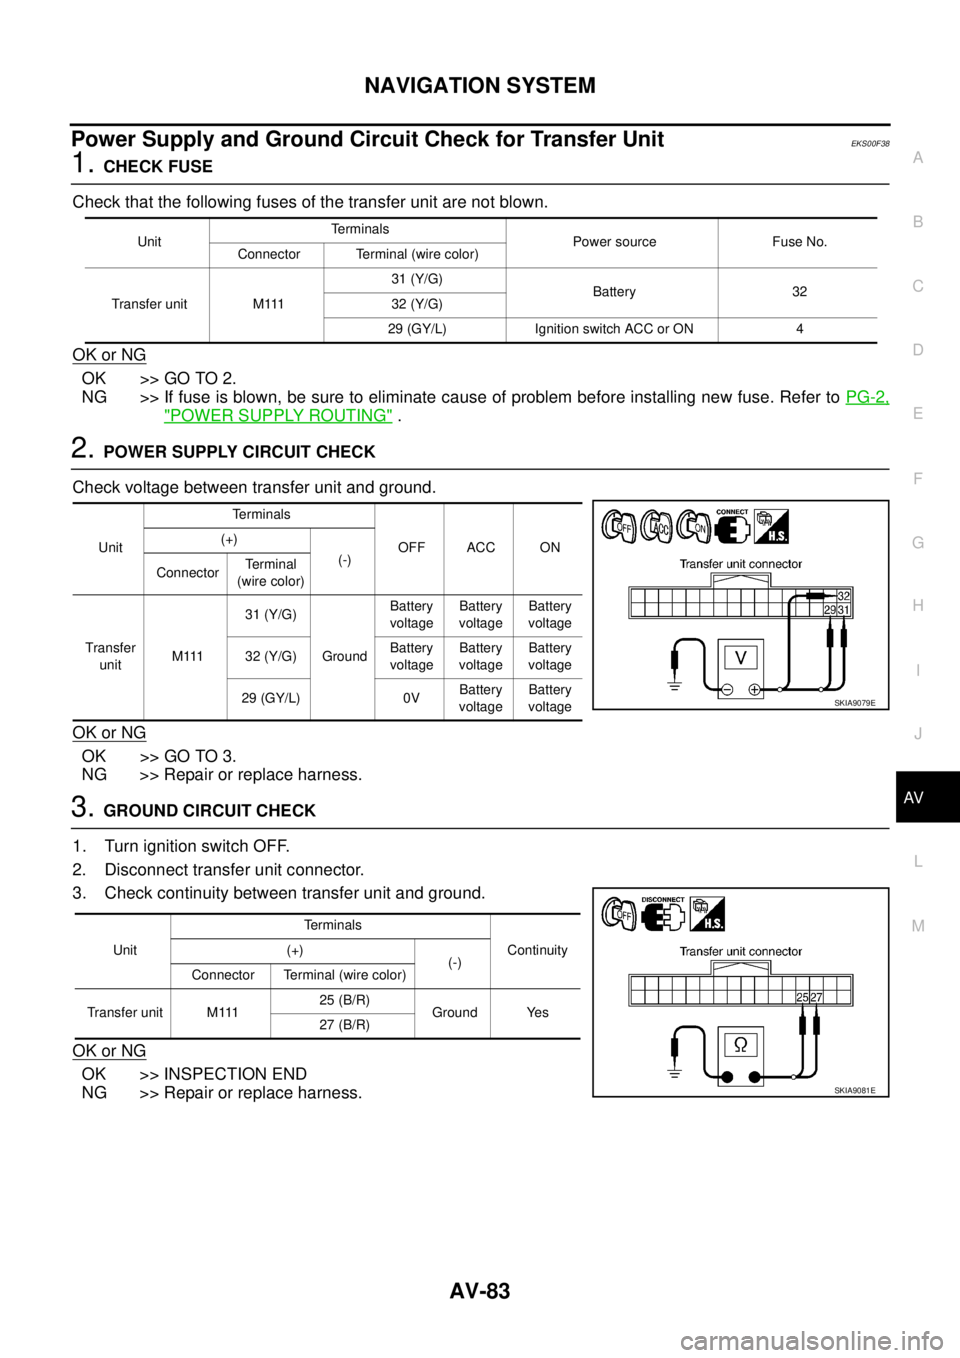
Power Supply and Ground Circuit Check for Transfer UnitEKS00F38
1. CHECK FUSE
Check that the following fuses of the transfer unit are not blown.
OK or NG
OK >> GO TO 2.
NG >> If fuse is blown, be sure to eliminate cause of problem before installing new fuse. Refer to PG-2,
"POWER SUPPLY ROUTING" .
2. POWER SUPPLY CIRCUIT CHECK
Check voltage between transfer unit and ground.
OK or NG
OK >> GO TO 3.
NG >> Repair or replace harness.
3. GROUND CIRCUIT CHECK
1. Turn ignition switch OFF.
2. Disconnect transfer unit connector.
3. Check continuity between transfer unit and ground.
OK or NG
OK >> INSPECTION END
NG >> Repair or replace harness.
UnitTerminals
Power source Fuse No.
Connector Terminal (wire color)
Transfer unit M11131 (Y/G)
Battery 32
32 (Y/G)
29 (GY/L) Ignition switch ACC or ON 4
UnitTerminals
OFF ACC ON (+)
(-)
ConnectorTerminal
(wire color)
Transfer
unitM 11131 (Y/G)
GroundBattery
voltageBattery
voltageBattery
voltage
32 (Y/G)Battery
voltageBattery
voltageBattery
voltage
29 (GY/L) 0VBattery
voltageBattery
voltage
SKIA9079E
UnitTerminals
Continuity (+)
(-)
Connector Terminal (wire color)
Transfer unit M11125 (B/R)
Ground Yes
27 (B/R)
SKIA9081E
Page 3426 of 4555
AV-84
NAVIGATION SYSTEM
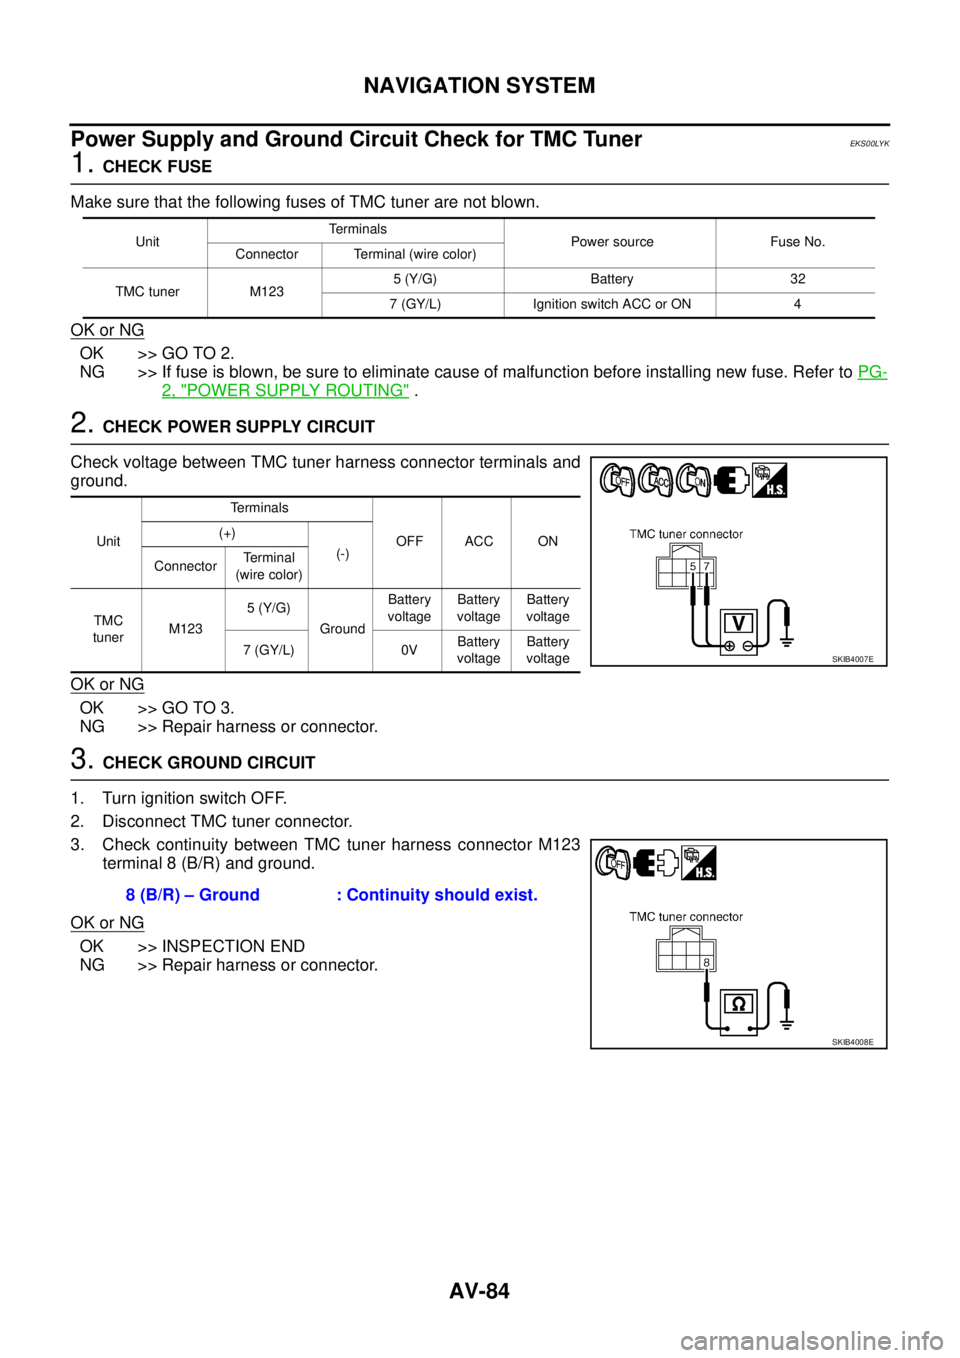
Power Supply and Ground Circuit Check for TMC TunerEKS00LYK
1. CHECK FUSE
Make sure that the following fuses of TMC tuner are not blown.
OK or NG
OK >> GO TO 2.
NG >> If fuse is blown, be sure to eliminate cause of malfunction before installing new fuse. Refer to PG-
2, "POWER SUPPLY ROUTING" .
2. CHECK POWER SUPPLY CIRCUIT
Check voltage between TMC tuner harness connector terminals and
ground.
OK or NG
OK >> GO TO 3.
NG >> Repair harness or connector.
3. CHECK GROUND CIRCUIT
1. Turn ignition switch OFF.
2. Disconnect TMC tuner connector.
3. Check continuity between TMC tuner harness connector M123
terminal 8 (B/R) and ground.
OK or NG
OK >> INSPECTION END
NG >> Repair harness or connector.
UnitTerminals
Power source Fuse No.
Connector Terminal (wire color)
TMC tuner M1235 (Y/G) Battery 32
7 (GY/L) Ignition switch ACC or ON 4
UnitTerminals
OFF ACC ON (+)
(-)
ConnectorTe r m i n a l
(wire color)
TMC
tunerM1235 (Y/G)
GroundBattery
voltageBattery
voltageBattery
voltage
7 (GY/L) 0VBattery
voltageBattery
voltage
SKIB4007E
8 (B/R) – Ground : Continuity should exist.
SKIB4008E
Page 3427 of 4555

NAVIGATION SYSTEM
AV-85
C
D
E
F
G
H
I
J
L
MA
B
AV
Communication Line Check (Between NAVI Control Unit and TMC Tuner)EKS00LYL
Symptom: “RDS-TMC Tuner” is not displayed on self-diagnosis screen.
1. CHECK TMC TUNER POWER SUPPLY AND GROUND CIRCUIT
Check TMC tuner power supply and ground circuit. Refer to AV- 8 4 , "
Power Supply and Ground Circuit Check
for TMC Tuner" .
OK or NG
OK >> GO TO 2.
NG >> Repair malfunctioning parts.
2. CHECK HARNESS
1. Turn ignition switch OFF.
2. Disconnect NAVI control unit and TMC tuner connectors.
3. Check continuity between NAVI control unit harness connector
M117 terminals 47 (P), 48 (L) and TMC tuner harness connector
M123 terminals 1 (P), 2 (L).
4. Check continuity between NAVI control unit harness connector
M117 terminals 47 (P), 48 (L) and ground.
OK or NG
OK >> GO TO 3.
NG >> Repair harness or connector.
3. CHECK NAVI CONTROL UNIT AND TMC TUNER
1. Replace NAVI control unit or TMC tuner.
2. Turn ignition switch ON.
3. Start self-diagnosis, and check if any malfunction is detected from the self-diagnosis result.
Is any malfunction detected from self
-diagnosis result?
YES >> Replace the other unit.
NO >> INSPECTION END
Communication Line Check (Between Display and NAVI switch) EKS00F39
1. CHECK POWER SUPPLY AND GROUND CIRCUIT
Check system of power supply and ground circuit display. Refer to AV- 8 1 , "
Power Supply and Ground Circuit
Check for Display" .
OK or NG
OK >> GO TO 2.
NG >> Check the malfunctioning parts.47 (P) – 1 (P) : Continuity should exist.
48 (L) – 2 (L) : Continuity should exist.
47 (P), 48 (L) – Ground : Continuity should not exist.
SKIB3991E
Page 3428 of 4555
AV-86
NAVIGATION SYSTEM
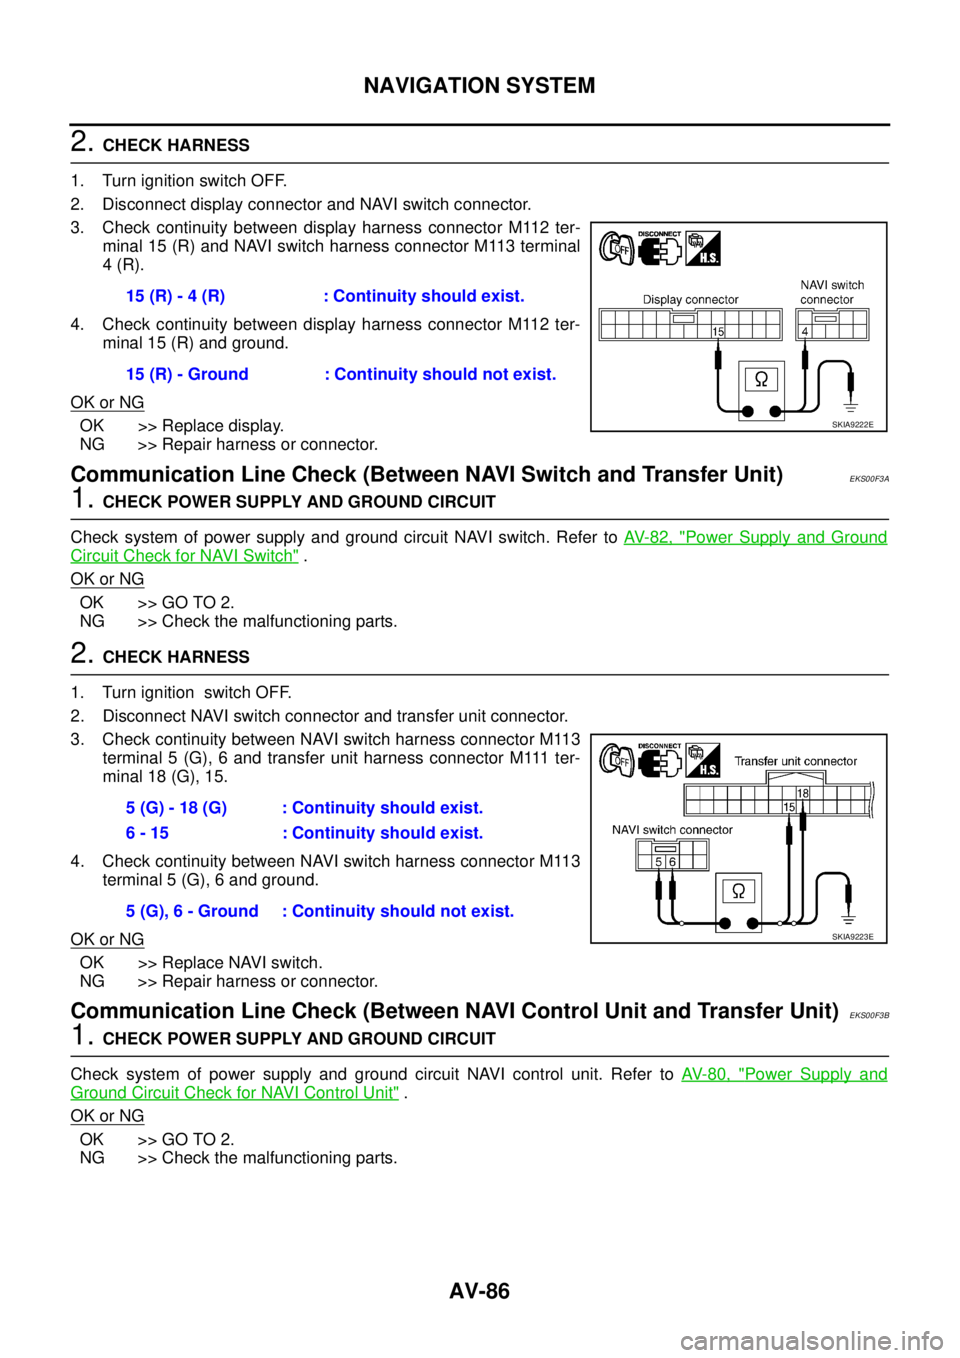
2. CHECK HARNESS
1. Turn ignition switch OFF.
2. Disconnect display connector and NAVI switch connector.
3. Check continuity between display harness connector M112 ter-
minal 15 (R) and NAVI switch harness connector M113 terminal
4 (R).
4. Check continuity between display harness connector M112 ter-
minal 15 (R) and ground.
OK or NG
OK >> Replace display.
NG >> Repair harness or connector.
Communication Line Check (Between NAVI Switch and Transfer Unit)EKS00F3A
1. CHECK POWER SUPPLY AND GROUND CIRCUIT
Check system of power supply and ground circuit NAVI switch. Refer to AV- 8 2 , "
Power Supply and Ground
Circuit Check for NAVI Switch" .
OK or NG
OK >> GO TO 2.
NG >> Check the malfunctioning parts.
2. CHECK HARNESS
1. Turn ignition switch OFF.
2. Disconnect NAVI switch connector and transfer unit connector.
3. Check continuity between NAVI switch harness connector M113
terminal 5 (G), 6 and transfer unit harness connector M111 ter-
minal 18 (G), 15.
4. Check continuity between NAVI switch harness connector M113
terminal 5 (G), 6 and ground.
OK or NG
OK >> Replace NAVI switch.
NG >> Repair harness or connector.
Communication Line Check (Between NAVI Control Unit and Transfer Unit) EKS00F3B
1. CHECK POWER SUPPLY AND GROUND CIRCUIT
Check system of power supply and ground circuit NAVI control unit. Refer to AV- 8 0 , "
Power Supply and
Ground Circuit Check for NAVI Control Unit" .
OK or NG
OK >> GO TO 2.
NG >> Check the malfunctioning parts. 15 (R) - 4 (R) : Continuity should exist.
15 (R) - Ground : Continuity should not exist.
SKIA9222E
5 (G) - 18 (G) : Continuity should exist.
6 - 15 : Continuity should exist.
5 (G), 6 - Ground : Continuity should not exist.
SKIA9223E