2005 NISSAN NAVARA turn signal bulb
[x] Cancel search: turn signal bulbPage 2084 of 3171
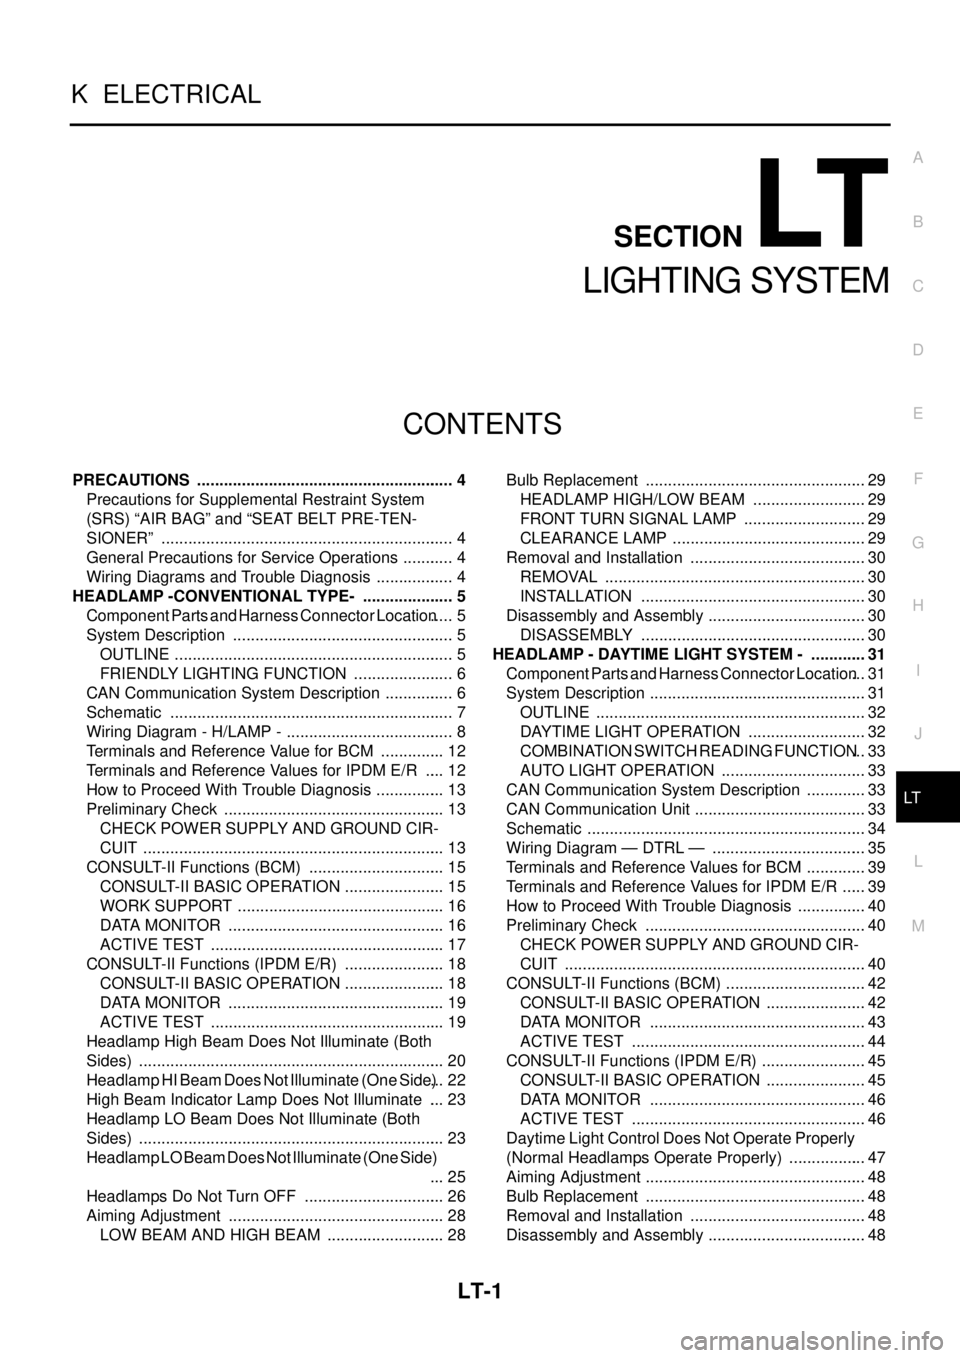
LT-1
LIGHTING SYSTEM
K ELECTRICAL
CONTENTS
C
D
E
F
G
H
I
J
L
M
SECTIONLT
A
B
LT
LIGHTING SYSTEM
PRECAUTIONS .......................................................... 4
Precautions for Supplemental Restraint System
(SRS)“AIRBAG”and“SEATBELTPRE-TEN-
SIONER” .................................................................. 4
General Precautions for Service Operations ............ 4
Wiring Diagrams and Trouble Diagnosis .................. 4
HEADLAMP -CONVENTIONAL TYPE- ..................... 5
Component Parts and Harness Connector Location..... 5
System Description .................................................. 5
OUTLINE ............................................................... 5
FRIENDLY LIGHTING FUNCTION ....................... 6
CAN Communication System Description ................ 6
Schematic ................................................................ 7
Wiring Diagram - H/LAMP - ...................................... 8
Terminals and Reference Value for BCM ............... 12
Terminals and Reference Values for IPDM E/R ..... 12
How to Proceed With Trouble Diagnosis ................ 13
Preliminary Check .................................................. 13
CHECK POWER SUPPLY AND GROUND CIR-
CUIT .................................................................... 13
CONSULT-II Functions (BCM) ............................... 15
CONSULT-II BASIC OPERATION ....................... 15
WORK SUPPORT ............................................... 16
DATA MONITOR ................................................. 16
ACTIVE TEST ..................................................... 17
CONSULT-II Functions (IPDM E/R) ....................... 18
CONSULT-II BASIC OPERATION ....................... 18
DATA MONITOR ................................................. 19
ACTIVE TEST ..................................................... 19
Headlamp High Beam Does Not Illuminate (Both
Sides) ..................................................................... 20
Headlamp HI Beam Does Not Illuminate (One Side)... 22
High Beam Indicator Lamp Does Not Illuminate .... 23
Headlamp LO Beam Does Not Illuminate (Both
Sides) ..................................................................... 23
Headlamp LO Beam Does Not Illuminate (One Side)
... 25
Headlamps Do Not Turn OFF ................................ 26
Aiming Adjustment ................................................. 28
LOW BEAM AND HIGH BEAM ........................... 28Bulb Replacement .................................................. 29
HEADLAMP HIGH/LOW BEAM .......................... 29
FRONT TURN SIGNAL LAMP ............................ 29
CLEARANCE LAMP ............................................ 29
Removal and Installation ........................................ 30
REMOVAL ........................................................... 30
INSTALLATION ................................................... 30
Disassembly and Assembly .................................... 30
DISASSEMBLY ................................................... 30
HEADLAMP - DAYTIME LIGHT SYSTEM - ............. 31
Component Parts and Harness Connector Location... 31
System Description ................................................. 31
OUTLINE ............................................................. 32
DAYTIME LIGHT OPERATION ........................... 32
COMBINATION SWITCH READING FUNCTION... 33
AUTO LIGHT OPERATION ................................. 33
CAN Communication System Description .............. 33
CAN Communication Unit ....................................... 33
Schematic ............................................................... 34
Wiring Diagram — DTRL — ................................... 35
Terminals and Reference Values for BCM .............. 39
Terminals and Reference Values for IPDM E/R ...... 39
How to Proceed With Trouble Diagnosis ................ 40
Preliminary Check .................................................. 40
CHECK POWER SUPPLY AND GROUND CIR-
CUIT .................................................................... 40
CONSULT-II Functions (BCM) ................................ 42
CONSULT-II BASIC OPERATION ....................... 42
DATA MONITOR ................................................. 43
ACTIVE TEST ..................................................... 44
CONSULT-II Functions (IPDM E/R) ........................ 45
CONSULT-II BASIC OPERATION ....................... 45
DATA MONITOR ................................................. 46
ACTIVE TEST ..................................................... 46
Daytime Light Control Does Not Operate Properly
(Normal Headlamps Operate Properly) .................. 47
Aiming Adjustment .................................................. 48
Bulb Replacement .................................................. 48
Removal and Installation ........................................ 48
Disassembly and Assembly .................................... 48
Page 2085 of 3171

LT-2
AUTO LIGHT SYSTEM ............................................. 49
Component Parts and Harness Connector Location... 49
System Description ................................................. 49
OUTLINE ............................................................. 49
COMBINATION SWITCH READING FUNCTION... 50
CAN Communication System Description .............. 50
Major Components and Functions .......................... 50
Schematic ............................................................... 51
Wiring Diagram — AUTO/L — ................................ 52
Terminals and Reference Values for BCM .............. 56
Terminals and Reference Values for IPDM E/R ...... 57
How to Proceed With Trouble Diagnosis ................ 57
Preliminary Check .................................................. 58
SETTING CHANGE FUNCTIONS ....................... 58
CHECK POWER SUPPLY AND GROUND CIR-
CUIT .................................................................... 58
CONSULT-II Function (BCM) .................................. 59
CONSULT-II OPERATION ................................... 59
WORK SUPPORT ............................................... 60
DATA MONITOR .................................................. 60
ACTIVE TEST ..................................................... 61
Trouble Diagnosis Chart by Symptom .................... 62
Lighting Switch Inspection ...................................... 62
Light and Rain Sensor System Inspection .............. 63
Removal and Installation of Light and Rain Sensor... 65
REMOVAL ........................................................... 65
INSTALLATION .................................................... 65
HEADLAMP AIMING CONTROL (MANUAL) ........... 66
Schematic ............................................................... 66
Wiring Diagram — H/AIM — ................................... 67
Removal and Installation ........................................ 70
Switch Circuit Inspection ........................................ 70
FRONT FOG LAMP .................................................. 71
Component Parts and Harness Connector Location... 71
System Description ................................................. 71
OUTLINE ............................................................. 71
COMBINATION SWITCH READING FUNCTION... 72
CAN Communication System Description .............. 72
Schematic ............................................................... 73
Wiring Diagram — F/FOG — .................................. 74
Terminals and Reference Values for BCM .............. 77
Terminals and Reference Values for IPDM E/R ...... 77
How to Proceed With Trouble Diagnosis ................ 78
Preliminary Check .................................................. 78
CHECK POWER SUPPLY AND GROUND CIR-
CUIT .................................................................... 78
CONSULT-II Functions (BCM) ................................ 79
CONSULT-II Functions (IPDM E/R) ........................ 79
Front Fog Lamps Do Not Illuminate (Both Sides) ... 80
Front Fog Lamp Does Not Illuminate (One Side) ... 82
Front Fog Lamp Indicator Lamp Does Not Illuminate... 83
Front Fog Lamps Do Not Turn OFF ........................ 84
Aiming Adjustment .................................................. 85
Bulb Replacement .................................................. 86
Removal and Installation of Front Fog Lamp .......... 86
REMOVAL ........................................................... 86
INSTALLATION .................................................... 86
REAR FOG LAMP ..................................................... 87
Component Parts and Harness Connector Location... 87System Description ................................................. 87
OUTLINE ............................................................. 87
COMBINATION SWITCH READING FUNCTION... 88
CAN Communication System Description .............. 88
CAN Communication Unit ....................................... 88
Wiring Diagram — R/FOG — .................................. 89
Terminals and Reference Values for BCM .............. 91
How to Proceed With Trouble Diagnosis ................ 91
Preliminary Check ................................................... 92
CHECK POWER SUPPLY AND GROUND CIR-
CUIT ..................................................................... 92
CONSULT-II Functions (BCM) ................................ 93
Rear Fog Lamp Does Not Operate ......................... 93
Rear Fog Lamp Indicator Lamp Does Not Illuminate... 95
Rear Fog Lamp Does Not Turn OFF ....................... 96
Bulb Replacement ................................................... 96
Removal and Installation ......................................... 96
TURN SIGNAL AND HAZARD WARNING LAMPS... 97
Component Parts and Harness Connector Location... 97
System Description ................................................. 97
OUTLINE ............................................................. 97
TURN SIGNAL OPERATION ............................... 97
HAZARD LAMP OPERATION ............................. 98
REMOTE KEYLESS ENTRY SYSTEM OPERA-
TION .................................................................... 99
COMBINATION SWITCH READING FUNCTION... 99
CAN Communication System Description .............. 99
Wiring Diagram — TURN — .................................100
Terminals and Reference Values for BCM ............102
How to Proceed With Trouble Diagnosis ..............103
Preliminary Check .................................................103
CHECK POWER SUPPLY AND GROUND CIR-
CUIT ...................................................................103
CONSULT-II Function (BCM) ................................105
CONSULT-II OPERATION .................................105
DATA MONITOR ................................................106
ACTIVE TEST ....................................................106
Turn Signal Lamp Does Not Operate ....................107
Hazard Warning Lamp Does Not Operate But Turn
Signal Lamps Operate ..........................................109
Turn Signal Indicator Lamp Does Not Operate .....110
Bulb Replacement (Front Turn Signal Lamp) ........ 111
Bulb Replacement (Rear Turn Signal Lamp) ........ 111
Bulb Replacement (Side Turn Signal Lamp) ......... 111
Removal and Installation of Front Turn Signal Lamp. 111
Removal and Installation of Rear Turn Signal Lamp. 111
Removal and Installation of Side Turn Signal Lamp. 111
REMOVAL .......................................................... 111
INSTALLATION .................................................. 111
LIGHTING AND TURN SIGNAL SWITCH ..............112
Removal and Installation .......................................112
REMOVAL ..........................................................112
INSTALLATION ..................................................112
HAZARD SWITCH ...................................................113
Removal and Installation .......................................113
REMOVAL ..........................................................113
INSTALLATION ..................................................113
COMBINATION SWITCH ........................................114
Wiring Diagram — COMBSW — ..........................114
Page 2105 of 3171
LT-22
HEADLAMP -CONVENTIONAL TYPE-
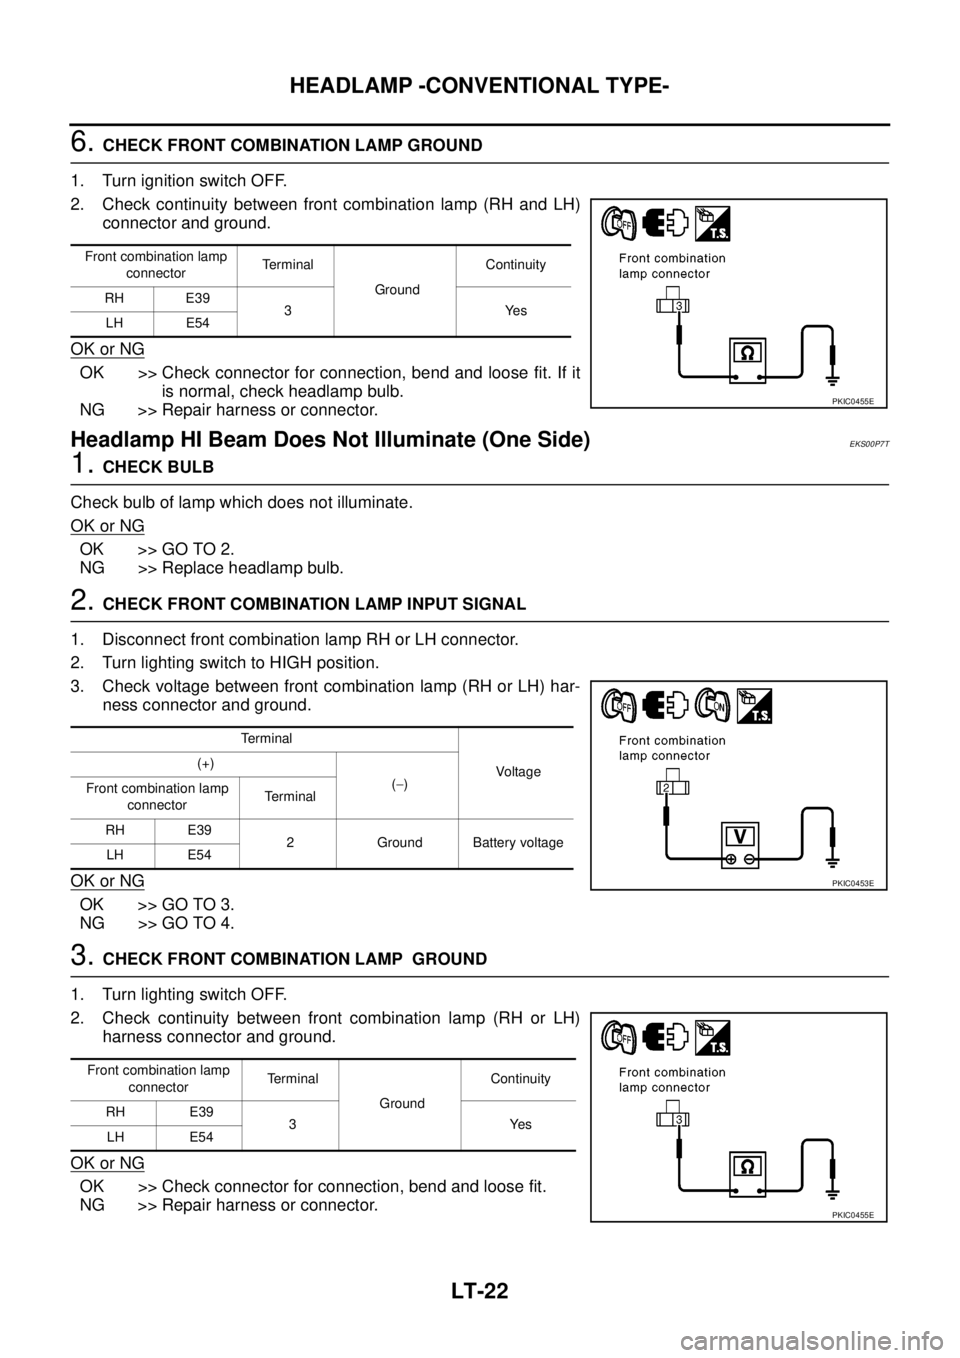
6.CHECK FRONT COMBINATION LAMP GROUND
1. Turn ignition switch OFF.
2. Check continuity between front combination lamp (RH and LH)
connector and ground.
OK or NG
OK >> Check connector for connection, bend and loose fit. If it
is normal, check headlamp bulb.
NG >> Repair harness or connector.
Headlamp HI Beam Does Not Illuminate (One Side)EKS00P7T
1.CHECK BULB
Check bulb of lamp which does not illuminate.
OK or NG
OK >> GO TO 2.
NG >> Replace headlamp bulb.
2.CHECK FRONT COMBINATION LAMP INPUT SIGNAL
1. Disconnect front combination lamp RH or LH connector.
2. Turn lighting switch to HIGH position.
3. Check voltage between front combination lamp (RH or LH) har-
ness connector and ground.
OK or NG
OK >> GO TO 3.
NG >> GO TO 4.
3.CHECK FRONT COMBINATION LAMP GROUND
1. Turn lighting switch OFF.
2. Check continuity between front combination lamp (RH or LH)
harness connector and ground.
OK or NG
OK >> Check connector for connection, bend and loose fit.
NG >> Repair harness or connector.
Front combination lamp
connectorTerminal
GroundContinuity
RH E39
3Yes
LH E54
PKIC0455E
Terminal
Voltag e (+)
(-)
Front combination lamp
connectorTerminal
RH E39
2 Ground Battery voltage
LH E54
PKIC0453E
Front combination lamp
connectorTe r m i n a l
GroundContinuity
RH E39
3Yes
LH E54
PKIC0455E
Page 2108 of 3171
HEADLAMP -CONVENTIONAL TYPE-
LT-25
C
D
E
F
G
H
I
J
L
MA
B
LT
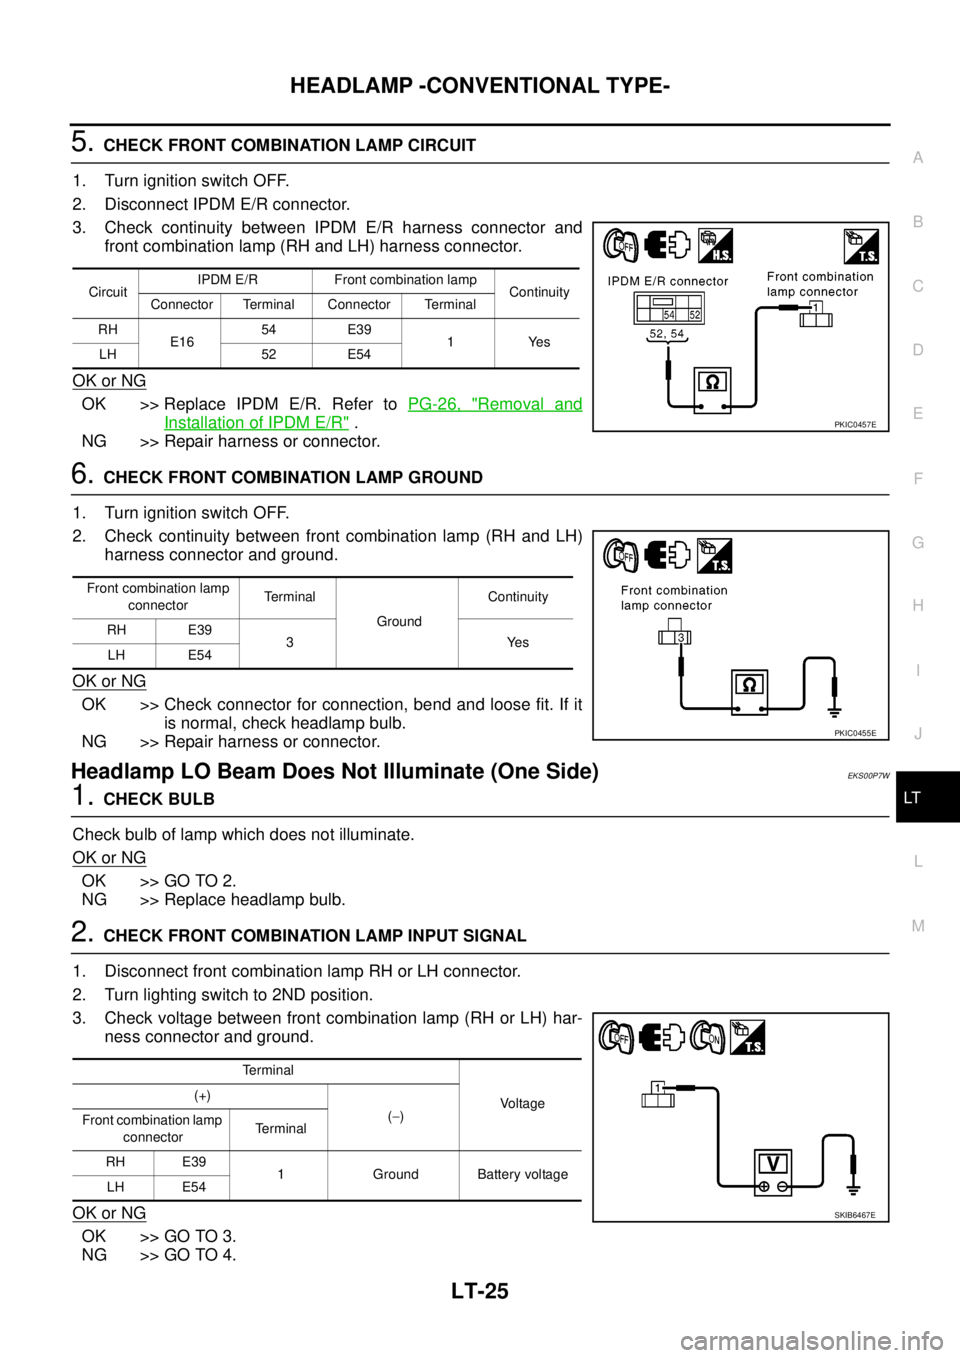
5.CHECK FRONT COMBINATION LAMP CIRCUIT
1. Turn ignition switch OFF.
2. Disconnect IPDM E/R connector.
3. Check continuity between IPDM E/R harness connector and
front combination lamp (RH and LH) harness connector.
OK or NG
OK >> Replace IPDM E/R. Refer toPG-26, "Removal and
Installation of IPDM E/R".
NG >> Repair harness or connector.
6.CHECK FRONT COMBINATION LAMP GROUND
1. Turn ignition switch OFF.
2. Check continuity between front combination lamp (RH and LH)
harness connector and ground.
OK or NG
OK >> Check connector for connection, bend and loose fit. If it
is normal, check headlamp bulb.
NG >> Repair harness or connector.
Headlamp LO Beam Does Not Illuminate (One Side)EKS00P7W
1.CHECK BULB
Check bulb of lamp which does not illuminate.
OK or NG
OK >> GO TO 2.
NG >> Replace headlamp bulb.
2.CHECK FRONT COMBINATION LAMP INPUT SIGNAL
1. Disconnect front combination lamp RH or LH connector.
2. Turn lighting switch to 2ND position.
3. Check voltage between front combination lamp (RH or LH) har-
ness connector and ground.
OK or NG
OK >> GO TO 3.
NG >> GO TO 4.
CircuitIPDM E/R Front combination lamp
Continuity
Connector Terminal Connector Terminal
RH
E1654 E39
1Yes
LH 52 E54
PKIC0457E
Front combination lamp
connectorTerminal
GroundContinuity
RH E39
3Yes
LH E54
PKIC0455E
Terminal
Voltage (+)
(-)
Front combination lamp
connectorTerminal
RH E39
1 Ground Battery voltage
LH E54
SKIB6467E
Page 2112 of 3171
HEADLAMP -CONVENTIONAL TYPE-
LT-29
C
D
E
F
G
H
I
J
L
MA
B
LT
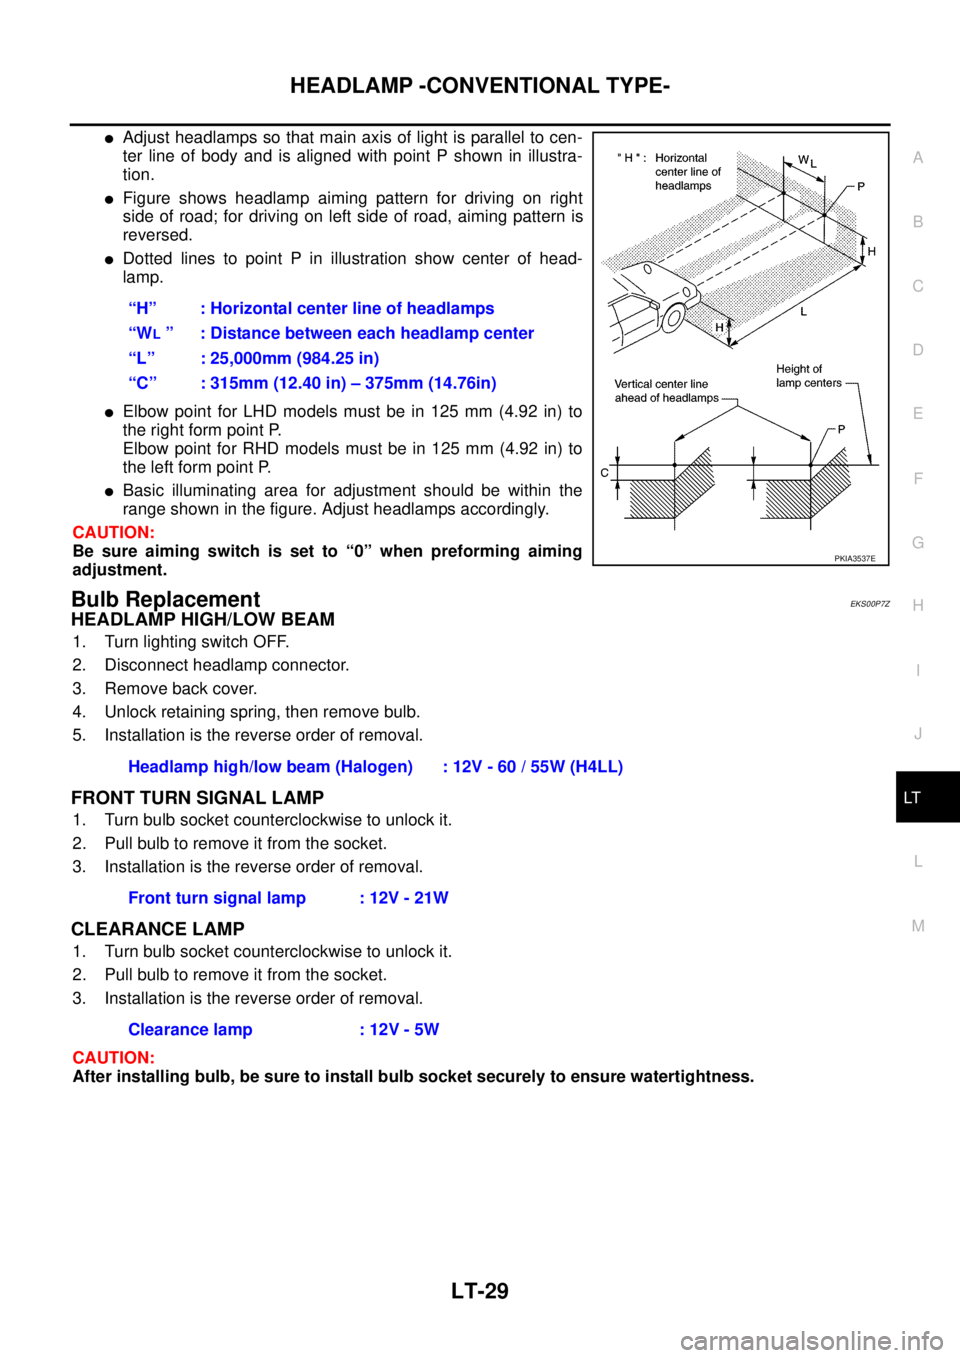
lAdjust headlamps so that main axis of light is parallel to cen-
ter line of body and is aligned with point P shown in illustra-
tion.
lFigure shows headlamp aiming pattern for driving on right
side of road; for driving on left side of road, aiming pattern is
reversed.
lDotted lines to point P in illustration show center of head-
lamp.
lElbow point for LHD models must be in 125 mm (4.92 in) to
the right form point P.
Elbow point for RHD models must be in 125 mm (4.92 in) to
the left form point P.
lBasic illuminating area for adjustment should be within the
range shown in the figure. Adjust headlamps accordingly.
CAUTION:
Be sure aiming switch is set to “0” when preforming aiming
adjustment.
Bulb ReplacementEKS00P7Z
HEADLAMP HIGH/LOW BEAM
1. Turn lighting switch OFF.
2. Disconnect headlamp connector.
3. Remove back cover.
4. Unlock retaining spring, then remove bulb.
5. Installation is the reverse order of removal.
FRONT TURN SIGNAL LAMP
1. Turn bulb socket counterclockwise to unlock it.
2. Pull bulb to remove it from the socket.
3. Installation is the reverse order of removal.
CLEARANCE LAMP
1. Turn bulb socket counterclockwise to unlock it.
2. Pull bulb to remove it from the socket.
3. Installation is the reverse order of removal.
CAUTION:
After installing bulb, be sure to install bulb socket securely to ensure watertightness.“H” : Horizontal center line of headlamps
“W
L” : Distance between each headlamp center
“L” : 25,000mm (984.25 in)
“C” : 315mm (12.40 in) – 375mm (14.76in)
PKIA3537E
Headlamp high/low beam (Halogen) : 12V - 60 / 55W (H4LL)
Front turn signal lamp : 12V - 21W
Clearance lamp : 12V - 5W
Page 2113 of 3171
LT-30
HEADLAMP -CONVENTIONAL TYPE-
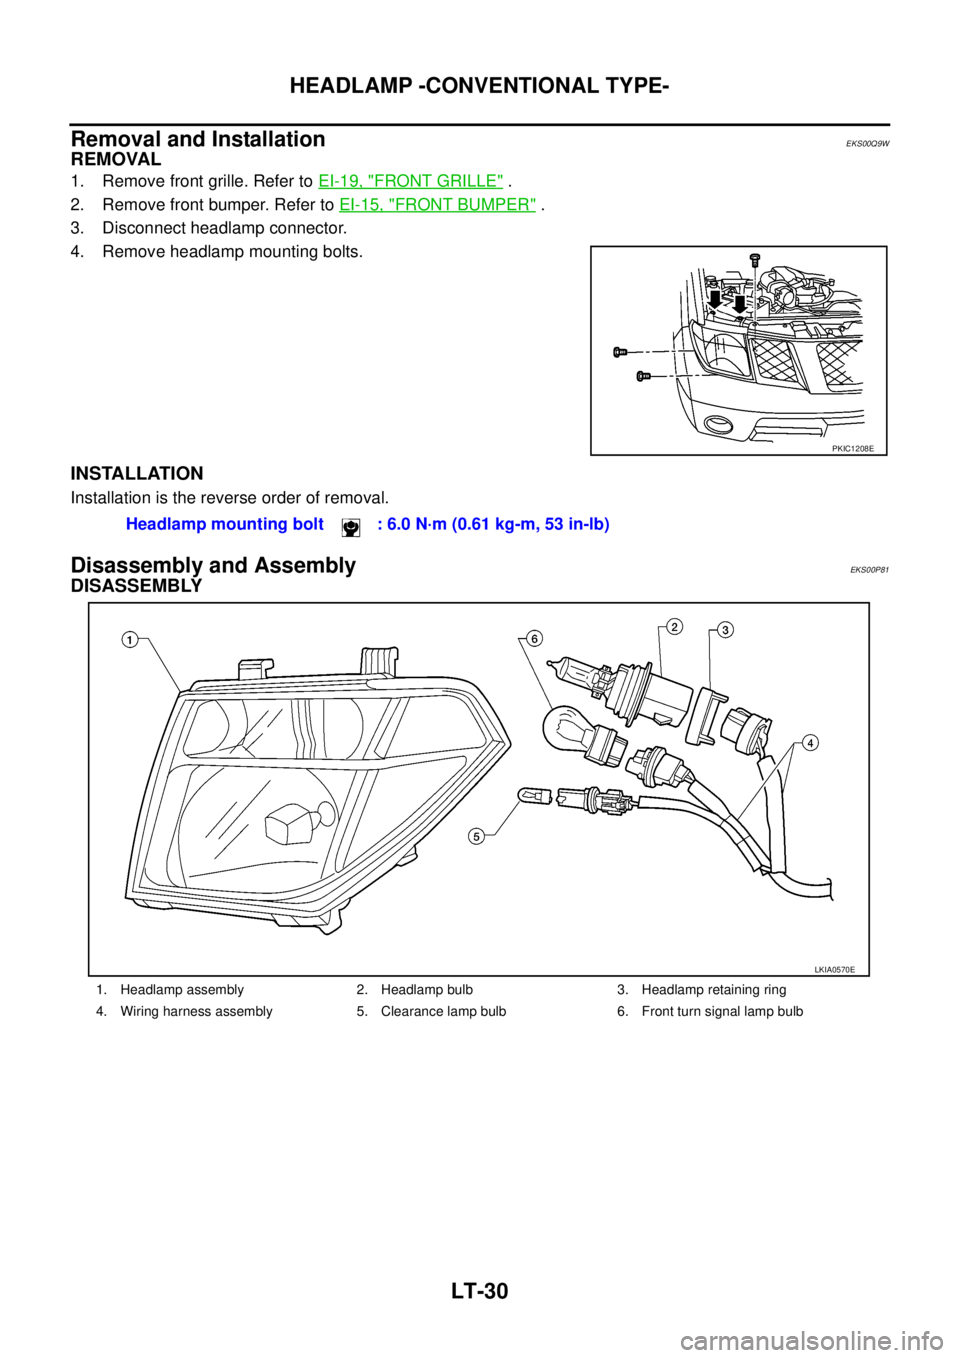
Removal and Installation
EKS00Q9W
REMOVAL
1. Remove front grille. Refer toEI-19, "FRONT GRILLE".
2. Remove front bumper. Refer toEI-15, "
FRONT BUMPER".
3. Disconnect headlamp connector.
4. Remove headlamp mounting bolts.
INSTALLATION
Installation is the reverse order of removal.
Disassembly and AssemblyEKS00P81
DISASSEMBLY
PKIC1208E
Headlamp mounting bolt : 6.0 N·m (0.61 kg-m, 53 in-lb)
1. Headlamp assembly 2. Headlamp bulb 3. Headlamp retaining ring
4. Wiring harness assembly 5. Clearance lamp bulb 6. Front turn signal lamp bulb
LKIA0570E
Page 2164 of 3171
FRONT FOG LAMP
LT-81
C
D
E
F
G
H
I
J
L
MA
B
LT
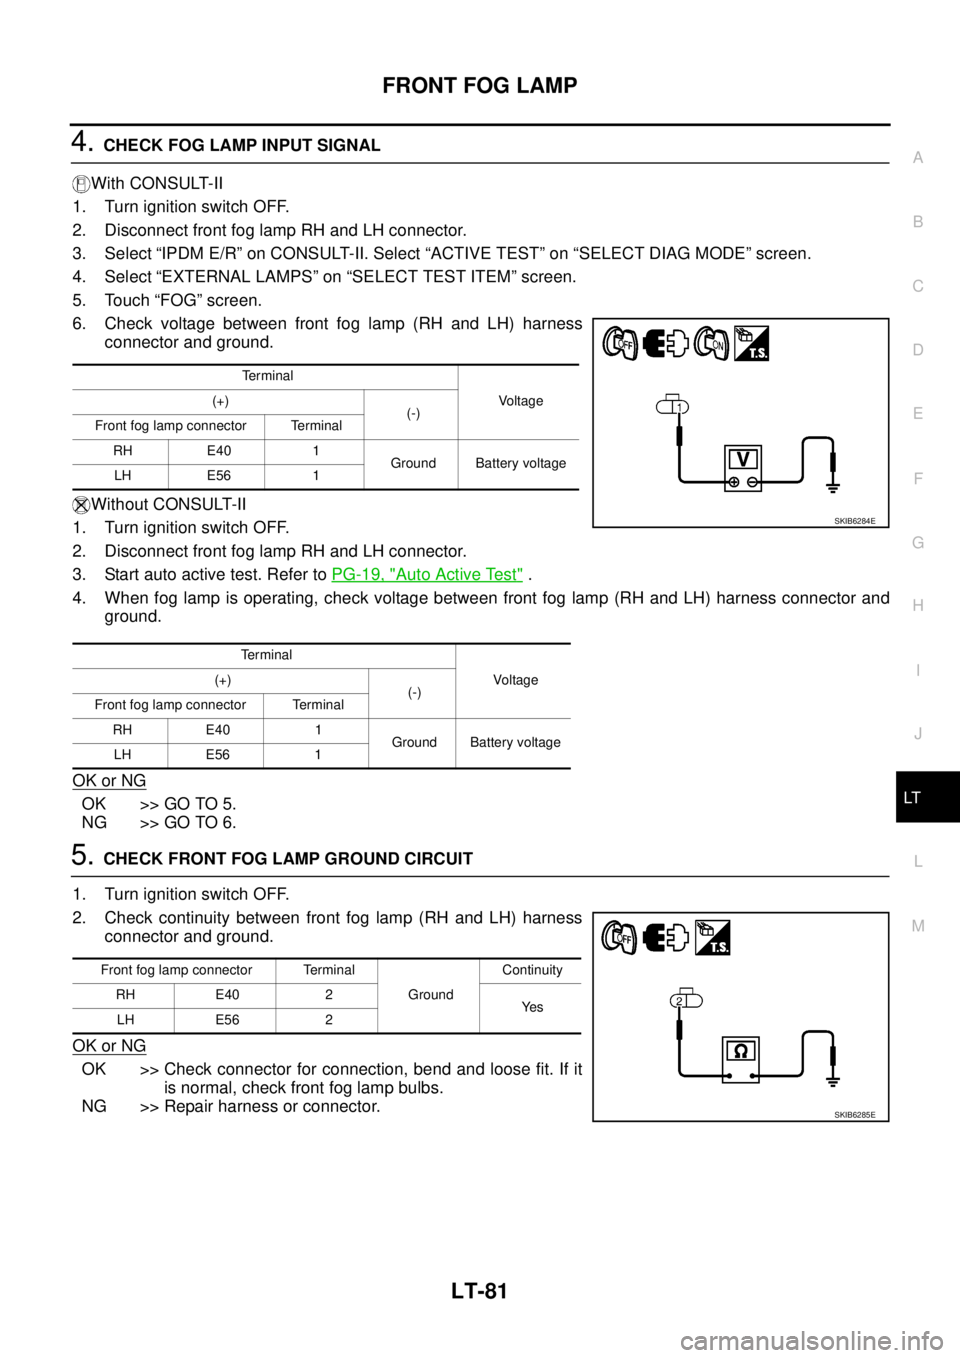
4.CHECK FOG LAMP INPUT SIGNAL
With CONSULT-II
1. Turn ignition switch OFF.
2. Disconnect front fog lamp RH and LH connector.
3. Select “IPDM E/R” on CONSULT-II. Select “ACTIVE TEST” on “SELECT DIAG MODE” screen.
4. Select “EXTERNAL LAMPS” on “SELECT TEST ITEM” screen.
5. Touch “FOG” screen.
6. Check voltage between front fog lamp (RH and LH) harness
connector and ground.
Without CONSULT-II
1. Turn ignition switch OFF.
2. Disconnect front fog lamp RH and LH connector.
3. Start auto active test. Refer toPG-19, "
Auto Active Test".
4. When fog lamp is operating, check voltage between front fog lamp (RH and LH) harness connector and
ground.
OK or NG
OK >> GO TO 5.
NG >> GO TO 6.
5.CHECK FRONT FOG LAMP GROUND CIRCUIT
1. Turn ignition switch OFF.
2. Check continuity between front fog lamp (RH and LH) harness
connector and ground.
OK or NG
OK >> Check connector for connection, bend and loose fit. If it
is normal, check front fog lamp bulbs.
NG >> Repair harness or connector.
Te r m i n a l
Voltage (+)
(-)
Front fog lamp connector Terminal
RH E40 1
Ground Battery voltage
LH E56 1
Te r m i n a l
Voltag e (+)
(-)
Front fog lamp connector Terminal
RH E40 1
Ground Battery voltage
LH E56 1
SKIB6284E
Front fog lamp connector Terminal
GroundContinuity
RH E40 2
Ye s
LH E56 2
SKIB6285E
Page 2165 of 3171
LT-82
FRONT FOG LAMP
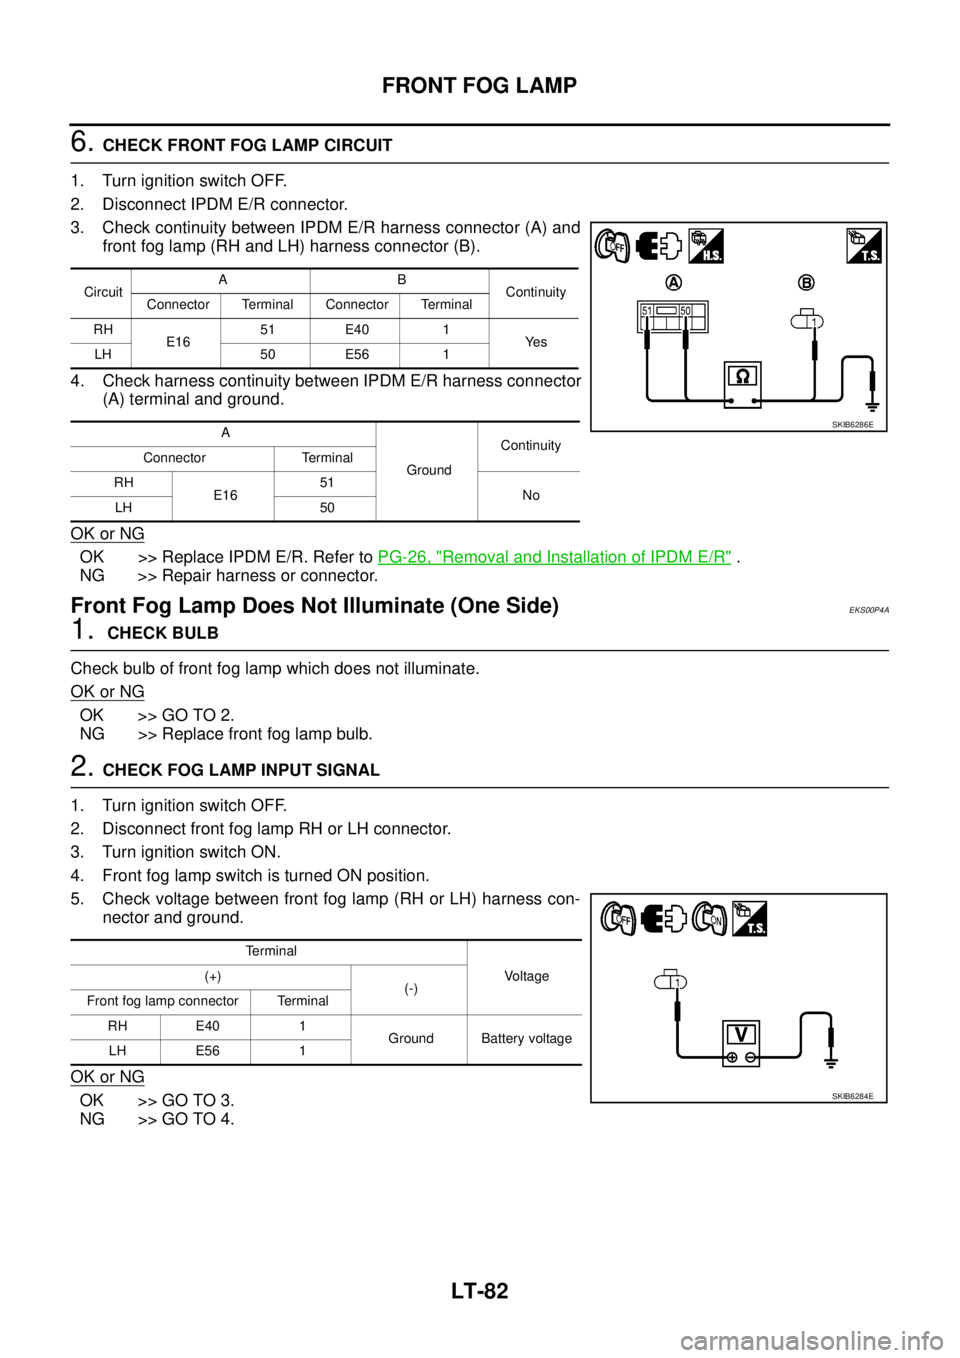
6.CHECK FRONT FOG LAMP CIRCUIT
1. Turn ignition switch OFF.
2. Disconnect IPDM E/R connector.
3. Check continuity between IPDM E/R harness connector (A) and
front fog lamp (RH and LH) harness connector (B).
4. Check harness continuity between IPDM E/R harness connector
(A) terminal and ground.
OK or NG
OK >> Replace IPDM E/R. Refer toPG-26, "Removal and Installation of IPDM E/R".
NG >> Repair harness or connector.
Front Fog Lamp Does Not Illuminate (One Side)EKS00P4A
1.CHECK BULB
Check bulb of front fog lamp which does not illuminate.
OK or NG
OK >> GO TO 2.
NG >> Replace front fog lamp bulb.
2.CHECK FOG LAMP INPUT SIGNAL
1. Turn ignition switch OFF.
2. Disconnect front fog lamp RH or LH connector.
3. Turn ignition switch ON.
4. Front fog lamp switch is turned ON position.
5. Check voltage between front fog lamp (RH or LH) harness con-
nector and ground.
OK or NG
OK >> GO TO 3.
NG >> GO TO 4.
CircuitAB
Continuity
Connector Terminal Connector Terminal
RH
E1651 E40 1
Ye s
LH 50 E56 1
A
GroundContinuity
Connector Terminal
RH
E1651
No
LH 50
SKIB6286E
Terminal
Voltage (+)
(-)
Front fog lamp connector Terminal
RH E40 1
Ground Battery voltage
LH E56 1
SKIB6284E