Page 11 of 364
ENGINE – CAMSHAFT, VALVE STEM SEAL
11 - 5
� �
O� �
� �
O� �
Removal procedure
1. Oil feeder control valve connector
2. Oil feeder control valve
3. O-ring
4. Breather hose
• Secondary air control valve
(refer to Section 15-2: Secondary Air
Control System)
5. Centre cover
• Ignition coil
6. O
2sensor connector
7. Crank angle sensor connector8. Connection of the control harness
9. Vacuum hose
10. PCV hose
11.Connection of the radiator upper hose
12. Camshaft position sensor connector
(exhaust side)
13. Camshaft position sensor connector
(inlet side)
14. Connection of the earth cable
15. Rocker cover ASSY
16. Spark plug hole gasket
17. Rocker cover gasket
� �
A� �
�
�
N� �
� �
M� �
Page 12 of 364

ENGINE – CAMSHAFT, VALVE STEM SEAL11 - 6
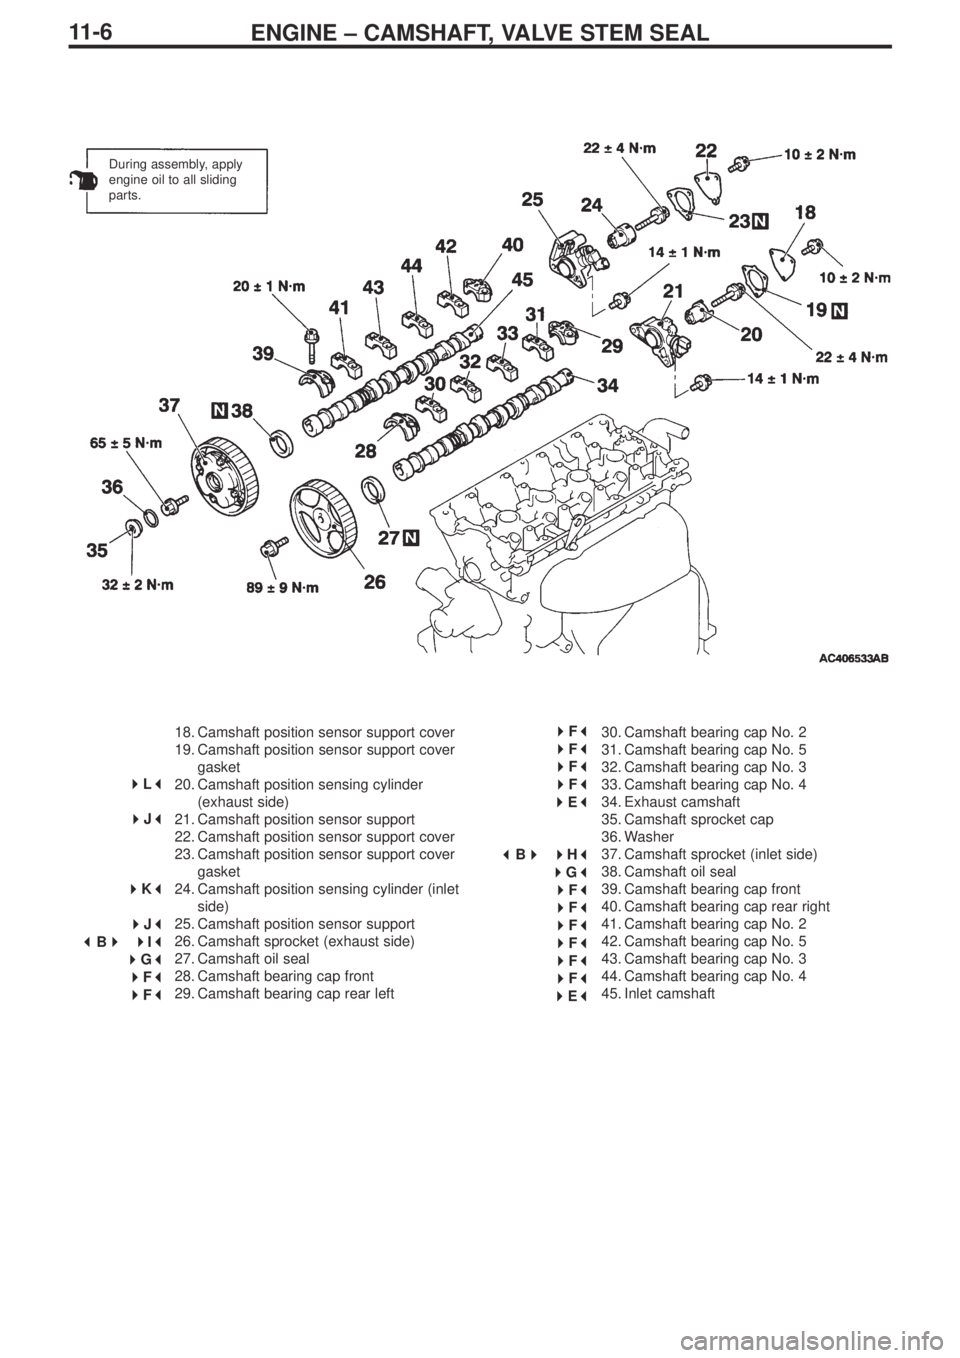
18. Camshaft position sensor support cover
19. Camshaft position sensor support cover
gasket
20. Camshaft position sensing cylinder
(exhaust side)
21. Camshaft position sensor support
22. Camshaft position sensor support cover
23. Camshaft position sensor support cover
gasket
24. Camshaft position sensing cylinder (inlet
side)
25. Camshaft position sensor support
26. Camshaft sprocket (exhaust side)
27. Camshaft oil seal
28. Camshaft bearing cap front
29. Camshaft bearing cap rear left30. Camshaft bearing cap No. 2
31. Camshaft bearing cap No. 5
32. Camshaft bearing cap No. 3
33. Camshaft bearing cap No. 4
34. Exhaust camshaft
35. Camshaft sprocket cap
36. Washer
37. Camshaft sprocket (inlet side)
38. Camshaft oil seal
39. Camshaft bearing cap front
40. Camshaft bearing cap rear right
41. Camshaft bearing cap No. 2
42. Camshaft bearing cap No. 5
43. Camshaft bearing cap No. 3
44. Camshaft bearing cap No. 4
45. Inlet camshaft
During assembly, apply
engine oil to all sliding
parts.
� �
F� �
� �
F� �
� �
F� �
� �
F� �
� �
E� �
� �
B� �
�
�
H� �
� �
G� �
� �
F� �
� �
F� �
� �
F� �
� �
F� �
� �
F� �
� �
F� �
� �
E� �
�
�
L� �
� �
J� �
� �
K� �
� �
J� �
� �
B� �
�
�
I� �
� �
G� �
� �
F� �
� �
F� �
Page 18 of 364

ENGINE – CAMSHAFT, VALVE STEM SEAL11-12
� �
H� �
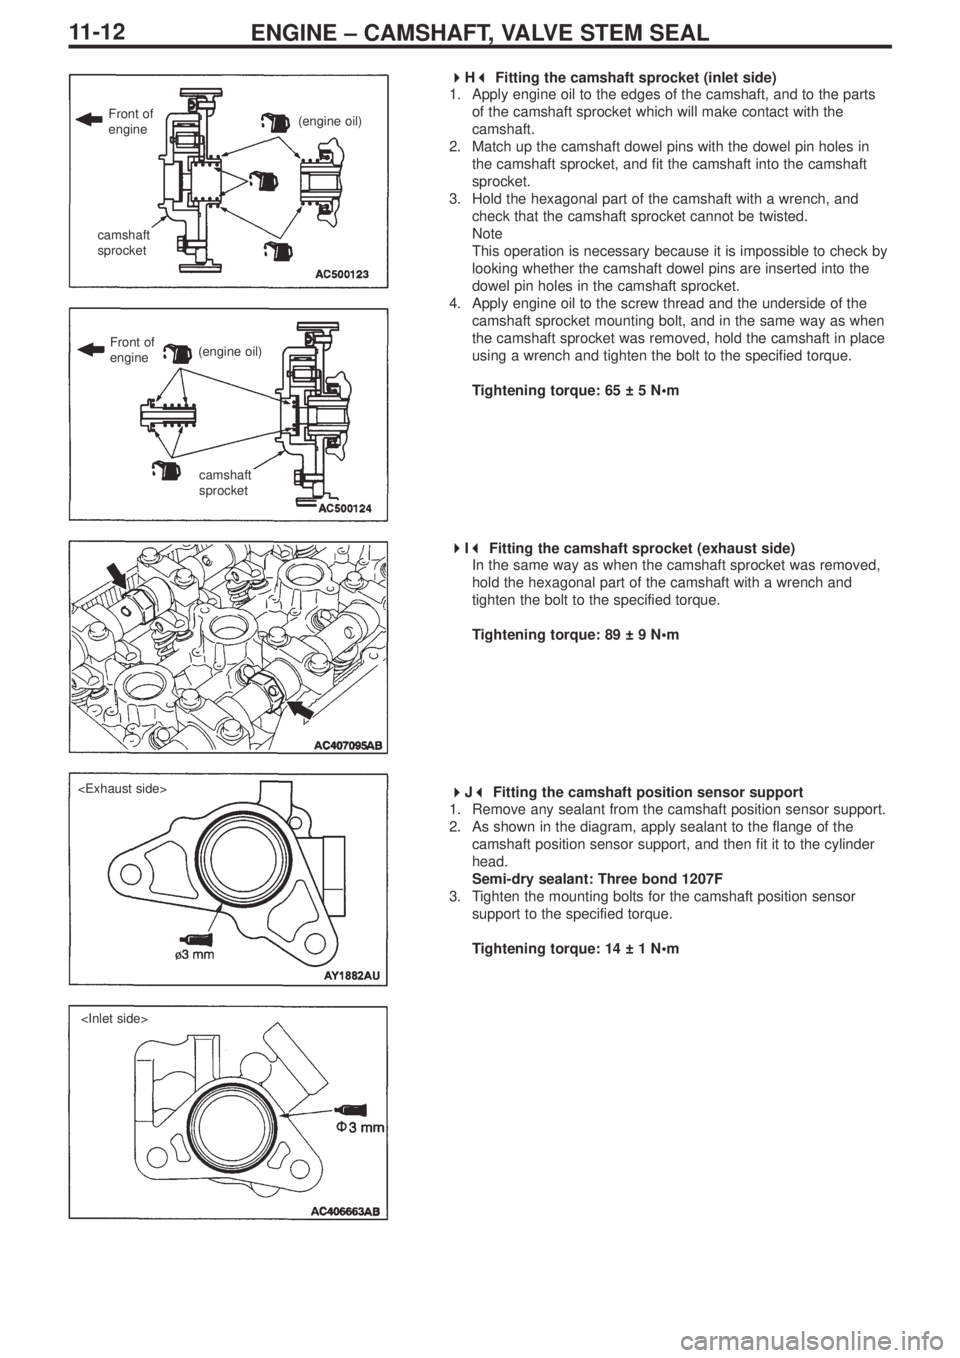
Fitting the camshaft sprocket (inlet side)
1. Apply engine oil to the edges of the camshaft, and to the parts
of the camshaft sprocket which will make contact with the
camshaft.
2. Match up the camshaft dowel pins with the dowel pin holes in
the camshaft sprocket, and fit the camshaft into the camshaft
sprocket.
3. Hold the hexagonal part of the camshaft with a wrench, and
check that the camshaft sprocket cannot be twisted.
Note
This operation is necessary because it is impossible to check by
looking whether the camshaft dowel pins are inserted into the
dowel pin holes in the camshaft sprocket.
4. Apply engine oil to the screw thread and the underside of the
camshaft sprocket mounting bolt, and in the same way as when
the camshaft sprocket was removed, hold the camshaft in place
using a wrench and tighten the bolt to the specified torque.
Tightening torque: 65 ± 5 N•m
� �
I� �
Fitting the camshaft sprocket (exhaust side)
In the same way as when the camshaft sprocket was removed,
hold the hexagonal part of the camshaft with a wrench and
tighten the bolt to the specified torque.
Tightening torque: 89 ± 9 N•m
� �
J� �
Fitting the camshaft position sensor support
1. Remove any sealant from the camshaft position sensor support.
2. As shown in the diagram, apply sealant to the flange of the
camshaft position sensor support, and then fit it to the cylinder
head.
Semi-dry sealant: Three bond 1207F
3. Tighten the mounting bolts for the camshaft position sensor
support to the specified torque.
Tightening torque: 14 ± 1 N•m
Front of
engine(engine oil)
(engine oil)
camshaft
sprocket
camshaft
sprocket
Front of
engine
Page 21 of 364
ENGINE – CYLINDER HEAD GASKET
11-15
Removal procedure
1. Ignition coil connector
2. O
2sensor connector
3. Oil feeder control valve connector
4. Crank angle sensor connector
5. Manifold absolute pressure sensor
connector
6. Fuel pressure solenoid valve connector
7. Knock sensor connector
8. Purge control solenoid valve connector
9. Throttle position sensor connector
10. Injector connector
11.Exhaust camshaft position sensor
connector12. Inlet camshaft position sensor
connector
13. Water temperature gauge unit
connector
14. Joint control harness and transmission
harness
15. Water temperature sensor connector
16. Secondary air control solenoid valve
connector
17. Vacuum tank, solenoid valve, vacuum
pipe and hose assembly
18. Brake booster vacuum hose connection
19. Oil level gauge and guide assembly
20. O-ring
21. Purge hose connection
(engine oil)
Page 27 of 364
ENGINE – TIMING BELT, TIMING BELT B
11-21
10. Power steering oil pressure switch connector
11.Heat protector
12. Power steering oil pump ASSY
13. Power steering oil pump bracket
14. Idler pulley
15. Crank angle sensor16. Crankshaft sprocket
17. Crankshaft sensing blade
•Adjust the tension of the timing belt B
18. Timing belt B tensioner
19. Timing belt B
Removal guidelines
� �
A� �
Removing the timing belt
1. Turn the crankshaft in a clockwise direction, and match up all
the timing marks until the No.1 cylinder is in the compressor top
dead centre position.
Caution
Turn the crankshaft in the normal way.
2. Remove the rubber plug from the rear cover of the timing belt,
and prepare the special tool for adjusting bolts (MD998738).
� �
C� �
�
�
C� �
� �
C� �
� �
B� �
� �
A� �
� �
D� �
�
�
A� �
�
�
B� �
(engine oil)
Timing marks
Timing belt
valence
Page 35 of 364
ENGINE – ENGINE ASSY
11-29
Removal procedure
1. Ignition coil connector
2. O
2sensor connector
3. Oil feeder control valve connector
4. Crank angle sensor connector
5. Manifold absolute pressure sensor
connector
6. Fuel pressure solenoid valve connector
7. Knock sensor connector
8. Purge control solenoid valve connector
9. Throttle position connector
10. Injector connector11.Exhaust cam position sensor connector
12. Inlet cam position sensor connector
13. Water temperature gauge unit connector
14. Joint control harness and transmission
harness
15. Water temperature sensor connector
16. Alternator connector and terminal
17. Secondary air control solenoid valve
connector
18. Engine oil pressure switch connector
19. Drive belt
� �
A� �
Page 41 of 364

MPI – GENERAL
13A-1
SECTION 13A
MPI (Multi-point Fuel Injection)
CONTENTS
General ..................................................................... 2
Servicing standards .................................................3
Special tools ............................................................3
Troubleshooting ......................................................5Servicing the vehicle ............................................29
1. Adjusting specified revolutions when idling.....29
2. MPI system components layout diagram ........29
3. Checking the air temperature sensor..............29
4. Checking the oil feeder control valve..............30
GENERAL
Servicing guidelines have been changed because of the changes listed below.
•Avariable valve timing control system (V.V.T.) has been adopted. Because of this, an oil feeder control valve and an intake
cam position sensor have been added.
•Amanifold absolute pressure (MAP) sensor has been added.
•An air temperature sensor has been added.
Page 42 of 364

MPI – GENERAL13A-2
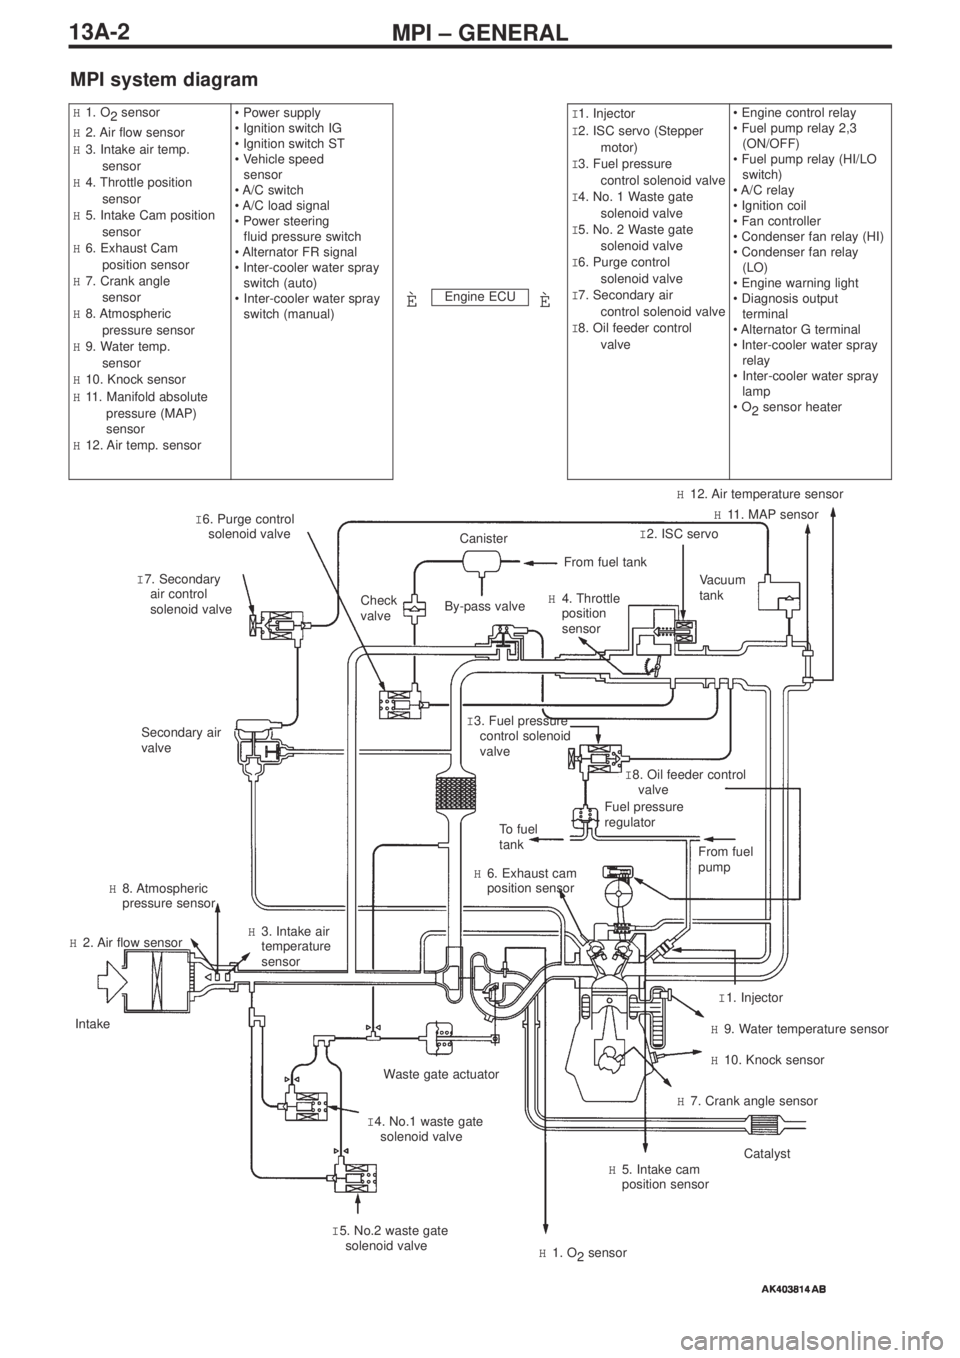
MPI system diagram
Engine ECU
H1. O
2 sensor
H2. Air flow sensor
H3. Intake air temp.
sensor
H4. Throttle position
sensor
H5. Intake Cam position
sensor
H6. Exhaust Cam
position sensor
H7. Crank angle
sensor
H8. Atmospheric
pressure sensor
H9. Water temp.
sensor
H10. Knock sensor
H11. Manifold absolute
pressure (MAP)
sensor
H12. Air temp. sensor• Power supply
• Ignition switch IG
• Ignition switch ST
• Vehicle speed
sensor
• A/C switch
• A/C load signal
• Power steering
fluid pressure switch
• Alternator FR signal
• Inter-cooler water spray
switch (auto)
•Inter-cooler water spray
switch (manual)I1. Injector
I2. ISC servo (Stepper
motor)
I3. Fuel pressure
control solenoid valve
I4. No. 1 Waste gate
solenoid valve
I5. No. 2 Waste gate
solenoid valve
I6. Purge control
solenoid valve
I7. Secondary air
control solenoid valve
I8. Oil feeder control
valve• Engine control relay
• Fuel pump relay 2,3
(ON/OFF)
• Fuel pump relay (HI/LO
switch)
• A/C relay
• Ignition coil
• Fan controller
• Condenser fan relay (HI)
• Condenser fan relay
(LO)
• Engine warning light
• Diagnosis output
terminal
• Alternator G terminal
• Inter-cooler water spray
relay
•Inter-cooler water spray
lamp
• O
2sensor heater
ÈÈ
I 6. Purge control
solenoid valve
I 7. Secondary
air control
solenoid valveCheck
valve
Secondary air
valve
To fuel
tank
H 6. Exhaust cam
position sensor
H 8. Atmospheric
pressure sensor
H 2. Air flow sensor
Intake
Waste gate actuator
I 4. No.1 waste gate
solenoid valve H 3. Intake air
temperature
sensor
I 5. No.2 waste gate
solenoid valve
H 1. O
2sensor
H 5. Intake cam
position sensorCatalyst
H 7. Crank angle sensor
H 10. Knock sensor
H 9. Water temperature sensor
I 1. Injector From fuel
pump
Fuel pressure
regulatorI 8. Oil feeder control
valve I 3. Fuel pressure
control solenoid
valve
Vacuum
tank
I 2. ISC servoH 11. MAP sensor
H 12. Air temperature sensor
H 4. Throttle
position
sensor
From fuel tank
Canister
By-pass valve