2005 MERCEDES-BENZ SPRINTER ECU
[x] Cancel search: ECUPage 1197 of 1232
ING/PLUMBING/REFRIGERANT - STANDARD
PROCEDURE).
(2) Disconnect and isolate the battery negative
cable.
(3) Remove the interior trim panel from the right
quarter panel (Refer to 23 - BODY/INTERIOR/
QUARTER TRIM PANEL - REMOVAL).
(4) Disconnect the fittings that secure the rear
refrigerant lines to the sidewall refrigerant lines.
(5) Remove the seals from the open liquid and suc-
tion line fittings and discard.
(6) Install plugs in, or tape over the open liquid
and suction line fittings.
(7) Raise and support the vehicle.
(8) Disconnect the fittings that secure the interme-
diate refrigerant lines to the rear refrigerant lines.
(9) Remove the seals from the open liquid and suc-
tion line fittings and discard.
(10) Install plugs in, or tape over the open liquid
and suction line fittings.
(11) Remove the propeller shaft (Refer to 3 - DIF-
FERENTIAL & DRIVELINE/PROPELLER SHAFT/
PROPELLER SHAFT - REMOVAL).
(12) Remove the seal from the right inner sidewall.
(13) Carefully pull the rubber rear refrigerant
lines out from the sidewall.
(14) Remove the bolts that secure the four rear
refrigerant line retaining blocks to the vehicle under-
body.
(15) Remove the rear section of the rear refriger-
ant lines from the vehicle underbody.
SIDEWALL REFRIGERANT LINES
(1) Recover the refrigerant from the refrigerant
system (Refer to 24 - HEATING & AIR CONDITION-
ING/PLUMBING/REFRIGERANT - STANDARD
PROCEDURE).
(2) Disconnect and isolate the battery negative
cable.
(3) Disconnect the suction line from the rear
expansion valve outlet port (Refer to 24 - HEATING
& AIR CONDITIONING/PLUMBING/REAR EXPAN-
SION VALVE - REMOVAL).
(4) Disconnect the liquid line from rear solenoid
valve inlet port (Refer to 24 - HEATING & AIR CON-
DITIONING/CONTROLS/SOLENOID - REMOVAL).
(5) Remove the seals from the open liquid and suc-
tion line fittings and discard.
(6) Install plugs in, or tape over the open liquid
and suction line fittings and, the rear solenoid and
expansion valve ports.
(7) Remove the interior trim panel from the right
quarter panel (Refer to 23 - BODY/INTERIOR/
QUARTER TRIM PANEL - REMOVAL).
(8) Disconnect the fittings that secure the rear
refrigerant lines to the sidewall refrigerant lines.(9) Remove the seals from the open liquid and suc-
tion line fittings and discard.
(10) Install plugs in, or tape over the open liquid
and suction line fittings.
(11) Remove the bolts that secure the two refriger-
ant line retaining blocks to the vehicle sidewall.
(12) Carefully pull the rubber refrigerant lines out
from the sidewall.
(13) Remove the sidewall section of the rear refrig-
erant lines from the vehicle.
INSTALLATION
FRONT LIQUID LINE
(1) Install the front liquid line into the engine
compartment.
(2) Remove plugs or tape from the liquid line fit-
tings, the reciever-drier outlet port and the expan-
sion valve ports.
(3) Lubricate new rubber o-ring seals with clean
refrigerant oil and install the seals onto the liquid
line fittings.
(4) Connect the quick-disconnect front liquid line
fitting to the intermediate liquid line.
(5) Connect the rear section of the front liquid line
to the receiver-drier and the evaporator (Refer to 24 -
HEATING & AIR CONDITIONING/PLUMBING/
LIQUID LINE - INSTALLATION).
(6) Reconnect the battery negative cable.
(7) Evacuate the refrigerant system (Refer to 24 -
HEATING & AIR CONDITIONING/PLUMBING -
STANDARD PROCEDURE - REFRIGERANT SYS-
TEM EVACUATE).
(8) Charge the refrigerant system (Refer to 24 -
HEATING & AIR CONDITIONING/PLUMBING -
STANDARD PROCEDURE - REFRIGERANT SYS-
TEM CHARGE).
FRONT SUCTION LINE
(1) If the compressor portion of the front suction
line was separated from the front suction line tap-
ping plate, remove plugs or tape from the suction
line fitting, lubricate a new rubber o-ring seal with
clean refrigerant oil and install the seal onto the suc-
tion line fitting and, install the bolt that secures the
compressor portion of the front suction line to the
front suction line tapping plate. Tighten the bolt to 5
N´m (45 in. lbs.).
(2) Install the front suction line into the engine
compartment.
(3) Remove plugs or tape from the suction line fit-
tings, the compressor inlet port and the expansion
valve ports.
(4) Lubricate new rubber o-ring seals with clean
refrigerant oil and install the seals onto the suction
line fittings.
VAPLUMBING 24 - 69
UNDERBODY LINES (Continued)
Page 1198 of 1232
(5) Connect the front suction line to the compres-
sor and front evaporator valve (Refer to 24 - HEAT-
ING & AIR CONDITIONING/PLUMBING/SUCTION
LINE - INSTALLATION).
(6) Remove plugs or tape from the intermediate
suction line fitting and the front suction line tapping
plate inlet port.
(7) Lubricate a new rubber o-ring seal with clean
refrigerant oil and install the seal onto the interme-
diate suction line fitting.
(8) Connect the intermediate suction line fitting to
the front suction line tapping plate.
(9)
Install the nut that secures the intermediate
suction line fitting to the stud on the front suction line
tapping plate. Tighten the nut to 10 N´m (89 in. lbs.).
(10) Reconnect the battery negative cable.
(11) Evacuate the refrigerant system (Refer to 24 -
HEATING & AIR CONDITIONING/PLUMBING -
STANDARD PROCEDURE - REFRIGERANT SYS-
TEM EVACUATE).
(12) Charge the refrigerant system (Refer to 24 -
HEATING & AIR CONDITIONING/PLUMBING -
STANDARD PROCEDURE - REFRIGERANT SYS-
TEM CHARGE).
INTERMEDIATE REFRIGERANT LINES
(1) Raise and support the vehicle.
(2) Install the intermediate section of the rear
refrigerant lines to the vehicle underbody.
(3) Install the bolts that secure the two intermedi-
ate refrigerant line retaining blocks to the vehicle
underbody. Tighten the bolts to 5 N´m (45 in. lbs.).
(4) Remove plugs or tape from the open intermedi-
ate and rear refrigerant line fittings.
(5) Lubricate new rubber o-ring seals with clean
refrigerant oil and install the seals onto the interme-
diate-to-rear refrigerant line fittings.
(6) Connect the fittings that secure the intermedi-
ate refrigerant lines to the rear refrigerant lines.
Tighten the liquid line fitting to 16 N´m (142 in. lbs.).
Tighten the suction line fitting to 30 N´m (22 ft. lbs.).
(7) Lower the vehicle.
(8) Connect the quick-disconnect front liquid line
fitting to the intermediate liquid line.
(9) Remove plugs or tape from the intermediate
suction line fitting and the front suction line tapping
plate inlet port.
(10) Lubricate a new rubber o-ring seal with clean
refrigerant oil and install the seal onto the interme-
diate suction line fitting.
(11) Connect the intermediate suction line fitting
to the front suction line tapping plate.
(12) Install the nut that secures the intermediate
suction line fitting to the stud on the front suction
line tapping plate. Tighten the nut to 10 N´m (89 in.
lbs.).(13) Reconnect the battery negative cable.
(14) Evacuate the refrigerant system (Refer to 24 -
HEATING & AIR CONDITIONING/PLUMBING -
STANDARD PROCEDURE - REFRIGERANT SYS-
TEM EVACUATE).
(15) Charge the refrigerant system (Refer to 24 -
HEATING & AIR CONDITIONING/PLUMBING -
STANDARD PROCEDURE - REFRIGERANT SYS-
TEM CHARGE).
REAR REFRIGERANT LINES
(1) Raise and support the vehicle.
(2) Install the rear section of the rear refrigerant
lines to the vehicle underbody.
(3) Install the bolts that secure the four rear
refrigerant line retaining blocks to the vehicle under-
body. Tighten the bolts to 5 N´m (45 in. lbs.).
(4) Carefully route the rubber rear refrigerant
lines into the right sidewall.
(5) Install the seal into the inner sidewall.
(6) Install the propeller shaft (Refer to 3 - DIF-
FERENTIAL & DRIVELINE/PROPELLER SHAFT/
PROPELLER SHAFT - INSTALLATION).
(7) Remove plugs or tape from the open intermedi-
ate and rear refrigerant line fittings.
(8) Lubricate new rubber o-ring seals with clean
refrigerant oil and install the seals onto the interme-
diate-to-rear refrigerant line fittings.
(9) Connect the fittings that secure the intermedi-
ate refrigerant lines to the rear refrigerant lines.
Tighten the liquid line fitting to 16 N´m (142 in. lbs.).
Tighten the suction line fitting to 30 N´m (22 ft. lbs.).
(10) Lower the vehicle.
(11) Remove plugs or tape from the open sidewall
and rear refrigerant line fittings.
(12) Lubricate new rubber o-ring seals with clean
refrigerant oil and install the seals onto the rear-to-
sidewall refrigerant line fittings.
(13) Connect the fittings that secure the rear
refrigerant lines to the sidewall refrigerant lines.
Tighten the liquid line fitting to 16 N´m (142 in. lbs.).
Tighten the suction line fitting to 30 N´m (22 ft. lbs.).
(14) Install the interior trim panel from the right
quarter panel (Refer to 23 - BODY/INTERIOR/
QUARTER TRIM PANEL - INSTALLATION).
(15) Reconnect the battery negative cable.
(16) Evacuate the refrigerant system (Refer to 24 -
HEATING & AIR CONDITIONING/PLUMBING -
STANDARD PROCEDURE - REFRIGERANT SYS-
TEM EVACUATE).
(17) Charge the refrigerant system (Refer to 24 -
HEATING & AIR CONDITIONING/PLUMBING -
STANDARD PROCEDURE - REFRIGERANT SYS-
TEM CHARGE).
24 - 70 PLUMBINGVA
UNDERBODY LINES (Continued)
Page 1199 of 1232
SIDEWALL REFRIGERANT LINES
(1) Install the sidewall section of the rear refriger-
ant lines to the vehicle.
(2) Carefully route the rubber refrigerant lines
through the sidewall.
(3) Install the bolts that secure the two refrigerant
line retaining blocks to the vehicle sidewall. Tighten
the bolts to 5 N´m (45 in. lbs.).
(4) Remove plugs or tape from the open rear and
sidewall refrigerant line fittings.
(5) Lubricate new rubber o-ring seals with clean
refrigerant oil and install the seals onto the rear-to-
sidewall refrigerant line fittings.
(6) Connect the fittings that secure the rear refrig-
erant lines to the sidewall refrigerant lines. Tighten
the liquid line fitting to 16 N´m (142 in. lbs.). Tighten
the suction line fitting to 30 N´m (22 ft. lbs.).
(7) Install the interior trim panel from the right
quarter panel (Refer to 23 - BODY/INTERIOR/
QUARTER TRIM PANEL - INSTALLATION).
(8) Remove plugs or tape from the open sidewall
liquid and suction line fittings and, the rear solenoid
and expansion valve ports.(9) Lubricate new rubber o-ring seals with clean
refrigerant oil and install the seals onto the sidewall
refrigerant line fittings.
(10) Connect the liquid line to the rear solenoid
valve inlet port (Refer to 24 - HEATING & AIR CON-
DITIONING/CONTROLS/SOLENOID - INSTALLA-
TION).
(11) Connect the suction line to the rear expansion
valve outlet port and reinstall the rear A/C evapora-
tor panel and duct (Refer to 24 - HEATING & AIR
CONDITIONING/PLUMBING/REAR EXPANSION
VALVE - INSTALLATION).
(12) Connect the battery negative cable.
(13) Evacuate the refrigerant system (Refer to 24 -
HEATING & AIR CONDITIONING/PLUMBING -
STANDARD PROCEDURE - REFRIGERANT SYS-
TEM EVACUATE).
(14) Charge the refrigerant system (Refer to 24 -
HEATING & AIR CONDITIONING/PLUMBING -
STANDARD PROCEDURE - REFRIGERANT SYS-
TEM CHARGE).
VAPLUMBING 24 - 71
UNDERBODY LINES (Continued)
Page 1201 of 1232
SYMPTOMS DIAGNOSIS TABLE
Symptom Possible Causes
Smell of diesel fuel. Check heater system integration in vehicle's fuel system. Check fuel
lines for leakage, kinks or obstructions. If OK, Inspect the inlet muffler,
drain as necessary. Re-test the unit and re-inspect. Inspect the exhaust
tube and heater unit for the presence of external fuel. If a volume is
observed on the unit or in the exhaust tube or after draining and testing.
Remove heater unit from vehicle and repair or replace components as
required.
Heater does not achieve full load
operation.Check heater operation with DRBIIITscan tool and replace components
as required.
Continuous white smoke from heater
exhaust during combustion operation.Check heater operation with DRBIIITscan tool and replace components
as required. White smoke is typical in extreme weather conditions.
Heater can not be switched off. Check heater operation with DRBIIITscan tool and replace components
as required.
Heater does not operate. Diagnosis cabin heater control module using the DRBIIITscan tool and
the procedures listed in Vehicle Performance under Cabin Heater
Diagnosis in Group 18.
Loss of coolant (Leakage) or heater
develops smoke during combustion
operation and exhaust has an
extremely sweet smell.Inspect coolant hoses for leakage, kinks or loose hose connection.
Inspect the exhaust tube assembly for continuous flow, if OK there is an
internal heater leak and unit should be inspected and components
should be replaced as required.
Loss of fuel (dripping). Check heater system integration in vehicles fuel system. Check fuel line
connection for leakage. If OK there is an internal leak and unit should
be inspected and replaced as required.
EXHAUST TUBE
REMOVAL
WARNING: THERE IS A POTENTIAL DANGER OF
SKIN BURNS AS THE HEATER AND ITS COMPO-
NENTS MAY BE VERY HOT. MAKE SURE THE
HEATER IS ALLOWED TO COOL DOWN BEFORE
ANY SERVICE WORK ON THE CABIN HEATER SYS-
TEM IS ATTEMPTED.
(1) Raise and support the vehicle while taking note
of the location of the flexible exhaust tube section.
(2) Remove the exhaust clamp at the flexible pipe
and steel pipe connection (Fig. 1).
(3) Remove the clamp at the flexible pipe connec-
tion and the supplemental heater housing (if
required).
(4) Remove the three screws holding the exhaust
pipe to the body.(5) Remove the steel exhaust pipe from the vehi-
cle.
(6) Remove the flexible exhaust pipe from the
vehicle (if required).INSTALLATION
(1) Install the flexible exhaust pipe to the heater
unit. Tighten mounting clamp securely.
(2) Position the steel exhaust pipe to the flexible
exhaust and install and tighten the mounting clamp
securely.
(3) Install the three exhaust pipe screws, adjust
pipe placement as needed and tighten the screws
securely.
(4) Install the clamp to connect the steel exhaust
pipe to the flexible exhaust pipe and tighten clamp
securely.
(5) Check exhaust pipe exhaust end placement and
make any final adjustments.
(6) Lower the vehicle.
VACABIN HEATER 24 - 73
CABIN HEATER (Continued)
Page 1204 of 1232
INSTALLATION
WARNING: DO NOT OPERATE THE DCHA IN AN
ENCLOSED AREA SUCH AS A GARAGE THAT
DOES NOT HAVE EXHAUST VENTILATION FACILI-
TIES. ALWAYS VENT THE DCHA'S EXHAUST WHEN
OPERATING THE DCHA. FAILURE TO FOLLOW
THESE INSTRUCTIONS MAY RESULT IN PERSONAL
INJURY OR DEATH.
WARNING: ALLOW THE DCHA ASSEMBLY TO
COOL BEFORE PERFORMING A COMPONENT
INSPECTION/REPAIR/REPLACEMENT. FAILURE TO
FOLLOW THESE INSTRUCTIONS MAY RESULT IN
PERSONAL INJURY.
WARNING: VERIFY THAT ALL DCHA FUEL LINES
ARE SECURELY FASTENED TO THEIR RESPECTIVE
COMPONENTS BEFORE PERFORMING THIS PRO-
CEDURE.
NOTE: Verify that there is more than 1/8 of a tank of
fuel in the vehicle's fuel tank before performing this
procedure. Add fuel, if necessary.(1) Install the heater fuel supply line into vehicle
and fuel line retainers.
(2) Install the fuel line connection at the fuel tank
and tighten the connection securely.
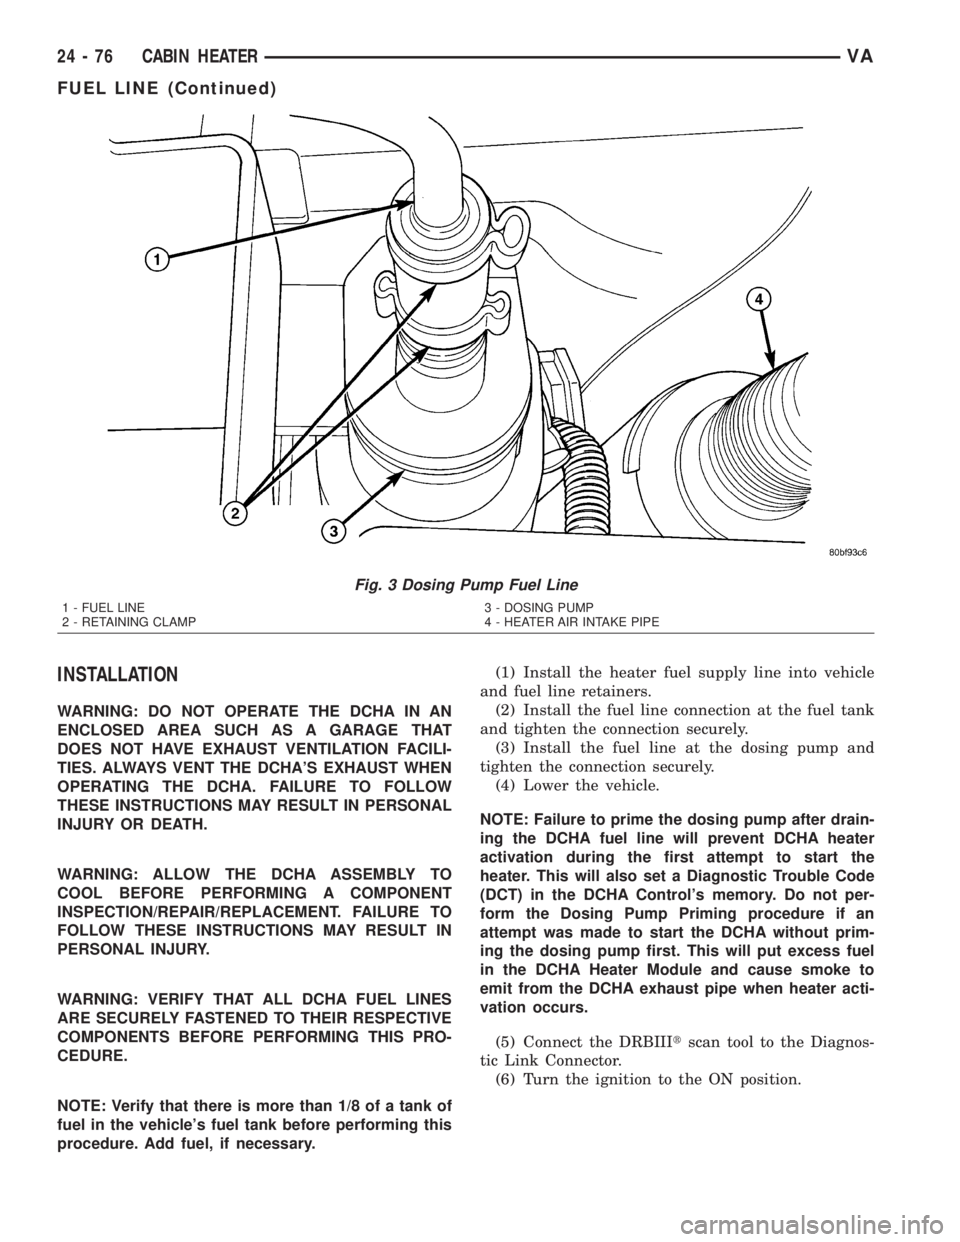
(3) Install the fuel line at the dosing pump and
tighten the connection securely.
(4) Lower the vehicle.
NOTE: Failure to prime the dosing pump after drain-
ing the DCHA fuel line will prevent DCHA heater
activation during the first attempt to start the
heater. This will also set a Diagnostic Trouble Code
(DCT) in the DCHA Control's memory. Do not per-
form the Dosing Pump Priming procedure if an
attempt was made to start the DCHA without prim-
ing the dosing pump first. This will put excess fuel
in the DCHA Heater Module and cause smoke to
emit from the DCHA exhaust pipe when heater acti-
vation occurs.
(5) Connect the DRBIIItscan tool to the Diagnos-
tic Link Connector.
(6) Turn the ignition to the ON position.
Fig. 3 Dosing Pump Fuel Line
1 - FUEL LINE
2 - RETAINING CLAMP3 - DOSING PUMP
4 - HEATER AIR INTAKE PIPE
24 - 76 CABIN HEATERVA
FUEL LINE (Continued)
Page 1205 of 1232
NOTE: Do not activate the Dosing Pump Prime
more than one time. This will put excess fuel in the
DCHA Heater Module an cause smoke to emit from
the DCHA exhaust pipe when heater activation
occurs.
NOTE: A clicking noise heard coming from the dos-
ing pump indicates that the pump is operational.
(7) With the DRBIIItscan tool in Cabin Heater,
select System Tests and Dosing Pump Prime. Allow
the dosing pump to run for the full 45 second cycle
time. When the 45 second cycle is complete, press
Page Back on the DRBIIItscan tool key pad to exit
the Dosing Pump Prime. The Dosing Pump Priming
procedure is now complete.
HEATER UNIT
REMOVAL
REMOVAL
WARNING: ALLOW THE SUPPLEMENTAL HEATER
TO COOL BEFORE PERFORMING A COMPONENT
INSPECTION/REPAIR OR REPLACEMENT. FAILURE
TO FOLLOW THESE INSTRUCTIONS MAY RESULT
IN PERSONAL INJURY.
WARNING: ALLOW THE EXHAUST SYSTEM TO
COOL BEFORE PERFORMING A COMPONENT
INSPECTION/REPAIR OR REPLACEMENT. FAILURE
TO FOLLOW THESE INSTRUCTION MAY RESULT IN
PERSONAL INJURY.
(1) Raise and support the vehicle. Take note of the
location of the flexible exhaust tube section.
(2) Drain the engine cooling system (Refer to 7 -
COOLING - STANDARD PROCEDURE).
(3) Carefully open one hose to the underbody tube
assembly and drain the remaining coolant. A salvage
hose is a good idea to control the residual coolant, as
flow will occur from both the heater and the hose and
tube assemblies.
(4) Remove the second hose from the underbody
hose and tube assembly.
(5) Loosen the hose and tube assembly from the
toe-board cross member at two locations.
(6) Disconnect the electrical connector from the
body harness near the toe-board cross member and
rail.(7) Remove the wiring harness from the toe-board
cross member (Refer to 24 - HEATING & AIR CON-
DITIONING/CABIN HEATER/HEATER UNIT -
REMOVAL).
(8) Open the fuel filler cap. Disconnect the rubber
fuel hose between the body tube assembly and the
fuel pump nipple at the body tube joint. A minimal
amount of fuel may flow from the open port.
NOTE: Utilize an approved fuel storage container to
catch any residual fuel.
(9) Loosen the two fasteners at the rail. Take care
to notice that the exhaust tube bracket tab is on top
of the heater bracket and that there are two spacer
washers installed between the rubber grommets.
(10) Remove the heater exhaust tube flex section
from the exhaust tube by loosening the bolt of the
clamp assembly. Remove the hose from the exhaust
tube. Removal of the rail tube assembly may aid in
this service operation (Refer to 24 - HEATING & AIR
CONDITIONING/CABIN HEATER/EXHAUST TUBE
- REMOVAL).
(11) Remove seat hex nut at the heater mounting
flange to cross member.
(12) Loosen the remaining fasteners which mount
the exhaust tube assembly to the vehicle.
(a) Install a suitable cabin heater support device
under the cabin heater and secure the cabin heater
to the device.
(13) Loosen the remaining three fasteners to the
cross members.
(14) Remove the loosened fasteners that support
the heater while supporting the weight of the heater.
(15) Swing the unit mounting bracket from
between the exhaust bracket and rail mounting loca-
tion. Drain any residual coolant from the heater unit.
(16) Lower the cabin heater and remove from the
supporting device and place on a suitable work area.
REMOVAL
(1) Raise and support the vehicle while taking note
of the location of the flexible exhaust tube section.
(2) Unplug the wire harness connector from vehi-
cle wiring harness to cabin heater harness.
(3) Unplug the wire harness connector from cabin
heater harness to dosing pump connector.
(4) Unplug the two wire harness connectors from
cabin heater harness to cabin heater controller con-
nectors.
(5) Remove two wiring harness connectors from
underbody.
(6) Remove two wiring harness connectors from
cabin heater shield.
(7) Carefully route the cabin heater harness to the
left side between the cabin heater unit and the cabin
heater shield.
VACABIN HEATER 24 - 77
FUEL LINE (Continued)
Page 1206 of 1232
INSTALLATION
INSTALLATION
(1) Install the unit mounting bracket between the
exhaust bracket and the rail mounting location.
(2) Install the fasteners that support the heater
while supporting the weight of the heater.
(3) Install the three fasteners to the cross mem-
bers. Tighten the M6 fasteners to 7 N´m (62 in. lbs.).
(4) Position the two spacer washers between the
body and the rubber grommets for the two mounting
points on the rail.
(5) Tighten the remaining M6 fasteners to 7 N´m
(62 in. lbs.) and the M8 fasteners to 23 N´m (17 ft.
lbs.) which mount the exhaust tube assembly to the
vehicle.
(6) Install the seat hex nut at the heater mounting
flange to the cross members. Tighten the nut to 60
N´m (44 ft. lbs.)
(7) Install the heater exhaust tube flex section to
the exhaust tube by tightening the M6 bolt of the
clamp assembly. Install the hose to the exhaust tube.
(8) Tighten the two M8 fasteners at the rail to 23
N´m (17 ft. lbs.). Taking care so that the exhaust
tube bracket tab is on the top of the heater bracket.
(9) Install the wiring harness (Refer to 24 - HEAT-
ING & AIR CONDITIONING/CABIN HEATER/
HEATER UNIT - INSTALLATION).
(10) Tighten the hose and tube assembly to the
toe-board cross member at two locations.
(11) Install the second hose to the underbody hose
and tube assembly.
(12) Connect the rubber fuel hose between the
body tube assembly and the fuel pump nipple at the
body tube joint. Close the fuel fill cap.
(13) Remove the heater unit support device from
under the vehicle.
(14) Lower the vehicle.
(15) Fill the engine cooling system (Refer to 7 -
COOLING - STANDARD PROCEDURE).
(16) Verify function of the cabin heater.
INSTALLATION
(1) Carefully route the cabin heater harness from
the left side of the cabin heater between the cabin
heater unit and the cabin heater shield.(2) Install the two wiring harness retaining con-
nectors to the cabin heater shield.
(3) Route the wiring harness along the underside
of the vehicle and install the two wiring harness
retaining connectors.
(4) Plug the two connectors from the cabin heater
harness to the cabin heater controller.
(5) Plug the connector to the cabin heater harness
to the dosing pump connector.
(6) Plug the connector from the vehicle wiring har-
ness to the cabin heater harness.
(7) Lower the vehicle.
(8) Verify function of the cabin heater.
INLET HOSE
REMOVAL
NOTE: Heater air intake tube is part of an assembly
that includes the heater cooling intake and return
pipes. If heater air intake tube requires removal or
replacement the entire assembly will require remov-
al/replacement.
(1) Drain the engine cooling system (Refer to 7 -
COOLING - STANDARD PROCEDURE).
(2) Remove clamps from the heater tubes at the
lower heater port and the lower EGR connector
which are located under the hood.
(3) Remove the retaining clamp at the heater air
intake muffler connection (Refer to 24 - HEATING &
AIR CONDITIONING/CABIN HEATER/INLET
MUFFLER - REMOVAL).
(4) Remove the clamp at the flexible tube to steel
tube connection (Fig. 4).
(5) Remove the two retaining screws and remove
pipe assembly (Fig. 5).
INSTALLATION
(1) Install the air intake pipe assembly and install
the two retaining screws. Tighten the screws to 7
N´m (62 in. lbs.).
(2) Attach the steel tube to the flexible tube and
position and then tighten the retaining clamp
securely.
(3) Install the flexible tube to the heater air intake
muffler and install and tighten the retaining clamp
securely.
24 - 78 CABIN HEATERVA
HEATER UNIT (Continued)
Page 1221 of 1232
MODULE - DESCRIPTION, SENTRY KEY
REMOTE ENTRY......................8Q-2
MODULE - DESCRIPTION,
TRANSMISSION CONTROL..............8E-5
MODULE - DIAGNOSIS AND TESTING,
CENTRAL TIMER......................8E-2
MODULE - DIAGNOSIS AND TESTING,
CONTROL..........................24-24
MODULE - INSTALLATION, AIRBAG
CONTROL..........................8O-11
MODULE - INSTALLATION, CENTRAL
TIMER..............................8E-2
MODULE - INSTALLATION, CONTROL.....24-25
MODULE - INSTALLATION, ENGINE
CONTROL...........................8E-4
MODULE - INSTALLATION, FUEL TANK....14-14
MODULE - INSTALLATION, SECURITY
SYSTEM............................8Q-2
MODULE - INSTALLATION, SENTRY KEY
REMOTE ENTRY......................8Q-4
MODULE - OPERATION, AIRBAG
CONTROL...........................8O-9
MODULE - OPERATION, CENTRAL TIMER . . 8E-2
MODULE - OPERATION, CONTROL.......24-24
MODULE - OPERATION, SENTRY KEY
REMOTE ENTRY......................8Q-3
MODULE - OPERATION, TRANSMISSION
CONTROL...........................8E-5
MODULE - REMOVAL, AIRBAG CONTROL . 8O-10
MODULE - REMOVAL, CENTRAL TIMER....8E-2
MODULE - REMOVAL, CONTROL........24-24
MODULE - REMOVAL, ENGINE CONTROL . . . 8E-4
MODULE - REMOVAL, FUEL TANK.......14-13
MODULE - REMOVAL, SECURITY
SYSTEM............................8Q-2
MODULE - REMOVAL, SENTRY KEY
REMOTE ENTRY......................8Q-3
MOTOR - DESCRIPTION, WIPER........8R-19
MOTOR - DIAGNOSIS AND TESTING,
STARTER ...........................8F-29
MOTOR - DIESEL - SPECIFICATIONS,
STARTER ...........................8F-29
MOTOR - INSTALLATION, BLOWER . 24-33,24-40
MOTOR - INSTALLATION, DOOR LOCK....8N-1
MOTOR - INSTALLATION, HEADLAMP
LEVELING..........................8L-16
MOTOR - INSTALLATION, STARTER......8F-31
MOTOR - INSTALLATION, WIPER........8R-19
MOTOR - OPERATION, WIPER..........8R-19
MOTOR - REMOVAL, BLOWER.....24-32,24-39
MOTOR - REMOVAL, DOOR LOCK........8N-1
MOTOR - REMOVAL, HEADLAMP
LEVELING..........................8L-15
MOTOR - REMOVAL, STARTER..........8F-30
MOTOR - REMOVAL, WINDOW...........8N-5
MOTOR - REMOVAL, WIPER...........8R-19
MOTOR RELAY - DESCRIPTION,
BLOWER...........................24-23
MOTOR RELAY - DESCRIPTION,
STARTER ...........................8F-31
MOTOR RELAY - DIAGNOSIS AND
TESTING, BLOWER...................24-24
MOTOR RELAY - INSTALLATION,
BLOWER...........................24-24
MOTOR RELAY - INSTALLATION,
STARTER
...........................8F-32
MOTOR RELAY - OPERATION, BLOWER
. . . 24-23
MOTOR RELAY - REMOVAL, BLOWER
....24-24
MOTOR RELAY - REMOVAL, STARTER
....8F-31
MOTOR RESISTOR BLOCK -
DESCRIPTION, BLOWER
...............24-16
MOTOR RESISTOR BLOCK - DIAGNOSIS
AND TESTING, BLOWER
...............24-16
MOTOR RESISTOR BLOCK -
INSTALLATION, BLOWER
..............24-17
MOTOR RESISTOR BLOCK - OPERATION,
BLOWER
...........................24-16
MOTOR RESISTOR BLOCK - REMOVAL,
BLOWER
...........................24-16
MOTOR SWITCH - DESCRIPTION,
BLOWER
......................24-17,24-22
MOTOR SWITCH - DIAGNOSIS AND
TESTING, BLOWER
..............24-17,24-23
MOTOR SWITCH - INSTALLATION,
BLOWER
...........................24-23
MOTOR SWITCH - OPERATION, BLOWER
. 24-17,
24-22MOTOR SWITCH - REMOVAL, BLOWER . . 24-17,
24-23
MOUNT - INSTALLATION, LEFT...........9-49
MOUNT - INSTALLATION, RIGHT.........9-49
MOUNT - REMOVAL, LEFT..............9-49
MOUNT - REMOVAL, RIGHT.............9-49
MOUNTED STOP LAMP BULB -
INSTALLATION, CENTER HIGH...........8L-7
MOUNTED STOP LAMP BULB -
REMOVAL, CENTER HIGH...............8L-7
MOUNTED STOP LAMP UN -
INSTALLATION, CENTER HIGH...........8L-8
MOUNTED STOP LAMP UN - REMOVAL,
CENTER HIGH........................8L-8
MOUNTING - STANDARD PROCEDURE,
MATCH .............................22-2
MULTI-FUNCTION INDICATOR -
DESCRIPTION.......................8J-20
MULTI-FUNCTION INDICATOR -
OPERATION.........................8J-21
MULTI-FUNCTION SWITCH -
INSTALLATION.......................8L-20
MULTI-FUNCTION SWITCH - REMOVAL . . . 8L-19
NAG1 - DESCRIPTION, AUTOMATIC
TRANSMISSION.......................21-2
NAG1 - DESCRIPTION, AUTOMATIC
TRANSMISSION FLUID..................0-4
NAG1 - OPERATION, AUTOMATIC
TRANSMISSION.......................21-4
NAG1 AUTOMATIC TRANSMISSION -
SPECIAL TOOLS.....................21-69
NAG1 AUTOMATIC TRANSMISSION -
SPECIFICATIONS.....................21-68
NOISE - DIAGNOSIS AND TESTING,
COMPRESSOR.......................24-49
NOISE - DIAGNOSIS AND TESTING,
WIND...............................23-2
NOISE OR VIBRATION - DIAGNOSIS AND
TESTING, TIRE.......................22-8
NON-DEPLOYED SUPPLEMENTAL
RESTRAINTS - STANDARD
PROCEDURE, HANDLING...............8O-6
NOZZLE - DESCRIPTION, WASHER.......8R-9
NOZZLE - INSTALLATION, WASHER.......8R-9
NOZZLE - OPERATION, WASHER.........8R-9
NOZZLE - REMOVAL, WASHER...........8R-9
NUMBER - DESCRIPTION, VEHICLE
IDENTIFICATION....................Intro.-1
ODOMETER - DESCRIPTION............8J-21
ODOMETER - OPERATION..............8J-22
OIL - DESCRIPTION, REFRIGERANT......24-65
OIL - DIESEL ENGINES - DESCRIPTION,
ENGINE..............................0-3
OIL - OPERATION, REFRIGERANT........24-65
OIL COOLER & LINES - INSTALLATION....9-50
OIL COOLER & LINES - REMOVAL........9-50
OIL FILTER - INSTALLATION.............9-51
OIL FILTER - REMOVAL.................9-51
OIL GALLERY PLUGS - STANDARD
PROCEDURE, REPLACING ENGINE
CORE...............................9-34
OIL JET - DESCRIPTION................9-51
OIL JET - INSTALLATION...............9-51
OIL JET - REMOVAL...................9-51
OIL LEVEL - STANDARD PROCEDURE,
CHECK............................21-102
OIL LEVEL - STANDARD PROCEDURE,
REFRIGERANT.......................24-65
OIL LEVEL INDICATOR - DESCRIPTION,
LOW...............................8J-18
OIL LEVEL INDICATOR - OPERATION,
LOW...............................8J-18
OIL PAN - INSTALLATION...............9-52
OIL PAN - REMOVAL...................9-52
OIL PUMP - ASSEMBLY..............21-121
OIL PUMP - DESCRIPTION............21-120
OIL PUMP - DISASSEMBLY............21-120
OIL PUMP - OPERATION..............21-120
OIL PUMP CHAIN - INSTALLATION........9-54
OIL PUMP CHAIN - REMOVAL
...........9-53
OIL SEAL - FRONT - INSTALLATION,
CRANKSHAFT
........................9-38
OIL SEAL - FRONT - REMOVAL,
CRANKSHAFT
........................9-38
OIL SEAL - REAR - INSTALLATION,
CRANKSHAFT
........................9-37
OIL SEAL - REAR - REMOVAL,
CRANKSHAFT
........................9-37OIL SEPARATOR - INSTALLATION.........9-50
OIL SEPARATOR - REMOVAL............9-50
OIL TEMPERATURE SENSOR -
DESCRIPTION........................9-56
OIL TEMPERATURE SENSOR -
INSTALLATION........................9-57
OIL TEMPERATURE SENSOR -
OPERATION..........................9-56
OIL TEMPERATURE SENSOR - REMOVAL . . . 9-57
OPEN-CIRCUIT VOLTAGE TEST -
STANDARD PROCEDURE...............8F-10
OPENING COVER - INSTALLATION,
STEERING COLUMN..................23-66
OPENING COVER - REMOVAL, STEERING
COLUMN...........................23-66
OPENING DIMENSIONS -
SPECIFICATIONS.....................23-90
OPENING SEALS - INSTALLATION, DOOR . . 23-87
OPENING SEALS - REMOVAL, DOOR.....23-87
OUTBOARD - INSTALLATION...........8O-31
OUTBOARD - REMOVAL...............8O-30
OUTER BELT WEATHERSTRIP -
INSTALLATION, FRONT DOOR...........23-87
OUTER BELT WEATHERSTRIP -
REMOVAL, FRONT DOOR..............23-87
OUTER TIE ROD END - DIAGNOSIS AND
TESTING...........................19-10
OUTLET - DESCRIPTION, CIGAR
LIGHTER.........................8W-97-1
OUTLET - DESCRIPTION, POWER......8W-97-3
OUTLET - DIAGNOSIS AND TESTING,
CIGAR LIGHTER...................8W-97-2
OUTLET - DIAGNOSIS AND TESTING,
POWER..........................8W-97-4
OUTLET - INSTALLATION, POWER.....8W-97-4
OUTLET - OPERATION, CIGAR LIGHTER . 8W-97-2
OUTLET - OPERATION, POWER.......8W-97-4
OUTLET - REMOVAL, CIGAR LIGHTER . . 8W-97-2
OUTLET - REMOVAL, POWER.........8W-97-4
OUTLET TEMPERATURE SENSOR -
DESCRIPTION, AIR...................24-14
OUTLET TEMPERATURE SENSOR -
INSTALLATION, AIR...................24-15
OUTLET TEMPERATURE SENSOR -
OPERATION, AIR.....................24-15
OUTLET TEMPERATURE SENSOR -
REMOVAL, AIR......................24-15
OUTLETS - INSTALLATION, AIR.........24-32
OUTLETS - REMOVAL, AIR.............24-31
OUTPUT SHAFT BEARING -
INSTALLATION......................21-122
OUTPUT SHAFT BEARING - REMOVAL . . . 21-122
OUTPUT SHAFT SEAL - INSTALLATION . . 21-125
OUTPUT SHAFT SEAL - REMOVAL......21-125
PADS - INSTALLATION, STEPWELL
SCUFF.............................23-73
PADS - REMOVAL, STEPWELL SCUFF....23-72
PAINT CODES - SPECIFICATIONS........23-74
PAINT TOUCH-UP - DESCRIPTION.......23-74
PAINT TOUCH-UP - STANDARD
PROCEDURE........................23-75
PAN - INSTALLATION, OIL...............9-52
PAN - REMOVAL, OIL..................9-52
PANEL - INSTALLATION, BACKLITE -
BULKHEAD TRIM.....................23-81
PANEL - INSTALLATION, BULKHEAD
TRIM..............................23-69
PANEL - INSTALLATION, INSTRUMENT
. . . 8L-29
PANEL - INSTALLATION, QUARTER TRIM
. . 23-72
PANEL - INSTALLATION, TRIM
.....23-20,23-35,
23-46
PANEL - REMOVAL, BACKLITE -
BULKHEAD TRIM
.....................23-81
PANEL - REMOVAL, BULKHEAD TRIM
....23-69
PANEL - REMOVAL, INSTRUMENT
.......8L-28
PANEL - REMOVAL, QUARTER TRIM
.....23-71
PANEL - REMOVAL, TRIM
....23-19,23-35,23-46
PANEL ANTENNA CABLE -
INSTALLATION, INSTRUMENT
............8A-2
PANEL ANTENNA CABLE - REMOVAL,
INSTRUMENT
........................8A-1
PANEL ASSEMBLY - INSTALLATION,
INSTRUMENT
.......................23-61
PANEL ASSEMBLY - REMOVAL,
INSTRUMENT
.......................23-57
PANEL CENTER BEZEL - INSTALLATION,
INSTRUMENT
.......................23-55
VAINDEX 11
Description Group-Page Description Group-Page Description Group-Page