2005 MERCEDES-BENZ SPRINTER injector
[x] Cancel search: injectorPage 751 of 1232
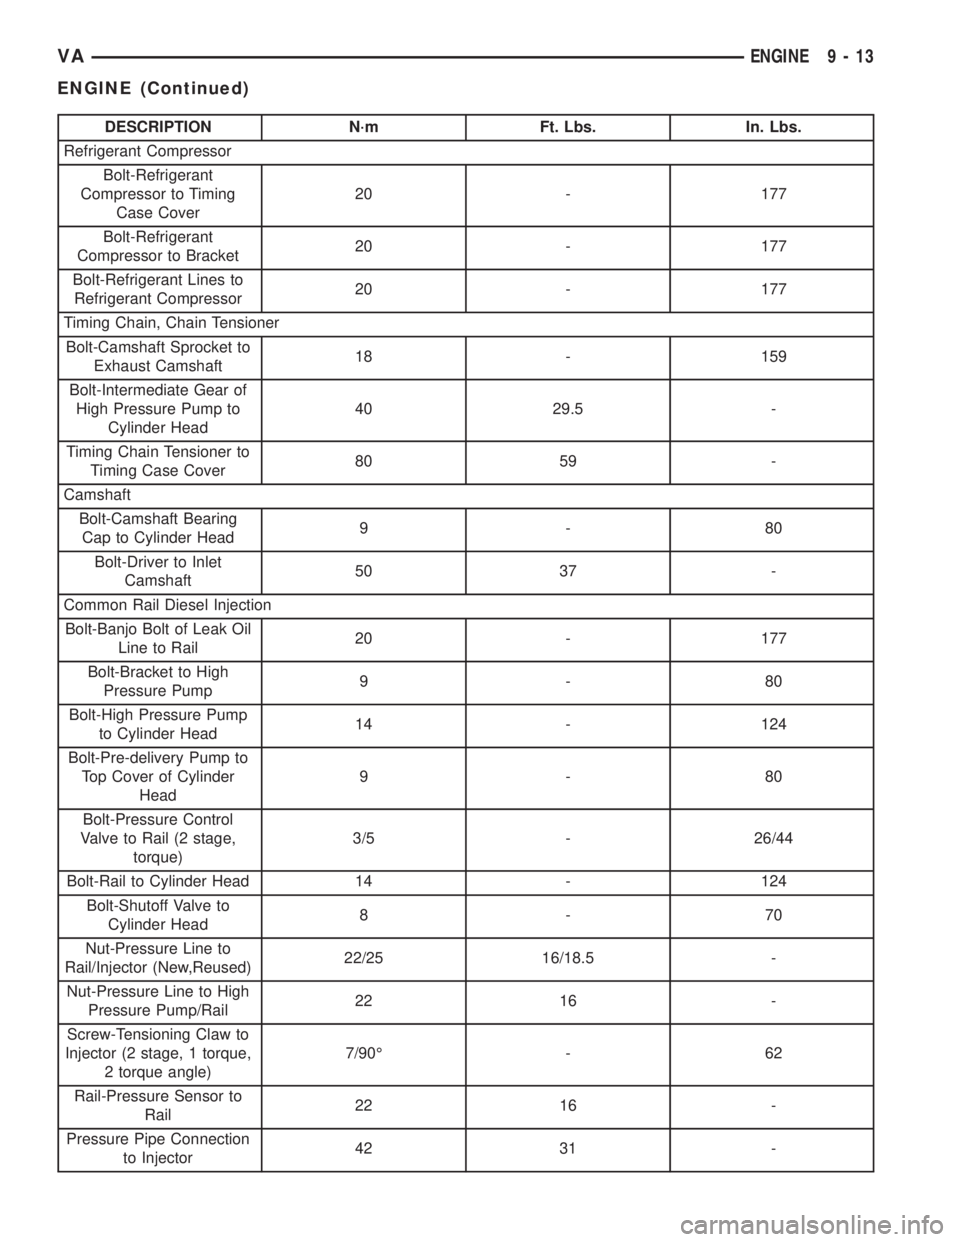
DESCRIPTION N´m Ft. Lbs. In. Lbs.
Refrigerant Compressor
Bolt-Refrigerant
Compressor to Timing
Case Cover20 - 177
Bolt-Refrigerant
Compressor to Bracket20 - 177
Bolt-Refrigerant Lines to
Refrigerant Compressor20 - 177
Timing Chain, Chain Tensioner
Bolt-Camshaft Sprocket to
Exhaust Camshaft18 - 159
Bolt-Intermediate Gear of
High Pressure Pump to
Cylinder Head40 29.5 -
Timing Chain Tensioner to
Timing Case Cover80 59 -
Camshaft
Bolt-Camshaft Bearing
Cap to Cylinder Head9-80
Bolt-Driver to Inlet
Camshaft50 37 -
Common Rail Diesel Injection
Bolt-Banjo Bolt of Leak Oil
Line to Rail20 - 177
Bolt-Bracket to High
Pressure Pump9-80
Bolt-High Pressure Pump
to Cylinder Head14 - 124
Bolt-Pre-delivery Pump to
Top Cover of Cylinder
Head9-80
Bolt-Pressure Control
Valve to Rail (2 stage,
torque)3/5 - 26/44
Bolt-Rail to Cylinder Head 14 - 124
Bolt-Shutoff Valve to
Cylinder Head8-70
Nut-Pressure Line to
Rail/Injector (New,Reused)22/25 16/18.5 -
Nut-Pressure Line to High
Pressure Pump/Rail22 16 -
Screw-Tensioning Claw to
Injector (2 stage, 1 torque,
2 torque angle)7/90É - 62
Rail-Pressure Sensor to
Rail22 16 -
Pressure Pipe Connection
to Injector42 31 -
VAENGINE 9 - 13
ENGINE (Continued)
Page 763 of 1232
(5) Carefully raise locking pawl of top slide rail
and remove front cover at cylinder head (Fig. 15).
(6) Insert a locking pin through 1st camshaft bear-
ing cap into the hole in the inlet camshaft sprocket.
(7) Counter hold the camshaft with an open end
wrench to avoid damage and unbolt driver of inlet
camshaft sprocket.
(8) Remove top guide rail.
INSTALLATION
INSTALLATION - CYLINDER HEAD
WARNING: (Refer to 14 - FUEL SYSTEM - WARN-
ING)
NOTE: Thoroughly clean all mating surfaces with
appropriate solvents and blow out bolt holes, to
assure that no grease or oil is present during reas-
sembly.
NOTE: If piston or connecting rods have been
replaced, measure piston protrusion.
NOTE: Check facing cylinder head contact surface.
(1) Position the cylinder head and gasket properly
on engine using the dowel pins as guide (Fig. 14).
NOTE: Inspect all cylinder head bolts for defects
and stretching before installation (Refer to 9 -
ENGINE/CYLINDER HEAD - STANDARD PROCE-
DURE).
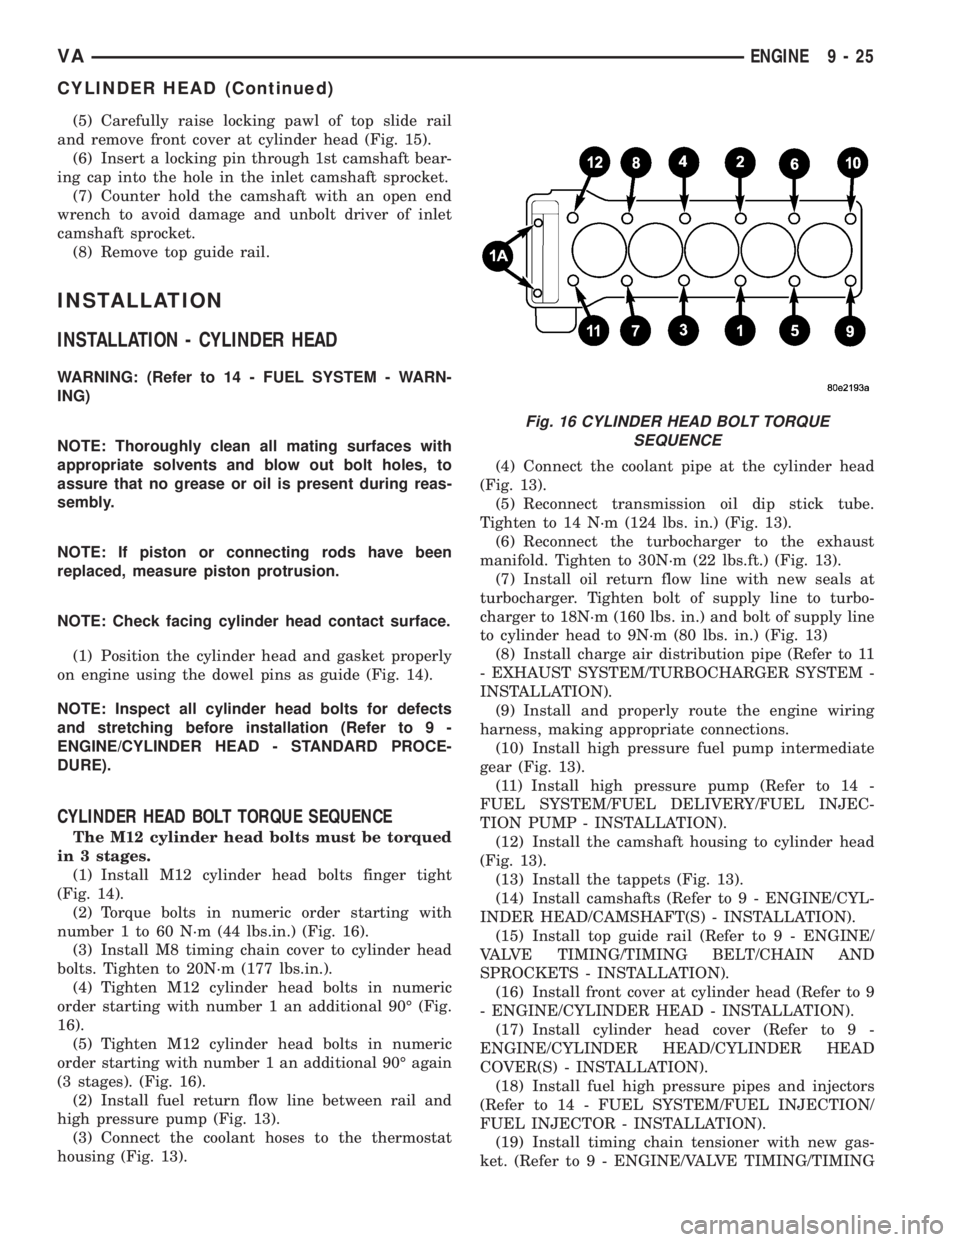
CYLINDER HEAD BOLT TORQUE SEQUENCE
The M12 cylinder head bolts must be torqued
in 3 stages.
(1) Install M12 cylinder head bolts finger tight
(Fig. 14).
(2) Torque bolts in numeric order starting with
number 1 to 60 N´m (44 lbs.in.) (Fig. 16).
(3) Install M8 timing chain cover to cylinder head
bolts. Tighten to 20N´m (177 lbs.in.).
(4) Tighten M12 cylinder head bolts in numeric
order starting with number 1 an additional 90É (Fig.
16).
(5) Tighten M12 cylinder head bolts in numeric
order starting with number 1 an additional 90É again
(3 stages). (Fig. 16).
(2) Install fuel return flow line between rail and
high pressure pump (Fig. 13).
(3) Connect the coolant hoses to the thermostat
housing (Fig. 13).(4) Connect the coolant pipe at the cylinder head
(Fig. 13).
(5) Reconnect transmission oil dip stick tube.
Tighten to 14 N´m (124 lbs. in.) (Fig. 13).
(6) Reconnect the turbocharger to the exhaust
manifold. Tighten to 30N´m (22 lbs.ft.) (Fig. 13).
(7) Install oil return flow line with new seals at
turbocharger. Tighten bolt of supply line to turbo-
charger to 18N´m (160 lbs. in.) and bolt of supply line
to cylinder head to 9N´m (80 lbs. in.) (Fig. 13)
(8) Install charge air distribution pipe (Refer to 11
- EXHAUST SYSTEM/TURBOCHARGER SYSTEM -
INSTALLATION).
(9) Install and properly route the engine wiring
harness, making appropriate connections.
(10) Install high pressure fuel pump intermediate
gear (Fig. 13).
(11) Install high pressure pump (Refer to 14 -
FUEL SYSTEM/FUEL DELIVERY/FUEL INJEC-
TION PUMP - INSTALLATION).
(12) Install the camshaft housing to cylinder head
(Fig. 13).
(13) Install the tappets (Fig. 13).
(14) Install camshafts (Refer to 9 - ENGINE/CYL-
INDER HEAD/CAMSHAFT(S) - INSTALLATION).
(15) Install top guide rail (Refer to 9 - ENGINE/
VALVE TIMING/TIMING BELT/CHAIN AND
SPROCKETS - INSTALLATION).
(16) Install front cover at cylinder head (Refer to 9
- ENGINE/CYLINDER HEAD - INSTALLATION).
(17) Install cylinder head cover (Refer to 9 -
ENGINE/CYLINDER HEAD/CYLINDER HEAD
COVER(S) - INSTALLATION).
(18) Install fuel high pressure pipes and injectors
(Refer to 14 - FUEL SYSTEM/FUEL INJECTION/
FUEL INJECTOR - INSTALLATION).
(19) Install timing chain tensioner with new gas-
ket. (Refer to 9 - ENGINE/VALVE TIMING/TIMING
Fig. 16 CYLINDER HEAD BOLT TORQUE
SEQUENCE
VAENGINE 9 - 25
CYLINDER HEAD (Continued)
Page 765 of 1232
(2) Counter hold the camshaft with an open end
wrench and install driver of inlet camshaft sprocket.
Tight bolt to 50N´m (37 lbs. ft.).
(3) Remove camshaft sprocket locking pin.
(4) Carefully raise locking pawl of top guide rail
and install front cover at cylinder head.
(5) Install timing chain tensioner with new gasket
(Refer to 9 - ENGINE/VALVE TIMING/TIMING
BELT/CHAIN AND SPROCKETS - INSTALLA-
TION).
(6) Install engine cover (Refer to 9 - ENGINE/
CYLINDER HEAD/CYLINDER HEAD COVER(S) -
INSTALLATION).
(7) Reconnect negative battery cable.
WARNING: US EXTREME CAUTION WHEN THE
ENGINE IS OPERATING. DO NOT STAND IN A
DIRECT LINE WITH THE FAN. DO NOT PUT YOUR
HANDS NEAR THE PULLEYS, BELTS OR FAN. DO
NOT WEAR LOOSE CLOTHES.
(8) Start engine and inspect for leaks.
CAMSHAFT(S)
STANDARD PROCEDURE - CHECKING
CAMSHAFT POSITION
(1) Disconnect negative battery cable.
(2) Remove engine cover (Refer to 9 - ENGINE
COVER - REMOVAL).
WARNING: (Refer to 14 - FUEL SYSTEM - WARN-
ING)
(3) Remove injectors (Refer to 14 - FUEL SYS-
TEM/FUEL INJECTION/FUEL INJECTOR -
REMOVAL).
(4) Clean injectors and recesses(Refer to 14 -
FUEL SYSTEM/FUEL INJECTION/FUEL INJEC-
TOR - STANDARD PROCEDURE).
(5) Remove cylinder head cover (Refer to 9 -
ENGINE/CYLINDER HEAD/CYLINDER HEAD
COVER(S) - REMOVAL).
NOTE: Rotate engine at crankshaft only. DO NOT
crank engine at the camshaft and DO NOT rotate
the engine backward.
(6) Position piston of cylinder #1 to ignition TDC.
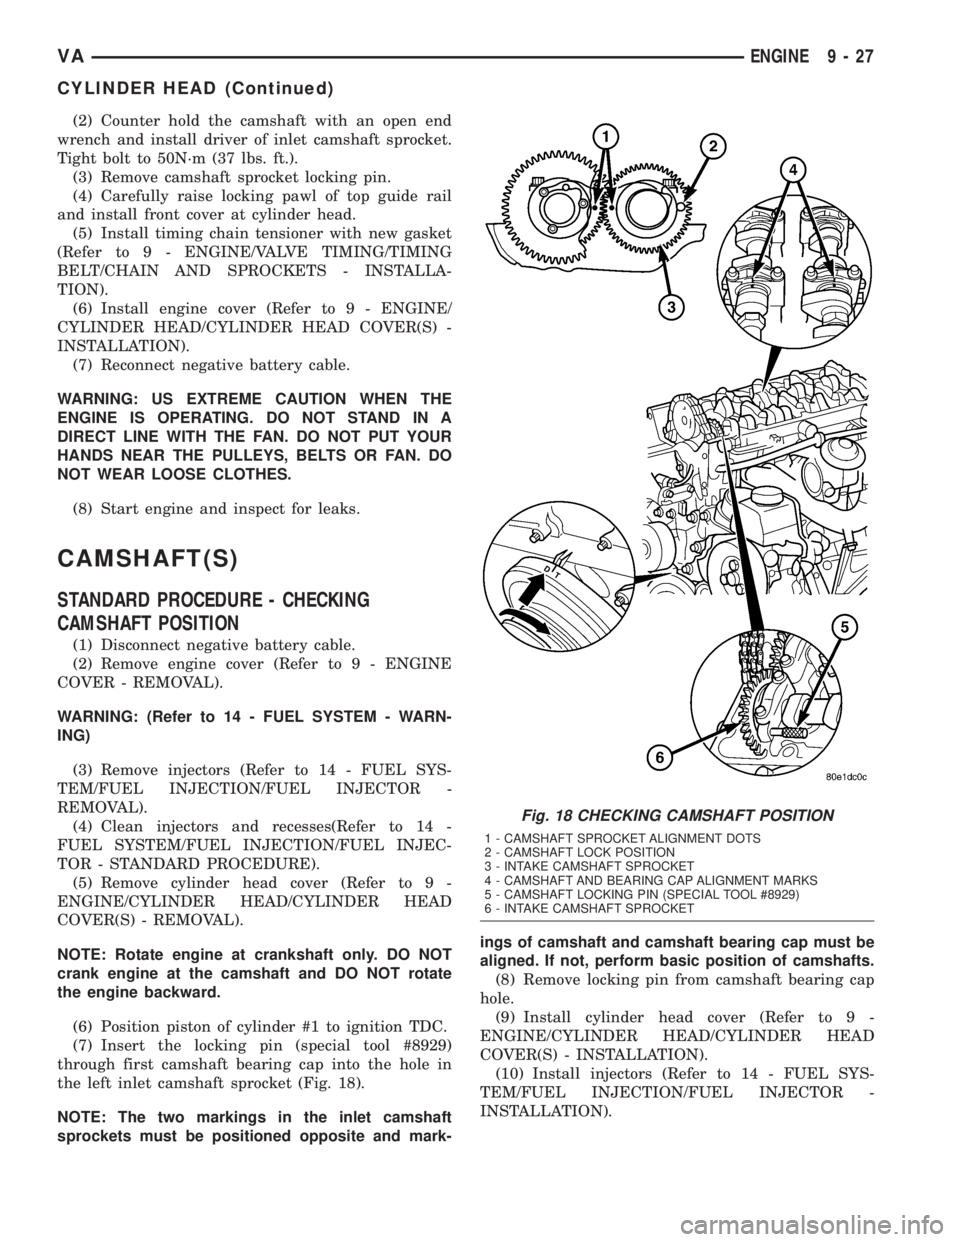
(7) Insert the locking pin (special tool #8929)
through first camshaft bearing cap into the hole in
the left inlet camshaft sprocket (Fig. 18).
NOTE: The two markings in the inlet camshaft
sprockets must be positioned opposite and mark-ings of camshaft and camshaft bearing cap must be
aligned. If not, perform basic position of camshafts.
(8) Remove locking pin from camshaft bearing cap
hole.
(9) Install cylinder head cover (Refer to 9 -
ENGINE/CYLINDER HEAD/CYLINDER HEAD
COVER(S) - INSTALLATION).
(10) Install injectors (Refer to 14 - FUEL SYS-
TEM/FUEL INJECTION/FUEL INJECTOR -
INSTALLATION).
Fig. 18 CHECKING CAMSHAFT POSITION
1 - CAMSHAFT SPROCKET ALIGNMENT DOTS
2 - CAMSHAFT LOCK POSITION
3 - INTAKE CAMSHAFT SPROCKET
4 - CAMSHAFT AND BEARING CAP ALIGNMENT MARKS
5 - CAMSHAFT LOCKING PIN (SPECIAL TOOL #8929)
6 - INTAKE CAMSHAFT SPROCKET
VAENGINE 9 - 27
CYLINDER HEAD (Continued)
Page 766 of 1232
WARNING: USE EXTREME CAUTION WHEN THE
ENGINE IS OPERATING. DO NOT STAND IN A
DIRECT LINE WITH THE FAN. DO NOT PUT YOUR
HANDS NEAR THE PULLEYS, BELTS OR FAN. DO
NO WEAR LOOSE CLOTHING.
(11) Start the engine and inspect for leaks.
REMOVAL
(1) Disconnect negative battery cable.
(2) Remove engine cover.(Refer to 9 - ENGINE -
REMOVAL).
WARNING: (Refer to 14 - FUEL SYSTEM - WARN-
ING)
(3) Remove high pressure lines and injectors
(Refer to 14 - FUEL SYSTEM/FUEL INJECTION/
FUEL INJECTOR - REMOVAL).
(4) Remove cylinder head cover (Refer to 9 -
ENGINE/CYLINDER HEAD/CYLINDER HEAD
COVER(S) - REMOVAL).
NOTE: Rotate engine at the crankshaft only. DO
NOT rotate the engine at the camshaft. DO NOT
rotate the engine backward.
(5) Position piston of cylinder #1 to ignition TDC.
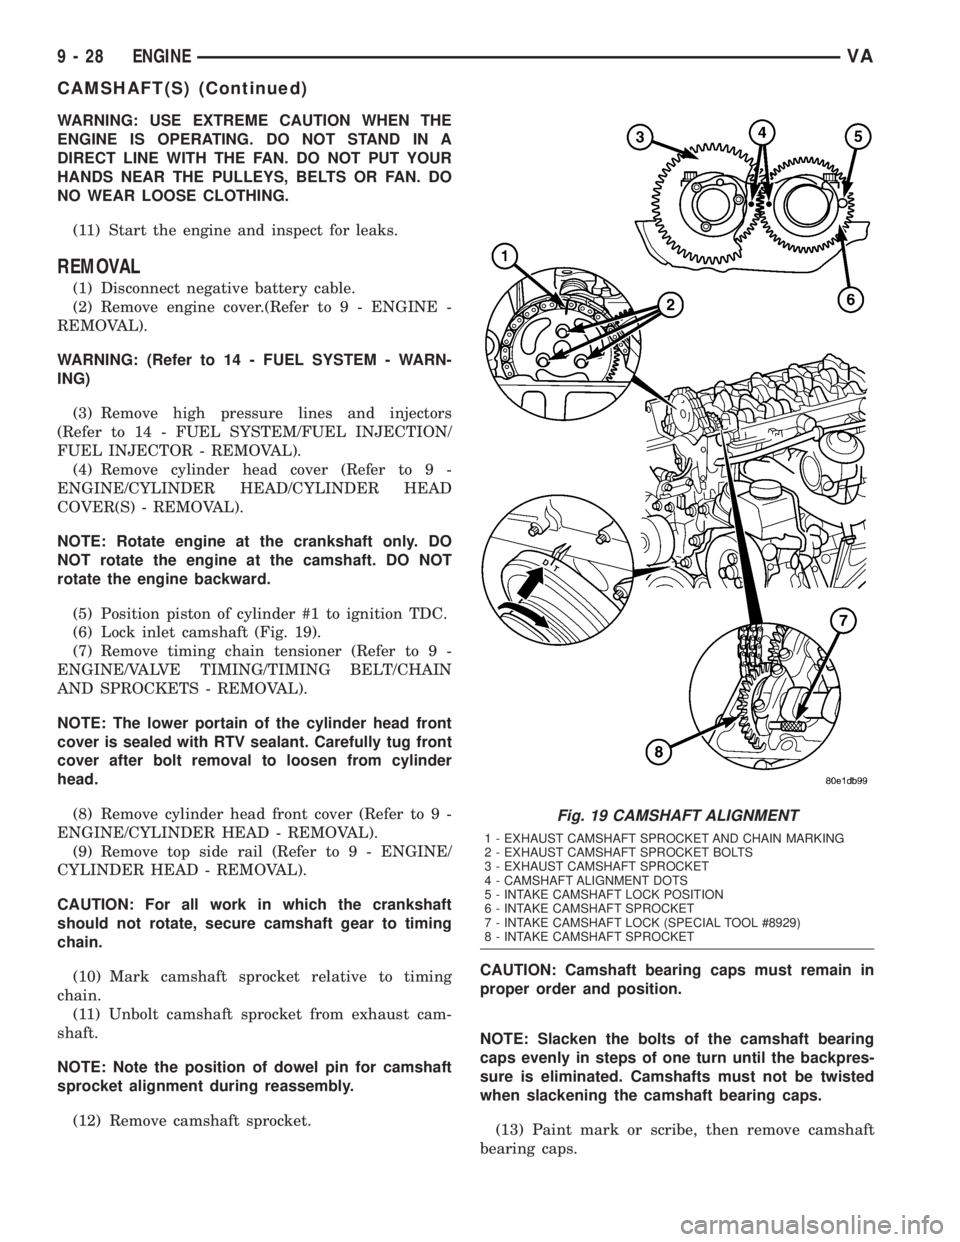
(6) Lock inlet camshaft (Fig. 19).
(7) Remove timing chain tensioner (Refer to 9 -
ENGINE/VALVE TIMING/TIMING BELT/CHAIN
AND SPROCKETS - REMOVAL).
NOTE: The lower portain of the cylinder head front
cover is sealed with RTV sealant. Carefully tug front
cover after bolt removal to loosen from cylinder
head.
(8) Remove cylinder head front cover (Refer to 9 -
ENGINE/CYLINDER HEAD - REMOVAL).
(9) Remove top side rail (Refer to 9 - ENGINE/
CYLINDER HEAD - REMOVAL).
CAUTION: For all work in which the crankshaft
should not rotate, secure camshaft gear to timing
chain.
(10) Mark camshaft sprocket relative to timing
chain.
(11) Unbolt camshaft sprocket from exhaust cam-
shaft.
NOTE: Note the position of dowel pin for camshaft
sprocket alignment during reassembly.
(12) Remove camshaft sprocket.CAUTION: Camshaft bearing caps must remain in
proper order and position.
NOTE: Slacken the bolts of the camshaft bearing
caps evenly in steps of one turn until the backpres-
sure is eliminated. Camshafts must not be twisted
when slackening the camshaft bearing caps.
(13) Paint mark or scribe, then remove camshaft
bearing caps.
Fig. 19 CAMSHAFT ALIGNMENT
1 - EXHAUST CAMSHAFT SPROCKET AND CHAIN MARKING
2 - EXHAUST CAMSHAFT SPROCKET BOLTS
3 - EXHAUST CAMSHAFT SPROCKET
4 - CAMSHAFT ALIGNMENT DOTS
5 - INTAKE CAMSHAFT LOCK POSITION
6 - INTAKE CAMSHAFT SPROCKET
7 - INTAKE CAMSHAFT LOCK (SPECIAL TOOL #8929)
8 - INTAKE CAMSHAFT SPROCKET
9 - 28 ENGINEVA
CAMSHAFT(S) (Continued)
Page 767 of 1232
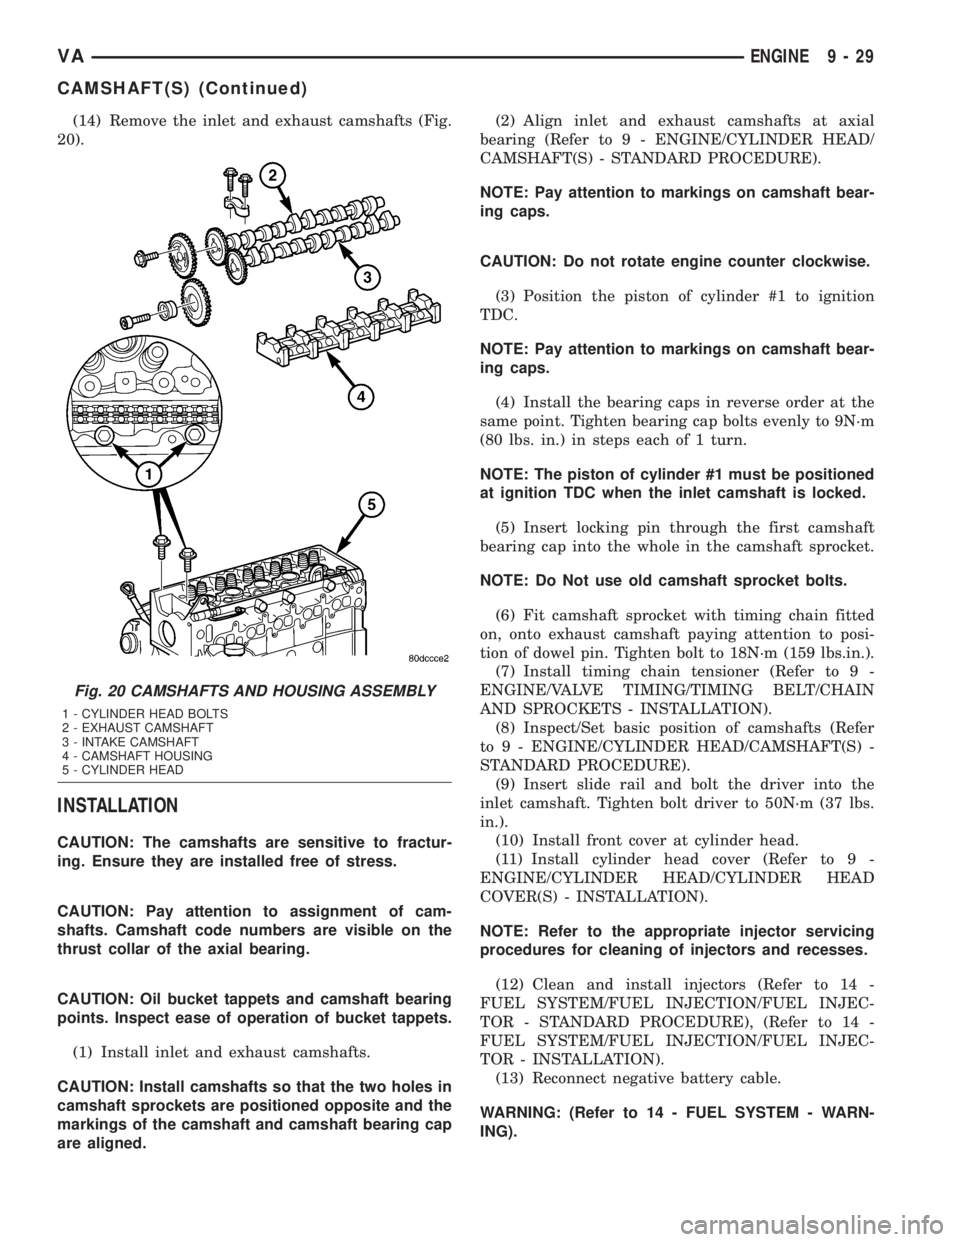
(14) Remove the inlet and exhaust camshafts (Fig.
20).
INSTALLATION
CAUTION: The camshafts are sensitive to fractur-
ing. Ensure they are installed free of stress.
CAUTION: Pay attention to assignment of cam-
shafts. Camshaft code numbers are visible on the
thrust collar of the axial bearing.
CAUTION: Oil bucket tappets and camshaft bearing
points. Inspect ease of operation of bucket tappets.
(1) Install inlet and exhaust camshafts.
CAUTION: Install camshafts so that the two holes in
camshaft sprockets are positioned opposite and the
markings of the camshaft and camshaft bearing cap
are aligned.(2) Align inlet and exhaust camshafts at axial
bearing (Refer to 9 - ENGINE/CYLINDER HEAD/
CAMSHAFT(S) - STANDARD PROCEDURE).
NOTE: Pay attention to markings on camshaft bear-
ing caps.
CAUTION: Do not rotate engine counter clockwise.
(3) Position the piston of cylinder #1 to ignition
TDC.
NOTE: Pay attention to markings on camshaft bear-
ing caps.
(4) Install the bearing caps in reverse order at the
same point. Tighten bearing cap bolts evenly to 9N´m
(80 lbs. in.) in steps each of 1 turn.
NOTE: The piston of cylinder #1 must be positioned
at ignition TDC when the inlet camshaft is locked.
(5) Insert locking pin through the first camshaft
bearing cap into the whole in the camshaft sprocket.
NOTE: Do Not use old camshaft sprocket bolts.
(6) Fit camshaft sprocket with timing chain fitted
on, onto exhaust camshaft paying attention to posi-
tion of dowel pin. Tighten bolt to 18N´m (159 lbs.in.).
(7) Install timing chain tensioner (Refer to 9 -
ENGINE/VALVE TIMING/TIMING BELT/CHAIN
AND SPROCKETS - INSTALLATION).
(8) Inspect/Set basic position of camshafts (Refer
to 9 - ENGINE/CYLINDER HEAD/CAMSHAFT(S) -
STANDARD PROCEDURE).
(9) Insert slide rail and bolt the driver into the
inlet camshaft. Tighten bolt driver to 50N´m (37 lbs.
in.).
(10) Install front cover at cylinder head.
(11) Install cylinder head cover (Refer to 9 -
ENGINE/CYLINDER HEAD/CYLINDER HEAD
COVER(S) - INSTALLATION).
NOTE: Refer to the appropriate injector servicing
procedures for cleaning of injectors and recesses.
(12) Clean and install injectors (Refer to 14 -
FUEL SYSTEM/FUEL INJECTION/FUEL INJEC-
TOR - STANDARD PROCEDURE), (Refer to 14 -
FUEL SYSTEM/FUEL INJECTION/FUEL INJEC-
TOR - INSTALLATION).
(13) Reconnect negative battery cable.
WARNING: (Refer to 14 - FUEL SYSTEM - WARN-
ING).
Fig. 20 CAMSHAFTS AND HOUSING ASSEMBLY
1 - CYLINDER HEAD BOLTS
2 - EXHAUST CAMSHAFT
3 - INTAKE CAMSHAFT
4 - CAMSHAFT HOUSING
5 - CYLINDER HEAD
VAENGINE 9 - 29
CAMSHAFT(S) (Continued)
Page 768 of 1232
WARNING: USE EXTREME CAUTION WHEN THE
ENGINE IS OPERATING. DO NOT STAND IN A
DIRECT LINE WITH THE FAN. DO NOT PUT YOUR
HANDS NEAR THE PULLEYS, BELTS OR FAN. DO
NOT WEAR LOOSE CLOTHING.
(14) Start engine and inspect for leaks.Care must
be taken to observe the fuel system warning (Refer to
14 - FUEL SYSTEM - WARNING).
(15) Install engine cover (Refer to 9 - ENGINE
COVER - INSTALLATION).
CYLINDER HEAD COVER(S)
REMOVAL
(1) Disconnect negative battery cable.
(2) Disconnect the air inlet and set aside.
(3) Detach hose from oil separator.
(4) Disconnect the camshaft position sensor.
(5) Disconnect fuel injector and glow plug harness
and set aside.(6) Remove fuel high pressure pipes and injectors
(Refer to 14 - FUEL SYSTEM/FUEL INJECTION/
FUEL INJECTOR - REMOVAL).
(7) Disconnect the out let line.
(8) Remove cylinder head cover retaining bolts and
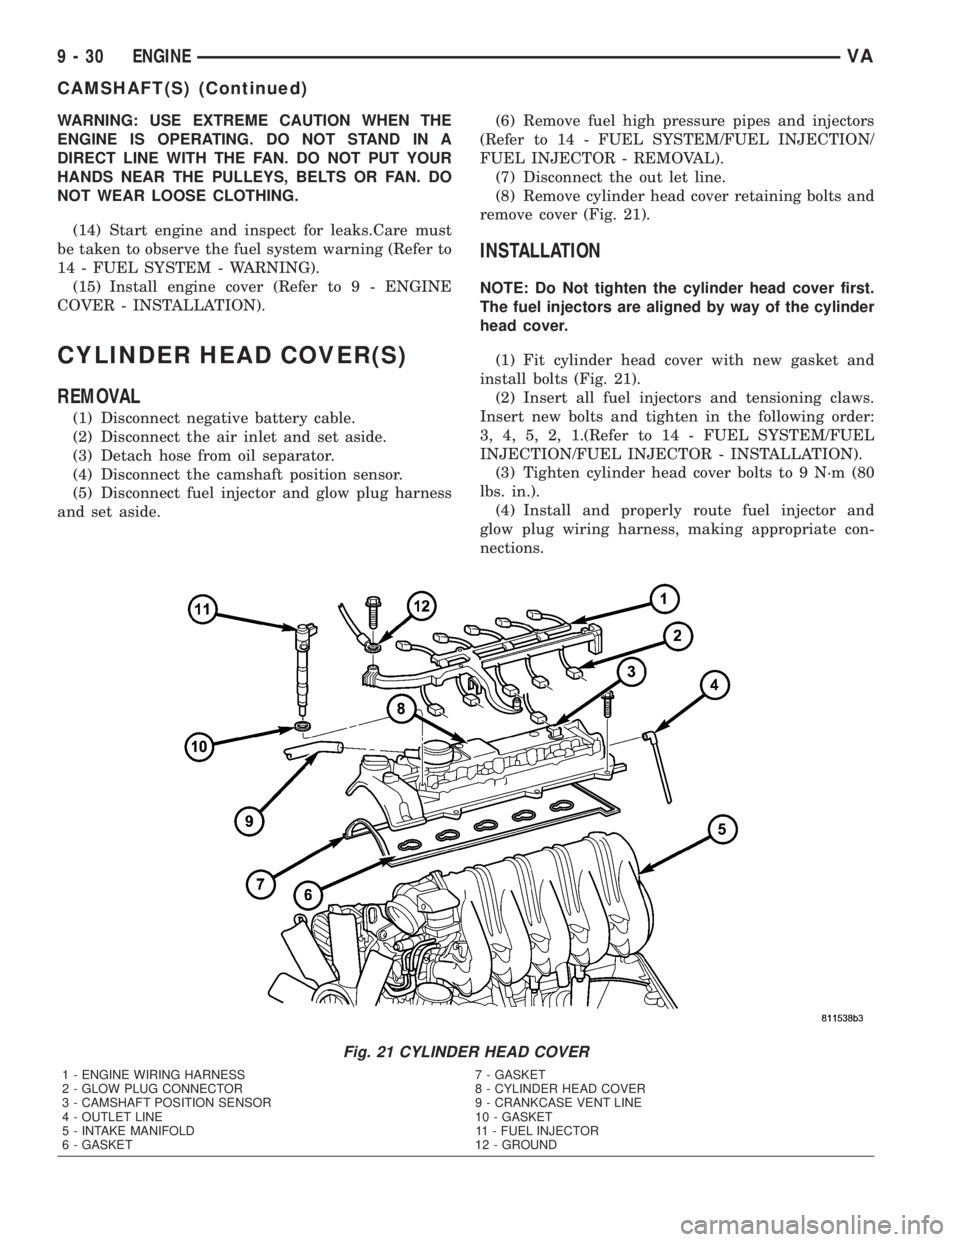
remove cover (Fig. 21).
INSTALLATION
NOTE: Do Not tighten the cylinder head cover first.
The fuel injectors are aligned by way of the cylinder
head cover.
(1) Fit cylinder head cover with new gasket and
install bolts (Fig. 21).
(2) Insert all fuel injectors and tensioning claws.
Insert new bolts and tighten in the following order:
3, 4, 5, 2, 1.(Refer to 14 - FUEL SYSTEM/FUEL
INJECTION/FUEL INJECTOR - INSTALLATION).
(3) Tighten cylinder head cover bolts to 9 N´m (80
lbs. in.).
(4) Install and properly route fuel injector and
glow plug wiring harness, making appropriate con-
nections.
Fig. 21 CYLINDER HEAD COVER
1 - ENGINE WIRING HARNESS 7 - GASKET
2 - GLOW PLUG CONNECTOR 8 - CYLINDER HEAD COVER
3 - CAMSHAFT POSITION SENSOR 9 - CRANKCASE VENT LINE
4 - OUTLET LINE 10 - GASKET
5 - INTAKE MANIFOLD 11 - FUEL INJECTOR
6 - GASKET 12 - GROUND
9 - 30 ENGINEVA
CAMSHAFT(S) (Continued)
Page 769 of 1232
(5) Connect the camshaft position sensor.
(6) Connect the return flow line.
(7) Attach oil separator hose.
(8) Install the fuel injector lines (Refer to 14 -
FUEL SYSTEM/FUEL DELIVERY/FUEL LINES -
INSTALLATION).
(9) Connect negative battery cable.
WARNING: (Refer to 14 - FUEL SYSTEM - WARN-
ING).
WARNING: USE EXTREME CAUTION WHEN ENGINE
IS OPERATING. DO NOT STAND IN A DIRECT LINE
WITH FAN. DO NOT PUT YOUR HANDS NEAR PUL-
LEYS, BELTS OR FAN. DO NOT WEAR LOOSE
CLOTHES.
(10) Start engine and inspect for leaks. Care must
be take to observe the fuel system warning (Refer to
14 - FUEL SYSTEM - WARNING).
VALVE SPRINGS
REMOVAL
REMOVAL - VALVE SPRINGS
(1) Disconnect negative battery cable.
(2) Remove glow plugs (Refer to 8 - ELECTRICAL/
IGNITION CONTROL/GLOW PLUG - REMOVAL).
(3) Remove injectors (Refer to 14 - FUEL SYS-
TEM/FUEL INJECTION/FUEL INJECTOR -
REMOVAL).
(4) Remove cylinder head cover (Refer to 9 -
ENGINE/CYLINDER HEAD/CYLINDER HEAD
COVER(S) - REMOVAL).
(5) Remove timing chain tensioner (Refer to 9 -
ENGINE/VALVE TIMING/TIMING BELT/CHAIN
AND SPROCKETS - REMOVAL).
(6) Remove front cover at cylinder head (Refer to 9
- ENGINE/CYLINDER HEAD - REMOVAL).
(7) Remove top guide rail (Refer to 9 - ENGINE/
CYLINDER HEAD - REMOVAL).
(8) Remove camshafts (Refer to 9 - ENGINE/CYL-
INDER HEAD/CAMSHAFT(S) - REMOVAL).
NOTE: The timing chain must be held in up position
so as not to jam during procedure.
(9) Position piston of cylinder to be processed to
DTC by rotating the crankshaft clockwise.DO NOT
crank engine.DO NOT rotate engine backward.
(10) Install crankshaft lock, special tool #8932.
(11) Seal injector hole with connection piece and
retain with orginal tensioning claw.(12) Connect cylinder leak tester with adaptors
and pressurize the cylinder to 5 bar (73 psi.).
WARNING: Valve springs and retainers must be
kept in order of the cylinder they were removed.
NOTE: Using valve service tools #9307, screw
retaining fork into threaded edge of cylinder head
and position thrust piece vertically at top of valve
spring retainer.
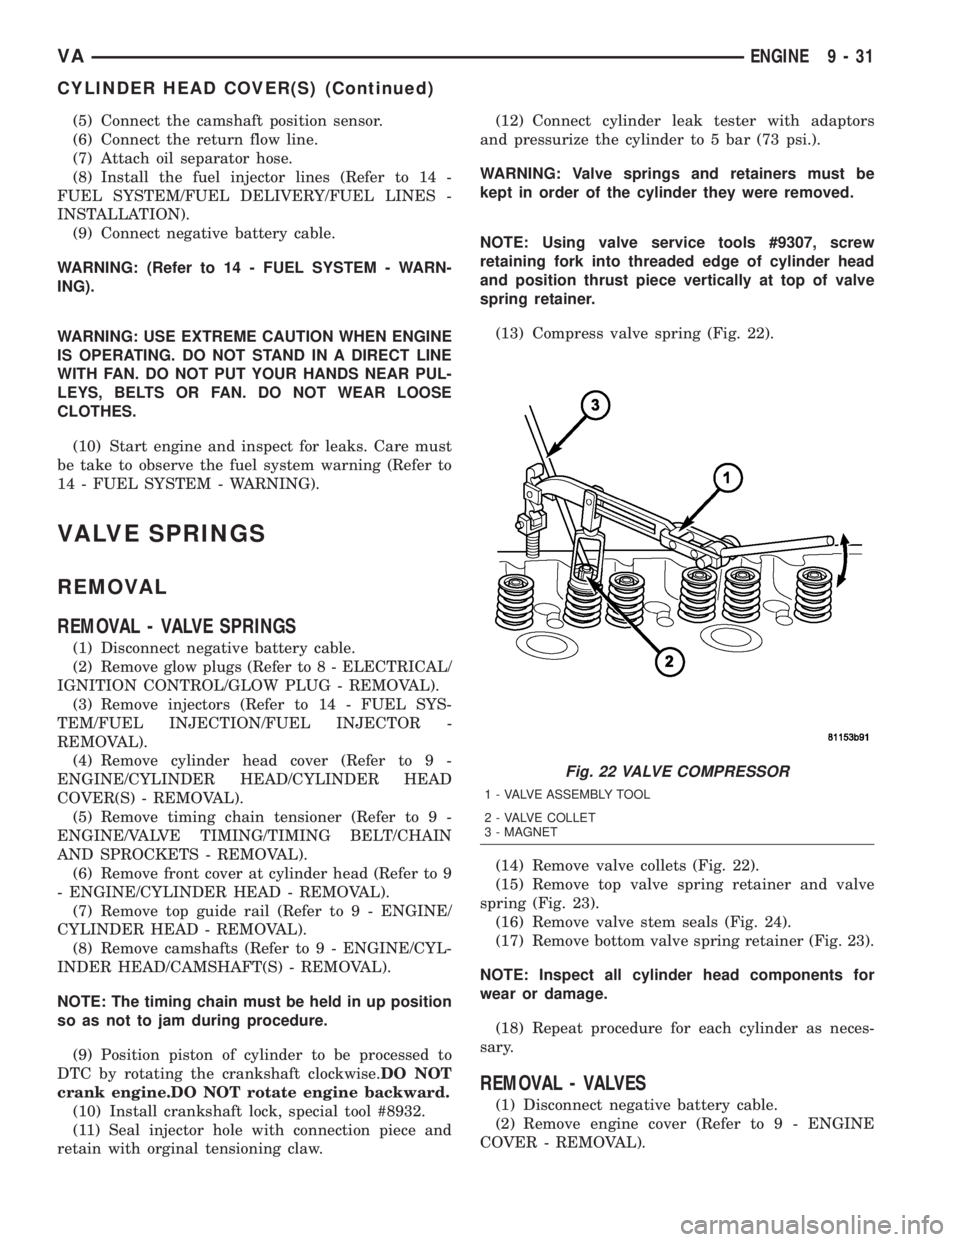
(13) Compress valve spring (Fig. 22).
(14) Remove valve collets (Fig. 22).
(15) Remove top valve spring retainer and valve
spring (Fig. 23).
(16) Remove valve stem seals (Fig. 24).
(17) Remove bottom valve spring retainer (Fig. 23).
NOTE: Inspect all cylinder head components for
wear or damage.
(18) Repeat procedure for each cylinder as neces-
sary.
REMOVAL - VALVES
(1) Disconnect negative battery cable.
(2) Remove engine cover (Refer to 9 - ENGINE
COVER - REMOVAL).
Fig. 22 VALVE COMPRESSOR
1 - VALVE ASSEMBLY TOOL
2 - VALVE COLLET
3 - MAGNET
VAENGINE 9 - 31
CYLINDER HEAD COVER(S) (Continued)
Page 771 of 1232
(10) Position piston of #1 cylinder to ignition TDC.
(11) Install camshafts and check basic position
(Refer to 9 - ENGINE/CYLINDER HEAD/CAM-
SHAFT(S) - INSTALLATION).
(12) Install top guide rail (Refer to 9 - ENGINE/
CYLINDER HEAD - INSTALLATION).
(13) Install front cover at cylinder head (Refer to 9
- ENGINE/CYLINDER HEAD - INSTALLATION).
(14) Install timing chain tensioner with new gas-
ket (Refer to 9 - ENGINE/VALVE TIMING/TIMING
BELT/CHAIN AND SPROCKETS - INSTALLATION)
(15) Install cylinder head cover (Refer to 9 -
ENGINE/CYLINDER HEAD/CYLINDER HEAD
COVER(S) - INSTALLATION).
(16) Install glow plugs (Refer to 8 - ELECTRICAL/
IGNITION CONTROL/GLOW PLUG - INSTALLA-
TION).
WARNING: SERVICE VEHICLES IN A WELL VENTI-
LATED AREA AND AVOID IGNITION SORCES. RISK
OF INJURY TO SKIN AND EYES FROM FUEL JET
FLOWING OUT.
(17) Install injectors (Refer to 14 - FUEL SYS-
TEM/FUEL INJECTION/FUEL INJECTOR -
INSTALLATION).
(18) Reconnect negative battery cable.
WARNING: USE EXTREME CAUTION WHEN THE
ENGINE IS OPERATING. DO NOT STAND IN ADIRECT LINE WITH THE FAN. DO NOT PUT YOUR
HANDS NEAR THE PULLEYS, BELTS OR FAN. DO
NOT WEAR LOOSE CLOTHING.
(19) Start the engine and inspect for leaks.Care
must be taken to observe the fuel system warning
(Refer to 14 - FUEL SYSTEM - WARNING)
(20) Install engine cover (Refer to 9 - ENGINE
COVER - INSTALLATION).
INSTALLATION - VALVES
WARNING: Valves must be kept in their original
positions in cylinder head. Failure to do so will
result in engine damage.
NOTE: Inspect all valves, springs and retainers for
wear or damage. Replace as necessary.
(1) Install valves in their original position in the
cylinder head.
(2) Install lower valve spring retainer.
(3) Install valve stem seal.
(4) Install valve spring.
(5) Install valve spring retainer.
NOTE: Using tool, screw retaining fork into
threaded edge of cylinder head and position thrust
piece vertically at the top of each valve spring
retainer.
NOTE: Ensure that the valve keepers are seated
properly.
(6) Using a suitable valve spring compressor, com-
press valve spring and install valve keepers.
(7) Repeat steps 3 through 7 for each valve as nec-
essary.
(8) Remove valve assembly from cylinder head.
(9) Install cylinder head on engine block (Refer to
9 - ENGINE/CYLINDER HEAD - INSTALLATION).
(10) Install glow plugs (Refer to 8 - ELECTRICAL/
IGNITION CONTROL/GLOW PLUG - INSTALLA-
TION).
(11) Connect negative battery cable.
WARNING: US EXTREME CAUTION WHEN THE
ENGINE IS IN OPERATION. DO NOT STAND IN A
DIRECT LINE WITH THE FAN. DO NOT PUT YOUR
HANDS NEAR THE PULLEYS, BELTS OR FAN. DO
NOT WEAR LOOSE CLOTHING.
(12) Start engine and check for leaks. Care must
be taken to observe the fuel system warning (Refer to
14 - FUEL SYSTEM - WARNING)
(13) Install engine cover (Refer to 9 - ENGINE
COVER - INSTALLATION).
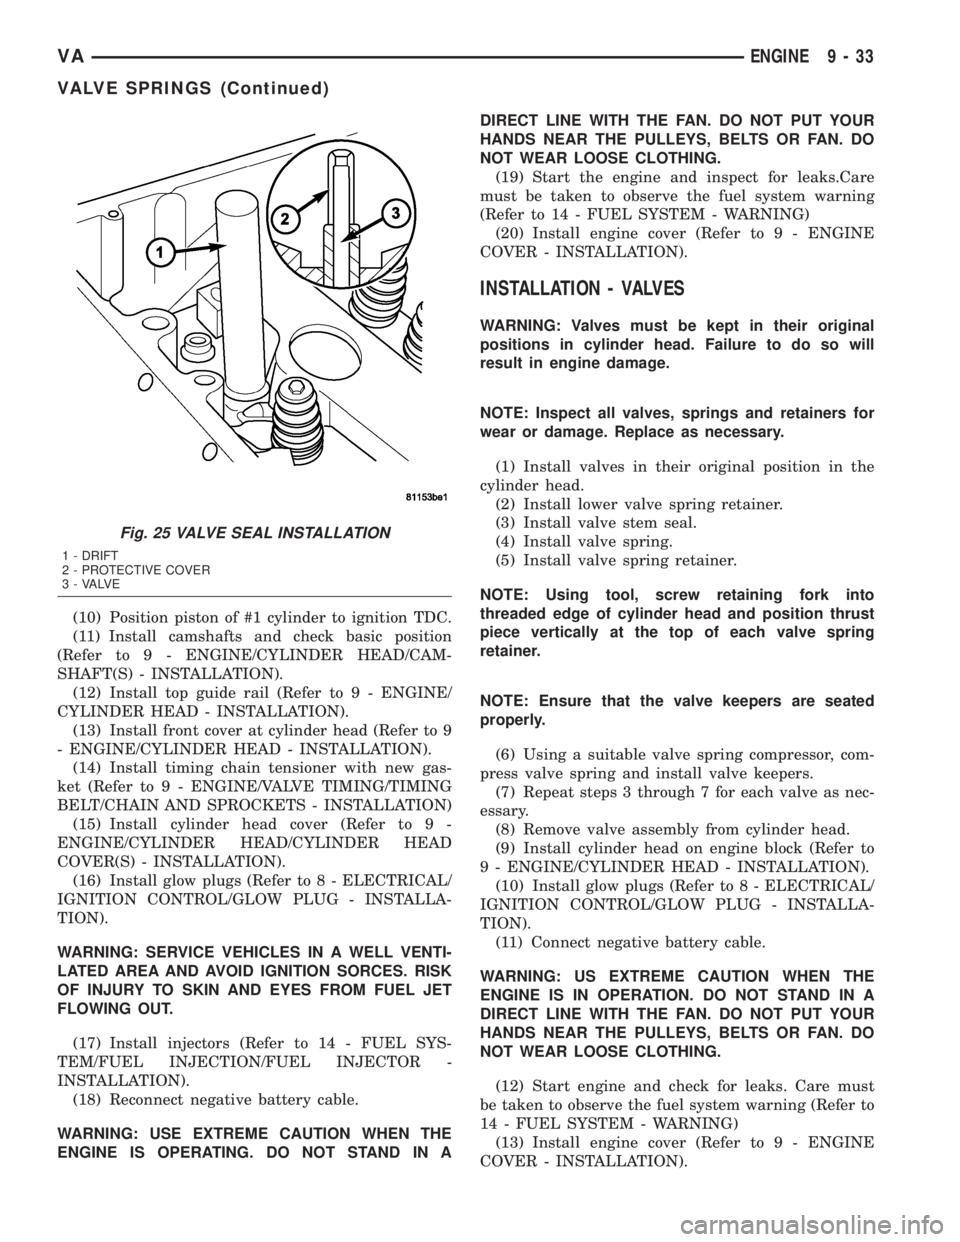
Fig. 25 VALVE SEAL INSTALLATION
1 - DRIFT
2 - PROTECTIVE COVER
3 - VALVE
VAENGINE 9 - 33
VALVE SPRINGS (Continued)