Page 127 of 173
124 Navigation*Route guidanceRoute guidance
After you select the destination and the
route is calculated, the navigation system
uses both pictorial displays and voice
prompts to guide you to the destination.
When the route is calculated, the display
switches to the map mode or to the ma-
neuver screen.The system announces “Proceed to the
highlighted Route” and the display shows
“Please Proceed”. The route is now in
progress.
While the system is guiding you on your
route, you can manually change the display
between modes. The Guidance Display
mode shows an arrow indicating the next
maneuver.
Press the joystick to the right to preview
the next maneuver. Press the joystick to
the left to return to the current maneuver.
iAfter entering the destination, you can
change to an audio source. If you have
selected the Hybrid or Arrow mode
(�page 143), the Guidance Display
comes up when a maneuver is started.
The voice instructions are announced
simultaneously.
Page 128 of 173

125 Navigation*
Route guidance
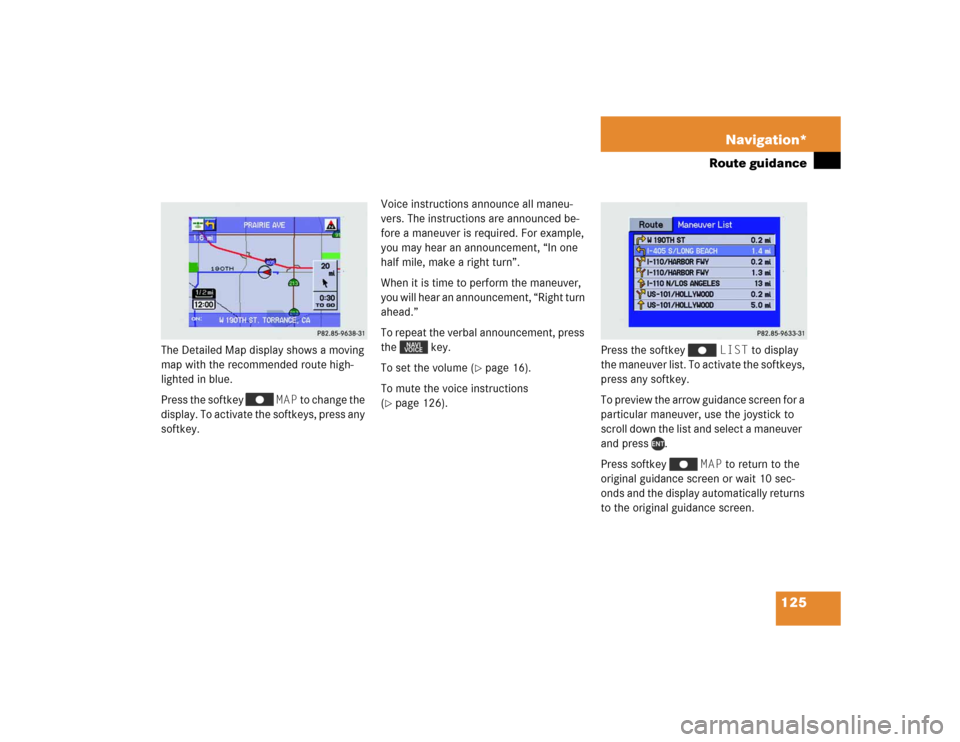
The Detailed Map display shows a moving
map with the recommended route high-
lighted in blue.
Press the softkey MAP to change the
display. To activate the softkeys, press any
softkey. Voice instructions announce all maneu-
vers. The instructions are announced be-
fore a maneuver is required. For example,
you may hear an announcement, “In one
half mile, make a right turn”.
When it is time to perform the maneuver,
you will hear an announcement, “Right turn
ahead.”
To repeat the verbal announcement, press
the key.
To set the volume (
�page 16).
To mute the voice instructions
(
�page 126).Press the softkey LIST to display
the maneuver list. To activate the softkeys,
press any softkey.
To preview the arrow guidance screen for a
particular maneuver, use the joystick to
scroll down the list and select a maneuver
and press .
Press softkey MAP to return to the
original guidance screen or wait 10 sec-
onds and the display automatically returns
to the original guidance screen.
Page 129 of 173
126 Navigation*Route guidanceIf you programmed the address and name,
they are displayed when you reach your
final destination.Muting voice instructions
Activate the softkeys by pressing any
softkey. Press the softkey MUTE. to
mute the voice instructions. The softkey
MUTE is highlighted.
To cancel the mute function, press the
highlighted softkey MUTE.
If you press , the system gives the
current voice instruction even when MUTE
is switched on.Altering the map scale
You can increase or decrease the level of
detail in the map mode.
�
Press to zoom in (increase detail)
�
Press to zoom out (decrease de-
tail).
Page 131 of 173
128 Navigation*Route guidance�
Use the joystick to select Change
Current Method and press .
The Change Current Method menu ap-
pears.
�
Use the joystick to select one of the fol-
lowing routing methods.�
Quickest Route: The MCS cal-
culates the shortest and most effi-
cient way to arrive at your
destination.
�
Maximize Freeways: The MCS
calculates a route that makes most
efficient use of the freeways.
�
Minimize Freeways: The MCS
calculates a route that uses mostly
county and local roads.
�
Minimize Toll Roads: The
MCS calculates a route that uses
the least number of toll roads.
�
After selection press .
The MCS automatically returns to the
detailed map display.
Page 132 of 173
129 Navigation*
Route guidance
Viewing the maneuver list during guid-
ance
You can display the Maneuver List during
route guidance to preview upcoming turns
and street names.�
Use the joystick to select ROUTE
FUNCTIONS and press .
�
To activate the softkeys, press any
softkey.
�
Press the softkey LIST.
The Maneuver List menu appears.
�
To preview a specific maneuver, use
the joystick to select a street name/
maneuver and press .
The maneuver screen for the selected
maneuver appears on the display.
�
To return to the Guidance mode, press
the softkey MAP.
or
�
Wait 10 seconds and the system will
automatically return to the Guidance
mode.Avoiding a road
�
Press .
�
Use the joystick to select ROUTE
FUNCTIONS and press .
The Route Select menu appears.
��������
����
���������
��
Page 136 of 173

133 Navigation*
Destination memory
�
Use the joystick to select the first char-
acter of the name and press .
The character appears in the text win-
dow. Use the joystick to spell out the
name as you would like to see it in the
address book.
�
To enter additional characters, repeat
above step.
�
To correct the last character, use the
joystick to select Delete and press
.
�
If you don’t wish to save the address,
press .
or
�
When the new name is completely
spelled out, use the joystick to select
Done and press .
The Input Phone Number menu ap-
pears.
�
You can enter the phone number of the
destination. Use the joystick to elect
the first number of the desired phone
number and press .
or
�
Use the number keypad to enter the
number.
The number appears in the number
window.
�
To enter additional numbers, repeat
the above step.
�
To correct the last character, use the
joystick to select Delete and press
.
�
After you have entered the phone num-
ber, use the joystick to select Save
and press .
�
If you don’t want to enter a phone num-
ber, press .
The name and address are now stored
in the Address Book.
iThe Point of Interest name automatical-
ly appears in the Input Name display.
Use the joystick to select Delete if
you want to completely erase and re-
place the name.
Page 140 of 173
137 Navigation*
Destination memory
�
You can select from the following
options:�
Return
Returns you to the previous menu.
�
Change Name
Changes the name of the address
(�page 133).
�
Change Phone Number
Changes the phone number of the
address (
�page 133).
�
Delete
Deletes the address from your ad-
dress book.
A pop up menu appears and asks
you if you want to delete all. Select
Yes if you want to delete all ad-
dresses or No to cancel.
Press .
�
Folder
Moves your address to another
folder.
A menu appears that displays all
available folders. Select the desired
folder and press .
�
Use the joystick to select the desired
option and press . This function helps you find the most effi-
cient route if your travels require stops at
multiple locations. You can store up to 10
separate destinations in Today’s Plan.
Adding a destination to Today’s Plan
Whenever you select and enter a destina-
tion, the system allows you to add the des-
tination to Today’s Plan.
Today’s plan
Page 141 of 173
138 Navigation*Destination memory�
In the Confirm Destination menu, use
the joystick to select Options and
press .
The Options menu appears.
�
In the Options menu, use the joystick
to select Add to Today’s Plan
and press .
The Today’s Plan list is displayed and the
added destination is highlighted.
Press , the system returns to the Find
Destination menu. You can now enter a
destination to add additional entries to To-
day’s Plan.Using Today’s Plan
�
Press .
�
Use the joystick to select INPUT
DESTINATION and press .
The Find Destination by menu appears.
�
Use the joystick to select Today’s
Plan and press .
���������
���
�������������
���������
��