Page 1 of 969

AIR CONDITIONING SYSTEM
PREC")
550BQ-01
AC2810
AC2811
N11084
Wrong Okay
HI
LO HI LO
- HEATER & AIR CONDITIONERAIR CONDITIONING SYSTEM
55-1
2616 Author�: Date�:
2005 LEXUS ES330 REPAIR MANUAL (RM1124U)
AIR CONDITIONING SYSTEM
PRECAUTION
1. DO NOT HANDLE REFRIGERANT IN AN ENCLOSED
AREA OR NEAR AN OPEN FLAME
2. ALWAYS WEAR EYE PROTECTION
3. BE CAREFUL NOT TO GET LIQUID REFRIGERANT IN
YOUR EYES OR ON YOUR SKIN
If liquid refrigerant gets in your eyes or on your skin.
(a) Wash the area with lots of cool water.
CAUTION:
Do not rub your eyes or skin.
(b) Apply clean petroleum jelly to the skin.
(c) Go immediately to a physician or hospital for professional
treatment.
4. NEVER HEAT CONTAINER OR EXPOSE IT TO NAKED
FLAME
5. BE CAREFUL NOT TO DROP CONTAINER AND NOT
TO APPLY PHYSICAL SHOCKS TO IT
6. DO NOT OPERATE COMPRESSOR WITHOUT
ENOUGH REFRIGERANT IN REFRIGERANT SYSTEM
If there is not enough refrigerant in the refrigerant system oil lu-
brication will be insufficient and compressor burnout may occur,
so take care to avoid this, necessary care should be taken.
7. DO NOT OPEN HIGH PRESSURE MANIFOLD VALVE
WHILE COMPRESSOR IS OPERATING
If the high pressure valves opened, refrigerant flows in the re-
verse direction and could cause the charging cylinder to rup-
ture, so open and close the only low pressure valve.
8. BE CAREFUL NOT TO OVERCHARGE SYSTEM WITH
REFRIGERANT
If refrigerant is overcharged, it causes problems such as insuffi-
cient cooling, poor fuel economy, engine overheating etc.
Page 2 of 969

REFRIGERANT
ON-VEHICLE INSPECTION
1. INSPECT REFRIGERANT VOLUME")
550D4-02
I31521
Sight Glass
55-2
- HEATER & AIR CONDITIONERREFRIGERANT
2617 Author�: Date�:
2005 LEXUS ES330 REPAIR MANUAL (RM1124U)
REFRIGERANT
ON-VEHICLE INSPECTION
1. INSPECT REFRIGERANT VOLUME
(a) Observe the sight glass on the cooler refrigerant liquid
pipe A.
Test conditions:
�Running engine at 1,500 rpm
�Blower speed control switch at ºHIº
�A/C switch ON
�Temperature control dial at ºMAX. COOLº
�Fully open the doors
ItemSymptomAmount of refrigerantCorrective Actions
1Bubbles presentInsufficient*
(1) Check for gas leakage and repair if nec-
essary
(2) Add refrigerant until bubbles disappear
2No bubbles presentNone, insufficient or too muchRefer 3 and 4
3No temperature difference between com-
pressor inlet and outletEmpty or nearly empty
(1) Check for gas leakage with gas leak de-
tector and repair if necessary
(2) Add refrigerant until bubbles disappear
4Considerable temperature difference be-
tween compressor inlet and outlet.Correct or too muchRefer to 5 and 6
5Immediately after air conditioning is turned
off, refrigerant clearToo much
(1) Discharge refrigerant
(2) Remove air and supply proper amount or
purified refrigerant
6
Immediately after air conditioning is turned
off, refrigerant foams and then becomes
clear
Correct-
*: Bubbles in the sight glass with ambient temperatures higher than usual can be considered normal if cooling
is sufficient.
Page 12 of 969
550D8-02
I31621
Heater Control Housing Sub-assy
Heater Control Housing Air Conditioning Control Bulb
55-12
- HEATER & AIR CONDITIONERAIR CONDITIONER CONTROL ASSEMBLY
2627 Author�: Date�:
2005 LEXUS ES330 REPAIR MANUAL (RM1124U)
AIR CONDITIONER CONTROL ASSEMBLY
COMPONENTS
Page 13 of 969
550D9-02
I316224 Claws
I31623
I31626
I316278 Claws
- HEATER & AIR CONDITIONERAIR CONDITIONER CONTROL ASSEMBLY
55-13
2628 Author�: Date�:
2005 LEXUS ES330 REPAIR MANUAL (RM1124U)
OVERHAUL
HINT:
COMPONENTS: See page 55-12
1. REMOVE AIR CONDITIONER CONTROL ASSEMBLY (See page 71-1 1)
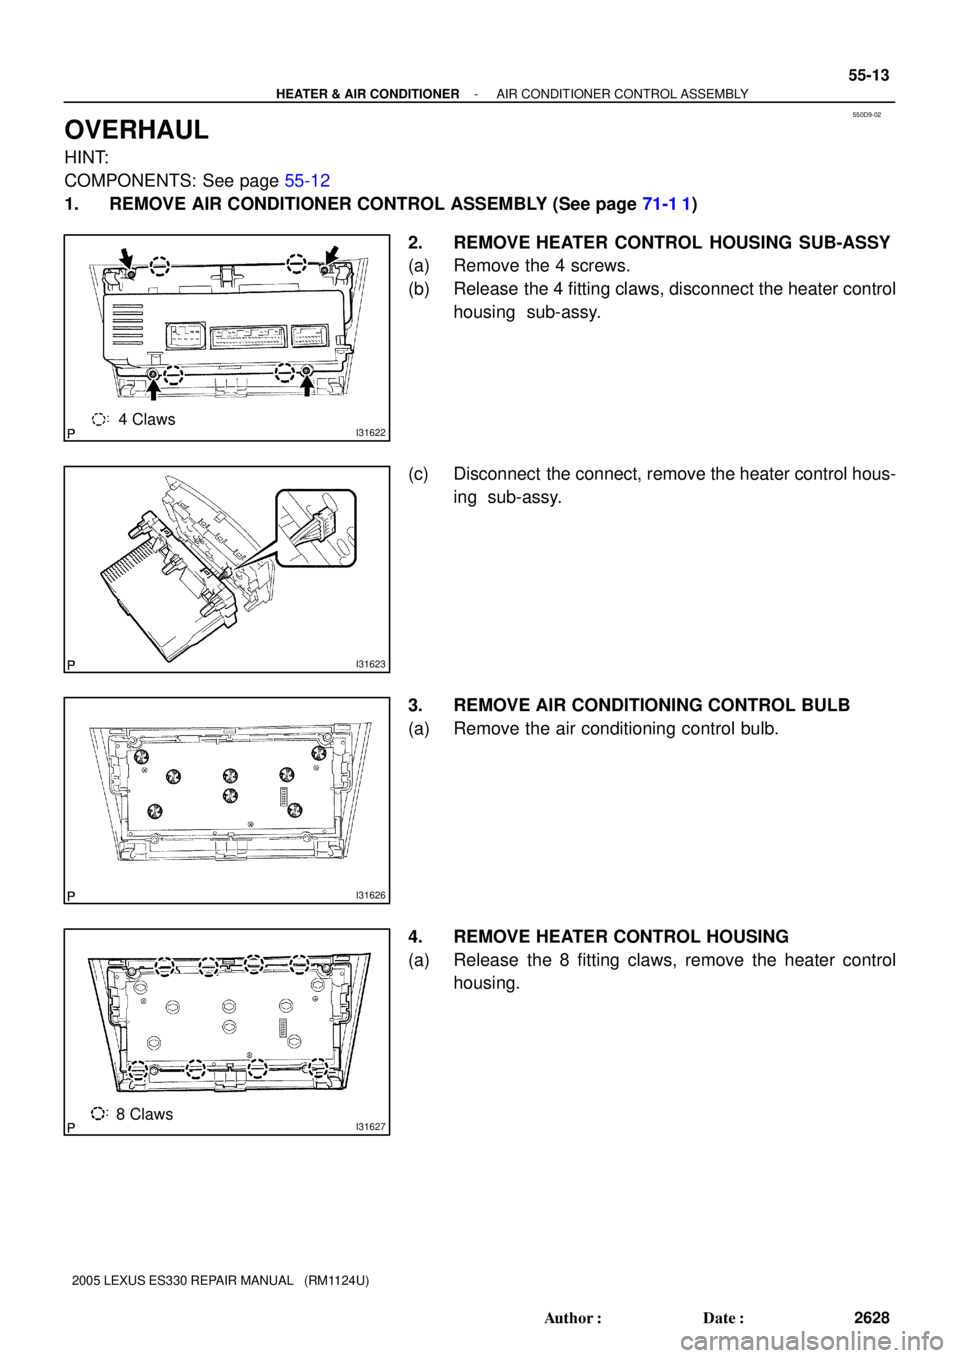
2. REMOVE HEATER CONTROL HOUSING SUB-ASSY
(a) Remove the 4 screws.
(b) Release the 4 fitting claws, disconnect the heater control
housing sub-assy.
(c) Disconnect the connect, remove the heater control hous-
ing sub-assy.
3. REMOVE AIR CONDITIONING CONTROL BULB
(a) Remove the air conditioning control bulb.
4. REMOVE HEATER CONTROL HOUSING
(a) Release the 8 fitting claws, remove the heater control
housing.
Page 14 of 969
I31626
A
BB
B
55-14
- HEATER & AIR CONDITIONERAIR CONDITIONER CONTROL ASSEMBLY
2629 Author�: Date�:
2005 LEXUS ES330 REPAIR MANUAL (RM1124U)
5. INSTALL AIR CONDITIONING CONTROL BULB
(a) Install the air conditioning control bulb to the air condition-
er panel sub-assy.
Bulb position:
PositionPart No.
A90010 - 03048
B90010 - 03049
Page 15 of 969
550DA-02
I31632
Instrument Panel Reinforcement
Instrument Panel
Brace Sub-assy No. 2
Instrument Finish Panel Retainer Lower
Air Duct Rear No. 2 Air Duct Rear No. 1 Instrument Panel
Brace Sub-assy
Console Box Duct No. 1
Defroster Nozzle
Assy Lower
Piping ClampO-ring �
Blower Assy
Heater To Foot Duct No. 1
Air Conditioning Radiator Assy Heater To Foot Duct No. 3
Compressor Oil ND-OIL 8 or equivalent
� Non-reusable part
NVm (kgfVcm, ftVlbf)
: Specified torque1.5 (15, 12 in.Vlbf)
O-ring �
9.8 (100, 87 in.Vlbf)
1.5 (15, 12 in.Vlbf)
1.5 (15, 12 in.Vlbf)
1.5 (15, 12 in.Vlbf)
20 (203, 14)
- HEATER & AIR CONDITIONERAIR CONDITIONING RADIATOR ASSY
55-15
2630 Author�: Date�:
2005 LEXUS ES330 REPAIR MANUAL (RM1124U)
AIR CONDITIONING RADIATOR ASSY
COMPONENTS
Page 16 of 969
I31633
Compressor Oil ND-OIL 8 or equivalent
� Non-reusable part
NVm (kgfVcm, ftVlbf): Specified torque
3.5 (35, 30 in.Vlbf)
Heater Radiator Unit Sub-assy Piping Clamp Mode Damper Servo Sub-assy
Cooler Thermistor No. 1 Cooler Evaporator Sub-assy No. 1Packing Air Conditioning Tube Assy
Cooler Expansion Valve
O-ring �
Air Mix Damper Servo
Sub-assy
Air Mix Damper Servo
Sub-assy
�
55-16
- HEATER & AIR CONDITIONERAIR CONDITIONING RADIATOR ASSY
2631 Author�: Date�:
2005 LEXUS ES330 REPAIR MANUAL (RM1124U)
Page 17 of 969

550DB-02
I03839
Push
SSTPull
Release
Lever
I06919
Screw
Driver Disconnect the
tube using hand
I31522
- HEATER & AIR CONDITIONERAIR CONDITIONING RADIATOR ASSY
55-17
2632 Author�: Date�:
2005 LEXUS ES330 REPAIR MANUAL (RM1124U)
OVERHAUL
HINT:
COMPONENTS: See page 55-15
1. DISCHARGE REFRIGERANT FROM REFRIGERATION SYSTEM (See page 55-8)
SST 07110-58060 (07117-58080, 07117-58090, 07117-78050, 07117-88060, 07117-88070,
07117-88080)
2. DISCONNECT COOLER REFRIGERANT SUCTION
HOSE NO.1
(a) Install SST to piping clamp.
SST 09870-00015
HINT:
Confirm the direction of the piping clamp claw and SST using
the illustration showing on the caution label.
(b) Push down SST and release the clamp lock.
NOTICE:
Be careful not to deform the tube, when pushing SST.
(c) Pull SST slightly and push the release lever, then remove
the piping clamp with SST.
(d) Disconnect the cooler refrigerant suction hose No. 1.
NOTICE:
�Do not use tools like screwdriver to remove the tube.
�Cap the open fittings immediately to keep moisture or
dirt out of the system.
3. DISCONNECT COOLER REFRIGERANT LIQUID PIPE A
SST 09870-00025
HINT:
Disconnect cooler refrigerant liquid pipe A in the same way as the cooler refrigerant suction hose No. 1.
4. DISCONNECT HEATER OUTLET WATER HOSE
(a) Using pliers, grip the claws of clip and slide the clip and
disconnect the heater outlet water hose.