Page 597 of 969
- FUELFUEL INJECTOR ASSY (3MZ-FE)
11-17
2045 Author�: Date�:
2005 LEXUS ES330 REPAIR MANUAL (RM1124U)
18. ADD ENGINE COOLANT (See page 16-9)
19. CHECK FOR ENGINE COOLANT LEAKS (See page 16-1)
20. CHECK FOR FUEL LEAKS (See page 11-5)
21. INSTALL V-BANK COVER SUB-ASSY (See page 10-1 1)
22. INSTALL FRONT SUSPENSION UPPER BRACE CENTER (W/O TEMS) (See page 10-1 1)
23. SYSTEM INITIALIZATION (See page 19-15)
Page 650 of 969

160QB-01
A60522
Radiator Cap
Tester
- COOLINGCOOLING SYSTEM (3MZ-FE)
16-1
2279 Author�: Date�:
2005 LEXUS ES330 REPAIR MANUAL (RM1124U)
COOLING SYSTEM (3MZ-FE)
ON-VEHICLE INSPECTION
1. INSPECT COOLING SYSTEM FOR LEAKS
(a) Remove the water outlet cap.
CAUTION:
To avoid the danger of being burned, do not remove the wa-
ter outlet cap while the engine and radiator are still hot.
Thermal expansion will cause hot engine coolant and
steam to blow out from the radiator.
(b) Fill the radiator with coolant, then attach a radiator cap
tester.
(c) Warm up the engine.
(d) Pump it to 118 kPa (1.2 kgf/cm
2, 17.1 psi), then check that
the pressure does not drop.
If the pressure drops, check the hoses, radiator and water
pump for leaks. If there are no signs or traces of external coolant
leaks, check the heater core, cylinder block and head.
(e) Reinstall the water outlet cap.
2. CHECK ENGINE COOLANT LEVEL AT RESERVOIR
(a) The engine coolant should be between the ºLOWº and ºFULLº lines when the engine is cold.
If low, check for leaks and add ºToyota Super Long Life Coolantº or similar high quality ethylene glycol based
non-silicate, non-amine, non-nitrite, and non-borate coolant with long-life hybrid organic acid technology
up to the ºFULLº line.
3. CHECK ENGINE COOLANT QUALITY
(a) Remove the water outlet cap.
CAUTION:
To avoid the danger of being burned, do not remove the water outlet cap while the engine and radiator
are still hot. Thermal expansion will cause hot engine coolant and steam to blow out from the radiator.
(b) Check if there are any excessive deposits of rust or scale around the water outlet cap and water outlet
filler hole; the coolant should free of oil.
If excessively dirty, replace the coolant.
(c) Reinstall the water outlet cap.
Page 654 of 969

160QC-01
P13560
P00436
A85445
10 mm
(0.39 in.)
- COOLINGCOOLING SYSTEM (3MZ-FE)
16-3
2281 Author�: Date�:
2005 LEXUS ES330 REPAIR MANUAL (RM1124U)
INSPECTION
1. INSPECT THERMOSTAT
HINT:
The thermostat is inscribed with the valve opening temperature.
(a) Immerse the thermostat in water, then gradually heat the
water.
(b) Inspect the valve opening temperature of the thermostat.
Valve opening temperature:
80 to 84�C (176 to 183�F)
If the valve opening temperature is not as specified, replace the
thermostat.
(c) Inspect the valve lift.
Valve lift: 10 mm (0.39 in.) or more at 95�C (203�F)
If the valve lift is not as specified, replace the thermostat.
(d) Check that the valve is fully closed when the thermostat
is at low temperature (below 77�C (171�F)).
If not fully closed, replace the thermostat.
2. INSPECT WATER OUTLET CAP SUB-ASSY
NOTICE:
�If the water outlet cap is contaminated, rinse it with
water.
�Before using a radiator cap tester, wet the relief valve
and pressure valve with engine coolant or water.
�When performing the following steps (a) and (b), keep
the tester at an angle of over 30� above horizontal.
Page 657 of 969

A86576
Ohmmeter
A86577
Ohmmeter Battery
A86580
Ohmmeter
A86581
Ohmmeter 16-8
- COOLINGCOOLING FAN SYSTEM (3MZ-FE)
2286 Author�: Date�:
2005 LEXUS ES330 REPAIR MANUAL (RM1124U)
3. INSPECT COOLING FAN RELAY NO.3
(a) Check the continuity.
(1) Using an ohmmeter, check for continuity between
the terminals.
Standard:
Tester ConnectionSpecified Condition
1 - 2Continuity
3 - 5No continuity
If the result is not as specified, replace the cooling fan relay.
(b) Check the operation.
(1) Apply battery positive voltage across terminals 1
and 2.
(2) Using an ohmmeter, check that there is continuity
between terminals 3 and 5.
If there is no continuity, replace the cooling fan relay.
4. INSPECT TEMPERATURE DETECT SWITCH
(a) Check the continuity.
(1) Using an ohmmeter, check for continuity between
the terminals.
Standard:
Coolant TemperatureSpecified Condition
Above 98�C (208�F)Continuity
Below 88�C (190�F)No continuity
If the result is not as specified, replace the temperature detect
switch.
5. INSPECT TEMPERATURE DETECT SWITCH NO.2
(a) Check the continuity.
(1) Using an ohmmeter, check for continuity between
the terminals.
Standard:
Coolant TemperatureSpecified Condition
Above 93�C (199�F)Continuity
Below 83�C (181�F)No continuity
If the result is not as specified, replace the temperature detect
switch.
Page 658 of 969

160QF-01
A86582
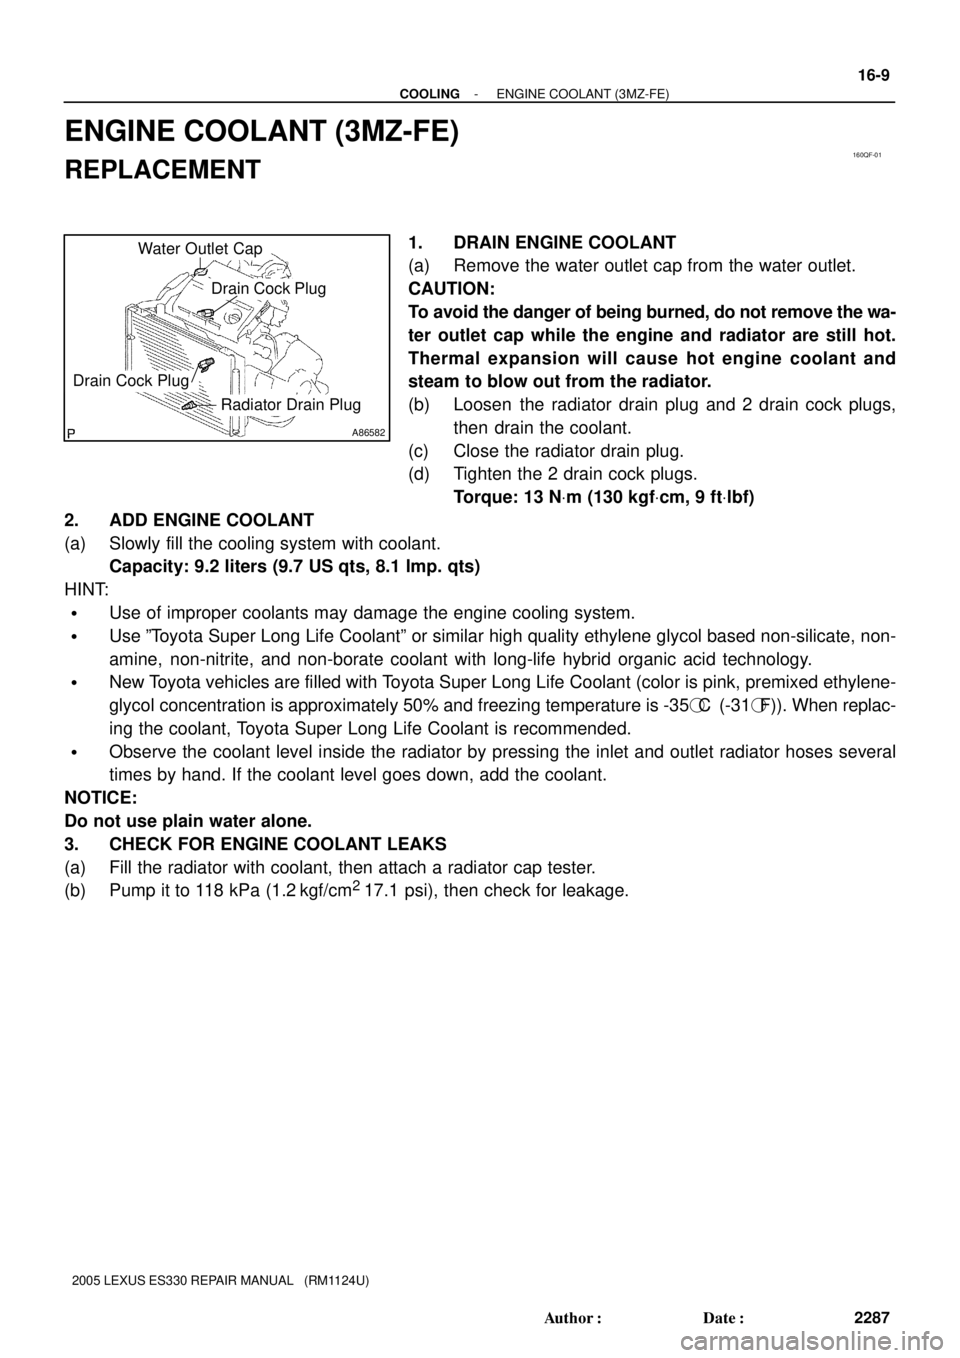
Drain Cock Plug
Radiator Drain Plug
Drain Cock Plug
Water Outlet Cap
- COOLINGENGINE COOLANT (3MZ-FE)
16-9
2287 Author�: Date�:
2005 LEXUS ES330 REPAIR MANUAL (RM1124U)
ENGINE COOLANT (3MZ-FE)
REPLACEMENT
1. DRAIN ENGINE COOLANT
(a) Remove the water outlet cap from the water outlet.
CAUTION:
To avoid the danger of being burned, do not remove the wa-
ter outlet cap while the engine and radiator are still hot.
Thermal expansion will cause hot engine coolant and
steam to blow out from the radiator.
(b) Loosen the radiator drain plug and 2 drain cock plugs,
then drain the coolant.
(c) Close the radiator drain plug.
(d) Tighten the 2 drain cock plugs.
Torque: 13 NVm (130 kgfVcm, 9 ftVlbf)
2. ADD ENGINE COOLANT
(a) Slowly fill the cooling system with coolant.
Capacity: 9.2 liters (9.7 US qts, 8.1 lmp. qts)
HINT:
�Use of improper coolants may damage the engine cooling system.
�Use ºToyota Super Long Life Coolantº or similar high quality ethylene glycol based non-silicate, non-
amine, non-nitrite, and non-borate coolant with long-life hybrid organic acid technology.
�New Toyota vehicles are filled with Toyota Super Long Life Coolant (color is pink, premixed ethylene-
glycol concentration is approximately 50% and freezing temperature is -35�C (-31�F)). When replac-
ing the coolant, Toyota Super Long Life Coolant is recommended.
�Observe the coolant level inside the radiator by pressing the inlet and outlet radiator hoses several
times by hand. If the coolant level goes down, add the coolant.
NOTICE:
Do not use plain water alone.
3. CHECK FOR ENGINE COOLANT LEAKS
(a) Fill the radiator with coolant, then attach a radiator cap tester.
(b) Pump it to 118 kPa (1.2
kgf/cm2
17.1 psi), then check for leakage.
Page 662 of 969

160QH-01
A78535
- COOLINGWATER PUMP ASSY (3MZ-FE)
16-13
2291 Author�: Date�:
2005 LEXUS ES330 REPAIR MANUAL (RM1124U)
REPLACEMENT
1. DRAIN ENGINE COOLANT (See page 16-9)
2. REMOVE FRONT WHEEL RH
3. REMOVE FRONT FENDER APRON SEAL RH
4. REMOVE V (COOLER COMPRESSOR TO CRANKSHAFT PULLEY) BELT NO.1
(See page 14-5)
5. REMOVE VANE PUMP V BELT (See page 14-5)
6. REMOVE ENGINE MOVING CONTROL ROD (See page 14-79)
7. REMOVE ENGINE MOUNTING STAY NO.2 RH (See page 14-79)
8. REMOVE GENERATOR BRACKET NO.2 (See page 14-79)
9. REMOVE CRANKSHAFT PULLEY (See page 14-79)
SST 09213-54015 (91651-60855), 09330-00021, 09950-50013 (09951-05010, 09952-05010,
09953-05020, 09954-05031)
10. REMOVE TIMING BELT NO.1 COVER
11. REMOVE TIMING BELT NO.2 COVER (See page 14-79)
12. REMOVE ENGINE MOUNTING BRACKET RH (See page 14-79)
13. REMOVE TIMING BELT GUIDE NO.2
14. REMOVE TIMING BELT (See page 14-79)
15. REMOVE TIMING BELT IDLER SUB-ASSY NO.2
16. REMOVE CAMSHAFT TIMING PULLEY (See page 14-93)
SST 09960-10010 (09962-01000, 09963-01000), 09249-63010
17. REMOVE TIMING BELT NO.3 COVER (See page 14-93)
18. REMOVE TIMING BELT IDLER SUB-ASSY NO.1
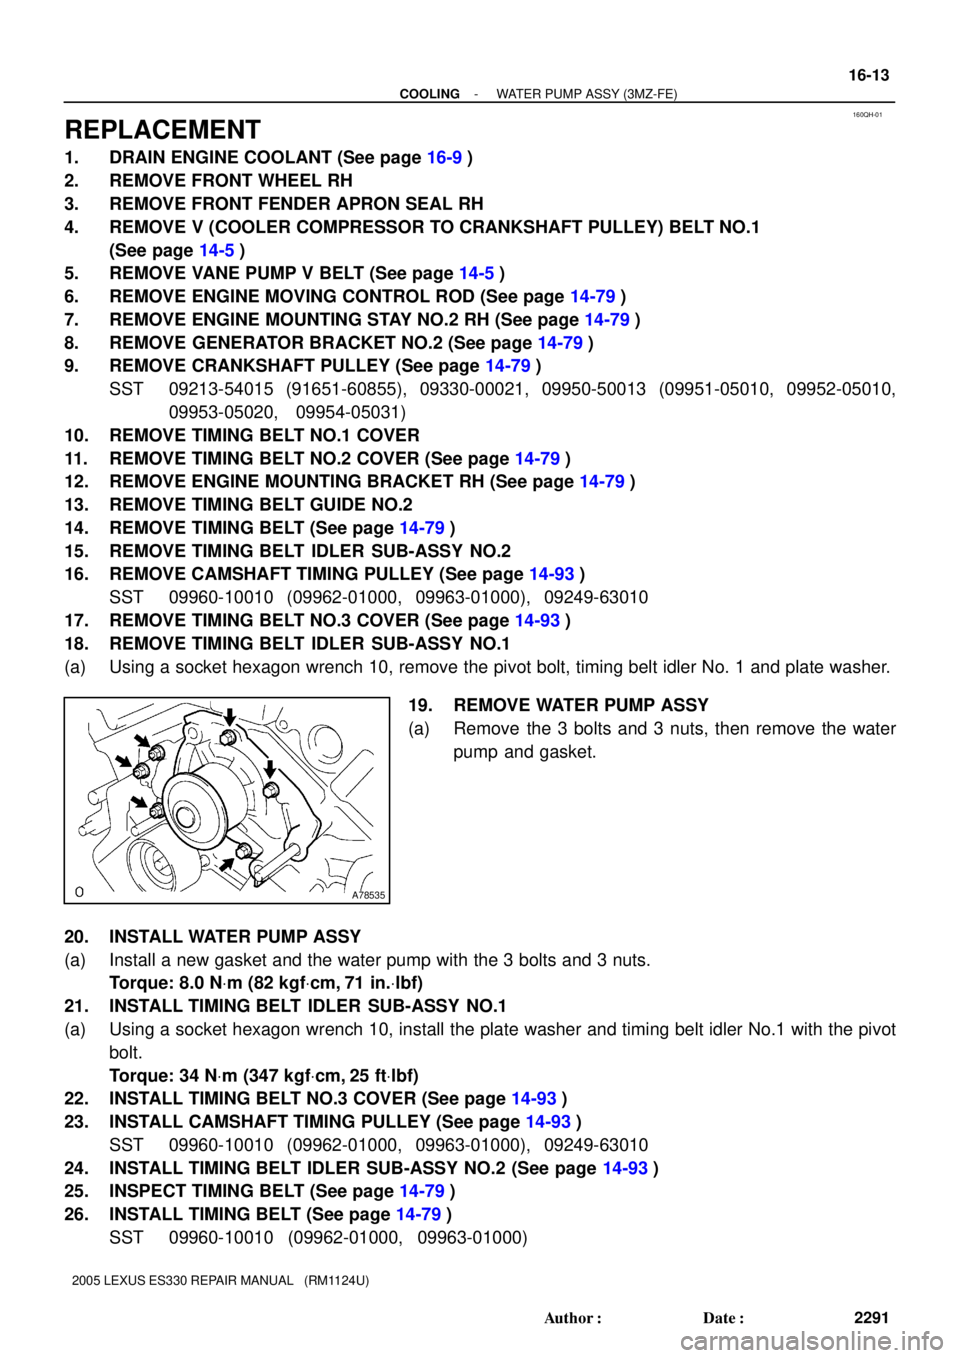
(a) Using a socket hexagon wrench 10, remove the pivot bolt, timing belt idler No. 1 and plate washer.
19. REMOVE WATER PUMP ASSY
(a) Remove the 3 bolts and 3 nuts, then remove the water
pump and gasket.
20. INSTALL WATER PUMP ASSY
(a) Install a new gasket and the water pump with the 3 bolts and 3 nuts.
Torque: 8.0 NVm (82 kgfVcm,
71 in.Vlbf)
21. INSTALL TIMING BELT IDLER SUB-ASSY NO.1
(a) Using a socket hexagon wrench 10, install the plate washer and timing belt idler No.1 with the pivot
bolt.
Torque: 34 NVm (347 kgfVcm,
25 ftVlbf)
22. INSTALL TIMING BELT NO.3 COVER (See page 14-93)
23. INSTALL CAMSHAFT TIMING PULLEY (See page 14-93)
SST 09960-10010 (09962-01000, 09963-01000), 09249-63010
24. INSTALL TIMING BELT IDLER SUB-ASSY NO.2 (See page 14-93)
25. INSPECT TIMING BELT (See page 14-79)
26. INSTALL TIMING BELT (See page 14-79)
SST 09960-10010 (09962-01000, 09963-01000)
Page 663 of 969
16-14
- COOLINGWATER PUMP ASSY (3MZ-FE)
2292 Author�: Date�:
2005 LEXUS ES330 REPAIR MANUAL (RM1124U)
27. INSTALL TIMING BELT TENSIONER ASSY (See page 14-79)
28. INSTALL TIMING BELT GUIDE NO.2 (See page 14-79)
29. INSTALL ENGINE MOUNTING BRACKET RH (See page 14-79)
30. INSTALL TIMING BELT NO.2 COVER (See page 14-79)
31. INSTALL TIMING BELT NO.1 COVER (See page 14-79)
32. INSTALL CRANKSHAFT PULLEY (See page 14-79)
SST 09213-54015 (91651-60855), 09330-00021
33. INSTALL GENERATOR BRACKET NO.2 (See page 14-79)
34. INSTALL ENGINE MOUNTING STAY NO.2 RH (See page 14-79)
35. INSTALL ENGINE MOVING CONTROL ROD (See page 14-79)
36. INSTALL VANE PUMP V BELT (See page 14-5)
37. INSTALL V (COOLER COMPRESSOR TO CRANKSHAFT PULLEY) BELT NO.1
(See page 14-5)
38. INSPECT DRIVE BELT DEFLECTION AND TENSION (See page 14-1)
39. INSTALL FRONT WHEEL RH (See page 14-5)
40. ADD ENGINE COOLANT (See page 16-9)
41. CHECK FOR ENGINE COOLANT LEAKS (See page 16-1)
Page 664 of 969
160LM-03
P12487
- COOLINGWATER PUMP ASSY (3MZ-FE)
16-15
2293 Author�: Date�:
2005 LEXUS ES330 REPAIR MANUAL (RM1124U)
INSPECTION
1. INSPECT WATER PUMP ASSY
(a) Visually check the drain hole for coolant leakage.
(b) Turn the pulley, then check that the water pump bearing
moves smoothly without making a niose.
If not, replace the water pump.