2005 LEXUS ES300 airbag
[x] Cancel search: airbagPage 880 of 969
Lexus Supports ASE CertificationPage 1 of 2
Title:
PASSENGER AIRBAG INDICATOR LAMP
Models:
'04 ± '05 ES 330 & RX 330
Technical Service
Information Bulletin
February 22, 2005
EL002-05
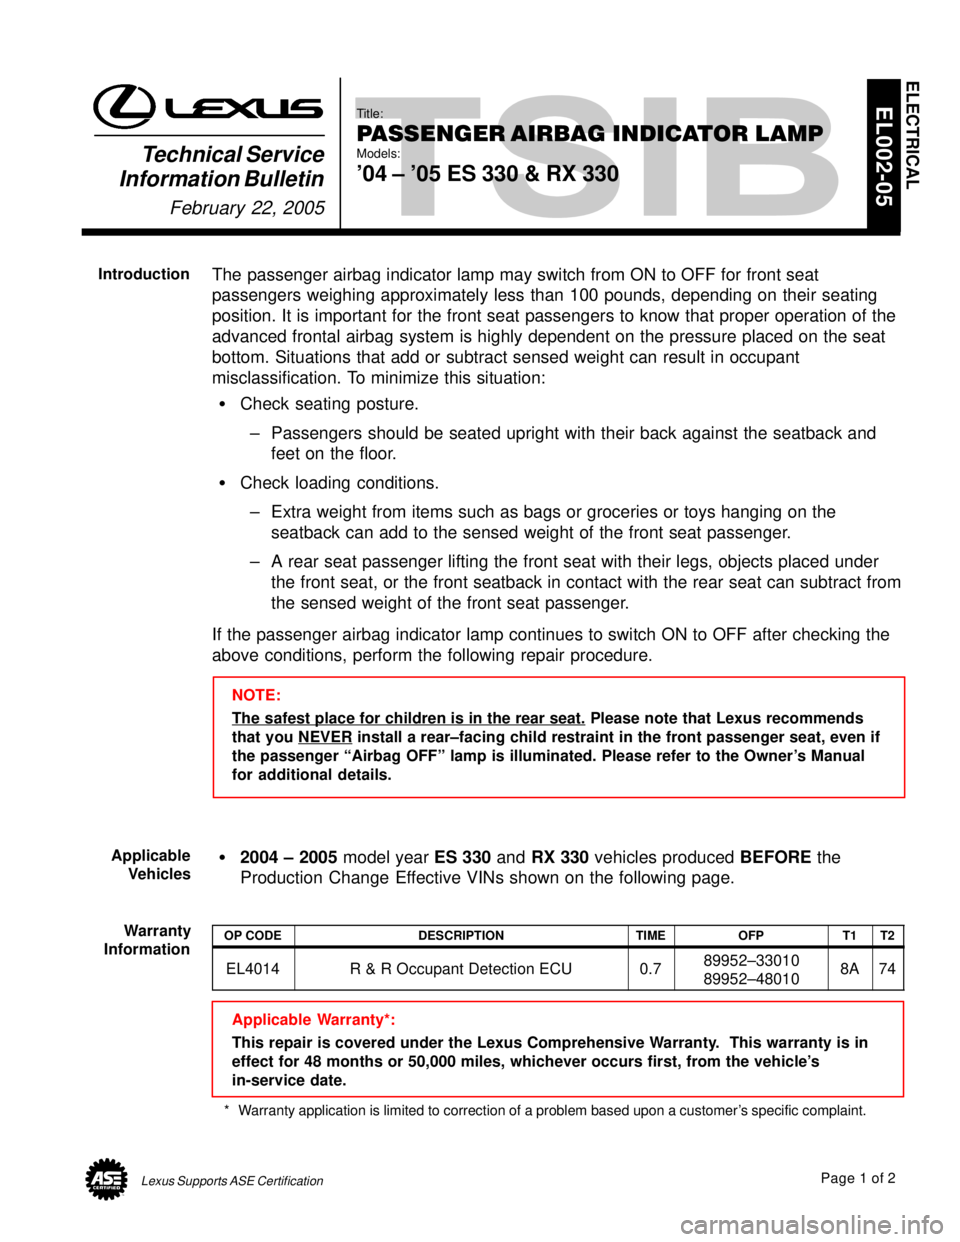
The passenger airbag indicator lamp may switch from ON to OFF for front seat
passengers weighing approximately less than 100 pounds, depending on their seating
position. It is important for the front seat passengers to know that proper operation of the
advanced frontal airbag system is highly dependent on the pressure placed on the seat
bottom. Situations that add or subtract sensed weight can result in occupant
misclassification. To minimize this situation:
Check seating posture.
± Passengers should be seated upright with their back against the seatback and
feet on the floor.
Check loading conditions.
± Extra weight from items such as bags or groceries or toys hanging on the
seatback can add to the sensed weight of the front seat passenger.
± A rear seat passenger lifting the front seat with their legs, objects placed under
the front seat, or the front seatback in contact with the rear seat can subtract from
the sensed weight of the front seat passenger.
If the passenger airbag indicator lamp continues to switch ON to OFF after checking the
above conditions, perform the following repair procedure.
NOTE:
The safest place for children is in the rear seat.
Please note that Lexus recommends
that you NEVER
install a rear±facing child restraint in the front passenger seat, even if
the passenger ªAirbag OFFº lamp is illuminated. Please refer to the Owner's Manual
for additional details.
2004 ± 2005 model year ES 330 and RX 330 vehicles produced BEFORE the
Production Change Effective VINs shown on the following page.
OP CODEDESCRIPTIONTIMEOFPT1T2
EL4014R & R Occupant Detection ECU0.789952±33010
89952±480108A74
Applicable Warranty*:
This repair is covered under the Lexus Comprehensive Warranty. This warranty is in
effect for 48 months or 50,000 miles, whichever occurs first, from the vehicle's
in-service date.
* Warranty application is limited to correction of a problem based upon a customer's specific complaint.
ELECTRICAL
Introduction
Applicable
Vehicles
Warranty
Information
Page 881 of 969

PASSENGER AIRBAG INDICATOR LAMP ± EL002-05 February 22, 2005
Page 2 of 2
MODELPLANTDRIVETRAINPRODUCTION CHANGE EFFECTIVE VIN
ES 330Tsutsumi2WDJTHBA30G#50024130ES 330Kanto2WDJTHBA30G#55068000
TMK2WDJTJGA3#U#50046500
RX 330
TMK4WDJTJHA3#U#50076003RX 330
TMMC2WD2T2GA3#U#5C021700TMMC4WD2T2HA3#U#5C046800
PREVIOUS PART NUMBERCURRENT PART NUMBERPART NAMEQTY
89952±3301089952±33011
Occupant Detection Computer
1
89952±4801089952±48011Occupant Detection Computer1
SPECIAL SERVICE TOOLS (SSTs)PART NUMBERQUANTITY
Lexus Diagnostic Tester Kit*010012701
12 Megabyte Diagnostic Tester Program Card
with version 12.01a Software (or later)*01002593-0051
Occupant Seat Weight Set*
00002±09077±011
* Essential SSTs.
NOTE:
Additional Diagnostic Tester Kits, Program Cards, or other SSTs may be ordered by
calling SPX/OTC at 1-800-933-8335.
1. Unfasten passenger seat and rock the assembly back providing access to the
underside of the seat. For information to unfasten the passenger seat, refer to the
Technical Information System (TIS): 2004 ± 2005 model year ES 330 or RX 330
Repair Manual:
Seat: Front Seat Assembly LH: Overhaul.
2. Disconnect the negative terminal of the vehicle battery.
3. Disconnect electrical connectors from Occupant Detection ECU.
4. Remove and replace the Occupant Detection ECU.
5. Reinstall the seat assembly. For more information, refer to TIS: 2004 ± 2005 model
year ES 330 or RX 330 Repair Manual:
Seat: Front Seat Assembly LH: Overhaul.
Torque: 36.8 Nm (375 kgfcm, 27 ftlbf)
6. Reconnect the negative terminal of the vehicle battery.
7. Perform Zero Point Calibration and Sensitivity Check following prompts in the
Diagnostic tool found under the Occupant Detect menu item (refer to
TSIB No. EL007±03, ª
Occupancy Classification System Calibration
(DTC B1150 & B1650)
.º
8. Reinitialize systems affected by the disconnection of the vehicle battery.
Production
Change
Information
Parts
Information
Required
SSTs
Repair
Procedure
Page 926 of 969
August 26, 2002IMMOBILIZER KEY CODE RESET ± SS002-01 Revised
Page 3 of 6
NOTE:
Ensure that the Diagnostic Tester is equipped with the latest version of software (13.0a
or later).
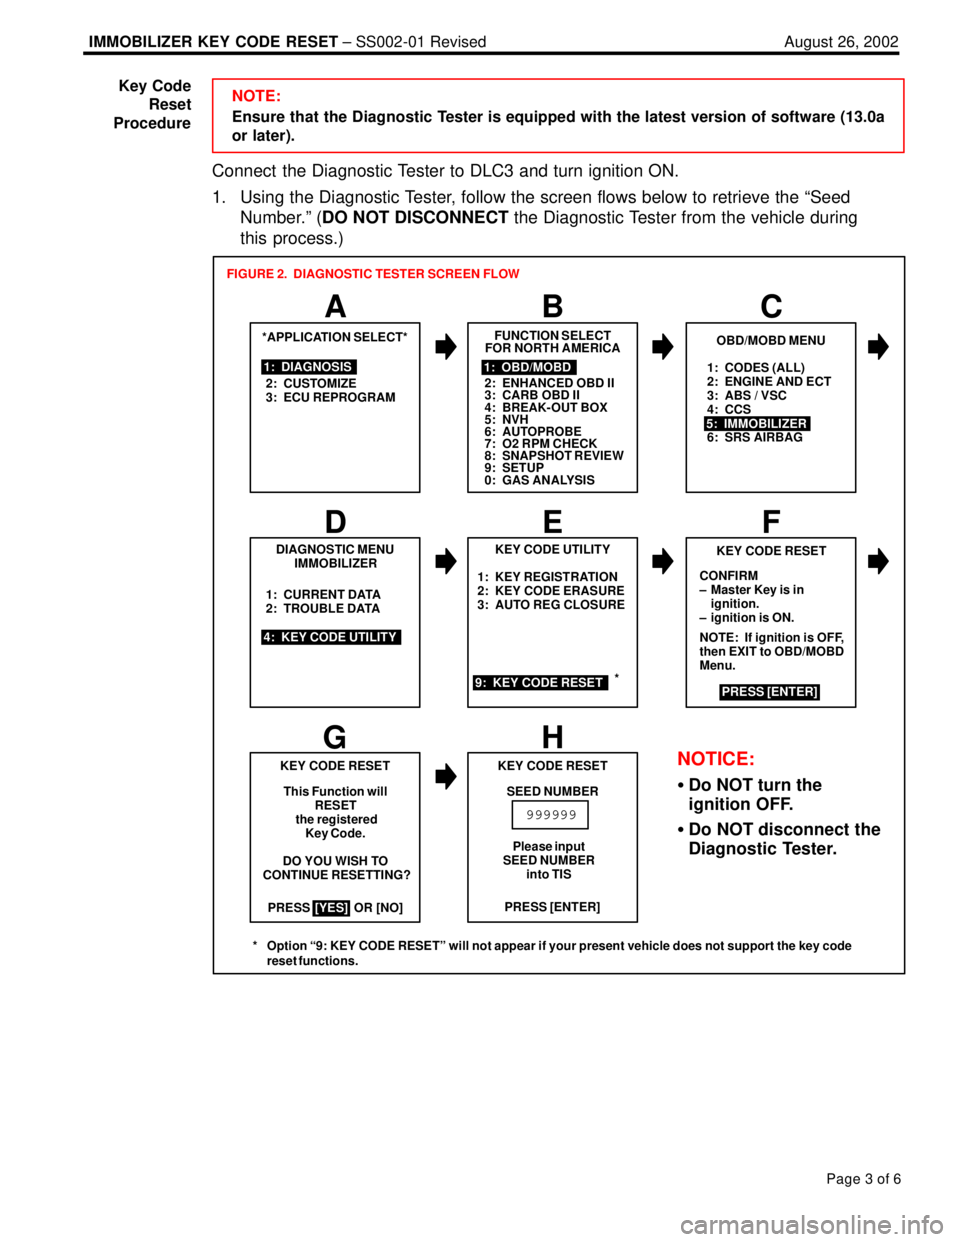
Connect the Diagnostic Tester to DLC3 and turn ignition ON.
1. Using the Diagnostic Tester, follow the screen flows below to retrieve the ªSeed
Number.º (DO NOT DISCONNECT the Diagnostic Tester from the vehicle during
this process.)
1: CODES (ALL)
2: ENGINE AND ECT
3: ABS / VSC
4: CCS
6: SRS AIRBAG
PRESS OR [NO]1: KEY REGISTRATION
2: KEY CODE ERASURE
3: AUTO REG CLOSURE
*APPLICATION SELECT*
1: DIAGNOSIS
2: CUSTOMIZE
3: ECU REPROGRAM
A
FUNCTION SELECT
FOR NORTH AMERICA
BC
1: OBD/MOBD
2: ENHANCED OBD II
3: CARB OBD II
4: BREAK-OUT BOX
5: NVH
6: AUTOPROBE
7: O2 RPM CHECK
8: SNAPSHOT REVIEW
9: SETUP
0: GAS ANALYSIS
OBD/MOBD MENU
5: IMMOBILIZER
DIAGNOSTIC MENU
IMMOBILIZER
4: KEY CODE UTILITY1: CURRENT DATA
2: TROUBLE DATA
D
KEY CODE UTILITY
EF
9: KEY CODE RESET
KEY CODE RESET
CONFIRM
± Master Key is in
ignition.
± ignition is ON.
NOTE: If ignition is OFF,
then EXIT to OBD/MOBD
Menu.
PRESS [ENTER]
GH
KEY CODE RESET
This Function will
RESET
the registered
Key Code.
DO YOU WISH TO
CONTINUE RESETTING?
[YES]PRESS [ENTER] KEY CODE RESET
SEED NUMBER
999999
FIGURE 2. DIAGNOSTIC TESTER SCREEN FLOW
Please input
SEED NUMBER
into TIS
NOTICE:
Do NOT turn the
ignition OFF.
Do NOT disconnect the
Diagnostic Tester.
*
* Option ª9: KEY CODE RESETº will not appear if your present vehicle does not support the key code
reset functions.
Key Code
Reset
Procedure
Page 935 of 969
DIAGNOSTIC TESTER IMMOBILIZER FUNCTIONS ± SS005-01 Revised July 6, 2001
Page 4 of 14
1. Transponder Key Type
Before any Immobilizer functions are performed, verify the type of transponder key
that you are attempting to use for the service operation. Some functions may only be
performed with a registered Master Key.
A. Insert the current key into the ignition cylinder and turn to the ON position.
HINT:
The Immobilizer key blanks are preconfigured as Master or Sub Keys. Master Key
blanks cannot be registered as Sub Keys nor can Sub Key blanks be registered as
Master Keys. Also, the flat key is now enabled as a full function Master Key that must
be registered.
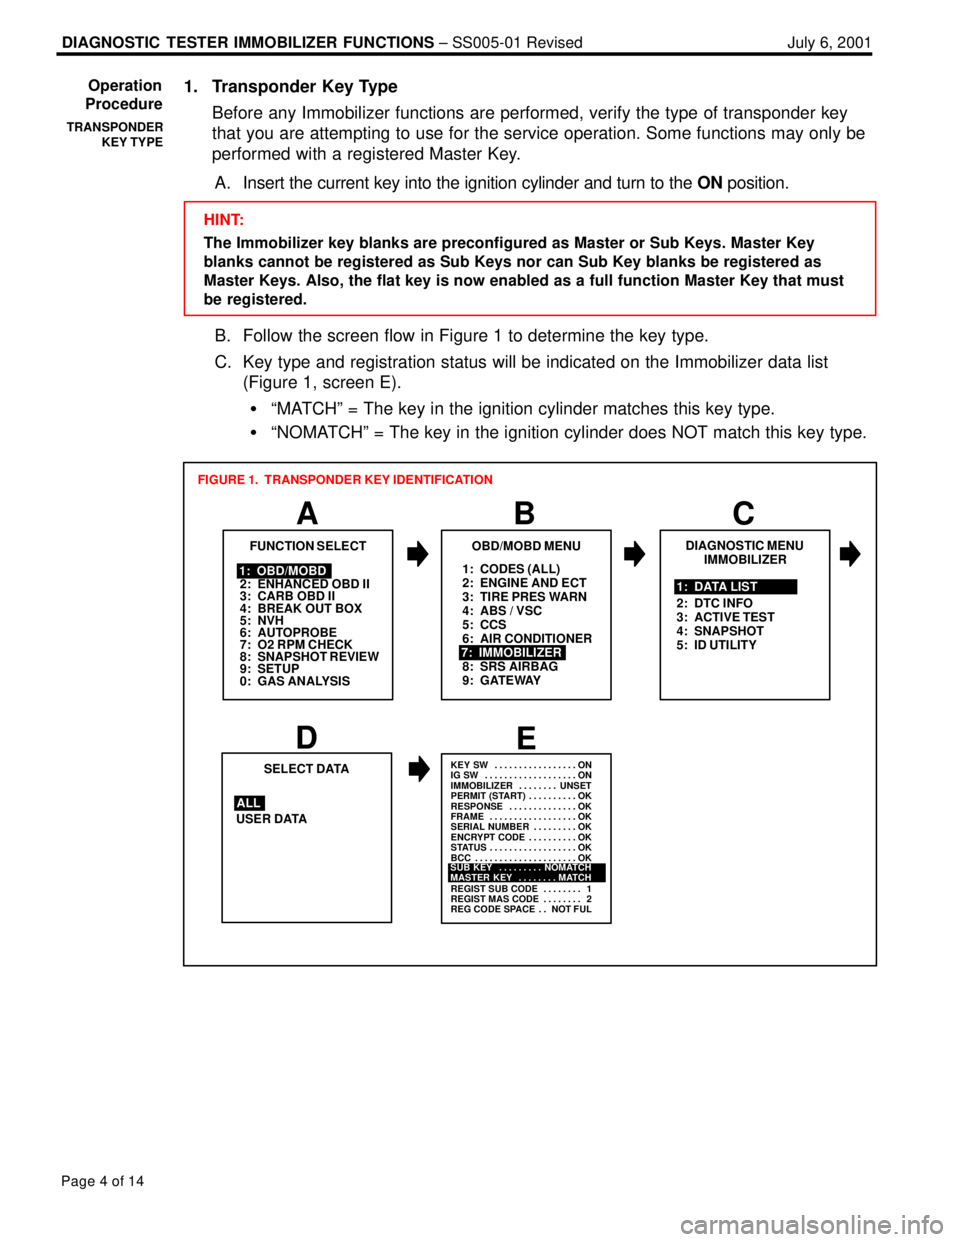
B. Follow the screen flow in Figure 1 to determine the key type.
C. Key type and registration status will be indicated on the Immobilizer data list
(Figure 1, screen E).
ªMATCHº = The key in the ignition cylinder matches this key type.
ªNOMATCHº = The key in the ignition cylinder does NOT match this key type.
1: CODES (ALL)
2: ENGINE AND ECT
3: TIRE PRES WARN
4: ABS / VSC
5: CCS
6: AIR CONDITIONER
8: SRS AIRBAG
9: GATEWAY
A
FUNCTION SELECT
B
1: OBD/MOBD
2: ENHANCED OBD II
3: CARB OBD II
4: BREAK OUT BOX
5: NVH
6: AUTOPROBE
7: O2 RPM CHECK
8: SNAPSHOT REVIEW
9: SETUP
0: GAS ANALYSIS
OBD/MOBD MENU
7: IMMOBILIZER
FIGURE 1. TRANSPONDER KEY IDENTIFICATION
DE
USER DATASELECT DATA
ALL
KEY SW ON. . . . . . . . . . . . . . . . .
IG SW ON. . . . . . . . . . . . . . . . . . .
IMMOBILIZER UNSET. . . . . . . .
PERMIT (START) OK. . . . . . . . . .
RESPONSE OK. . . . . . . . . . . . . .
FRAME OK. . . . . . . . . . . . . . . . . .
SERIAL NUMBER OK. . . . . . . . .
ENCRYPT CODE OK. . . . . . . . . .
STATUS OK. . . . . . . . . . . . . . . . . .
BCC OK. . . . . . . . . . . . . . . . . . . . .
REGIST SUB CODE 1. . . . . . . .
REGIST MAS CODE 2. . . . . . . .
REG CODE SPACE NOT FUL. .
SUB KEY NOMATCH. . . . . . . . .
MASTER KEY MATCH. . . . . . . .
C
DIAGNOSTIC MENU
IMMOBILIZER
1: DATA LIST
2: DTC INFO
3: ACTIVE TEST
4: SNAPSHOT
5: ID UTILITY
Operation
Procedure
TRANSPONDER
KEY TYPE
Page 937 of 969

DIAGNOSTIC TESTER IMMOBILIZER FUNCTIONS ± SS005-01 Revised July 6, 2001
Page 6 of 14
1: CODES (ALL)
2: ENGINE AND ECT
3: TIRE PRES WARN
4: ABS / VSC
5: CCS
6: AIR CONDITIONER
7: IMMOBILIZER
8: SRS AIRBAG
9: GATEWAY
A
FUNCTION SELECT
B
1: OBD/MOBD
2: ENHANCED OBD II
3: CARB OBD II
4: BREAK OUT BOX
5: NVH
6: AUTOPROBE
7: O2 RPM CHECK
8: SNAPSHOT REVIEW
9: SETUP
0: GAS ANALYSIS
OBD/MOBD MENU
FIGURE 2. REGISTRATION OF ADDITIONAL TRANSPONDER KEY
1: TRANSP CODE REG
2: TRANSP CODE ERS
D
ID UTILITY
IMMOBILIZER
EF
GH
THIS FUNCTION WILL
REGISTER THE
TRANSPONDER CODE.
Do you wish to
continue the
registration?
PRESS [YES] OR [NO] 9: TRANSP CODE RESETPlease remove the
Master Key from
the IG cylinder,
insert it again,
and turn the IG ON
within 120 seconds.
Then press [ENTER]
Remaining Time:
[120] Seconds
Please remove the Master
Key from the IG cylinder
within 20 seconds.
Then press [ENTER]
Remaining Time:
[20] SecondsPlease insert the New Key
into the IG cylinder within
10 seconds.
Remaining Time:
[10] Seconds
I
**NOW REGISTERING**
[60] SecondsPlease wait.
J
K
THE TRANSPONDER
CODE WAS REGISTERED
CORRECTLY.Please insert a
Master Key and
turn the IG to
ON.
If the ignition
is already ON,
please turn it
OFF and back to
ON.
DO NOT TURN IG ON
PRESS [ENTER]
PRESS [ENTER]
C
DIAGNOSTIC MENU
IMMOBILIZER
5: ID UTILITY 1: DATA LIST
2: DTC INFO
3: ACTIVE TEST
4: SNAPSHOT
Operation
Procedure
(Continued)
TRANSPONDER
CODE
REGISTRATION
Page 938 of 969

DIAGNOSTIC TESTER IMMOBILIZER FUNCTIONS ± SS005-01 Revised July 6, 2001
Page 7 of 14
3. Transponder Code Erasure
This function allows the user to erase all the transponder keys except the registered
Master Key used during this function.
NOTE:
This function requires the use of one registered Master Key. The use of a Sub Key will
NOT complete Transponder Code Erasure.
A. Insert a registered Master Key into the ignition cylinder and turn to the ON position.
B. Follow the screen flow in Figure 3 below to erase all Master or Sub keys, except
the registered Master Key used for this procedure.
1: CODES (ALL)
2: ENGINE AND ECT
3: TIRE PRES WARN
4: ABS / VSC
5: CCS
6: AIR CONDITIONER
8: SRS AIRBAG
9: GATEWAY
A
FUNCTION SELECT
B
1: OBD/MOBD
2: ENHANCED OBD II
3: CARB OBD II
4: BREAK OUT BOX
5: NVH
6: AUTOPROBE
7: O2 RPM CHECK
8: SNAPSHOT REVIEW
9: SETUP
0: GAS ANALYSIS
OBD/MOBD MENU
7: IMMOBILIZER
FIGURE 3. ERASING TRANSPONDER CODES
1: TRANSP CODE REG
D
ID UTILITY
IMMOBILIZER
EF
GH
This function will
ERASE ALL
TRANSPONDER CODES
except the
Master key in the
IG cylinder.
PRESS OR [NO]
[YES]
2: TRANSP CODE ERS
9: TRANSP CODE RESETRemaining Time:
[120] Seconds
***NOW ERASING***
WARNING: Master Key
must be removed from
IG cylinder within 10
seconds or erasure will
not complete.ALL TRANSPONDER
CODES EXCEPT THE
INSERTED MASTER
KEY'S TRANSPONDER
CODE WERE ERASED.
PRESS DO YOU WISH TO
CONTINUE ERASING?
Remaining Time:
[10] Seconds
[ENTER]Please remove the
Master Key from
the IG cylinder,
insert it again,
and turn the IG ON
within 120 seconds.
Then press [ENTER]
C
DIAGNOSTIC MENU
IMMOBILIZER
5: ID UTILITY1: DATA LIST
2: DTC INFO
3: ACTIVE TEST
4: SNAPSHOT
Operation
Procedure
(Continued)
TRANSPONDER
CODE ERASURE
Page 940 of 969
DIAGNOSTIC TESTER IMMOBILIZER FUNCTIONS ± SS005-01 Revised July 6, 2001
Page 9 of 14
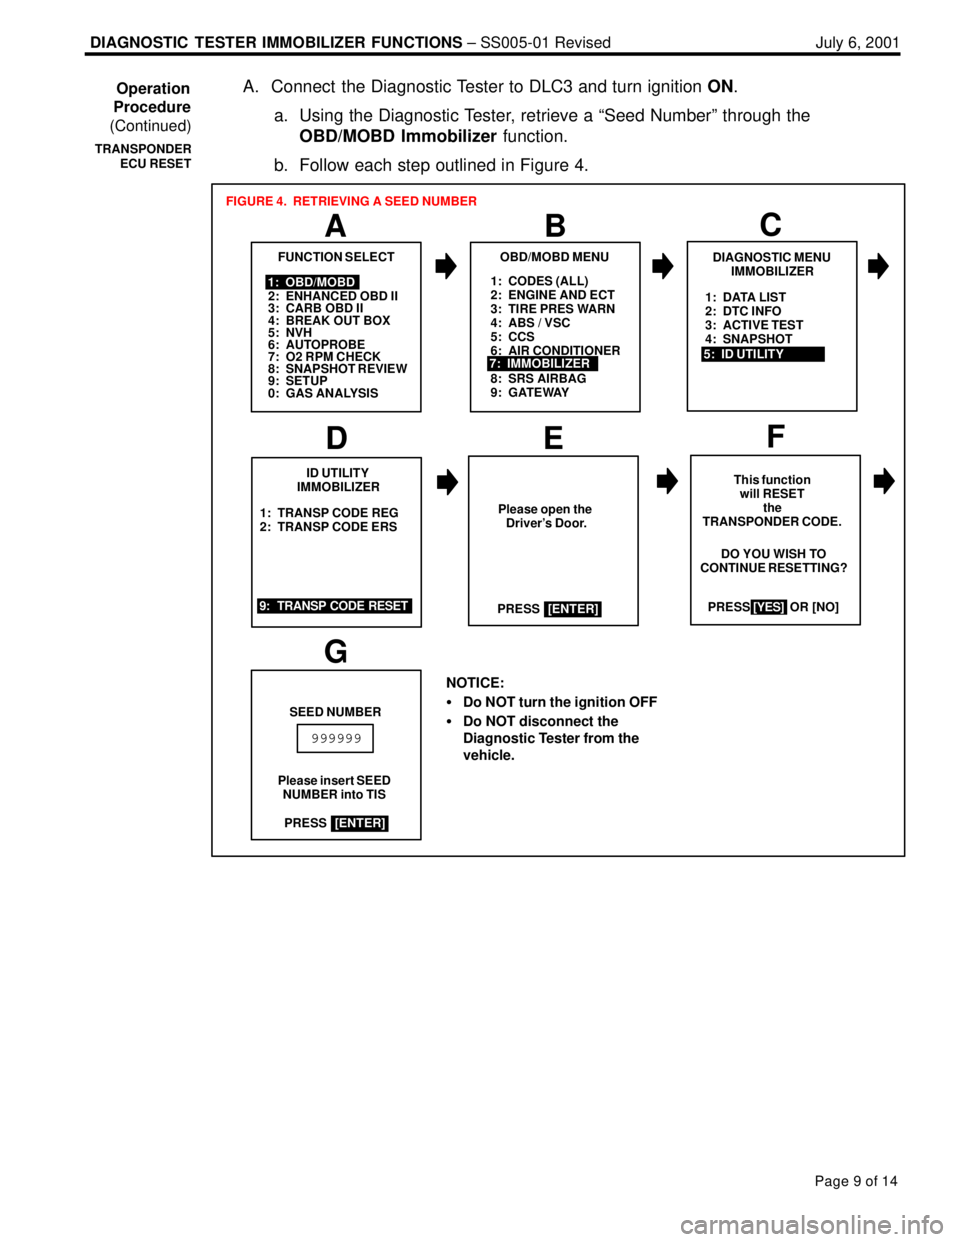
A. Connect the Diagnostic Tester to DLC3 and turn ignition ON.
a. Using the Diagnostic Tester, retrieve a ªSeed Numberº through the
OBD/MOBD Immobilizer function.
b. Follow each step outlined in Figure 4.
1: CODES (ALL)
2: ENGINE AND ECT
3: TIRE PRES WARN
4: ABS / VSC
5: CCS
6: AIR CONDITIONER
8: SRS AIRBAG
9: GATEWAY
A
FUNCTION SELECT
B
1: OBD/MOBD
2: ENHANCED OBD II
3: CARB OBD II
4: BREAK OUT BOX
5: NVH
6: AUTOPROBE
7: O2 RPM CHECK
8: SNAPSHOT REVIEW
9: SETUP
0: GAS ANALYSIS
OBD/MOBD MENU
7: IMMOBILIZER
FIGURE 4. RETRIEVING A SEED NUMBER
1: TRANSP CODE REG
2: TRANSP CODE ERS
D
ID UTILITY
IMMOBILIZER
EF
This function
will RESET
the
TRANSPONDER CODE.
PRESS [YES] OR [NO]
9: TRANSP CODE RESETDO YOU WISH TO
CONTINUE RESETTING?
NOTICE:
Do NOT turn the ignition OFF
Do NOT disconnect the
Diagnostic Tester from the
vehicle.
[YES]
G
SEED NUMBER
Please insert SEED
NUMBER into TIS
999999
Please open the
Driver's Door.
PRESS
[ENTER]
PRESS
[ENTER]
C
DIAGNOSTIC MENU
IMMOBILIZER
5: ID UTILITY1: DATA LIST
2: DTC INFO
3: ACTIVE TEST
4: SNAPSHOT
Operation
Procedure
(Continued)
TRANSPONDER
ECU RESET