Page 2471 of 3419
LT-24
HEADLAMP (FOR USA)
Revision: October 20052005 QX56
Headlamp HI Does Not Illuminate (One Side)EKS00B84
1. BULB INSPECTION
Inspect inoperative headlamp bulb.
OK or NG
OK >> GO TO 2.
NG >> Replace headlamp bulb. Refer to LT-31, "
HEADLAMP (INNER SIDE), FOR HIGH BEAM" .
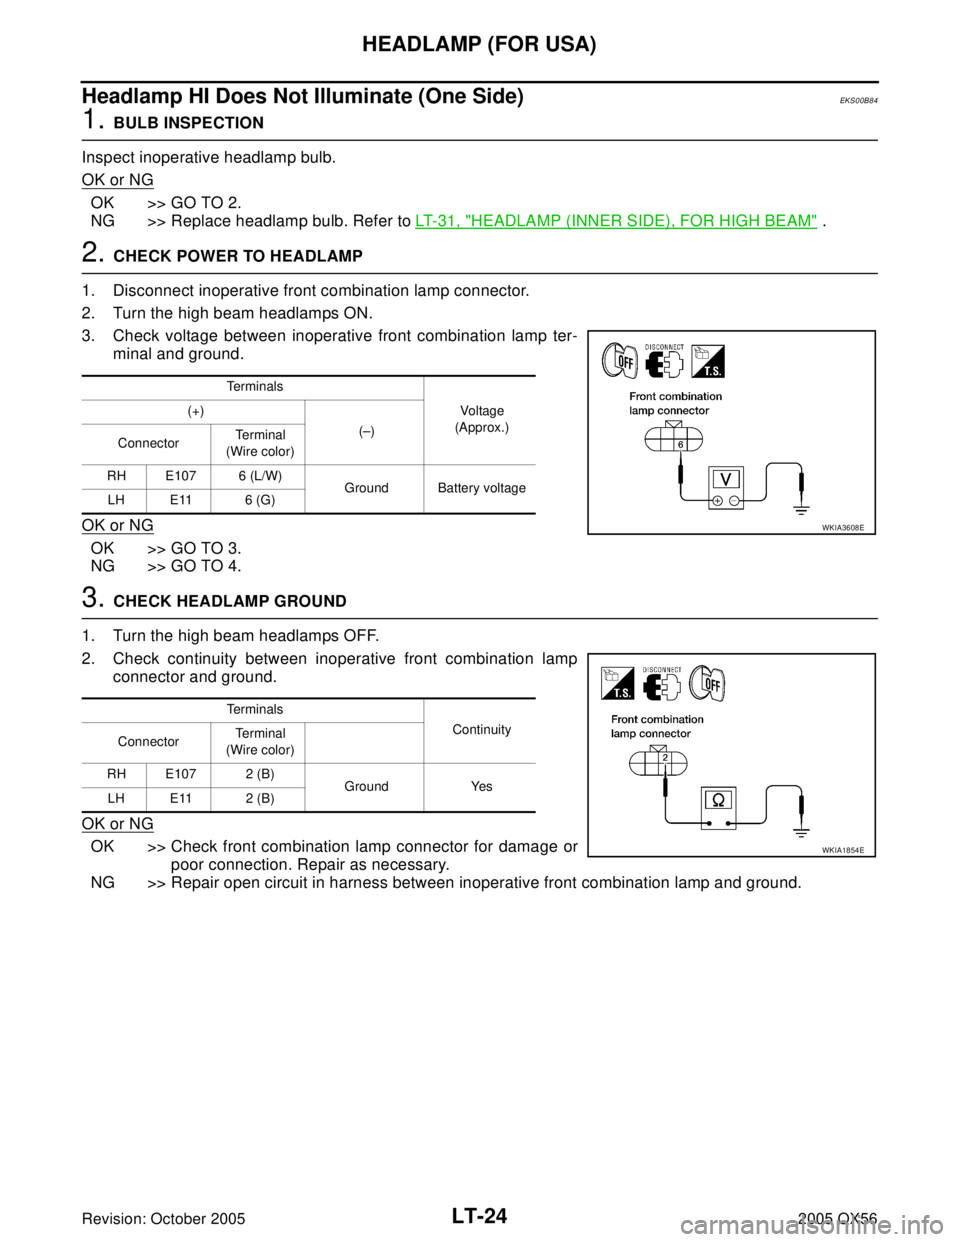
2. CHECK POWER TO HEADLAMP
1. Disconnect inoperative front combination lamp connector.
2. Turn the high beam headlamps ON.
3. Check voltage between inoperative front combination lamp ter-
minal and ground.
OK or NG
OK >> GO TO 3.
NG >> GO TO 4.
3. CHECK HEADLAMP GROUND
1. Turn the high beam headlamps OFF.
2. Check continuity between inoperative front combination lamp
connector and ground.
OK or NG
OK >> Check front combination lamp connector for damage or
poor connection. Repair as necessary.
NG >> Repair open circuit in harness between inoperative front combination lamp and ground.
Te r m i n a l s
Vo ltag e
(Approx.) (+)
(–)
ConnectorTe r m i n a l
(Wire color)
RH E107 6 (L/W)
Ground Battery voltage
LH E11 6 (G)
WKIA3608E
Te r m i n a l s
Continuity
ConnectorTe r m i n a l
(Wire color)
RH E107 2 (B)
Ground Yes
LH E11 2 (B)
WKIA1854E
Page 2472 of 3419
HEADLAMP (FOR USA)
LT-25
C
D
E
F
G
H
I
J
L
MA
B
LT
Revision: October 20052005 QX56
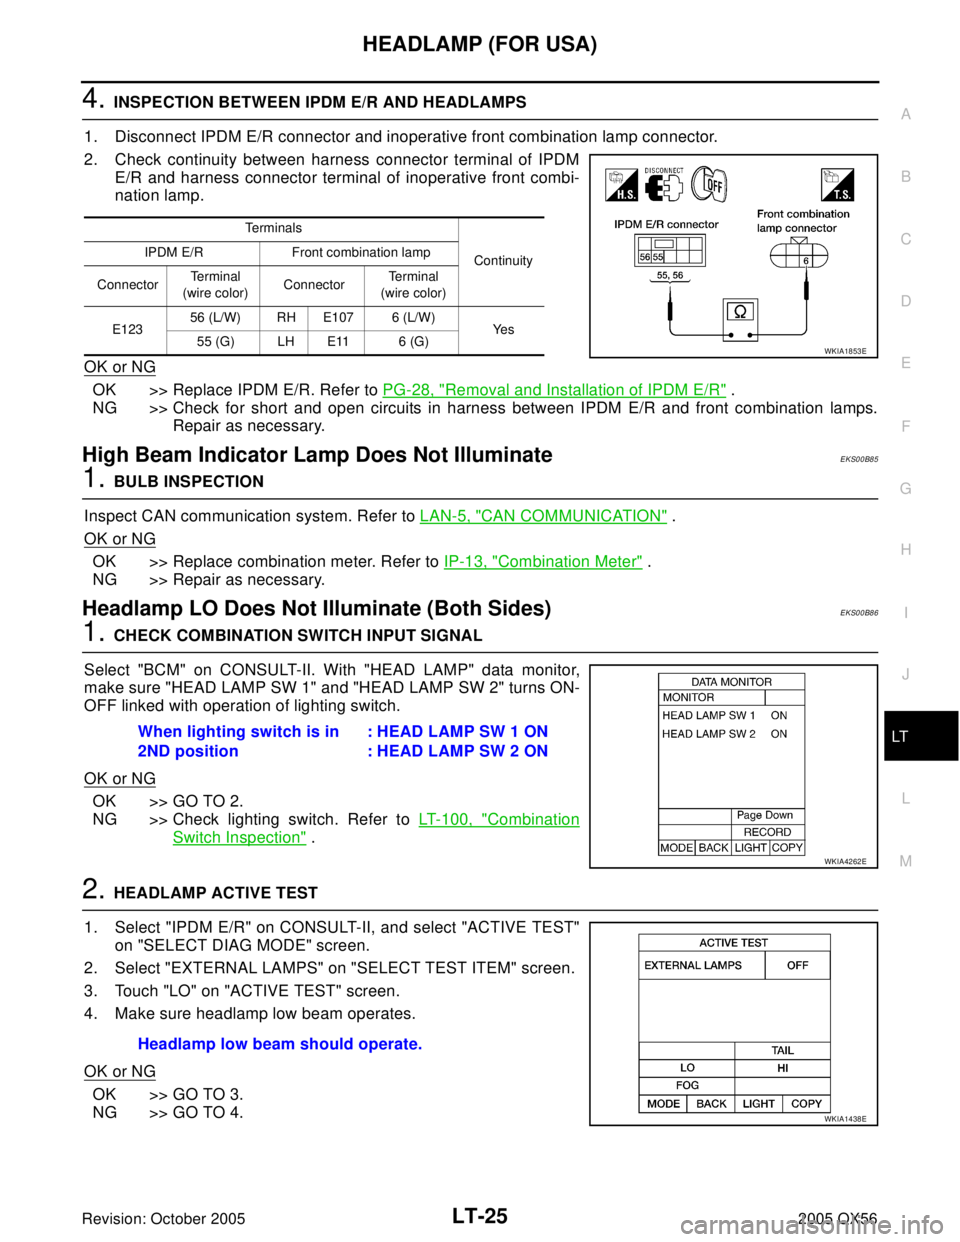
4. INSPECTION BETWEEN IPDM E/R AND HEADLAMPS
1. Disconnect IPDM E/R connector and inoperative front combination lamp connector.
2. Check continuity between harness connector terminal of IPDM
E/R and harness connector terminal of inoperative front combi-
nation lamp.
OK or NG
OK >> Replace IPDM E/R. Refer to PG-28, "Removal and Installation of IPDM E/R" .
NG >> Check for short and open circuits in harness between IPDM E/R and front combination lamps.
Repair as necessary.
High Beam Indicator Lamp Does Not IlluminateEKS00B85
1. BULB INSPECTION
Inspect CAN communication system. Refer to LAN-5, "
CAN COMMUNICATION" .
OK or NG
OK >> Replace combination meter. Refer to IP-13, "Combination Meter" .
NG >> Repair as necessary.
Headlamp LO Does Not Illuminate (Both Sides)EKS00B86
1. CHECK COMBINATION SWITCH INPUT SIGNAL
Select "BCM" on CONSULT-II. With "HEAD LAMP" data monitor,
make sure "HEAD LAMP SW 1" and "HEAD LAMP SW 2" turns ON-
OFF linked with operation of lighting switch.
OK or NG
OK >> GO TO 2.
NG >> Check lighting switch. Refer to LT-100, "
Combination
Switch Inspection" .
2. HEADLAMP ACTIVE TEST
1. Select "IPDM E/R" on CONSULT-II, and select "ACTIVE TEST"
on "SELECT DIAG MODE" screen.
2. Select "EXTERNAL LAMPS" on "SELECT TEST ITEM" screen.
3. Touch "LO" on "ACTIVE TEST" screen.
4. Make sure headlamp low beam operates.
OK or NG
OK >> GO TO 3.
NG >> GO TO 4.
Te r m i n a l s
Continuity IPDM E/R Front combination lamp
ConnectorTe r m i n a l
(wire color)ConnectorTe r m i n a l
(wire color)
E12356 (L/W) RH E107 6 (L/W)
Ye s
55 (G) LH E11 6 (G)
WKIA1853E
When lighting switch is in
2ND position: HEAD LAMP SW 1 ON
: HEAD LAMP SW 2 ON
WKIA4262E
Headlamp low beam should operate.
WKIA1438E
Page 2473 of 3419
LT-26
HEADLAMP (FOR USA)
Revision: October 20052005 QX56
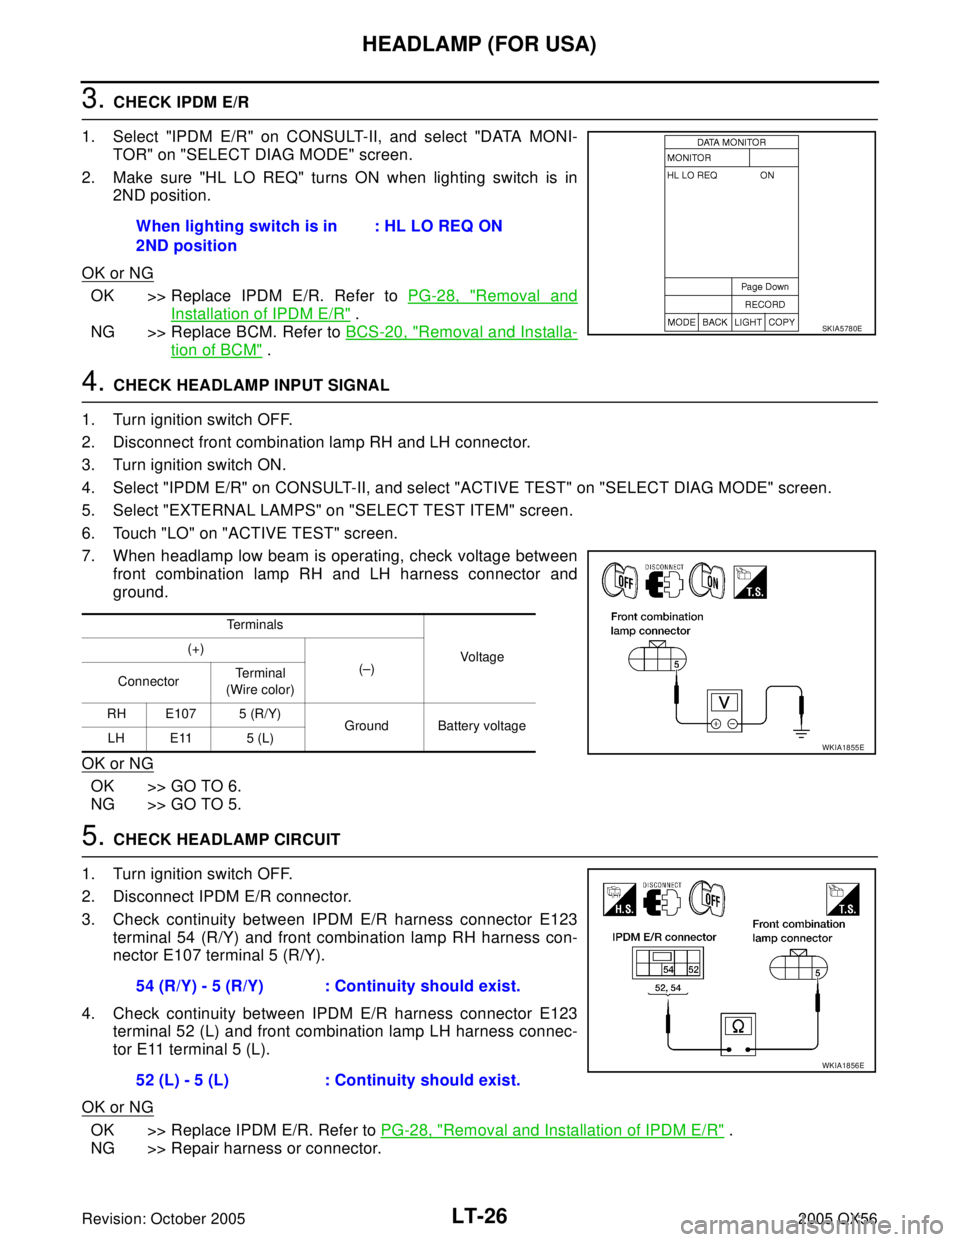
3. CHECK IPDM E/R
1. Select "IPDM E/R" on CONSULT-II, and select "DATA MONI-
TOR" on "SELECT DIAG MODE" screen.
2. Make sure "HL LO REQ" turns ON when lighting switch is in
2ND position.
OK or NG
OK >> Replace IPDM E/R. Refer to PG-28, "Removal and
Installation of IPDM E/R" .
NG >> Replace BCM. Refer to BCS-20, "
Removal and Installa-
tion of BCM" .
4. CHECK HEADLAMP INPUT SIGNAL
1. Turn ignition switch OFF.
2. Disconnect front combination lamp RH and LH connector.
3. Turn ignition switch ON.
4. Select "IPDM E/R" on CONSULT-II, and select "ACTIVE TEST" on "SELECT DIAG MODE" screen.
5. Select "EXTERNAL LAMPS" on "SELECT TEST ITEM" screen.
6. Touch "LO" on "ACTIVE TEST" screen.
7. When headlamp low beam is operating, check voltage between
front combination lamp RH and LH harness connector and
ground.
OK or NG
OK >> GO TO 6.
NG >> GO TO 5.
5. CHECK HEADLAMP CIRCUIT
1. Turn ignition switch OFF.
2. Disconnect IPDM E/R connector.
3. Check continuity between IPDM E/R harness connector E123
terminal 54 (R/Y) and front combination lamp RH harness con-
nector E107 terminal 5 (R/Y).
4. Check continuity between IPDM E/R harness connector E123
terminal 52 (L) and front combination lamp LH harness connec-
tor E11 terminal 5 (L).
OK or NG
OK >> Replace IPDM E/R. Refer to PG-28, "Removal and Installation of IPDM E/R" .
NG >> Repair harness or connector.When lighting switch is in
2ND position: HL LO REQ ON
SKIA5780E
Te r m i n a l s
Vo ltag e (+)
(–)
ConnectorTe r m i n a l
(Wire color)
RH E107 5 (R/Y)
Ground Battery voltage
LH E11 5 (L)
WKIA1855E
54 (R/Y) - 5 (R/Y) : Continuity should exist.
52 (L) - 5 (L) : Continuity should exist.
WKIA1856E
Page 2474 of 3419
HEADLAMP (FOR USA)
LT-27
C
D
E
F
G
H
I
J
L
MA
B
LT
Revision: October 20052005 QX56
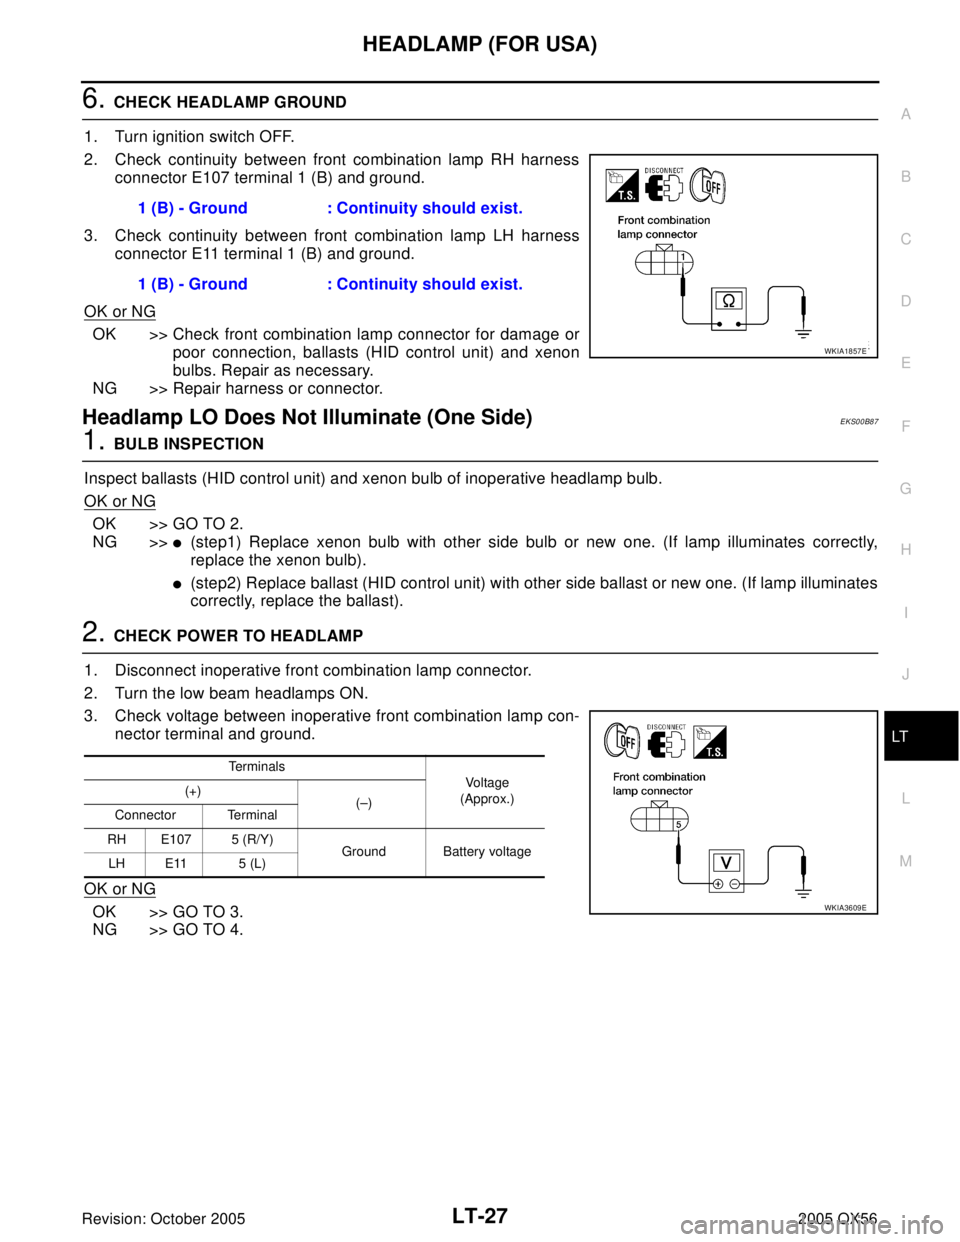
6. CHECK HEADLAMP GROUND
1. Turn ignition switch OFF.
2. Check continuity between front combination lamp RH harness
connector E107 terminal 1 (B) and ground.
3. Check continuity between front combination lamp LH harness
connector E11 terminal 1 (B) and ground.
OK or NG
OK >> Check front combination lamp connector for damage or
poor connection, ballasts (HID control unit) and xenon
bulbs. Repair as necessary.
NG >> Repair harness or connector.
Headlamp LO Does Not Illuminate (One Side)EKS00B87
1. BULB INSPECTION
Inspect ballasts (HID control unit) and xenon bulb of inoperative headlamp bulb.
OK or NG
OK >> GO TO 2.
NG >>
�(step1) Replace xenon bulb with other side bulb or new one. (If lamp illuminates correctly,
replace the xenon bulb).
�(step2) Replace ballast (HID control unit) with other side ballast or new one. (If lamp illuminates
correctly, replace the ballast).
2. CHECK POWER TO HEADLAMP
1. Disconnect inoperative front combination lamp connector.
2. Turn the low beam headlamps ON.
3. Check voltage between inoperative front combination lamp con-
nector terminal and ground.
OK or NG
OK >> GO TO 3.
NG >> GO TO 4.1 (B) - Ground : Continuity should exist.
1 (B) - Ground : Continuity should exist.
WKIA1857E
Te r m i n a l s
Vo l ta g e
(Approx.) (+)
(–)
Connector Terminal
RH E107 5 (R/Y)
Ground Battery voltage
LH E11 5 (L)
WKIA3609E
Page 2475 of 3419
LT-28
HEADLAMP (FOR USA)
Revision: October 20052005 QX56
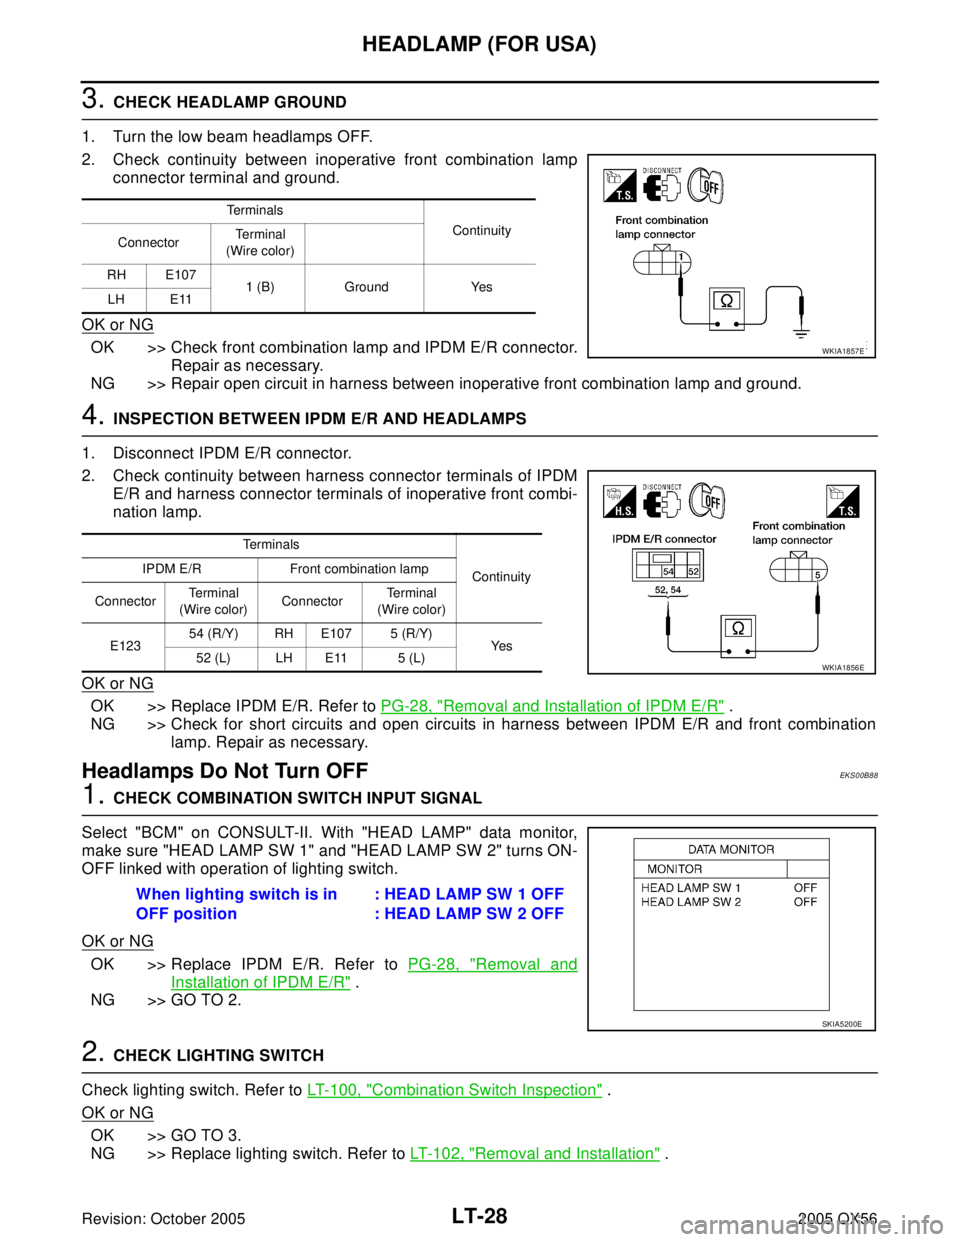
3. CHECK HEADLAMP GROUND
1. Turn the low beam headlamps OFF.
2. Check continuity between inoperative front combination lamp
connector terminal and ground.
OK or NG
OK >> Check front combination lamp and IPDM E/R connector.
Repair as necessary.
NG >> Repair open circuit in harness between inoperative front combination lamp and ground.
4. INSPECTION BETWEEN IPDM E/R AND HEADLAMPS
1. Disconnect IPDM E/R connector.
2. Check continuity between harness connector terminals of IPDM
E/R and harness connector terminals of inoperative front combi-
nation lamp.
OK or NG
OK >> Replace IPDM E/R. Refer to PG-28, "Removal and Installation of IPDM E/R" .
NG >> Check for short circuits and open circuits in harness between IPDM E/R and front combination
lamp. Repair as necessary.
Headlamps Do Not Turn OFFEKS00B88
1. CHECK COMBINATION SWITCH INPUT SIGNAL
Select "BCM" on CONSULT-II. With "HEAD LAMP" data monitor,
make sure "HEAD LAMP SW 1" and "HEAD LAMP SW 2" turns ON-
OFF linked with operation of lighting switch.
OK or NG
OK >> Replace IPDM E/R. Refer to PG-28, "Removal and
Installation of IPDM E/R" .
NG >> GO TO 2.
2. CHECK LIGHTING SWITCH
Check lighting switch. Refer to LT-100, "
Combination Switch Inspection" .
OK or NG
OK >> GO TO 3.
NG >> Replace lighting switch. Refer to LT- 1 0 2 , "
Removal and Installation" .
Te r m i n a l s
Continuity
ConnectorTe r m i n a l
(Wire color)
RH E107
1 (B) Ground Yes
LH E11
WKIA1857E
Terminals
Continuity IPDM E/R Front combination lamp
ConnectorTe r m i n a l
(Wire color)ConnectorTe r m i n a l
(Wire color)
E12354 (R/Y) RH E107 5 (R/Y)
Ye s
52 (L) LH E11 5 (L)
WKIA1856E
When lighting switch is in
OFF position: HEAD LAMP SW 1 OFF
: HEAD LAMP SW 2 OFF
SKIA5200E
Page 2476 of 3419
HEADLAMP (FOR USA)
LT-29
C
D
E
F
G
H
I
J
L
MA
B
LT
Revision: October 20052005 QX56
3. CHECKING CAN COMMUNICATIONS BETWEEN BCM AND IPDM E/R
Select "BCM" on CONSULT-II and perform self-diagnosis for BCM.
Display of self-diagnosis results
NO DTC>>Replace IPDM E/R. Refer to PG-28, "Removal and
Installation of IPDM E/R" .
CAN COMM CIRCUIT>> Refer to BCS-13, "
CAN Communication
Inspection Using CONSULT-II (Self-Diagnosis)" .
SKIA1039E
Page 2477 of 3419
LT-30
HEADLAMP (FOR USA)
Revision: October 20052005 QX56
Aiming AdjustmentEKS00B89
For details, refer to the regulations in your state.
Before performing aiming adjustment, check the following.
1. Ensure all tires are inflated to correct pressure.
2. Place vehicle and screen on level surface.
3. Ensure there is no load in vehicle other than the driver (or equivalent weight placed in driver's position).
Coolant and engine oil filled to correct level, and fuel tank full.
4. Confirm spare tire, jack and tools are properly stowed.
5. If equipped, confirm headlamp aiming switch is set to "0" (zero) position.
LOW BEAM AND HIGH BEAM
NOTE:
Aim each headlamp individually and ensure other headlamp beam pattern is blocked from screen.
1. Turn headlamp low beam on.
2. Use adjusting screw to perform aiming adjustment.
WKIA1859E
Page 2478 of 3419
HEADLAMP (FOR USA)
LT-31
C
D
E
F
G
H
I
J
L
MA
B
LT
Revision: October 20052005 QX56
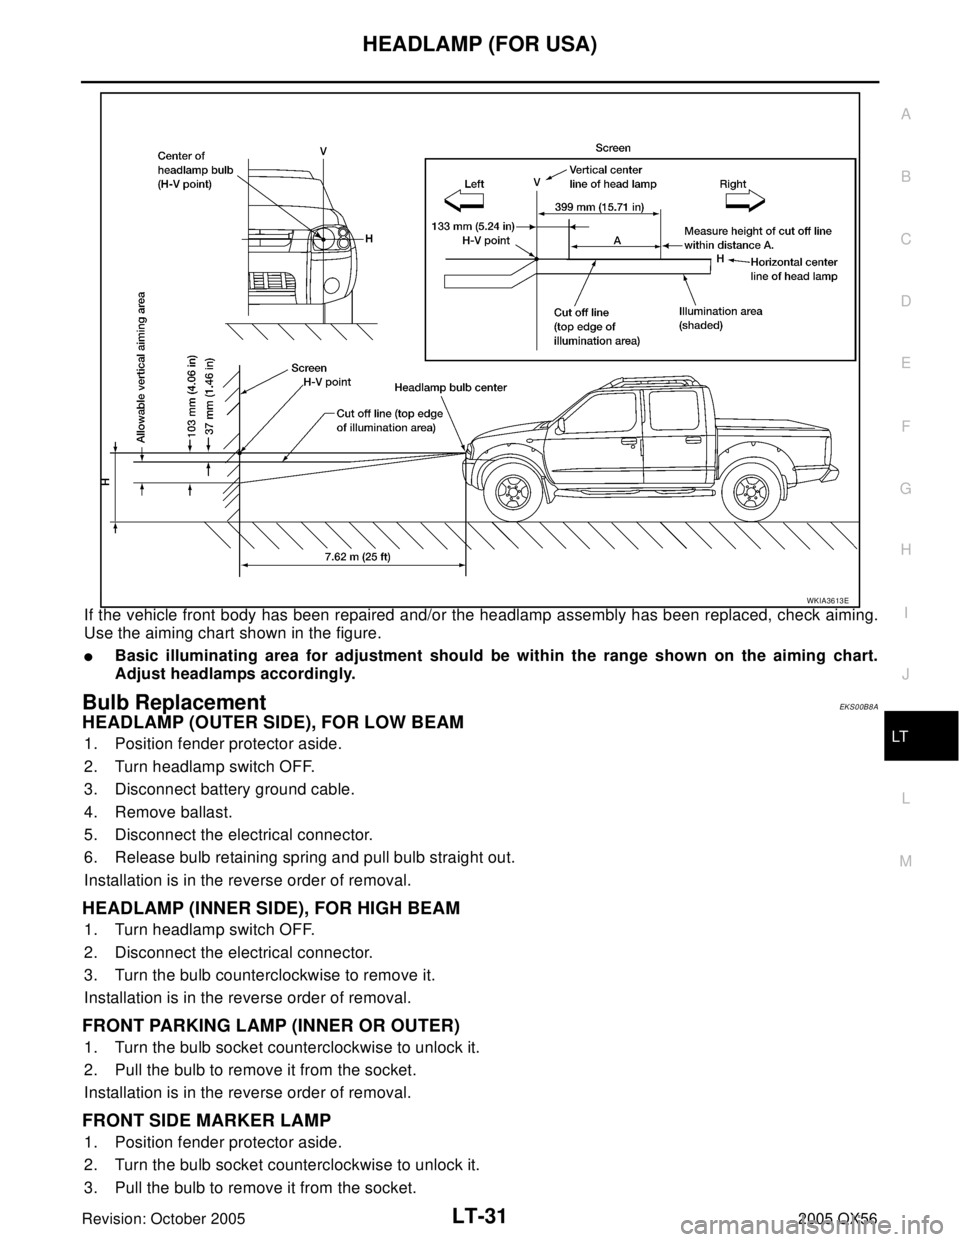
If the vehicle front body has been repaired and/or the headlamp assembly has been replaced, check aiming.
Use the aiming chart shown in the figure.
�Basic illuminating area for adjustment should be within the range shown on the aiming chart.
Adjust headlamps accordingly.
Bulb Replacement EKS00B8A
HEADLAMP (OUTER SIDE), FOR LOW BEAM
1. Position fender protector aside.
2. Turn headlamp switch OFF.
3. Disconnect battery ground cable.
4. Remove ballast.
5. Disconnect the electrical connector.
6. Release bulb retaining spring and pull bulb straight out.
Installation is in the reverse order of removal.
HEADLAMP (INNER SIDE), FOR HIGH BEAM
1. Turn headlamp switch OFF.
2. Disconnect the electrical connector.
3. Turn the bulb counterclockwise to remove it.
Installation is in the reverse order of removal.
FRONT PARKING LAMP (INNER OR OUTER)
1. Turn the bulb socket counterclockwise to unlock it.
2. Pull the bulb to remove it from the socket.
Installation is in the reverse order of removal.
FRONT SIDE MARKER LAMP
1. Position fender protector aside.
2. Turn the bulb socket counterclockwise to unlock it.
3. Pull the bulb to remove it from the socket.
WKIA3613E